

Transform your holiday table into a magical winter wonderland with the Christmas Reindeer Pair and Holiday Sleigh Set—a showstopping handcrafted amigurumi centerpiece featuring standing 14 cm (5.5 in) four-legged reindeer hitched to a majestic 3D wire-framed Santa sleigh. Complete with festive holly-and-berry collars, black harness reins, golden curled runners, scalloped snow trim, wrapped holiday gift packages, and a wired peppermint candy cane, this heirloom display captures the pure wonder of Christmas Eve!
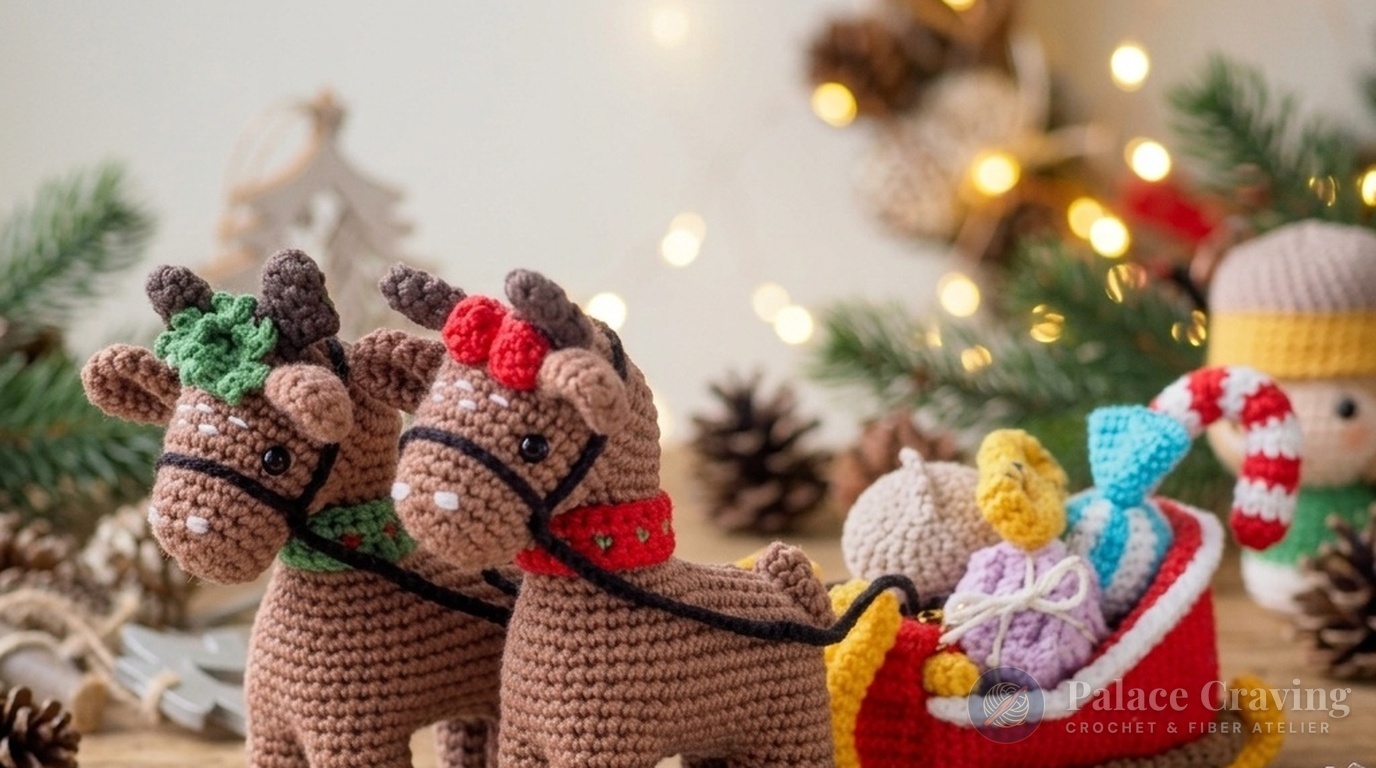
Skillfully worked with an innovative seamless four-legged construction, the reindeer transition smoothly from the sculpted snout and split neck opening into a spine bridge that branches directly into all four legs without sewing. An insulated craft wire frame gives the sleigh rigid structural integrity, allowing its side tubes to curve gracefully into the golden curled skids. Whether styled on your Christmas dining table, mantelpiece, or entryway console, this heirloom set brings enchanting holiday storytelling straight into your home.
Pattern Architecture & Masterclass Specifications
| Technical Parameter | Specification / Measurement | Artisan Notes |
|---|---|---|
| Finished Reindeer Height | ~14 cm (5.5 inches) Tall | Standing four-legged stance measured from hooves to antler tips |
| Finished Sleigh Dimensions | ~18 cm Long × 11 cm Wide × 10 cm High | Wire-framed body mounted securely on 2 golden curled runners |
| Gauge (Single Crochet) | 26 sts × 28 rounds = 10 cm (4 in) | Tight tension worked with a 2.50 mm hook ensures a firm, freestanding shape |
| Crochet Hook Size | 2.50 mm (US Steel 1 / Clover #4) | Used uniformly across reindeer body, sleigh, runners, and candy confections |
| Reindeer Construction | Seamless Head-to-Belly Architecture | Snout and neck bridge into spine (Ch-7) and divide into 4 legs (14 sts each) |
| 3D Sleigh Framework | Insulated Wire-Reinforced Rails | 65-round curved side tube fitted with taped wire, mounted on 50-round gold runners |
| Festive Accessories | Collar, Harness, Candies & Cane | Black harness reins (Ch-120), striped candy balls with wrapper cones, and wired candy cane |
Yarn Palette & Essential Notions

To produce the crisp, durable stitch definition required for the freestanding reindeer legs and structured 3D sleigh curves, we recommend premium sport-weight mercerized cotton yarns (Alize Baby Cotton Soft and Schachenmayr Catania Original: 50 g / 125–165 m):
- Warm Chestnut Brown: ~50 g for the reindeer body, head, neck, legs, and tail.
- Mahogany / Dark Brown: ~15 g for the hoof tips and bobble-stitch antlers.
- Cream / Off-White: ~25 g for hoof trim rings, scalloped snow sleigh border, and candy cane stripes.
- Evergreen Green or Festive Red: ~60 g for the double-walled sleigh bottom and curved side rails.
- Sun Gold / Yellow: ~30 g for the curled sleigh runners, front crossbar, and holiday pretzel cookies.
- Candy Pastel Accents (Pink, Orange, Purple, Blue): ~20 g for striped holiday candies and gift boxes.
- Black Thread: ~5 g for embroidered snout nostrils and the 120-chain harness reins.
- Hardware & Notions: 2.50 mm crochet hook, two pairs of 6.0 mm black safety eyes, insulated craft armature wire (for sleigh side rails, runners, and candy cane), electrical tape (to secure wire ends), tapestry needle, and premium polyester fiberfill.
Recommended Supplies for 3D Holiday Sleigh Sets
Clover Amour 2.50 mm Steel Crochet Hook
Ultra-smooth polished hook tip with non-slip handle, ideal for dense amigurumi tension and seamless 4-leg division.
Heavy-Duty 2.5 mm Craft Armature Wire (10m)
Sturdy yet pliable coated craft wire that gives the sleigh runners, curved hood, and candy cane rigid support.
As an Amazon Associate, Palace Craving earns from qualifying purchases at no extra cost to you.
Comprehensive Step-by-Step Stitch Guide
Work in continuous spirals using a stitch marker to track round starts, except where rows or joined rounds are indicated. For more heartwarming holiday designs, explore our newly published Christmas Santa Twins Doll Set, the adorable Nordic Christmas Reindeer Boy & Girl Duo, and the beloved Johnny the Christmas Elf Doll.

Part 1: Standing Reindeer — Head & Split Neck Opening • 2.50 mm Hook
Start with Brown yarn at the top of the head:
- Head Crown (Rnds 1–4): R1: 6 sc in MR [6] • R2: 6 inc [12] • R3: (inc, 1 sc) × 6 [18] • R4: (2 sc, inc) × 6 [24].
- Midsection (Rnds 5–9): R5: (inc, 2 sc) × 8 [32] • Rnds 6–9: 32 sc around (4 rnds even) [32].
- Rnd 10 (Split Neck Opening): Work 22 sc, ch 6, skip 10 sts (reserved for neck opening), and join directly into the 1st stitch of Rnd 10 to continue the snout [28].
- Snout & Safety Eyes (Rnds 11–12): R11: 22 sc on head, 6 sc along the ch-6 bridge [28] • R12: 28 sc around [28]. Insert 6.0 mm safety eyes between Rnds 12 and 13 (skip 6 sts from start of R12, place 1st eye, skip 9 sts, place 2nd eye).
- Snout Taper (Rnds 13–19): R13: dec, 18 sc, 4 dec [23] • Rnds 14–15: 23 sc (2 rnds) • R16: 5 sc, (dec, 3 sc) × 2, dec, 6 sc [20] • R17: 5 sc, dec, 6 sc, dec, 5 sc [18] • R18: 18 sc [18] • R19: 9 dec [9]. Stuff head firmly, cinch front opening through FLO, and weave in tail.
- Reindeer Neck (Rnds 11–14): Rejoin Brown yarn in 1st unworked neck stitch of Rnd 10: R11: 10 sc around head opening, 6 sc along opposite side of ch-6 bridge [16] • R12: 1 sc, inc, 6 sc, inc, 7 sc [18] • Rnds 13–14: 18 sc around (2 rnds) [18]. Stuff neck firmly; do not cut yarn!
Part 2: Seamless Spine Bridge, 4 Divided Legs & Belly Flap
Continue directly from Neck Round 14:
- Spine Bridge (Rnds 15–20): R15: 7 sc on neck, ch 7 (spine bridge); from 2nd ch work inc, 5 sc back along chain, then 11 sc around remaining neck stitches • R16: 7 sc, 5 sc along other side of ch-7, inc in last ch, 2 inc, 16 sc [34] • R17: 13 sc, (inc, 1 sc) × 3, 15 sc [37] • R18: inc, 12 sc, (inc, 2 sc) × 3, 10 sc, inc, 4 sc [42] • R19: 15 sc, (inc, 3 sc) × 3, 15 sc [45] • R20: 1 sc, inc, 14 sc, inc, 23 sc, inc, 4 sc [48].
- Body Barrel (Rnds 21–25): 48 sc around (5 rnds even). After R25, work +23 sc to reach center back stitch and place marker in next stitch [48]. Do not cut yarn!
- 1st Back Leg (Rnds 26–33): Work 10 sc on body, ch 4, join to marked stitch: R26: 10 sc on body + 4 sc on ch [14] • Rnds 27–30 (Brown): 14 sc (4 rnds) • R31 (Cream): 14 sc [14] • R32 (Dark Brown): 14 sc [14] • R33: 7 dec [7]. Fasten off leaving a tail.
- 1st Front Leg (Rnds 26–33): Skip 4 belly sts from 1st back leg; join Brown in 5th st: work 10 sc on body, ch 4, join to start marker, and repeat Rnds 26–33 identically [14 → 7].
- 2nd Front Leg & 2nd Back Leg: Work identically on the opposite side, skipping 4 belly sts between legs [14 → 7 each]. Stuff body and all 4 legs very firmly, close hoof openings cleanly, and sew the inner 3-ch loops between pairs of legs together.
- Belly Flap (Rows 1–4): Join Brown in remaining inner 1-ch loop of back leg: Row 1: 1 sc in back leg ch-loop, 4 sc across side belly gap, 1 sc in front leg ch-loop, ch 1, turn [6] • Rows 2–4: 6 sc across, ch 1, turn [6]. Fasten off and sew flap securely across to the 4 unworked belly stitches on the opposite side!
Part 3: Tail, Ears, Bobble Antlers, Collar & Harness Reins
- Tail: In Brown: R1: 6 sc in MR [6] • R2: (1 sc, inc) × 3 [9] • R3: 9 sc [9] • R4: (2 sc, inc) × 3 [12] • Rnds 5–6: 12 sc (2 rnds) • R7: (dec, 1 sc) × 4 [8]. Stuff lightly and sew to the rump pointing upward.
- Ears (Make 2): In Brown: R1: 6 sc in MR [6] • R2: (1 sc, inc) × 3 [9] • R3: (2 sc, inc) × 3 [12] • Rnds 4–7: 12 sc (4 rnds). Fold ear base in half, sew edges together, and sew to head across Rounds 6–10.
- Bobble-Stitch Antlers (Make 2): In Mahogany/Dark Brown: R1: 6 sc in MR [6] • R2: 6 sc [6] • R3: 5 sc, 3-dc bobble stitch (creates the natural antler fork) [6] • Rnds 4–5: 6 sc (2 rnds). Fasten off and sew to crown over Rounds 5–6. Embroider delicate white forehead flecks and 2 nostrils on the snout tip.
- Festive Striped Collar: In Red, ch 23. From 2nd ch: Row 1: 22 sc, ch 1, turn [22] • Row 2 (Colorwork): (1 sc Red, 1 sc Green) × 11, ch 1, turn [22] • Row 3: 22 sc [22]. Wrap around the neck and sew ends together.
- Holly Berries & Picot Leaves: Make 2 red berries (6 sc in MR, expand to 9 sc, close FLO) and 2 green holly leaves (ch 4, work (1 sc, picot) × 2 on both sides of chain). Sew securely to the crown between the antlers.
- Black Harness Reins: In Black thread: crochet a noseband (ch 24, slip stitch into a ring and slide over snout). Crochet long reins (ch 120), loop around head behind ears, pass ends through both sides of the noseband, and tie to the front of the sleigh!
Part 4: 3D Wire-Framed Sleigh & Curled Golden Runners
- Sleigh Bottom (Rnds 1–42): In Green or Red, ch 18. Work around both sides of chain starting in 2nd ch: R1: inc, 15 sc, 3 sc in last ch, 16 sc on other side [36] • Rnds 2–40: 36 sc around (39 rnds even) [36] • R41: 5 sc, 2 dec, 14 sc, 2 dec, 9 sc [32] • R42: 4 sc, 2 dec, 12 sc, 2 dec, 8 sc [28]. Work +5 sc to corner, sew flat across FLO [28].
- Curved Sides & Back Tube (Rnds 1–65): In Green or Red: R1: 7 sc in MR [7] • R2: 7 inc [14] • Rnds 3–10: 14 sc [14] • expand gradually across Rnds 11–23 to 29 sc [29] • Rnds 24–43: 29 sc (20 rnds even) [29] • decrease symmetrically across Rnds 44–64 back to 14 sc • R65: 7 dec [7]. Insert taped craft wire along the entire length of the tube and cinch closed.
- White Scalloped Trim Binding: In Cream/White, ch 61. From 2nd ch: work [2 sc, (ch 2, sl st in 2nd ch from hook)] × 29, 2 sc. Sew along the top contour edge of the sides and back piece.
- Curled Golden Runners (Make 2), Front Bar & Partitions: In Sun Gold:
• Runners (Make 2): R1: 6 sc in MR [6]; R2–21: 6 sc (20 rnds); R22: inc, 5 sc [7]; Rnds 23–50: 7 sc (28 rnds). Insert taped wire, curl front tips into graceful scrolls, and close.
• Front Bar: 6 sc in MR; 20 rnds of 6 sc [6]. Insert wire and close.
• Partitions (Make 3): 6 sc in MR; 7 rnds of 6 sc [6]. Stuff lightly.
• Sleigh Assembly: Wrap first 12 rounds of the Sleigh Bottom around the Yellow Front Bar to form the curved front dash. Bend the wire-framed Sides & Back tube into a crisp U-shape and sew around the bottom. Sew the 3 partitions between the 2 runners, and mount the sleigh body onto the runners!
Part 5: Holiday Sleigh Fillers — Striped Candies & Candy Cane
- Candy Style 1 (Vertical Stripes): Worked in White & Pink: R1: 6 sc in MR • expand across Rnds 2–4 to 24 sc alternating 2 sc White, 2 sc Pink • Rnds 5–9: 24 sc even (5 rnds) • Rnds 10–11: decrease to 12 sc. Stuff firmly and close FLO. Crochet two flared wrapper cones (ch-6 MR expanded to 18 sc) and sew to both ends of the candy ball!
- Candy Style 2 (Horizontal Stripes): Worked in Orange & White: alternate 1 round of Orange and 1 round of White expanding from 6 sc up to 24 sc for 9 rounds, then decrease to 12 sc, stuff firmly, and attach wrapper cones.
- Wired Peppermint Candy Cane: Start in Red: Rnds 1–2: 7 sc in MR [7]. Alternate 2 rounds of White and 2 rounds of Red for 38 rounds total [7]. Insert a matching length of craft wire with taped tips, cinch closed through FLO, and curve the top into an authentic candy cane hook!
- Ribbed Gift Packages: Crochet 21 rows of 7 sc in BLO to create ribbed gift box walls. Fold into a neat cube, insert a square foam/cardboard core, close seams, and wrap with contrasting satin chain ribbons and bows!

3 Artisan Secrets for Flawless Holiday Sleigh Sets
1. Wire End Insulation: When inserting craft wire into the curved sleigh tube, golden runners, and candy cane, always fold the cut wire ends back by 5 mm and wrap them securely with electrician’s tape. This prevents sharp metal edges from poking through the cotton stitches over years of holiday handling.
2. Firm Freestanding Reindeer Legs: When working the four legs in Part 2, stuff the hooves and lower leg columns very firmly with fiberfill using the eraser end of a pencil. Firmly stuffed legs ensure that the reindeer stand tall and level without bowing outward under the harness tension.
3. Securing Sleigh Runners to Base: To give the sleigh a rock-solid foundation, tack the 3 golden cross partitions to the underside of the sleigh bottom with hidden whipstitches through both layers. This anchors the runners parallel to each other and prevents the sleigh from tipping when loaded with treats.
Holiday Styling & Winter Decor Ideas
- Christmas Dinner Table Centerpiece: Arrange the reindeer team leading the sleigh down the center of your table over a runner of fresh pine boughs, pinecones, and battery-operated twinkle lights.
- Mantelpiece Holiday Display: Pose the reindeer prancing across your fireplace mantel with the sleigh overflowing with real cinnamon sticks, wrapped chocolates, and holiday confections.
- Cherished Heirloom Tradition: Crocheting an additional pair of reindeer allows you to expand the team to four or six reindeer, creating a majestic Santa display that will become your family’s favorite Christmas treasure.
Care, Cleaning & Long-Term Preservation
- Spot Clean Only: Because of the internal wire armature and delicate scalloped borders, never machine wash. Clean gently using a damp cotton swab and mild wool wash detergent.
- Re-Shaping Sleigh Runners: If the runners or candy cane become bent during storage, simply use your fingers to gently re-curve the internal wire into graceful Nordic arches.
- Archival Holiday Storage: Pack the reindeer and sleigh in a rigid holiday storage box lined with acid-free tissue paper and natural cedar shavings to keep fibers vibrant and protect against dust.
Save to Pinterest: Christmas Sleigh Crochet Patterns
Save these high-resolution pin guides to your favorite Holiday Crochet, Christmas Amigurumi, or Free Crochet Patterns boards on Pinterest:

Pin Guide 1: Complete Christmas Reindeer team and 3D holiday sleigh pattern architecture.

Pin Guide 2: Technique guide for seamless 4-leg reindeer, wired golden runners, and candy treats.
Frequently Asked Questions
Can I crochet more than two reindeer to hitch to the sleigh?
Yes! You can crochet as many reindeer as you like (such as a full team of four, six, or eight). Simply lengthen the black harness reins (Ch-120) by adding 40 chains for each additional pair of reindeer.
Will the sleigh hold real treats and small gifts?
Yes! Thanks to the double-walled bottom and wire-reinforced side rails, the sleigh is very sturdy and can easily hold small wrapped holiday gifts, miniature pinecones, wrapped chocolates, or small amigurumi figurines.
Can I make the sleigh in red instead of green?
Absolutely! The pattern works identically in either Festive Red or Evergreen Green. Pairing a red sleigh with white scalloped snow trim and gold runners gives it a classic traditional Santa look.