

Welcome holiday joy into your home with Johnny the Christmas Elf Doll with Curly Wig & Suspender Breeches—a timeless 21–22 cm (8.5 in) handcrafted Christmas elf boy amigurumi doll. Featuring mustard boots with post-stitch cuffs, candy-cane striped socks, tailored green suspender breeches with tiny red buttons, a red and cream striped winter sweater with flared cuff sleeves, an internal neck wire support, a 7-tier cascading curly terracotta wig, a warm cream winter scarf, and a post-stitch ribbed green elf hat topped with a cherry red pompom, Johnny is ready for festive adventures!
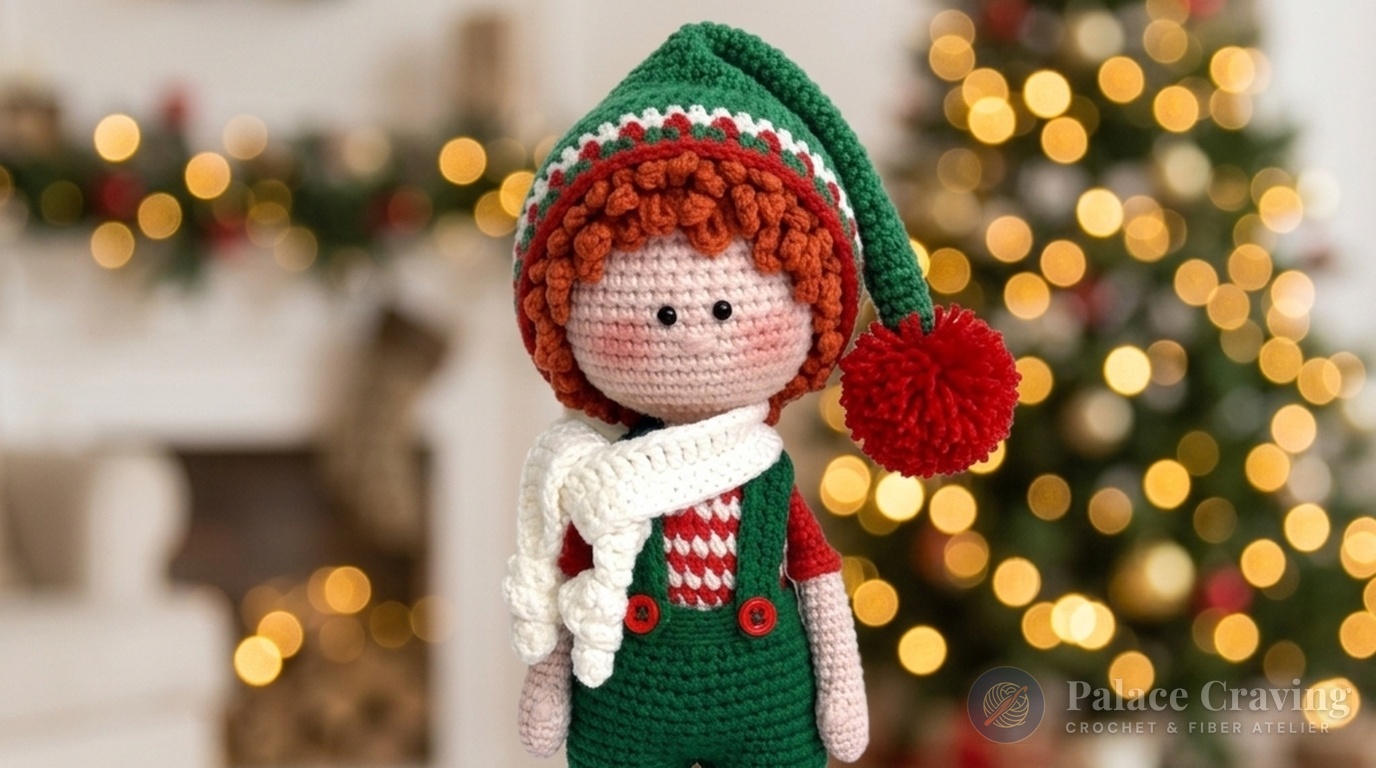
Skillfully worked from his sturdy mustard boots seamlessly upward through his candy-cane striped socks, striped sweater, wire-reinforced neck, and head, Johnny features an ingenious construction sequence: his green suspender breeches are slipped over the legs right before joining the torso, ensuring a seamless, impeccably tailored silhouette. Whether perched on a holiday mantelpiece, nestled within your Christmas tree branches, or gifted to someone special, Johnny brings heartwarming artisan spirit into every holiday home.
Pattern Architecture & Masterclass Specifications
| Technical Parameter | Specification / Measurement | Artisan Notes |
|---|---|---|
| Finished Doll Height | ~21–22 cm (8.5 inches) | Measured from boot soles to crown of curly head (excluding hat point) |
| Gauge (Single Crochet) | 28 sts × 30 rounds = 10 cm (4 in) | Tight tension worked with a 2.0 mm hook prevents fiberfill show-through |
| Crochet Hook Sizes | 2.0 mm (Body, Arms, Wig) & 2.5 mm (Breeches, Hat, Scarf) | Different hooks optimize drape for clothing while keeping doll body ultra-firm |
| Construction Framework | Seamless Boots-to-Head Architecture | Legs, striped sweater, neck, and head are worked in one continuous piece (Rnds 1–77) |
| Tailored Breeches | BLO Slip-Stitch Ribbing + Suspenders | Breeches are slid onto legs before Round 29 leg join for a perfect tailored fit |
| 7-Tier Curly Wig | BLO Cap + Front-Loop Ch-8 Spirals | Cascading spirals worked around every single tier from Round 8 down to Round 1 |
| Hat & Scarf Notions | FPDC / BPDC Ribbed Brim & Knotted Scarf | Post-stitch textured brim, 3.5 cm fluffy red yarn pompom, and double-crochet scarf |
Yarn Palette & Essential Notions

To produce the crisp, durable stitch definition required for Johnny’s tailored breeches and curly wig, we recommend sport-weight cotton-acrylic blend yarns (Alize Cotton Gold: 100 g / 330 m and YarnArt Jeans: 50 g / 160 m):
- Light-Beige (#67): ~10 g for hands, face, and seamless neck post.
- Terracotta (#89): ~20 g for the 7-tier curly wig cap and cascading spiral curls.
- Cream (#01): ~25 g for sweater stripes, sock stripes, hat ribbed brim, and winter scarf.
- Festive Red (#26 / #56): ~25 g for sweater stripes, sock stripes, sleeve cuffs, boot post-ribbing, and hat pompom.
- Mustard (#05): ~15 g for the boots and boot cuffs.
- Dark Brown (#493): ~5 g for the sturdy oval boot soles.
- Forest Green (#52 / #35): ~25 g for the suspender breeches, suspender straps, and conical elf hat.
- Hardware & Notions: 2.0 mm and 2.5 mm crochet hooks, two 4 mm black safety eyes or half-beads, two 6 mm red decorative buttons for suspenders, 15 cm piece of 2.0 mm craft armature wire (or plastic straw) for neck stabilization, rigid plastic or cardboard insoles, tapestry needle, stitch markers, and premium polyester fiberfill.
Recommended Supplies for Heirloom Holiday Dolls
Clover Amour 2.0 mm Ergonomic Crochet Hook
Ultra-smooth aluminum hook tip with comfort elastomer grip, ideal for tight amigurumi stitches and intricate curls.
Micro Mini Craft Buttons Assortment (6 mm)
Perfect tiny round resin buttons for doll clothes, suspender bibs, and heirloom amigurumi miniature detailing.
As an Amazon Associate, Palace Craving earns from qualifying purchases at no extra cost to you.
Comprehensive Step-by-Step Stitch Guide
Work in continuous spirals using a stitch marker to mark the beginning of each round, except where joined rounds are explicitly indicated. When alternating Cream and Red on the stockings and sweater, carry the yarn loosely along the inside to maintain elasticity. For more beloved holiday characters, explore our recently published Nordic Mr. Gnome in Overalls, the whimsical Christmas Mister Gnome in Belted Coat, and our popular Christmas Elf Chris with Holiday Gift Sack.

Part 1: Arms & Red Sleeve Cuffs (Make 2) • 2.0 mm Hook
Start with Light-Beige (#67) yarn:
- Rnds 1–3 (Hand): R1: 6 sc in MR [6] • R2: (2 sc, 1 inc) × 2 [8] • R3: (3 sc, 1 inc) × 2 [10].
- Rnds 4–5: R4: 4 sc, 1 inc, 5 sc [11] • R5: 11 sc around [11].
- Rnds 6–9 (Thumb & Wrist): R6: 5 sc, 3dcps (3-dc puff stitch for thumb), 5 sc [11] • R7: 4 sc, sc3tog, 4 sc [9] • Rnds 8–9: 9 sc around (2 rnds) [9]. Stuff hand firmly; stuff upper arm very lightly.
- Rnds 10–17 (Forearm): 9 sc around (8 rnds even). On Rnd 17, work 1–2 shift sc so color change sits at back of arm. Cut Light-Beige, join Red (#26) [9].
- Rnds 18–25 (Sleeve): R18: 9 sc [9] • R19: BLO 9 sc [9] • Rnds 20–24: 9 sc (5 rnds even; do not stuff upper 8 rnds) • R25: (1 sc, 1 dec) × 3, sl st [6]. Fasten off, leaving a long sewing tail.
- Flared Sleeve Cuff: Hold arm with palm pointing downward. Join Red (#26) in the unworked front loops of Rnd 18 at center back: R1: 9 sc in FLO [9] • R2: (2 sc, 1 inc) × 3, sl st to join [12]. Fasten off and weave in end.
Part 2: Green Suspender Breeches • 2.5 mm Hook
Note: Crochet the breeches before joining the doll legs! In Green (#52):
- Ribbed Waistband (Rnds 1–5): Work in spiral: R1: ch 38, join with sl st to 1st ch [38] • Rnds 2–5: 38 sl st in BLO loosely to form the ribbed waistband [38].
- Joined Pelvis (Rnds 6–15): Switch to joined rounds (ch 1 at start, work 1st sc into base of ch, sl st to join): R6: ch 1, BLO 38 sc, sl st [38] • R7: ch 1, 38 sc, sl st [38] • R8: ch 1, (18 sc, 1 inc) × 2, sl st [40] • R9: ch 1, 40 sc, sl st [40] • R10: ch 1, 9 sc, 1 inc, 19 sc, 1 inc, 10 sc, sl st [42] • R11: ch 1, 42 sc, sl st [42] • R12: ch 1, (20 sc, 1 inc) × 2, sl st [44] • Rnds 13–15: ch 1, 44 sc, sl st (3 rnds) [44].
- Left Leg (Rnds 1–8): Skip 22 sc from marker, insert hook in 23rd sc, join with sl st: R1–3: ch 1, 22 sc, sl st (3 rnds) [22] • R4: ch 1, 1 sc, (3 sc, 1 dec) × 4, 1 sc, sl st [18] • Rnds 5–8 (spiral): 18 sl st in BLO loosely, sl st to join, fasten off [18].
- Right Leg (Rnds 1–8): Join Green to 1st unworked st of Rnd 15: R1: ch 1, 22 sc, sl st [22] • Rnds 2–8: work identically to Left Leg [18]. Fasten off and weave in ends.
- Suspender Straps (Make 2): Leave a long tail, ch 26. Starting in 2nd ch from hook: work 24 sc, 3 sc in last ch, 24 sc along opposite side of chain [51]. Fasten off, leaving a long sewing tail.
Part 3: Mustard Boots & Striped Socks • 2.0 mm Hook
Start with Dark Brown (#493) for the sole:
- Boot Sole (Rnds 1–5): Ch 6; work around foundation chain starting in 2nd ch from hook: R1: 1 inc, 3 sc, 4 sc in last st, 3 sc, 1 inc [14] • R2: 1 sc, 1 inc, 3 sc, 4 inc, 3 sc, 1 inc, 1 sc [20] • R3: 1 inc, 5 sc, (1 sc, 1 inc) × 4, 5 sc, 1 inc [26] • R4: 1 sc, 1 inc, 5 sc, (1 inc, 2 sc) × 4, 5 sc, 1 inc, 1 sc [32]. Trace and cut 2 matching plastic/cardboard insoles now. R5: BLO 32 sc [32]. Cut Dark Brown, join Mustard (#05).
- Boot Uppers (Rnds 6–10): Rnds 6–7: 32 sc (2 rnds) • R8: 8 sc, 2 sc2tog, 6 dc2tog, 2 sc2tog, 6 sc (move marker +2 sc forward) [22] • R9: 22 sc [22] — insert rigid insole inside sole now. R10: 6 sc, 2 dec, 1 sc, 2 dec, 7 sc [18]. Cut Mustard, join Red (#26).
- Striped Socks (Rnds 11–25): R11: BLO 1 dec, 3 sc, 2 dec, 1 sc, 2 dec, 4 sc [13] • R12: 5 sc, sc3tog, 5 sc [11] — stuff boot firmly. R13 (Red): 11 sc [11]. Join Cream (#01) without cutting Red: R14 (Cream): 11 sc • R15 (Red): 11 sc • Rnds 16–25: repeat R14–15 (alternating Cream and Red every round for 10 more rounds) [11]. Cut Cream & Red.
- Boot Cuff: Hold leg upside down. Join Mustard (#05) in center back of Rnd 10 front loops: R1–3: ch 1, 18 sc, sl st to join [18], fasten off. Join Red (#26) at center back: R4: ch 1, 18 fpsc, sl st, fasten off.
- Left Leg vs. Right Leg:
• Left Leg: Join Green (#52): R26–27: 11 sc (2 rnds); R28: 8 sc (stops at center inner thigh), fasten off.
• Right Leg: Work R1–25 + Boot Cuff. Stuff firmly. Slide Right Leg inside the Right Leg of Green Breeches now! Join Green (#52) to top of leg: R26–27: 11 sc; R28: 14 sc (reaches center inner thigh). Do not cut Green yarn!
Part 4: Seamless Leg Join, Striped Sweater Torso, Neck & Head • 2.0 mm Hook
Worked in one continuous bottom-up piece from Rnds 29 through 77:
- Slide Breeches & Leg Join (Rnds 29–34): Slide Left Leg into the Left Leg of the breeches (heels facing you, breeches pulled down). From Right Leg, ch 4 and join to Left Leg: R29: 5 sc, 1 inc, 5 sc on Left Leg, 4 sc on ch-4, 5 sc, 1 inc, 5 sc on Right Leg, 4 inc along opposite side of ch-4 [36] • R30: 28 sc, (1 sc, 1 inc) × 4 [40] • Rnds 31–34: 40 sc (4 rnds even) [40].
- Lower Torso (Rnds 35–39): R35: (8 sc, 1 dec) × 4 [36] • R36: 36 sc • R37: 13 sc, 1 dec, 16 sc, 1 dec, 3 sc [34] • R38: 34 sc • R39: 5 sc, 1 dec, 13 sc, 1 dec, 12 sc [32]. Cut Green, join Red (#26).
- Striped Sweater Torso (Rnds 40–51): R40 (Red): BLO 32 sl st • R41 (Red): BLO 32 sc. Join Cream (#01) and alternate Cream & Red every round: R42 (Cream): 5 sc, dec, 13 sc, dec, 10 sc [30] • R43 (Red): (8 sc, dec) × 3 [27] • Rnds 44–47: 27 sc (4 rnds alternating Cream/Red) • R48: 4 sc, dec, (7 sc, dec) × 2, 3 sc [24] • R49: 24 sc • R50: 4 sc, 2 dec, 7 sc, 2 dec, 5 sc [20] • R51: 4 sc, dec, 7 sc, dec, 5 sc [18]. Stuff torso firmly; cut Red & Cream.
- Neck & Collar (Rnds 52–55): Join Light-Beige (#67): R52: BLO (1 sc, 1 dec) × 6 [12] • Rnds 53–55: 12 sc (3 rnds) [12]. (In Rnd 51 FLO, join Red #26 and work 18 loose slip stitches for the red neckline trim, fasten off.)
- Head & Neck Support Wire (Rnds 56–77): In Light-Beige: R56: 12 inc [24] • R57: (2 sc, inc) × 8 [32] • R58: (3 sc, inc) × 8 [40] • R59: 2 sc, inc, (4 sc, inc) × 7, 2 sc [48] • Rnds 60–70: 48 sc (11 rnds even) [48]. Wrap a 15 cm piece of craft wire with beige yarn + glue, fold in half, twist, and insert through neck into torso for support.
- Head Decreases: R71: 3 sc, dec, (6 sc, dec) × 5, 3 sc [42] • R72: (5 sc, dec) × 6 [36] • R73: 2 sc, dec, (4 sc, dec) × 5, 2 sc [30] • R74: (3 sc, dec) × 6 [24] • R75: 1 sc, dec, (2 sc, dec) × 5, 1 sc [18] • R76: (1 sc, dec) × 6 [12] • R77: 6 dec [6]. Stuff cheeks and head firmly, close opening, and fasten off.
Part 5: 7-Tier Curly Terracotta Wig • 2.0 mm Hook
Worked in Terracotta (#89) with joined rounds (ch counts as stitch; work Rnds 2–8 in BLO):
- Wig Cap Foundation (Rnds 1–8): R1: 6 sc in MR, sl st to 1st sc [6] • R2 (BLO): ch 1, 1 sc in base of ch, 5 inc, sl st in ch [12] • R3 (BLO): ch 2, 1 dc in base of ch, 11 dc-inc, sl st in 2nd ch [24] • R4 (BLO): ch 2, 1 dc-inc in next st, (1 dc, 1 dc-inc) × 11, sl st in 2nd ch [36] • R5 (BLO): ch 2, 1 dc in next st, 3 dc, 1 dc-inc, (5 dc, 1 dc-inc) × 5, 1 dc, sl st in 2nd ch [42] • Rnds 6–8 (BLO): ch 2, 1 dc in next st, 41 dc, sl st in 2nd ch (3 rnds) [42].
- Round 9 (Rim Curls): (Ch 8, sl st in next st) repeat all the way around Rnd 8, ending with sl st in base of 1st ch [42 loops]. Cut yarn leaving a long tail for sewing wig perimeter.
- Upper Spiral Tiers (Rnds 7 → 1 FLO): Attach Terracotta yarn to the unworked front loops of Rnd 7, then Rnd 6, Rnd 5, Rnd 4, Rnd 3, Rnd 2, and Rnd 1 in turn, working (ch 8, sl st in next front loop) around every tier all the way up to the crown! This creates Johnny’s iconic, dense, bouncy mop of red curls.
Part 6: Ribbed Brim Elf Hat & Knotted Scarf • 2.5 mm Hook
Work with 2.5 mm hook for flexible drape (ch 2 at start does not count as st):
- Elf Hat Crown (Rnds 1–12): In Green (#52): R1: ch 2, 10 dc in MR, sl st to 1st dc [10] • R2: ch 2, 10 dc-inc, sl st [20] • R3: ch 2, (1 dc, 1 dc-inc) × 10, sl st [30] • R4: ch 2, 1 dc, 1 dc-inc, (2 dc, 1 dc-inc) × 9, 1 dc, sl st [40] • R5: ch 2, (4 dc, 1 dc-inc) × 8, sl st [48] • Rnds 6–12: ch 2, 48 dc around, sl st to 1st dc (7 rnds even) [48]. Cut Green.
- Post-Stitch Ribbed Brim (Rnds 13–15): Join Cream (#01): R13: ch 2, 48 dc around, sl st to 1st dc [48] • R14 (Post Rib): ch 2, (1 fpdc around next st post, 1 bpdc around next st post) × 24, sl st to 1st fpdc [48] • R15 (Textured Edge): ch 1, (1 fpsc, ch 1, 1 bpsc, ch 1) × 24, sl st to 1st fpsc [48]. Fasten off and weave in ends.
- Red Pompom: Wind Red (#26) yarn into a dense ~3.5 cm pompom, tie the center tightly, trim into a neat sphere, and sew securely to the tip of the hat.
- Cream Winter Scarf: In Cream (#01), ch 92. Starting in 3rd ch from hook, work 89 dc along chain, 5 dc in last ch, then continue on opposite side of chain: 88 dc, 4 dc in last ch, sl st to join. Tie a neat overhand knot near each scarf tail and wrap around Johnny’s neck!
Part 7: Face Sculpting, Embroidery & Assembly
- 1. Sew Arms: Pin both arms to Rnd 50 of the torso (the last Cream stripe) and sew securely in the round. Lightly steam-press shoulders with a damp cloth so arms rest naturally against the body.
- 2. Eyes & Embroidered Nose: Count down 13 rounds from top crown of head and mark eye positions 3 sc apart. Secure 4 mm black eyes or half-beads in place. Mark nose 2 rounds below eyes; embroider horizontal satin stitches over 2 sc with Light-Beige (#67) yarn until a cute button nose emerges.
- 3. Wig & Breeches Finishing: Pin the curly wig onto head and sew around perimeter edge. Brush soft pink blush pastel onto cheeks. Pull green breeches up over waist, sew the 2 straps to back waistband, cross over shoulders, and button to the front waist with two 6 mm red buttons!

3 Artisan Secrets for Flawless Holiday Dolls
1. Sliding Breeches Before Leg Join: The most crucial technique in this pattern is inserting both legs into the green breeches before completing Round 29. If you join the legs first, the flared mustard boots will make it impossible to pull the fitted breeches onto the doll!
2. Springy Ch-8 Spiral Curls: When working each front-loop tier of the curly wig, keep your chains slightly loose. As you slip-stitch into each front loop, gently twist the 8-chain loop clockwise with your fingers. This gives the curls their signature bouncy, coiled corkscrew texture that never goes limp.
3. Armature Wire Stabilization: Amigurumi doll heads can droop over time if supported only by fiberfill. Folding a 15 cm piece of 2.0 mm craft armature wire, coating it with craft glue and yarn wraps, and anchoring it between the lower chest and crown prevents any bobbing or wobbling.
Holiday Styling & Winter Decor Ideas
- Mantelpiece Storybook Scene: Display Johnny alongside wooden toy nutcrackers, cinnamon bundles, and frosted cedar sprigs for a magical nostalgic Christmas display.
- Tree Branch Perch: Because Johnny has poseable limbs and a sturdy neck wire, he can be seated safely among sturdy evergreen pine branches as a showstopping Christmas tree ornament.
- Cherished Heirloom Keepsake: With his authentic post-stitch hat, tailored button breeches, and curly hair, Johnny makes an unforgettable handcrafted gift that will become part of family holiday traditions for decades.
Care, Cleaning & Long-Term Preservation
- Spot Clean Only: Due to the internal neck wire and wooden/resin buttons, never machine wash. Clean gently with a damp cotton cloth and mild wool wash detergent.
- Refreshing the Curly Wig: If the curls become flattened during storage, simply spritz lightly with distilled water, shape the spirals around a pencil or your fingertip, and allow to air dry.
- Archival Holiday Storage: Store Johnny in a breathable cotton dust bag or acid-free box with cedar chips to repel moths and protect his vibrant sport-weight cotton colors season after season.
Save to Pinterest: Christmas Elf Crochet Patterns
Save these high-resolution pin guides to your favorite Holiday Crochet, Christmas Amigurumi, or Free Crochet Patterns boards on Pinterest:

Pin Guide 1: Complete Johnny Elf boots, breeches, and curly wig construction guide.

Pin Guide 2: Technique guide for seamless boots join, ribbed brim hat, and 7-tier curly hair.
Frequently Asked Questions
Can I crochet Johnny using DK or Worsted weight yarn instead of sport weight?
Yes! You can use DK or worsted weight yarn (such as Paintbox Yarns Cotton DK or Lion Brand 24/7 Cotton) with a 2.75 mm or 3.0 mm hook. Note that your elf doll will turn out slightly larger (approximately 28–30 cm tall), and you will need proportionally larger safety eyes (6 mm or 8 mm).
Are the suspender breeches completely removable?
The breeches are joined at the waist during assembly to maintain a snug, tailored fit that won’t slip down. However, the shoulder straps can be unbuttoned using the front 6 mm buttons!
How do I keep the boot soles flat so Johnny stands upright?
Cutting rigid plastic insoles (from an ice cream tub lid or plastic milk jug) and slipping them inside the soles after Round 9 prevents the bottom from ballooning out under fiberfill pressure, giving Johnny a steady standing base.