

Infuse whimsical holiday sweetness into your seasonal home decor with the 5-in-1 Christmas Holiday Festive Cupcakes Set. This charming amigurumi collection transforms classic holiday icons—Santa Claus, a rosy-cheeked Snowman with a tilted top hat, Rudolph the Red-Nosed Reindeer, an evergreen tiered Christmas Tree crowned with a golden star, and an English Holly Berry Pudding draped in white icing drips—into tactile, palm-sized culinary confections. Measuring 10 to 11 cm (4 to 4.3 inches) tall, each amigurumi cupcake features an internal flat plastic base disc that keeps it upright on display, paired with an authentic removable ribbed baking cup liner worked perpendicular to the base in back-loops-only single crochet.
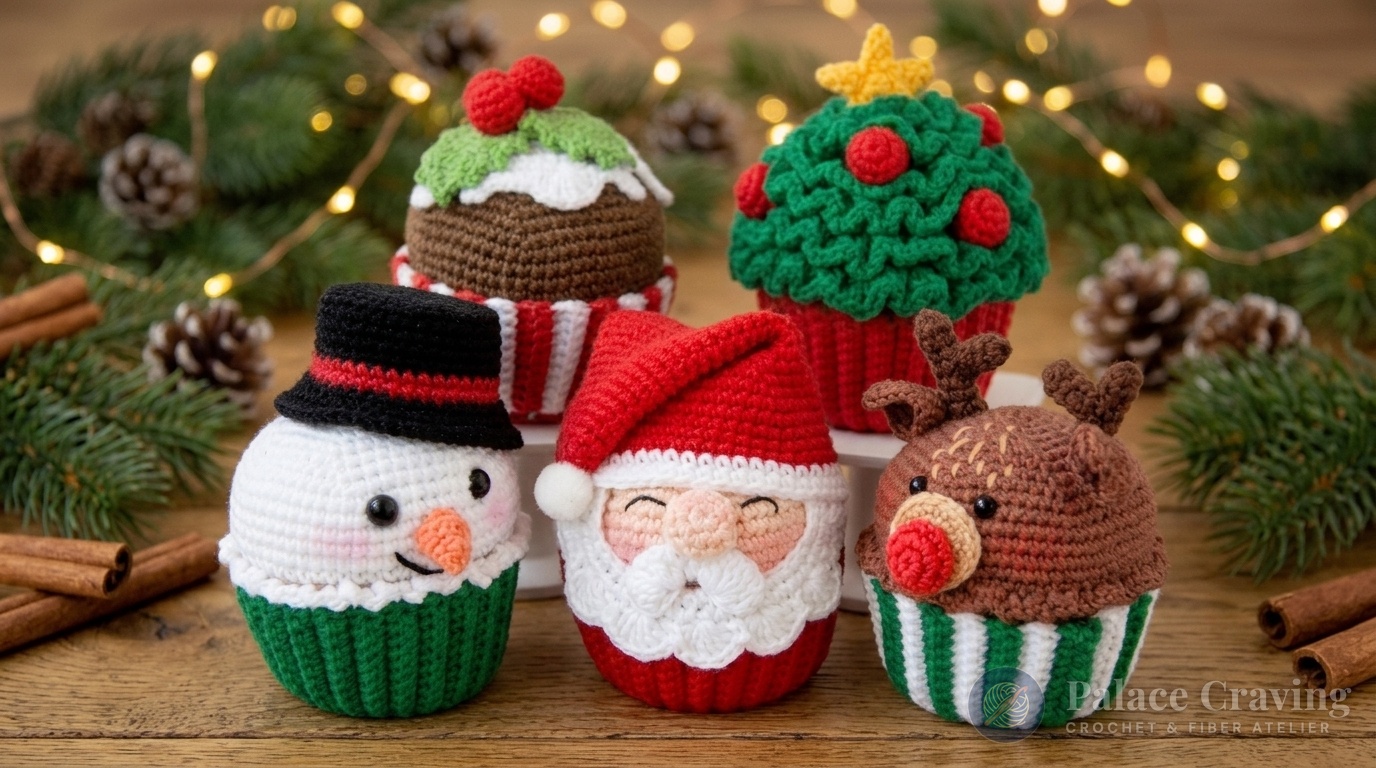
Unlike ordinary rounded amigurumi toys that easily roll over or lose their silhouette when handled, this holiday bakery set is built upon architectural principles. A rigid circular plastic disc inserted into the base of each cupcake guarantees a completely flat tabletop posture, while the ribbed cupcake liners slip on and off with tactile friction. Whether you are assembling a cheerful dessert tiered stand for your holiday dining buffet, crafting stocking stuffers, or searching for delightful handheld gifts for teachers and neighbors, this comprehensive guide delivers every round, count, assembly trick, and yarn specification with zero guesswork.
Anatomy of an Amigurumi Bakery: Engineering the Universal Base & Ribbed Liners
The genius of this 5-in-1 collection lies in its modular standardization. All five festive designs share an identical 16-round cake cylinder base. This uniformity allows you to batch-crochet the lower bases before personalizing the upper characters, or even swap cupcakes between different colored ribbed liners for endless display combinations:
- Reinforced Flat Base Disc (Rounds 1–6): Beginning with a 6-sc adjustable magic ring, each base expands symmetrically in 6-stitch increase intervals until reaching 36 stitches (diameter ~5 cm). Before proceeding, a circle cut from rigid plastic packaging is secured to the wrong side with craft adhesive. This internal base plate prevents the stuffing from rounding out the bottom, creating crisp perpendicular walls.
- Vertical Cake Wall Step-Up (Round 7 BLO): By working Round 7 entirely in the back loops only (BLO), a sharp 90-degree ridge is formed, cleanly separating the bottom surface from the upward-rising cake walls. The walls then expand gently from 36 to 48 stitches over Rounds 8 through 16 to simulate the natural tapered flare of a baked muffin.
- Perpendicular Ribbed Liner Construction (Rows 1–36 BLO): The removable baking cup liner is constructed by working 10-sc back-loop-only rows perpendicular to a 36-sc base disc. By alternating between attaching to the very next base stitch and skipping one base stitch before slip-stitching, the liner top expands naturally into authentic fluted ridges that grip the cupcake snugly without slipping off.
- Multi-Character Upper Modules: At Round 17, the work transitions into the individual holiday character: a deep chocolate dome for the Holly Pudding, snowy white rounds with safety eyes for the Snowman, warm camel brown with manicured antlers for Rudolph, soft peach facial contours with a shell beard for Santa, and a dense forest-green cone blanketed with front-loop pine ruffles for the Christmas Tree.
Crafters who enjoyed building the dimensional candy lid on our Christmas Gingerbread House Candy Holder Box or assembling the festive interactive elements of the Peek-a-Boo Santa in Brick Chimney will love the clean joinery and quick satisfaction of these holiday cupcakes.
Why You’ll Fall in Love with This Holiday Cupcake Set
- Zero-Roll Tabletop Stability: Thanks to the integrated plastic reinforcement base discs, each completed cupcake stands rock-solid on mantels, tiered trays, and dining tables without wobbling or toppling.
- Interactive Removable Liners: Children and holiday guests love pulling each cupcake out of its ribbed wrapper, revealing the clean bottom joinery and swapping liners between characters.
- Quick-Finish Weekend Projects: Because each cupcake measures just 10–11 cm, an entire character can be completed in a single cozy evening, making them the ultimate high-reward holiday gift set.
- Scrap Yarn Friendly: The small accents—carrot noses, antler branches, holly berries, top hat bands, and yellow tree stars—use up tiny leftover yardage from your festive stash.
Materials, Color Breakdown & Hardware Specifications

For crisp stitch definition, zero halo fuzz, and rich seasonal color saturation, we recommend a sport-weight cotton-acrylic blend (55% cotton / 45% acrylic, 160 m / 50 g) paired with a 2.25 mm ergonomic crochet hook. For delicate botanical details like the holly leaves, a slightly finer 2.0 mm hook yields razor-sharp leaf serrations.
| Component & Application | Yarn Color / Material Specification | Quantity & Notes |
|---|---|---|
| Universal Cake Base & Reindeer Muzzle | Warm Biscuit / Sand Beige Sport Cotton | 1 ball (~50 g / 175 yds) |
| Holly Pudding Dome & Antlers | Deep Chocolate Brown & Dark Espresso | 1 ball (~50 g / 175 yds) |
| Santa Hat, Liners, Berries & Rudolph Nose | Vibrant Holiday Crimson Red Sport Cotton | 1 ball (~50 g / 175 yds) |
| Snowman Head, Santa Beard & Pudding Icing | Crisp Snow White Sport Cotton | 1 ball (~50 g / 175 yds) |
| Christmas Tree Cupcake & Green Liners | Forest Pine Green Sport Cotton | 1 ball (~50 g / 175 yds) |
| Rudolph Head | Soft Warm Chestnut Brown | Small ball (~25 g) |
| Santa Face, Carrot Nose & Tree Star | Soft Peach, Carrot Orange & Bright Mustard Yellow | Small scrap skeins (~10 g each) |
| Holly Leaf Accent Yarn | Fine Cotton (60% cotton / 40% acrylic, 165 m / 50 g) | Small yardage worked with 2.0 mm hook |
| Safety Eyes & Internal Support | 8 mm black eyes (Snowman), 6 mm eyes (Rudolf), plastic sheet, wooden stick | Essential structural hardware |
| Finishing Essentials | 1.5–2.0 cm white pom-pom, polyester fiberfill, hot glue, pink pastel blush | Assembly and cosmetic accents |
Standard US Crochet Abbreviations & Techniques
- MR (Magic Ring): Adjustable loop used to begin tightly closed spiral rounds.
- ch: Chain stitch.
- sl st: Slip stitch.
- sc: Single crochet (US term).
- hdc: Half double crochet.
- dc: Double crochet.
- inc: Single crochet increase (2 sc worked into the same stitch).
- dec: Invisible single crochet decrease (worked through front loops of two adjacent stitches).
- BLO: Back loops only (leaves the front loop exposed for surface texture or ruffles).
- FLO: Front loops only (leaves the back loop available for internal structural stability).
- [ … ] × N: Repeat instructions within brackets N times around the round.
Part 1: The Universal Cupcake Base & Ribbed Removable Liner

Work with a 2.25 mm hook in continuous spiral rounds without joining, unless otherwise directed. Use Warm Beige for cupcakes #2 through #5, or Deep Brown for cupcake #1 (Holly Pudding).
Universal Cake Bottom Disc (Rounds 1–6)
- Round 1: 6 sc into an adjustable magic ring. Pull loop tight. [6 sts]
- Round 2: Work 2 sc in each st around (6 inc). [12 sts]
- Round 3: [1 sc, inc] × 6. [18 sts]
- Round 4: 1 sc, inc, [2 sc, inc] × 5, 1 sc. (Staggered increases prevent a hexagonal shape). [24 sts]
- Round 5: [3 sc, inc] × 6. [30 sts]
- Round 6: 2 sc, inc, [4 sc, inc] × 5, 2 sc. [36 sts]
- Stabilization Step: Sl st in next st. Do not fasten off. Trace the circular base onto a stiff sheet of clean plastic packaging (or yogurt tub lid). Cut a circle approximately 2 mm smaller in diameter than the crochet disc. Apply a thin dab of craft glue to the wrong side of Rounds 1–6 and press the plastic disc firmly into place.
Universal Cake Cylinder Walls (Rounds 7–16)
- Round 7: Working in BLO around the perimeter, work 36 sc. This establishes the sharp lower corner ridge. [36 sts]
- Round 8: Working through both loops normally, 36 sc. [36 sts]
- Round 9: [5 sc, inc] × 6. [42 sts]
- Rounds 10–12 (3 rounds): Sc in each st around. [42 sts per round]
- Round 13: [6 sc, inc] × 6. [48 sts]
- Rounds 14–16 (3 rounds): Sc in each st around. [48 sts per round]
- Base Complete: Sl st in next st. Fasten off Beige (or keep Brown attached if making the Holly Pudding). Your universal cake wall now stands approximately 4.5 cm tall with 48 live stitches around the top rim.
Crocheting the Removable Ribbed Baking Cup Liner
Each liner is worked in two integrated phases: a 36-stitch base circle followed by perpendicular back-loop-only side rows that form crisp vertical pleats mirroring paper cupcake liners.
- Liner Base (Rounds 1–6): Using Red (for Santa, Tree, and Pudding) or Green (for Snowman and Rudolph), repeat Base Rounds 1 through 6 exactly until you have 36 sts. Finish with a sl st in the next st, but do not fasten off. [36 sts]
- Ribbed Wall Row 1: Chain 11. Starting in the 2nd ch from hook, work 10 sc down the foundation chain toward the base disc. (If creating a festive candy-cane striped liner, complete the yarn-over of the 10th sc in Crisp White). Slip stitch into the next stitch of the base circle. [10 sc]
- Row 2 (Center to Edge): Turn your work (do not work a turning chain). Work 10 sc in BLO up to the outer top rim. [10 sc]
- Row 3 (Edge to Center): Ch 1, turn. Work 10 sc in BLO back down toward the base circle (switch back to your primary color on the final pull-through of the 10th sc). Key Joinery Technique: Skip 1 stitch on the base disc perimeter and sl st into the 2nd stitch. [10 sc]
- Rows 4–36: Repeat Rows 2 and 3 around the entire base disc. Always work in BLO. Always chain 1 at the outer top edge only. Alternate the base connection: attach to the very next base stitch on one cycle, and skip one base stitch on the alternating cycle. This geometry causes the top circumference to flare slightly outward while hugging the base snugly.
- Assembly: Align the final row with the starting foundation chain. Slip stitch through both edges to close the ribbed cylinder seamlessly, fasten off, and weave in all yarn ends.
Part 2: Character 1 — The Christmas Holly Berry Pudding Cupcake
- Pudding Dome (Rounds 17–29): Continuing in Chocolate Brown from Base Round 16:
- Round 17: In BLO, [3 sc, inc] × 12. [60 sts]
- Rounds 18–20 (3 rounds): Sc in each st around. [60 sts per round]
- Round 21: [8 sc, dec] × 6. [54 sts]
- Round 22: [7 sc, dec] × 6. [48 sts]
- Round 23: [6 sc, dec] × 6. [42 sts]
- Round 24: [5 sc, dec] × 6. [36 sts]
- Round 25: [4 sc, dec] × 6. [30 sts] Begin stuffing firmly, pressing fiberfill against the outer walls so the dome remains rounded and plump.
- Round 26: [3 sc, dec] × 6. [24 sts]
- Round 27: [2 sc, dec] × 6. [18 sts]
- Round 28: [1 sc, dec] × 6. [12 sts]
- Round 29: Dec 6 times. Fasten off, weave tail through remaining 6 front loops, pull tight, and knot securely inside the dome. [6 sts]
- White Icing Drips Topping: Using White yarn, work Rounds 1–6 as a flat circular disc expanding from 6 to 36 sts. Around Round 6 edge, create realistic organic icing drips: alternate between Chain Drips (ch 4–5, work sc back down the chain, sl st to disc) and Scallop Shell Drips (skip 1 st, 6 dc in next st, skip 1 st, sl st in next). Lightly sew or fabric-glue the icing over the pudding crown.
- Holly Leaves (Make 2): Using fine green cotton and a 2.0 mm hook: Ch 11. Work 1 sl st, 1 sc, 1 hdc, 4 dc, 1 hdc, 1 sc, 1 sl st down the chain. Ch 1, turn, and mirror the same stitch sequence down the opposite side of the chain. Edge both sides with sharp picots: [1 sc, ch 3, sl st in 1st ch, 2 sc].
- Red Holly Berries (Make 3): In Red: R1: 6 sc in MR (6). R2: 6 inc (12). R3–4: 12 sc. Stuff tiny pellet of fiberfill. R5: 6 dec (6). Fasten off and cluster in the center of the icing between the leaves.
Part 3: Character 2 — The Cheerful Snowman with Black Top Hat
- Snowman Head (Rounds 17–31): Complete Universal Base Rounds 1–16 in Beige. Join White yarn to the back loops of Round 16:
- Round 17: In BLO, [3 sc, inc] × 12. [60 sts]
- Rounds 18–22 (5 rounds): Sc in each st around. [60 sts per round]
- Safety Eye Placement: Insert two 8 mm black safety eyes between Rounds 21 and 22 (the 5th and 6th white rounds), spaced 7 stitches apart. Secure backs tightly.
- Round 23: [8 sc, dec] × 6. [54 sts]
- Round 24: [7 sc, dec] × 6. [48 sts]
- Round 25: [6 sc, dec] × 6. [42 sts]
- Round 26: [5 sc, dec] × 6. [36 sts]
- Round 27: [4 sc, dec] × 6. [30 sts] Stuff head firmly with fiberfill.
- Rounds 28–31: Decrease symmetrically ([3 sc, dec] × 6 to 24; [2 sc, dec] × 6 to 18; [1 sc, dec] × 6 to 12; 6 dec to 6). Close opening neatly.
- Delicate Waist Ruffle: Rejoin White yarn to the exposed front loops of Round 16 at the neck junction. Work [ch 3, sl st in next loop] into every one of the 48 exposed stitches around. This forms a frothy 48-arch collar resembling powdered sugar.
- Turned-Row Carrot Nose: In Carrot Orange: Row 1: 3 sc in MR, pull ring closed, ch 1, turn (3). Row 2: 3 inc, ch 1, turn (6). Row 3: [1 sc, inc] × 3, ch 1, turn (9). Row 4: [2 sc, inc] × 3 (12). Fasten off with long tail. Curl the flat semicircle into a conical carrot, seam the straight edges together, and sew centered beneath the safety eyes.
- Gentleman’s Black Top Hat:
- In Black: Work Rounds 1–6 as a flat 36-sc disc. Round 7: In BLO, 36 sc. Rounds 8–10: 36 sc.
- Switch to Festive Red: Rounds 11–12: 36 sc (creates the red silk hatband).
- Switch to Black for Brim: Round 13: In FLO, [5 sc, inc] × 6 [42]. Round 14: 3 sc, inc, [6 sc, inc] × 5, 3 sc [48]. Round 15: [7 sc, inc] × 6 [54]. Sl st and fasten off.
- Crochet a second flat black disc (Rounds 1–6 = 36 sts). Lightly stuff the top hat crown, stitch the disc inside to seal the cylinder base, and tilt-sew securely atop the snowman’s head. Embroider a charming coal smile and brush cheeks with soft pink pastel blush.
Part 4: Character 3 — Rudolf the Red-Nosed Reindeer Cupcake
- Head & Waist Ruffle: Work Universal Base Rounds 1–16 in Beige. Join Warm Chestnut Brown at Round 17 and execute Rounds 17–31 plus the Round 16 FLO waist ruffle exactly as the Snowman! Insert 6–8 mm safety eyes between the 6th and 7th brown rounds, spaced 7 stitches apart.
- Oval Beige Muzzle: In Beige: Chain 3. Round 1: Work 3 sc in the 2nd ch from hook, rotate and work 3 sc in the 3rd ch [6]. Round 2: 6 inc [12]. Round 3: [1 sc, inc] × 6 [18]. Sl st and fasten off leaving sewing tail.
- Shiny Stuffed Red Cherry Nose: In Festive Red: R1: 6 sc in MR (6). R2: 6 inc (12). Rnds 3–4: 12 sc. Sl st and leave tail. Stuff with a small ball of fiberfill, weave yarn tail through every second front loop, cinch closed into a tight shiny sphere, and sew directly onto the beige muzzle. Attach the assembled muzzle centered between the safety eyes.
- Poseable Branching Antlers (Make 2):
- Cut a standard wooden manicure stick in half. Push one half down through the top of the reindeer head, leaving approximately 2.5 cm protruding as the rigid internal antler core.
- Main Antler Beam: In Dark Espresso Brown: 7 sc in MR. Work spiral rounds of 7 sc until reaching 2.5 cm length. Slide the crochet sheath over the protruding stick and stitch the base to the head.
- Side Branch: In Dark Espresso Brown: 7 sc in MR. Work 7 sc in spiral for 1.5 cm. Insert a small sliver of wooden stick, stuff lightly, and sew perpendicular onto the side of the main antler beam.
- Triangular Reindeer Ears (Make 2): In Chestnut Brown: Row 1: Ch 7, 6 sc (6). For Rows 2–6, do not chain 1; simply skip the first stitch of each row to taper: Row 2: 5 sc. Row 3: 4 sc. Row 4: 3 sc. Row 5: 2 sc. Row 6: 1 sc. Single crochet evenly around the entire perimeter (working 3 sc in the tip corner), fold the base in half, seam closed, and stitch symmetrically beneath the antlers.
Part 5: Character 4 — Santa Claus Cupcake with Shell Beard & Slouchy Hat
- Head & Nose: Work Universal Base Rounds 1–16 in Beige. Join Soft Peach at Round 17 and work Rounds 17–31 exactly as the Snowman, omitting the waist ruffle. In Soft Peach, crochet a small rounded nose (R1: 6 sc in MR; R2: 12 sc; Rnds 3–4: 12 sc; stuff and cinch closed), then stitch centered on the face leaving two peach rounds visible below.
- Scalloped Shell Beard: In Snow White: Chain 42, slip stitch into the first chain to form an open ring.
- Round 1: [6 sc, inc] × 6 [48 sts].
- Round 2: 3 sc, inc, [7 sc, inc] × 5, 4 sc [54 sts].
- Round 3 (7 Fluffy Shells): [Skip 1 st, 6 dc into the next st, skip 1 st, sl st in next st] × 7. Fasten off. Stitch the shell beard to the lower face so the top inner ring sits just below the nose, framing the cheeks.
- Sculpted Mustache: In Snow White: Row 1: Ch 7, 6 sc (6). Row 2: Work 2 scallop shells across the row, fasten off. Turn wrong-side out, tightly wrap a length of white yarn around the center to cinch into two mustache wings, and stitch directly beneath Santa’s peach nose. Embroider two curved sleepy eyes above.
- Slouchy Red Santa Hat:
- In Festive Red: R1: 6 sc in MR (6). R2: [1 sc, inc] × 3 (9). R3: 9 sc. R4: [2 sc, inc] × 3 (12). R5: 12 sc. R6: [3 sc, inc] × 3 (15). R7: 15 sc. Continue gradual 3-stitch increases every second round until Round 26 reaches 51 sts.
- Round 27: [16 sc, inc] × 3 [54 sts].
- Rounds 28–30 (3 rounds): Sc in each st around [54 sts per round].
- Rounds 31–32 (Snow White Brim): Switch to White, work 54 sc in each round. Sl st and fasten off leaving sewing tail.
- Fit hat over the upper head, angle the pointed tip downward to the side, secure with a hidden stitch, and attach a fluffy 1.5 cm white pom-pom to the hat peak!
Part 6: Character 5 — Lush Evergreen Christmas Tree Cupcake
- Tapered Cone Core (Rounds 17–22): Complete Universal Base Rounds 1–16 in Beige. Fasten off. Join Forest Pine Green and work all cone rounds in BLO, stuffing firmly as you advance:
- Round 17: In BLO, 1 sc, 1 hdc, 46 dc around. [48 sts]
- Round 18: In BLO, [4 dc, dec] × 8. [40 dc]
- Round 19: In BLO, [3 dc, dec] × 8. [32 dc]
- Round 20: In BLO, [2 dc, dec] × 8. [24 dc]
- Round 21: In BLO, [1 dc, dec] × 8. [16 dc]
- Round 22: In BLO, 6 dc-dec, 1 hdc-dec, 1 sc-dec. [8 sts]. Do not fasten off!
- Continuous Downward Pine Ruffles (FLO): Without breaking yarn, pivot your hook downward into the exposed front loops (FLO) spiraling from the tip of the cone back down to Round 17:
- For the top 3 spiral rounds (highest density near the tip): Work 4 dc into every single exposed front loop!
- For all remaining spiral rounds down to the base: Work 3 dc into every single exposed front loop!
- This intense double-crochet density produces lush, fluttering pine boughs that completely mask the inner cone. Fasten off and weave in end.
- Two-Layer Golden Tree Star: In Mustard Yellow: 5 sc in MR, sl st to 1st sc [5]. Work 5 star rays: [Ch 4, sl st in 2nd ch from hook, 1 sc, 1 hdc, sl st into next st of center ring] × 5. Fasten off. Make a second identical star. Sew the two stars together around their perimeter edges for structural crispness, and stitch securely atop the pine cone peak.
- Crocheted Red Ornament Baubles (Make 6): In Festive Red: R1: 6 sc in MR (6). R2: 6 inc (12). Rnds 3–4: 12 sc. Stuff lightly. R5: 6 dec (6). Cinch closed and stitch or fabric-glue evenly nestled between the cascading green pine ruffles.
Display Styling & Holiday Presentation Ideas

Once your holiday cupcake quintet is assembled, display them in arrangements that showcase their playful bakery aesthetics:
- Vintage Tiered Bakery Stand: Arrange Santa and the Christmas Tree on the upper tier, with Snowman, Rudolph, and the Holly Pudding grounding the lower plate amidst fresh pine needles, star anise, and cinnamon sticks.
- Festive Place Setting Favors: Place an individual cupcake at each dinner plate atop a folded linen napkin and personalized chalkboard placecard. Guests can take them home as heirloom holiday keepsakes.
- Mantelpiece Baker’s Vignette: Pair the cupcake set alongside our Crochet Hot Cocoa Mug with Fluffy Marshmallows and Royal Christmas Nutcracker Soldier for a rich, nostalgic handcrafted holiday storybook display.
Pin This 5-in-1 Christmas Cupcake Pattern for Later
Save this festive amigurumi tutorial directly to your favorite Pinterest boards so you have the round-by-round counts and assembly diagrams ready whenever holiday crafting season strikes!

