

Combine seasonal holiday charm with everyday eco-friendly functionality with the 3-in-1 Christmas Folding Shopping Bags. This ingenious crochet pattern delivers three beloved holiday characters—a sweet frosted Gingerbread cookie with candy button sprinkles, a dapper Snowman in a tilted black top hat, and Rudolph the Red-Nosed Reindeer with branching antlers. Measuring 12 cm (4.7 inches) across, each circular amigurumi face doubles as a compact, self-contained storage pouch. When unbuttoned, it expands into a full-sized 35 cm (13.8 inch) lightweight breathable crochet mesh tote bag capable of carrying fresh holiday market produce, baked loaves, or seasonal gifts, before neatly folding back inside its character pocket.
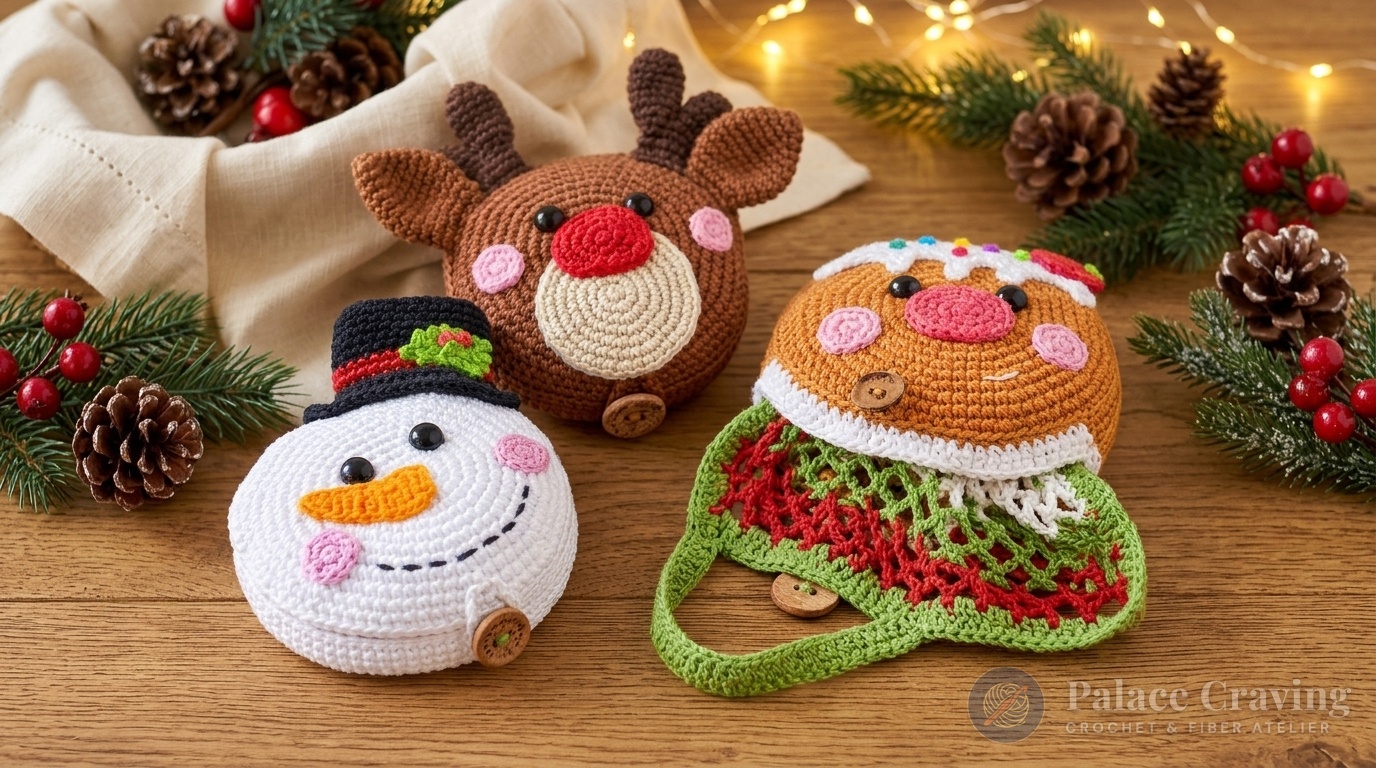
Traditional crochet market bags often end up tangled at the bottom of purses or forgotten in car trunks. This pattern solves that dilemma through clever structural origami. By constructing a 3-disc base foundation—a front decorative face disc, an integrated center anchor disc where the mesh bag is crocheted directly, and a back pocket disc—the entire mesh body collapses flat inside a 30-stitch top opening without requiring extra seams, bulky zippers, or separate storage sleeves. In this comprehensive pattern guide, you will master the third-loop-only (TLO) edge joinery, the rapid chain-7 diamond netting mathematics, the reinforced double-crochet tote handles, and the delightful holiday appliqués that turn simple sport cotton into durable holiday treasures.
Anatomy of a Foldable Market Bag: The Three-Base Engineering
What elevates this project from a novelty craft to an heirloom daily accessory is its architectural tri-disc construction:
- Base 1 (Decorative Front Face): An 84-stitch spiral disc (Rounds 1–13) worked in crisp X-single crochets. Round 14 is worked across 54 stitches in the Third Loop Only (TLO), leaving 30 stitches unworked to form the top pocket mouth. All character features—safety eyes, embroidered smiles, 3D noses, and hats—are anchored securely to this disc.
- Base 2 (Integrated Center Anchor): An identical 84-stitch spiral disc that serves as the permanent bedrock of the mesh bag. Round 1 of the mesh tote is crocheted directly into the edge of Base 2 with 28 chain-7 arches. Base 1 and Base 2 are joined wrong sides together with 84 slip stitches, completely sealing the backs of all facial embroidery and flattened safety eye posts inside.
- Base 3 (Back Pocket Envelope Wall): A matching 84-stitch disc finished with a 54-stitch TLO edge. Base 3 is slip-stitched directly to the front perimeter of Base 1 along the 54-stitch lower seam, creating an internal storage pocket with an open 30-stitch top slit.
- 28-Arch Diamond Netting (Rounds 1–26): Worked in a continuous joined spiral using a smaller 2.75 mm hook to balance elasticity and tensile load. The 28 repeating 7-chain loops expand diagonally under weight while collapsing completely flat when packed.
- Ergonomic Solid Handles (Rounds 27–29): The open mesh terminates in a structured double-crochet rim with two 30-chain handles reinforced with an overarching double crochet round, comfortably distributing weight across your fingers or shoulder.
Crafters who loved the dimensional structuring in our 5-in-1 Christmas Holiday Festive Cupcakes Set or assembled the interactive pocket mechanics in the Interactive Peek-a-Boo Reindeer in Gift Sack will appreciate how smoothly this tri-disc pouch comes together.
Why You’ll Love Crocheting & Using These Holiday Bags
- Eco-Friendly & Zero-Waste: Eliminate single-use holiday shopping plastic bags with a durable, machine-washable 100% cotton market tote that lasts for seasons.
- Compact Pocket Portability: Folds into a palm-sized 12 cm circular character disc weighing under 120 grams that easily slips into your coat pocket, purse, or glove compartment.
- Three Iconic Christmas Characters: Crochet the warm spiced Gingerbread Cookie, the frosty Snowman with his tilted top hat, or Rudolph with poseable branching antlers—or make all three for family gifting!
- Surprising Load Capacity: Despite folding into a pocket-sized pouch, the 35 cm diamond mesh expands to hold several kilograms of groceries, holiday yarn skeins, or gift packages without stretching out of shape.
Materials, Yarn Breakdown & Essential Notions

For optimal durability, minimal stretch sag, and crisp character stitch definition, we recommend a 100% mercerized sport-weight cotton (50 g / 125 m / 137 yds) paired with two hook sizes: a 3.25 mm hook for the sturdy character base discs and a 2.75 mm hook for the mesh bag body and facial appliqués.
| Component & Application | Yarn Color / Material Specification | Quantity per Character Bag |
|---|---|---|
| Gingerbread Bag & Pouch | Warm Spiced Ginger Gold (100% Sport Cotton) | 2 balls (~100 g / 274 yds) |
| Snowman Bag & Pouch | Crisp Snow White Sport Cotton | 2 balls (~100 g / 274 yds) |
| Reindeer Bag & Pouch | Deep Root Beer Chestnut Brown | 2 balls (~110 g / 300 yds) |
| Bag Trims & Accent Features | Kiwi Green (Snowman trim), Hot Red (Reindeer trim/nose), Jet Black (Top Hat/smile) | 15–20 g each (stash friendly) |
| Delicate Facial Details | Tulip Pink (cheeks), Tangerine (carrot nose), Linen (muzzle), Cornelia Rose (frosting) | Small scrap amounts (~5–10 g) |
| Hardware & Fasteners | 6× 12 mm black safety eyes, 3× 18 mm natural wooden toggle buttons | 1 set per bag (flatten eye posts with lighter) |
| Decorative Cookie Accents | 6 tiny pastel buttons (sprinkles) + 2 small red buttons (holly berries) | Sewn onto Gingerbread frosting and Snowman hat |
Part 1: Universal 3-Disc Base Foundation (All 3 Characters)

Each character bag requires three identical circular discs worked with a 3.25 mm hook in continuous spiral rounds. Use Ginger Gold for the Gingerbread Cookie, Snow White for the Snowman, or Root Beer Brown for Rudolph.
Universal Spiral Expansion (Rounds 1–13)
- Round 1: 6 sc into an adjustable magic ring. Pull loop firmly closed. Work 2 sc in each st around (6 inc). [12 sts]
- Round 2: [1 sc, inc] × 6. [18 sts]
- Round 3: [2 sc, inc] × 6. [24 sts]
- Round 4: [1 sc, inc, 2 sc] × 6. (Staggering the increases maintains a perfect circle rather than a hexagon). [30 sts]
- Round 5: [4 sc, inc] × 6. [36 sts]
- Round 6: [2 sc, inc, 3 sc] × 6. [42 sts]
- Round 7: [6 sc, inc] × 6. [48 sts]
- Round 8: [3 sc, inc, 4 sc] × 6. [54 sts]
- Round 9: [8 sc, inc] × 6. [60 sts]
- Round 10: [4 sc, inc, 5 sc] × 6. [66 sts]
- Round 11: [10 sc, inc] × 6. [72 sts]
- Round 12: [5 sc, inc, 6 sc] × 6. [78 sts]
- Round 13: [12 sc, inc] × 6. [84 sts]
Finishing the 3 Specific Discs
- Base 1 (Decorative Front Face): Work Row 14 in the Third Loop Only (TLO): 54 sc. Leave the remaining 30 stitches unworked to serve as the top pocket opening. Fasten off with a clean invisible join.
- Base 2 (Center Mesh Anchor): Fasten off directly after Round 13 with an invisible join (all 84 stitches remain intact).
- Base 3 (Back Pocket Envelope): Work Row 14 in the Third Loop Only (TLO): 54 sc across, leaving 30 stitches unworked. Do not fasten off! Keep the working yarn attached to seam the pocket.
Part 2: Joining the Pouch & Crocheting the 35 cm Mesh Tote Bag
Before assembling the three bases, decorate Base 1 with your chosen character’s face (see Parts 3, 4, or 5 below). Critical Pro-Tip: After pushing the 12 mm safety eyes through Base 1 and snapping the washer backs on, heat the protruding plastic posts with a lighter or heated craft spatula for 2–3 seconds and flatten them down firmly. This ensures the inside of the pouch is 100% flush, preventing snags when folding the delicate mesh tote!
Assembling the Pouch Discs
- Join Base 1 to Base 2: Place decorated Base 1 and undecorated Base 2 wrong sides together (Base 2 facing you). Using a 3.25 mm hook and main color yarn, insert hook through Base 2 Round 13 stitch and between Round 13 and Row 14 of Base 1 (along the 54-stitch section), then through both layers along the 30 unworked stitches. Work 84 slip stitches around the entire perimeter. Fasten off with an invisible needle join.
- Join Base 3 (Forming the Pocket): Position Base 3 over the front of Base 1 (wrong side out), aligning its 30 unworked stitches with the 30-stitch top opening of Base 1. Using Base 3’s remaining working yarn, work 54 slip stitches through the exposed Row 14 TLO ridges of both Base 3 and Base 1, sealing the bottom and sides while leaving the 30-stitch top slit open. Fasten off and weave in ends.
Crocheting the Mesh Market Bag (2.75 mm Hook)
- Round 1 (Foundation Arches): Join main bag yarn into Round 13 of Base 2. Work: [1 sc, ch 7, skip 2 sc] × 27 times around. Finish the 28th loop by working: 1 sc, ch 3, 1 dc into the first sc. (This places your working loop centered at the apex of the arch, ready for the next round). [28 chain-7 arches]
- Rounds 2–26 (25 Mesh Rounds): [Ch 1, 1 sc] in the space formed by the previous dc, [ch 7, 1 sc in the next ch-7 space] × 27 times. Finish every round with: ch 3, 1 dc into the starting sc. The bag body will measure approximately 28 cm of stretchy diamond mesh.
- Round 27 (Top Rim Trim): Change to your handle accent color (Snow White for Gingerbread, Kiwi Green for Snowman, Hot Red for Reindeer). Ch 3 (counts as 1st dc), 2 dc in same space, [1 dc in sc, 5 dc in next ch-7 space] × 27, 1 dc in sc, 2 dc in last space. Sl st to top of ch-3. [169 dc]
- Round 28 (Forming the Handles): Ch 3 (1st dc), 19 dc, chain 30 (1st handle), skip 30 dc, 54 dc across front span, chain 30 (2nd handle), skip 30 dc, 34 dc across remaining rim. Sl st to top of ch-3. [169 sts / handles formed]
- Round 29 (Reinforced Top Edge): Ch 3 (1st dc), work 1 dc in each dc and 1 dc in each chain of both 30-chain handles around (167 dc). Sl st to ch-3, fasten off, and weave in all yarn ends.
- Wooden Button Clasp: Attach main yarn to the center of the 30-stitch top opening on Base 2. Chain 15, sl st back into the same stitch to form a button loop. Sew an 18 mm natural wooden toggle or round button to the exterior center of Base 3.
Part 3: Bag #1 — Frosted Gingerbread Cookie Appliqués
- Snow-White Scalloped Frosting:
- In Snow White: Chain 16. Round 1: 1 sc in 2nd ch from hook, 13 sc, 4 sc in last ch; on opposite side of foundation chain: 13 sc, 3 sc in last ch [34 sts]. Round 2: Inc, 6 sc, 3 sc in next st, 6 sc, 4 inc, 13 sc, 3 inc [44 sts].
- Round 3 (5 Organic Icing Drips): 1 sc, inc, 16 sc, inc, 3 sc. Work 5 dripping drops: [Drop 1: ch 6, 1 hdc in 3rd ch, 1 hdc in next 2 ch, 3-hdc cluster]; [Drop 2: 2 sc, ch 5, 1 hdc in 3rd ch, 1 hdc in next ch, 3-hdc cluster]; [Drop 3: 2 sc, dec, 1 sc, ch 7, 1 hdc in 3rd ch, 1 hdc in next 3 ch, 3-hdc cluster]; [Drop 4: 1 sc, dec, 2 sc, ch 5, 1 hdc in 3rd ch, 1 hdc in next ch, 3-hdc cluster]; [Drop 5: 3 sc, ch 6, 1 hdc in 3rd ch, 1 hdc in next 2 ch, 3-hdc cluster, 2 sc]. Invisible join. Sew 6 tiny colored buttons across the frosting as edible sprinkles!
- Blushed Cheeks (Make 2): In Tulip Pink: 6 sc in MR. Round 1: 6 inc (12). Invisible join. Reattach Cornelia Rose in center MR and work a spiral of surface slip stitches around the magic ring and Round 1.
- Oval Cookie Nose: In Cornelia Rose: 6 sc in MR. Round 1: 2 sc, 4 sc in next st, 2 sc, 4 sc in next st (12). Round 2: 3 sc, 2 inc, 4 sc, 2 inc, 1 sc (16). Round 3: 3 sc, 4 inc, 4 sc, 4 inc, 1 sc (24). Fasten off leaving tail.
- Swirl Peppermint Candy Charm: In Candy Apple Red: 6 sc in MR. Round 1: 6 hdc-inc (12). Round 2: [1 hdc, hdc-inc] × 6 (18). Round 3 (Wrapper Fringe): 1 sl st, [ch 4, 5 trc, ch 3, 1 sl st] in same st. With Snow White, surface slip stitch a festive candy swirl from the center outwards. Repeat to make a second disc. Sew both discs wrong sides together with wrapper ends aligned opposite, stuffing lightly. Attach a 70-chain Ginger Gold hanging cord and loop securely to the bag handle!
- Assembly on Base 1: Insert 12 mm safety eyes between Rounds 3 and 4, spaced 6 stitches apart. Sew oval nose between Rounds 1–4, cheeks between Rounds 5–10, and frosting aligned with Round 13 top. Embroider a delicate 3-stitch white smile.
Part 4: Bag #2 — Top-Hat Snowman Appliqués
- 3D Turned Carrot Nose: In Tangerine Orange: Chain 13. Round 1: 1 dc in 4th ch from hook, 1 dc in next ch, 1 hdc in next ch, 1 sc in next ch, 1 dc in next 2 ch, 1 sc in next 3 ch, 3 sc in last ch; along opposite side: 1 sc, 1 hdc in next 2 ch, 1 dc, 1 hdc, 1 dc, dc-inc, 1 dc, [1 dc, ch 2, 1 sl st] in last ch. Close with invisible join.
- Cheeks (Make 2): In Tulip Pink: 6 sc in MR. Round 1: 6 inc (12). Invisible join leaving sewing tail.
- Gentleman’s Tilted Black Top Hat:
- Crown: In Jet Black, ch 13. Round 1: 1 sc in 2nd ch, 10 sc, 3 sc in last ch; opposite side: 10 sc, 2 sc in last ch (26). Rounds 2–7 (6 rounds): 26 sc in Black. Rounds 8–9 (2 rounds): Change to Hot Red (silk hatband), 26 sc. Flatten top edge and crochet closed with 13 sc in Black.
- Brim: Attach Jet Black to 1st st of crown base: Ch 5, 1 dc in 4th ch from hook, [1 dc in next ch, 1 dc in same sc] cluster; 12 dc across hat bottom; ch 5, 1 dc in 4th ch from hook, [1 dc in next ch, 1 dc in same dc] cluster; 1 sl st in last sc. Round 2: Sl st around entire brim perimeter for stiffness.
- Holly Berries & Leaves: In Kiwi Green, ch 5. Work picots down both sides [1 sl st in 2nd ch, (ch 2, sl st in 2nd ch, sl st in next ch) × 3]. Sew two leaves and two small red buttons to the red hatband!
- Assembly on Snow White Base 1: Insert 12 mm safety eyes between Rounds 3 and 4, spaced 4 stitches apart. Sew carrot nose with the wide end at the magic ring and tip pointing upward. Sew cheeks on Rounds 6–10, tilt top hat across upper right edge, and backstitch a friendly dashed black coal smile.
Part 5: Bag #3 — Rudolph Reindeer Appliqués
- Perky Triangular Ears (Make 2): In Root Beer Brown: 6 sc in MR. R1: 6 sc. R2: 6 inc (12). R3: 12 sc. R4: [1 sc, inc] × 6 (18). R5: 18 sc. R6: [2 sc, inc] × 6 (24). Rnds 7–8: 24 sc. R9: [2 sc, dec] × 6 (18). R10: 18 sc. R11: [1 sc, dec] × 6 (12). Flatten opening and crochet edges together with 6 sc.
- Branching Antlers (Make 2): In Black Coffee Dark Brown:
- Long Horn (Make 2): 6 sc in MR. R1: 6 inc (12). Rnds 2–7 (6 rounds): 12 sc. Invisible join.
- Short Horn (Make 2): 6 sc in MR. R1: 6 inc (12). Rnds 2–4 (3 rounds): 12 sc. Do not fasten off!
- Joining Antlers: Work 1 sc on Short Horn, insert hook into 1st st of Long Horn and work: 1 sc, dec, [2 sc, dec] × 2, 1 sc across Long Horn; jump back to Short Horn: 1 sc, dec, [2 sc, dec] × 2 [18 sts]. Round 9: [1 sc, dec] × 6 [12 sts]. Rounds 10–11: 12 sc. Flatten and close bottom edges in opposite directions so both long horn tips curve symmetrically inward.
- Oatmeal Linen Snout: In Linen / Oatmeal: 6 sc in MR. R1: 6 inc (12). R2: [1 sc, inc] × 6 (18). R3: [2 sc, inc] × 6 (24). R4: [1 sc, inc, 2 sc] × 6 (30). R5: [4 sc, inc] × 6 (36). R6: [2 sc, inc, 3 sc] × 6 (42). Fasten off leaving tail.
- Shiny Stuffed Red Cherry Nose: In Hot Red: 6 sc in MR. R1: 2 sc, 4 sc in next st, 2 sc, 4 sc in next st (12). R2: 3 sc, 2 inc, 4 sc, 2 inc, 1 sc (16). R3: 3 sc, 4 inc, 4 sc, 4 inc, 1 sc (24). Fasten off. Stuff lightly and sew centered at the top of the linen snout.
- Assembly on Root Beer Base 1: Sew ears between Rounds 11 and 12, spaced 12 stitches apart. Position antlers beside ears with long tips facing inward. Insert 12 mm safety eyes between Rounds 4 and 5, spaced 5 stitches apart. Sew snout below eyes, centering Rudolph’s glowing red nose!
Lifestyle Display & Folding Origami Guide

To pack your market tote inside its character pouch in under 10 seconds:
- Step 1: Lay the bag flat with the character face facing down and handles tucked straight inside the mesh cylinder.
- Step 2: Fold the left third of the mesh body toward the vertical center line, then fold the right third over it to create a neat lengthwise strip matching the 12 cm width of the pouch.
- Step 3: Fold the top handle edge downward twice in neat accordion segments toward the bottom circular base.
- Step 4: Invert the Base 3 back pocket over the folded bundle, bring the chain-15 button loop over the top edge, and secure it around the wooden toggle button. Your tote is now a palm-sized holiday ornament!
Display your completed set hung on kitchen pegs alongside our Christmas Gingerbread House Candy Holder Box and Royal Christmas Nutcracker Soldier for a handcrafted holiday home that is as functional as it is heartwarming.
Pin This 3-in-1 Christmas Folding Bag Pattern for Later
Save this multi-character foldable market bag tutorial directly to your Pinterest holiday crochet boards so you have the stitch counts, folding diagrams, and appliqué patterns ready for seasonal crafting!

