

Illuminate your holiday decor with warmth, vintage Scandinavian folklore, and cozy handmade radiance with the 2-in-1 Christmas Candle Lantern Gnomes Duo. This delightful paired pattern delivers complete instructions to create two charming holiday lantern sentinels: the Big Red Lantern Gnome, standing a stately 23 cm (9 inches) tall, and the Small White Lantern Gnome, measuring an endearing 18 cm (7 inches). Designed with flat, cardboard-reinforced standing bases, each gnome features a plush pear-shaped body, soft brushed semi-wool pigtails, a round button nose, mitten hands with distinct 3-dc cluster thumbs, and an architectural lantern hat featuring a glowing golden-yellow central glass cylinder enclosed by six raised vertical cage bars, double-crochet architectural trims, embroidered black roof stars, and an authentic arched wire carrying handle.
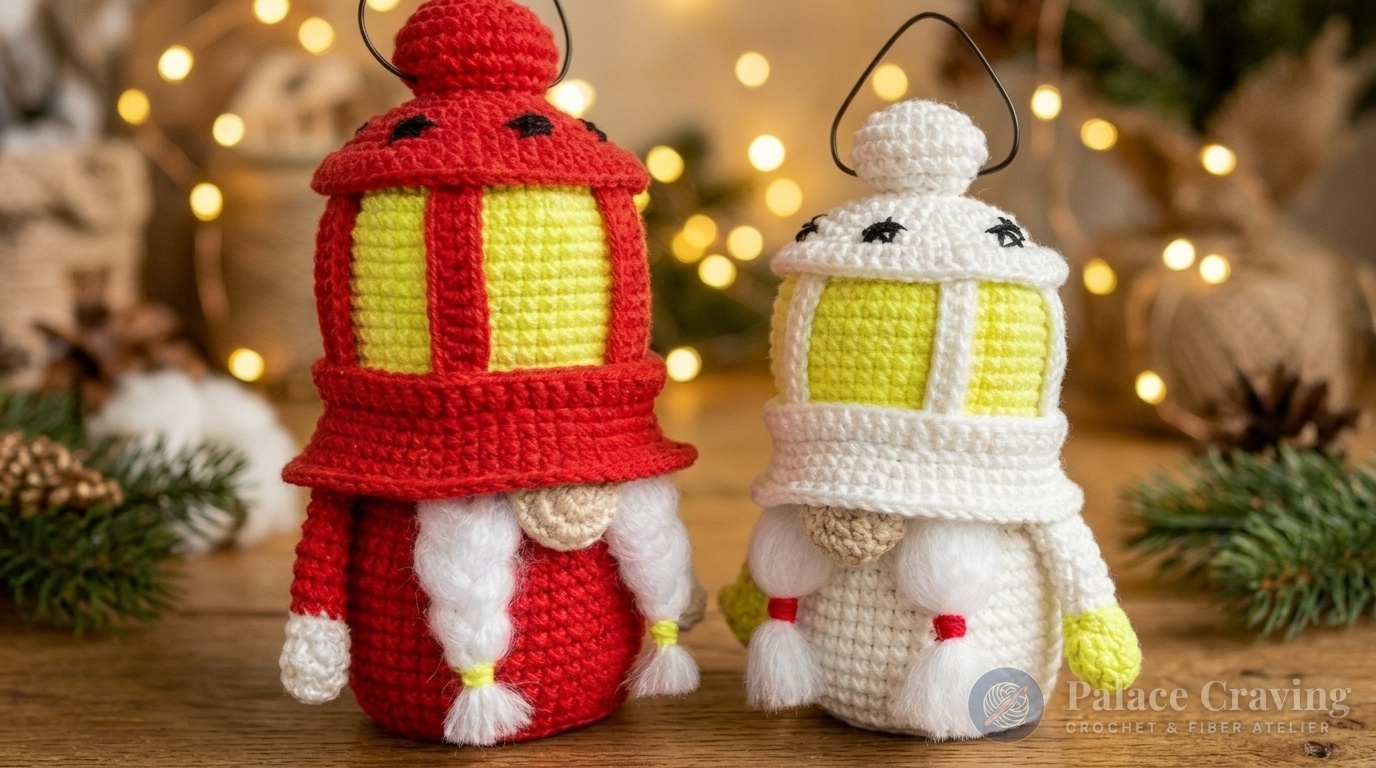
Unlike conventional stuffed gnomes whose conical hats simply taper into a fabric tip, these Christmas lantern gnomes incorporate genuine structural engineering. The lantern hat functions as an architectural miniature carriage lantern: worked in crisp color-blocked rounds, it features front-loop ridges where structural double-crochet moldings are anchored, while a gently curved internal craft wire creates a realistic functional handle arching above the stuffed roof chimney cap. Whether grouped together on a fireplace hearth, placed in a holiday window to welcome festive guests, or styled as centerpieces on a Christmas dining tablescape, this duo creates an instant focal point of storybook charm.
Structural Architecture: Lantern Framework & Stable Base Engineering
The distinctive character of this festive gnome duo stems from four thoughtful design elements:
- Cardboard-Reinforced Flat Standing Base: Both gnome bodies begin with a flat circular disc (expanding to 49 stitches for the Big Red Gnome and 42 stitches for the Small White Gnome). By working Round 8 in Back Loops Only (BLO) and slipping a matching round cardboard disc flat inside before stuffing, the bottom forms a crisp, planar base that never tips or wobbles.
- Two-Piece Lantern Hat Architecture: The hat begins as a tapered conical roof worked in solid Red or White yarn. At the transition round, the color shifts to bright Golden Yellow (working 13 rounds on the Big Gnome and 10 rounds on the Small Gnome) to simulate the warm, cozy glow of an interior candle flame. The brim flares outward through BLO increases to sit cleanly over the body.
- Raised Cage Bars & Horizontal Moldings: To transform the crocheted tube into a vintage lantern, double crochet ridges are worked directly into the free front loops at the upper and lower borders of the yellow glass. Six separate vertical bars are crocheted and hand-stitched symmetrically around the perimeter to mimic protective iron cage bars.
- Arched Wire Carrying Handle & Star Roof: A piece of soft craft wire (16 cm for the Big Gnome, 13 cm for the Small Gnome) is arched and threaded straight through the stuffed top cap, giving the lantern its authentic vintage portable appearance. Petite five-point stars embroidered with black thread along the roof slope complete the nostalgic lantern aesthetic.
- Fluffy Brushed Pigtails & Cluster Thumb Mittens: Semi-wool yarn strands are tied directly into the free front loops of Round 23 (or Round 20), braided or banded, and brushed with a slicker brush to create cloud-soft locks framing the round button nose, with poseable mitten arms worked using a 3-dc cluster thumb stitch.
Makers who loved crafting the freestanding balance in our Classic Standing Holiday Snowman Doll or the architectural texture of the Santa in a Brick Chimney Christmas Stocking will find this dual-gnome project both deeply rewarding and delightfully versatile.
Why You’ll Love Crocheting This Lantern Gnome Duo
- Two Coordinated Holiday Sizes: Includes complete independent round-by-round instructions for both the 23 cm Big Red Gnome and the 18 cm Small White Gnome for a tiered, balanced display.
- Rock-Solid Freestanding Balance: The internal cardboard base plates ensure both gnomes stand completely flat on any console, shelf, or tabletop without falling over.
- Clever Architectural Detailing: Combines color blocking, post-ridge surface work, wire shaping, and simple embroidery into a uniquely engaging project that looks far more intricate than it is.
- Giftable Holiday Keepsake: Keep the pair together on your mantelpiece, or give one as a cherished handmade hostess gift to spread warm holiday light to family and friends.
Materials, Color Palette & Essential Notions

To ensure crisp, sharp stitch definition and prevent fiberfill from peeking through the stitches, we recommend a sport/DK weight cotton-acrylic blend (such as YarnArt Jeans, 55% cotton, 45% acrylic, 50 g / 160 m) worked with a 2.0 mm or 2.25 mm (US B/1) crochet hook.
| Component & Role | Yarn Color / Material Specification | Recommended Quantity |
|---|---|---|
| Big Gnome Body & Small Gnome Trim | Holiday Festive Red (YarnArt Jeans № 90) | 1 ball (~50 g) |
| Small Gnome Body & Big Gnome Trim | Crisp Snow White (YarnArt Jeans № 01) | 1 ball (~50 g) |
| Glowing Lantern Glass (Both Gnomes) | Warm Candlelight Yellow (YarnArt Jeans № 58) | 1 ball (~30 g) |
| Button Noses (Both Gnomes) | Soft Peach / Nude (YarnArt Jeans № 05) | ~10 g scrap yarn |
| Fluffy Brushed Pigtails | White semi-wool or acrylic yarn (any thickness) | ~20 g |
| Hardware & Tools | Soft craft wire (16 cm & 13 cm), round cardboard discs (7 cm & 6 cm), 2.25 mm hook, pet slicker brush, black embroidery thread | Essential Notions |
Proportions & Dimensional Blueprint
| Gnome Specification | Big Red Lantern Gnome | Small White Lantern Gnome |
|---|---|---|
| Total Finished Height | 23 cm (9 inches) to wire handle apex | 18 cm (7 inches) to wire handle apex |
| Body Base Diameter | 7 cm (2.75 in) across flat cardboard base | 6 cm (2.35 in) across flat cardboard base |
| Lantern Hat Circumference | 54 sts around yellow glass (Rnds 11–23) | 48 sts around yellow glass (Rnds 10–19) |
| Vertical Cage Bars | 6 bars worked in double crochet (12 dc each) | 6 bars worked in single crochet (10 sc each) |
| Wire Handle Length | 16 cm (6.3 inches) soft craft wire | 13 cm (5.1 inches) soft craft wire |
Special Crochet Stitches & Abbreviations (US Terms)
- MR: Magic Ring (adjustable starting loop).
- sc / dc / sl st: Single crochet / double crochet / slip stitch.
- inc / dec: Increase (2 sc in next st) / decrease (sc 2 together).
- BLO / FLO: Back loop only / front loop only. Round 8 of the body is worked in BLO to create an internal right-angle shelf for the cardboard disc.
- 3dcCL (3 Double Crochet Cluster / Mitten Thumb): Worked in a single stitch to form a rounded amigurumi thumb: [Yarn over, insert hook into designated stitch, yarn over, pull up a loop, yarn over, pull through 2 loops] 3 times into the same stitch until 4 loops remain on hook. Yarn over and draw through all 4 loops at once.
- Invisible Needle Finish: After the final round of the hat, cut yarn with a 6-inch tail. Skip 1 stitch, thread yarn onto a needle, pass under both loops of the next stitch from front to back, then pass the needle back down into the center of the final worked stitch. Pull gently to mimic a continuous chain stitch.
Step-by-Step Tutorial: Big Red Lantern Gnome (23 cm)
Section 1: Big Gnome Body (Rounds 1–30)
Using the 2.25 mm hook and Red yarn, work in continuous rounds without slip stitching:
- Round 1: 7 sc in Magic Ring (7 sts).
- Round 2: [2 sc in each st] 7 times (14 sts).
- Round 3: [inc, 1 sc] 7 times (21 sts).
- Round 4: [inc, 2 sc] 7 times (28 sts).
- Round 5: [inc, 3 sc] 7 times (35 sts).
- Round 6: [inc, 4 sc] 7 times (42 sts).
- Round 7: [inc, 5 sc] 7 times (49 sts). (Trace this circle onto stiff cardboard and cut out a matching 7 cm disc).
- Round 8: In Back Loops Only (BLO), 49 sc around (49 sts).
- Rounds 9–19: 1 sc in each st around (49 sts for 11 rounds). Slip the cardboard circle flat against the inside base.
- Round 20: dec, 47 sc (48 sts).
- Round 21: [dec, 14 sc] 3 times (45 sts).
- Round 22: 45 sc around (45 sts).
- Round 23: [dec, 13 sc] 3 times (42 sts).
- Round 24: In BLO, 42 sc around (42 sts). (Leave the exposed front loops of Round 23 free for attaching pigtails, nose, and arms).
- Round 25: [dec, 5 sc] 6 times (36 sts).
- Round 26: [dec, 4 sc] 6 times (30 sts).
- Round 27: [dec, 3 sc] 6 times (24 sts).
- Round 28: [dec, 2 sc] 6 times (18 sts). Pack body firmly with fiberfill.
- Round 29: [dec, 1 sc] 6 times (12 sts). Add final stuffing.
- Round 30: 6 dec (6 sts). Fasten off, weave tail through FLO of remaining 6 sts, pull tight, and hide tail.

Section 2: Big Gnome Lantern Hat, Top Cap & Cage Bars
- Roof Cone (Red):
• R1: 6 sc in MR (6). R2: 6 inc (12).
• R3: [inc, 1 sc] 6 times (18). R4: [inc, 2 sc] 6 times (24).
• R5: [inc, 3 sc] 6 times (30). R6: [inc, 4 sc] 6 times (36).
• R7: [inc, 5 sc] 6 times (42). R8: [inc, 6 sc] 6 times (48).
• R9: [inc, 7 sc] 6 times (54 sts).
• R10: In BLO, 54 sc around (54 sts). Cut Red yarn. - Glowing Lantern Glass (Yellow):
• Connect Yellow yarn: Rounds 11–23: 1 sc in each st around (54 sts for 13 rounds). Cut Yellow yarn. - Hat Brim (Red):
• Connect Red yarn: Round 24: 54 sc around (54 sts).
• Round 25: In BLO, [inc, 17 sc] 3 times (57 sts).
• Round 26: 9 sc, [inc, 18 sc] 2 times, inc, 9 sc (60 sts).
• Round 27: [inc, 19 sc] 3 times (63 sts).
• Round 28: 10 sc, [inc, 20 sc] 2 times, inc, 10 sc (66 sts).
• Round 29: 66 sc around (66 sts). Fasten off with an invisible needle finish. - Horizontal Lantern Moldings: Connect Red yarn to the free front loops (FLO) of Round 9: ch 2, work 1 dc in each st around, sl st to join (54 dc). Repeat across the free FLO of Round 24 (54 dc).
- Top Chimney Cap: With Red: R1: 6 sc in MR (6). R2: 6 inc (12). R3: [inc, 1 sc] 6 times (18). R4: [inc, 2 sc] 6 times (24). R5: [inc, 3 sc] 6 times (30). R6: 30 sc. R7: [dec, 3 sc] 6 times (24). R8: [dec, 2 sc] 6 times (18). Stuff with fiberfill and sew centered to top of hat.
- Vertical Cage Bars (Make 6): With Red yarn, ch 14. Starting in 3rd ch from hook, work 12 dc across (12 dc). Fasten off with sewing tails. Sew 6 bars vertically around the yellow lantern cylinder, spaced 9 stitches apart, anchored to the FLO ridges.
- Wire Handle & Star Roof: Shape a 16 cm piece of soft craft wire into an elegant arch, thread both ends through the top chimney cap, and curl the inner tips to lock in place. Using black embroidery thread, stitch small 5-point stars around the red roof cone.
Section 3: Arms, Nose, Pigtails & Big Gnome Assembly
- Mitten Arms (Make 2): Start with White yarn:
• R1: 8 sc in MR (8). R2: [inc, 3 sc] 2 times (10). R3: 10 sc.
• R4 (Thumb Round): 4 sc, 3dcCL (cluster thumb), 5 sc (10 sts).
• R5: 10 sc. Connect Red yarn: R6: In BLO, 10 sc (10 sts).
• Rnds 7–13: 10 sc around (7 rounds). Stuff only the white mitten hand. Flatten the top opening and crochet opposite stitches together with 4–5 sc. Leave an 8-inch tail. - Button Nose (Nude): R1: 7 sc in MR (7). R2: 7 inc (14). R3: [inc, 1 sc] 7 times (21). R4: 21 sc. R5: [dec, 1 sc] 7 times (14). R6: 7 dec (7). Stuff with fiberfill, close opening, and leave sewing tail.
- Brushed Pigtails: Cut twenty 18 cm strands of white semi-wool yarn. Using a crochet hook, loop-knot 10 strands into 5 adjacent free front loops of Round 23 on the left side, and 10 strands into 5 loops on the right side (leaving 3 stitches free between them). Braid or tie with red yarn, then gently brush with a pet slicker brush to produce fluffy volume.
- Final Assembly: Sew the button nose centered between the pigtails into the free loops of Round 23. Sew both arms on either side so the mitten thumbs point forward. Place the stuffed lantern hat over the head and tack securely to the body in 2–3 concealed spots.
Step-by-Step Tutorial: Small White Lantern Gnome (18 cm)
- Small Gnome Body (White):
• R1: 7 sc in MR (7). R2: 7 inc (14). R3: [inc, 1 sc] 7 times (21).
• R4: [inc, 2 sc] 7 times (28). R5: [inc, 3 sc] 7 times (35).
• R6: [inc, 4 sc] 7 times (42 sts). (Cut matching 6 cm cardboard disc).
• R7: In BLO, 42 sc around (42 sts).
• Rnds 8–17: 42 sc around (10 rounds). Insert cardboard disc.
• R18: [dec, 12 sc] 3 times (39 sts). R19: 39 sc.
• R20: [dec, 11 sc] 3 times (36 sts).
• R21: In BLO, 36 sc around (36 sts).
• R22: [dec, 4 sc] 6 times (30). R23: [dec, 3 sc] 6 times (24).
• R24: [dec, 2 sc] 6 times (18 sts). Pack firmly with fiberfill.
• R25: [dec, 1 sc] 6 times (12). R26: 6 dec (6 sts). Close opening with needle. - Small Lantern Hat (White & Yellow):
• With White: R1: 6 sc in MR (6). R2: 6 inc (12). R3: [inc, 1 sc] 6 times (18). R4: [inc, 2 sc] 6 times (24). R5: [inc, 3 sc] 6 times (30). R6: [inc, 4 sc] 6 times (36). R7: [inc, 5 sc] 6 times (42). R8: [inc, 6 sc] 6 times (48 sts).
• R9: In BLO, 48 sc (48 sts). Connect Yellow: Rnds 10–19: 48 sc (10 rounds).
• Connect White: R20: 48 sc. R21: In BLO, [inc, 15 sc] 3 times (51 sts).
• R22: 8 sc, [inc, 16 sc] 2 times, inc, 8 sc (54 sts).
• R23: [inc, 17 sc] 3 times (57 sts). R24: 57 sc. Invisible finish.
• Work FLO double crochet ridges in White across Round 8 and Round 20. - Small Top Cap & Bars:
• Top Cap (White): R1: 6 sc in MR (6). R2: 6 inc (12). R3: [inc, 1 sc] 6 times (18). R4: [inc, 2 sc] 6 times (24). R5: 24 sc. R6: [dec, 2 sc] 6 times (18). R7: [dec, 1 sc] 6 times (12). Stuff and sew to hat.
• Vertical Bars (Make 6, White): Ch 11, from 2nd ch: 10 sc across (10 sc). Sew around yellow section. Insert 13 cm wire arch and embroider stars on the roof. - Small Gnome Arms & Finishing:
• Arms (Make 2): With Yellow: R1: 8 sc in MR (8). R2: [inc, 3 sc] 2 times (10). R3: 10 sc. R4: 4 sc, 3dcCL thumb, 5 sc (10). R5: 10 sc. Connect White: R6: In BLO, 10 sc. Rnds 7–11: 10 sc around (5 rounds).
• Work Nude button nose (same as Big Gnome) and attach pigtails to Round 20 free loops. Assemble and tack hat in place!

3 Master Finishing Secrets for Flawless Lantern Gnomes
To ensure your lantern gnomes achieve professional boutique presentation, apply these three expert crafting tips:
- 1. Perfecting the Lantern Cylinder Shape: When stuffing the lantern hat, pack fiberfill firmly into the top roof cone, but keep the yellow glass section lightly and evenly stuffed. If stuffed too tightly, the yellow section will bulge outward and distort the vertical cage bars. The six vertical bars should sit taut and straight against the fabric.
- 2. Securing Wire Handles for Safety: To prevent the ends of the soft craft wire from poking through the amigurumi fabric, use needle-nose pliers to bend the bottom 1 cm of each wire end into a tight circular loop or “U” hook. Wrap a small piece of fabric tape around the bent end before inserting it into the top cap fiberfill.
- 3. Fluffing Semi-Wool Pigtails: When brushing the semi-wool pigtails with a slicker brush, support the root knots with your thumb so you don’t pull the stitches loose from the body. Brush in short, gentle strokes starting at the ends and working upward toward the knots for maximum fluffy volume.
Care, Display & Holiday Storage
Keep your handmade lantern gnomes looking vibrant and festive for seasons to come:
- Display: Position on dry interior surfaces away from direct flames or radiators. Because of the cardboard base, keep away from water or damp areas.
- Cleaning: Dust gently with a clean soft makeup brush. If needed, spot-clean fabric gently with a slightly damp cloth and mild detergent. Do not submerge or wash in water.
- Storage: Store upright in a sturdy storage box lined with tissue paper. Ensure the wire handles are not crushed or bent during off-season packing.
Frequently Asked Questions
Can I insert real LED tealights inside the lantern hats?
Yes! If you wish to make the lanterns truly glow, you can leave the yellow cylinder unstuffed and insert a small, battery-operated flameless LED tea light or micro fairy light strand inside the hat before securing it to the body. Never use real candle flames.
What can I use instead of cardboard for the base?
You can use thin plastic sheets, flexible cutting mats, or plastic container lids cut to size. Plastic is waterproof, durable, and won’t warp if accidentally exposed to moisture.
Can I make male gnomes with beards instead of pigtails?
Absolutely! Simply replace the pigtails with a triangular loop-stitch or brushed-acrylic white beard sewn along Round 23. The lantern hats look equally magnificent on bearded boy gnomes!
Looking for more charming Christmas keepsakes? Explore our complete holiday crochet collection, including the Classic Standing Holiday Snowman Doll and our Santa in a Brick Chimney Christmas Stocking.
Pin This Pattern for Your Holiday Crocheting!
Save this 2-in-1 lantern gnome pattern to your favorite Pinterest boards so you have the round-by-round instructions and assembly secrets ready whenever you need them:

