

Embrace the heartwarming nostalgia of traditional European holiday lore with the Standing Father Christmas Santa Claus in Pocket Coat. Measuring approximately 28 to 30 cm (11 to 12 inches) in height with his draped pointed hat, this heirloom amigurumi doll showcases ingenious seamless construction from boots to shoulders. Worked in soft cotton-acrylic sport yarn using a 2.00 mm hook, this noble holiday patriarch features chocolate brown boots with folded cuffs, seamless no-sew legs joined in the round, an integrated midnight black waist belt, a flared coat hem edged with delicate white wave trim, seamless no-sew shoulder arm joins, an expressive face with 8 mm safety eyes and double handlebar mustaches, a magnificent four-tier cascading chain-loop beard, a 50-round tapered red Santa hat, and charming red bobble-thumb pocket mittens strung on a neck cord that rest snugly at his hips.
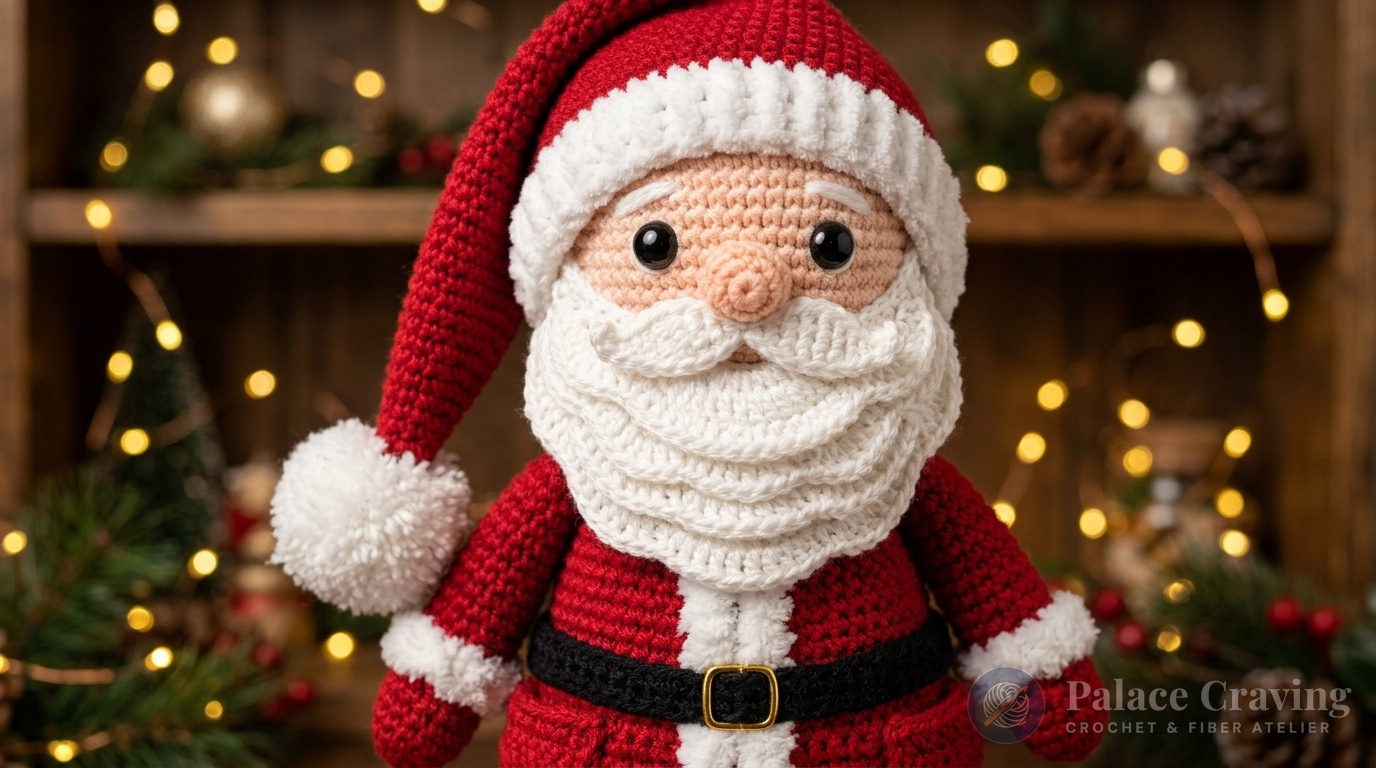
Unlike standard amigurumi dolls that require endless pinning and sewing of limbs to the torso, Father Christmas is engineered with modern seamless techniques. The legs begin at the soles of the brown boots, transition into red trousers, and join together with a simple 4-chain bridge to continue directly into the torso. The arms are joined seamlessly in Rounds 39 and 40, completely eliminating the risk of misaligned or weak limb seams. Paired with a four-tiered chain-loop beard that drapes naturally like spun wool, this standing Santa Claus makes an unforgettable centerpiece for your mantelpiece, sideboard, or holiday creche. In this comprehensive pattern guide, you will master the bottom-up leg join, the no-sew arm attachment, the dimensional coat hem, and the textured beard layering.
Structural Architecture: Seamless Engineering & 4-Tier Beard Geometry
What makes this Father Christmas pattern an exceptional holiday heirloom is its thoughtful structural design:
- Seamless Bottom-Up Leg Join (Round 17): Beginning at the soles of the brown boots, each leg is worked upward to 20 stitches. At Round 17, the legs are linked together with a 4-chain bridge, forming a solid 48-stitch circular foundation that flows directly into the lower torso without sewing seams.
- Dimensional Coat Skirt & Black Belt: Round 24 of the body is worked in Back Loops Only (BLO), leaving a continuous front-loop ridge. After the body is completed, a flared coat skirt is crocheted directly into these free front loops and finished with a delicate white
(ch 1, sl st)scallop trim. Directly above, three rounds of Jet Black form an integrated waist belt. - No-Sew Arm Joining Technique (Rounds 39–40): Rather than sewing separate arms onto the completed shoulders, the inner 3 stitches of each arm are crocheted directly with the torso stitches in Round 39, followed by working around the remaining 6 outer arm stitches in Round 40. This creates an unyielding, organic shoulder line with zero floppy wobble.
- 4-Tier Cascading Chain-Loop Beard: The signature full beard is composed of four separate tiered horizontal strips worked with
(ch 5, sl st)loops: Tier 1 (34 loops), Tier 2 (32 loops), Tier 3 (24 loops), and Tier 4 (19 loops). Pinned and hand-stitched in overlapping layers from temple to temple, they create authentic vintage texture that catches the light like fresh snow. - Hanging Pocket Mittens on Neck Cord: Two red mittens with 4-dc bubble stitch thumbs are connected by a 50-chain cord, draped around Santa’s neck underneath his beard, and tucked into his coat sides like cozy handwarmer pockets.
Makers who loved the warm glow of our 2-in-1 Christmas Candle Lantern Gnomes Duo or the freestanding poise of the Classic Standing Holiday Snowman Doll will find Father Christmas to be an instant family treasure.
Why You’ll Love Crocheting This Father Christmas Doll
- Minimal Sewing Assembly: Legs, hips, torso, and arms are all joined seamlessly as you crochet, reducing sewing time to just the head, beard tiers, and hat!
- Sturdy Freestanding Balance: The oval boot soles and wide leg stance allow the doll to stand upright on tables, mantels, and shelves with complete confidence.
- Rich Dimensional Storytelling: From the hanging pocket mittens to the layered chain beard and draped hat, every detail feels like a handcrafted heirloom straight from an old-world Christmas tale.
- Flawless Stitch Definition: Sport-weight cotton-acrylic yarn worked with a 2.0 mm hook yields crisp, dense stitches that completely conceal interior polyfill stuffing.
Materials, Color Palette & Essential Notions

To achieve clean, tight stitches with zero pilling, we recommend sport/DK weight cotton-acrylic yarn (such as Alize Cotton Gold or YarnArt Jeans, 55% cotton, 45% acrylic, 50 g / 160 m or 100 g / 330 m) worked with a 2.00 mm (US 0/B-1) crochet hook.
| Component & Role | Yarn Color / Material Specification | Estimated Quantity |
|---|---|---|
| Suit Trousers, Coat, Hat & Mittens | Festive Holiday Red (Alize Cotton Gold #56) | ~70 g (~230 m) |
| 4-Tier Beard, Mustache & Trims | Cream / Soft White (Alize Cotton Gold #62) | ~40 g (~130 m) |
| Standing Boots | Rich Chocolate Brown (Etrofil Jeans #059) | ~25 g (~80 m) |
| Waist Belt | Midnight Black (Alize Cotton Gold #60) | ~10 g (~35 m) |
| Head, Nose & Hands | Soft Peach / Skin Tone (Alize Cotton Gold #382) | ~25 g (~80 m) |
| Hardware & Notions | 8 mm black safety eyes (1 pair), fluffy 2.5 cm white pom-pom, 2.0 mm hook, polyfill, pins, tapestry needle | Essential Hardware |
Dimensional Blueprint & Proportions
| Doll Section | Measurement (Inches & Centimeters) | Construction Standard |
|---|---|---|
| Total Standing Height | 28–30 cm (11–12 inches) with draped pointed hat | 2.0 mm hook: 24 sc x 26 rounds = 4 inches (10 cm) |
| Head Circumference | 24 cm (9.5 inches) at widest round (60 sts) | 8 mm safety eyes placed between Rnds 17 & 18, 12 sts apart |
| Boot Base Dimensions | 6 cm long x 4 cm wide across oval base | Worked around ch-5 foundation; firm boot stuffing |
| Torso & Belt Girth | 22 cm (8.7 inches) around black belt (54 sts) | Seamless bottom-up leg join via 4-chain bridge |
Special Crochet Terms & Abbreviations (US Standards)
- mr: Magic Ring (adjustable starting loop).
- sc / hdc / dc / sl st: Single crochet / half double crochet / double crochet / slip stitch.
- inc / dec: Increase (2 sc in next st) / decrease (invisible sc 2 together).
- BLO / FLO: Back loop only / front loop only. Round 24 of the body is worked in BLO to leave the front loops free for the flared coat skirt.
- Bubble Stitch (4-dc Bobble): Worked in a single stitch to create the mitten thumb: [Yarn over, insert hook into stitch, pull up a loop, yarn over, pull through 2 loops] 4 times into the same stitch until 5 loops remain on hook. Yarn over and pull through all 5 loops at once.
- (ch 1, sl st) Trim: A delicate wavy decorative edge worked around the boot cuffs, sleeve rims, coat hem, and hat brim.
Step-by-Step Tutorial Walkthrough
Part 1: Arms, Head, Nose & Mustache
Work all pieces with the 2.00 mm hook in continuous spiral rounds:
- Arms (Make 2): Start with Skin/Peach (#382):
• R1: 6 sc in mr (6 sts).
• R2: [sc, inc] 3 times (9 sts).
• Rnds 3–5: 9 sc around (9 sts for 3 rounds).
• Connect Red (#56): R6: 9 sc around (9 sts).
• R7: In BLO, 9 sc around (9 sts).
• Rnds 8–18: 9 sc around (9 sts for 11 rounds). Fasten off.
• Sleeve Trim: Join White (#62) to the free front loops of Round 7 and work(ch 1, sl st)in each st around (9 sts). Fasten off. Stuff only the lower hand; leave the upper arm hollow for seamless joining. - Head (Skin/Peach #382):
• R1: 6 sc in mr (6 sts). R2: 6 inc (12 sts).
• R3: [sc, inc] 6 times (18 sts). R4: [inc, 2 sc] 6 times (24 sts).
• R5: [3 sc, inc] 6 times (30 sts). R6: 2 sc, inc, [4 sc, inc] 5 times, 2 sc (36 sts).
• R7: [5 sc, inc] 6 times (42 sts). R8: 3 sc, inc, [6 sc, inc] 5 times, 3 sc (48 sts).
• R9: [7 sc, inc] 6 times (54 sts). R10: 4 sc, inc, [8 sc, inc] 5 times, 4 sc (60 sts).
• Rnds 11–24: 60 sc around (60 sts for 14 rounds). (Insert 8 mm safety eyes between Rounds 17 & 18, spaced 12 stitches apart).
• R25: [3 sc, dec] 12 times (48 sts).
• R26: [2 sc, dec] 12 times (36 sts).
• R27: [sc, dec] 12 times (24 sts). Stuff head firmly and fasten off with an 18-inch sewing tail. - Round Nose (Skin/Peach #382): R1: 6 sc in mr (6). R2: [sc, inc] 3 times (9). Rnds 3–4: 9 sc around. Stuff lightly and sew centered between the eyes.
- Mustache Halves (Make 2 – White #62): R1: 6 sc in mr (6). R2: [sc, inc] 3 times (9). Rnds 3–4: 9 sc around. R5: [sc, dec] 3 times (6). R6: [sc, dec] 2 times (4 sts). Fasten off with a sewing tail; sew both pointed halves horizontally beneath the nose.
Part 2: 4-Tier Textured Chain-Loop Beard (White #62)
Each tier is worked flat in two rows using White (#62) yarn:
- Tier 1 (Longest / Base Layer):
• Row 1: Ch 35; from 2nd ch: 34 sc across, turn (34 sts).
• Row 2: Work[ch 5, sl st in next st]34 times across (34 loops). Fasten off with a sewing tail. - Tier 2 (Upper Mid Layer):
• Row 1: Ch 33; from 2nd ch: 32 sc across, turn (32 sts).
• Row 2: Work[ch 5, sl st in next st]32 times across (32 loops). Fasten off with tail. - Tier 3 (Lower Mid Layer):
• Row 1: Ch 25; from 2nd ch: 24 sc across, turn (24 sts).
• Row 2: Work[ch 5, sl st in next st]24 times across (24 loops). Fasten off with tail. - Tier 4 (Chin Layer):
• Row 1: Ch 20; from 2nd ch: 19 sc across, turn (19 sts).
• Row 2: Work[ch 5, sl st in next st]19 times across (19 loops). Fasten off with tail. - Layering: Pin Tier 1 across the lower head from ear to ear. Layer Tier 2 directly above it, followed by Tier 3, and finish with Tier 4 directly below the mustache. Stitch firmly along Row 1 of each tier so the loops cascade naturally down Santa’s chest!

Part 3: Brown Boots & Red Trousers Legs (Make 2)
Worked bottom-up starting with Chocolate Brown (#059) around a foundation chain:
- Foundation: Chain 5.
• Round 1: From 2nd ch: inc, 2 sc, 3 sc in last ch; on other side: 2 sc, inc (10 sts).
• Round 2: Ch 1, 2 inc, 2 sc, 3 inc, 2 sc, inc, sl st in 1st st (16 sts).
• Round 3: Ch 1, [sc, inc] 2 times, 2 sc, [sc, inc] 3 times, 3 sc, inc, sl st (22 sts).
• Round 4: Ch 1, in BLO, 22 sc around, sl st (22 sts).
• Rounds 5–6: Ch 1, 22 sc around, sl st (22 sts for 2 rounds).
• Round 7 (Toe Decreases): Ch 1, 9 sc, 4 dec, 5 sc, sl st (18 sts).
• Round 8: Ch 1, 8 sc, 3 dec, 4 sc, sl st (15 sts). - Boot Cuff & Leg:
• Round 9 (Brown Cuff): In FLO, ch 1, 15 sc around, sl st (15 sts). Fasten off Brown.
• Connect Red (#56) to Round 9 free back loops:
• Round 10: Ch 1, in BLO, 15 sc around, sl st (15 sts).
• Rounds 11–13: Ch 1, 15 sc around, sl st (15 sts for 3 rounds). Pack the boot very firmly.
• Round 14: [2 sc, inc] 5 times (20 sts).
• Rounds 15–16: Ch 1, 20 sc around, sl st (20 sts for 2 rounds).
• Important: Fasten off on the 1st leg only. Do not cut yarn on the 2nd leg!
Part 4: Seamless Leg Join, Body, Belt, Coat & Arm Joins
Continuing directly from the working yarn of the 2nd leg with Red (#56):
- Round 17 (Leg Join): From 2nd leg, ch 4. Count 6 stitches back from last st of Round 16 on 1st leg, insert hook into 7th st: work 20 sc around 1st leg, 4 sc along one side of ch-4, 20 sc around 2nd leg, 4 sc along opposite side of ch-4 (48 sts total). Place stitch marker.
- Round 18: [7 sc, inc] 6 times (54 sts).
- Rounds 19–23: 54 sc around (54 sts for 5 rounds).
- Round 24: In BLO, 54 sc around (54 sts). (Leave exposed front loops free for the coat skirt).
- Round 25: 54 sc around. Connect Black (#60) for the belt.
- Rounds 26–28 (Black Belt): 54 sc around (54 sts for 3 rounds). Connect Red (#56).
- Round 29: [7 sc, dec] 6 times (48 sts).
- Rounds 30–31: 48 sc around (48 sts for 2 rounds).
- Round 32: [6 sc, dec] 6 times (42 sts).
- Rounds 33–35: 42 sc around (42 sts for 3 rounds).
- Round 36: [5 sc, dec] 6 times (36 sts).
- Round 37: 36 sc around (36 sts).
- Round 38: [4 sc, dec] 6 times (30 sts).
- Round 39 (Seamless Inner Arm Join): 10 sc on body, 3 sc through both body and inner edge of 1st arm simultaneously, 12 sc across chest, 3 sc through both body and inner edge of 2nd arm simultaneously, 2 sc on body (30 sts).
- Round 40 (Seamless Outer Arm Working): 10 sc on body, 6 sc around remaining outer unworked stitches of 1st arm, 12 sc on chest, 6 sc around remaining outer stitches of 2nd arm, 2 sc on body (36 sts total).
- Round 41: [4 sc, dec] 6 times (30 sts).
- Round 42: [3 sc, dec] 6 times (24 sts).
- Round 43: 24 sc around (24 sts). Pack the torso and neck firmly with fiberfill. Sew the completed head securely onto the 24-stitch neck opening!
- Flared Coat Skirt (Round 24 FLO): Attach Red yarn to the free front loops of Round 24:
• Rnd 1: [8 sc, inc] 6 times (60 sts).
• Rnd 2: 60 sc around (60 sts).
• Trim: Connect White (#62) and work(ch 1, sl st)in each st around (60 sts). Fasten off.
Part 5: Hanging Pocket Mittens (Make 2)
- Rounds 1–3 (Red #56): R1: 6 sc in mr (6). R2: [sc, inc] 3 times (9). R3: [2 sc, inc] 3 times (12 sts).
- Rounds 4–6: 12 sc around (12 sts for 3 rounds).
- Round 7 (Bubble Thumb): 1 bubble stitch (4-dc bobble), 11 sc (12 sts).
- Round 8: [2 sc, dec] 3 times (9 sts).
- Round 9: 9 sc around (9 sts). Fasten off.
- Neck Cord: Make 2 identical mittens. Connect them with a chain of 50 stitches. Drape the cord around Santa’s neck under his beard so the mittens rest at his hips like warm coat pockets. Tack each mitten lightly to the coat at the side seams!
Part 6: Long Pointed Santa Hat with Pom-Pom (Rounds 1–50)
- Cone Shaping (Red #56):
• R1: 4 sc in mr (4). R2: 4 sc. R3: 4 inc (8). R4: 8 sc.
• R5: [sc, inc] 4 times (12). R6: 12 sc.
• R7: [2 sc, inc] 4 times (16). R8: 16 sc.
• R9: [3 sc, inc] 4 times (20). R10: 20 sc.
• R11: [4 sc, inc] 4 times (24). Rnds 12–13: 24 sc.
• R14: [5 sc, inc] 4 times (28). Rnds 15–16: 28 sc.
• R17: [6 sc, inc] 4 times (32). Rnds 18–19: 32 sc.
• R20: [7 sc, inc] 4 times (36). Rnds 21–22: 36 sc.
• R23: [8 sc, inc] 4 times (40). Rnds 24–25: 40 sc.
• R26: [9 sc, inc] 4 times (44). Rnds 27–28: 44 sc.
• R29: [10 sc, inc] 4 times (48). Rnds 30–31: 48 sc.
• R32: [11 sc, inc] 4 times (52). Rnds 33–34: 52 sc.
• R35: [12 sc, inc] 4 times (56). Rnds 36–37: 56 sc.
• R38: [13 sc, inc] 4 times (60). Rnds 39–40: 60 sc.
• R41: [14 sc, inc] 4 times (64). Rnds 42–43: 64 sc.
• R44: [15 sc, inc] 4 times (68). Rnds 45–46: 68 sc.
• R47: [16 sc, inc] 4 times (72). Rnds 48–49: 72 sc.
• Brim Trim: Connect White (#62): Round 50: work(ch 1, sl st)in each st around (72 sts). Fasten off. - Hat Assembly: Sew the fluffy white pom-pom to the tip of Round 1. Fit the hat snugly over Santa’s crown, drape the pointed cone down over the left shoulder, and tack in place with a few hidden stitches.

3 Master Finishing Secrets for Flawless Holiday Amigurumi
To ensure your handcrafted Father Christmas doll achieves boutique heirloom quality, follow these three artisan techniques:
- 1. Flawless Boot Stuffing for Upright Standing: The secret to getting Father Christmas to stand independently lies in the firmness of his chocolate brown boots. When stuffing Rounds 1–8, pack fiberfill tightly into the heel and toe curves using the blunt end of a chopstick. The soles must remain flat while the ankles are packed firmly enough to prevent wobbling under the torso’s weight.
- 2. Invisible Beard Tier Anchoring: When sewing the four beard strips onto Santa’s face, use fine white sewing thread or a single ply of white yarn. Anchor only the top foundation chain of each tier, allowing the chain-5 loops to hang completely loose. This allows the loops to flutter and drape naturally like real wool fleece.
- 3. Perfecting the Neck Cord Drape: Before tacking the mittens to Santa’s coat hips, drape the 50-chain cord around his neck and ensure it sits comfortably beneath his beard tiers. Adjust the chain length if needed so the mittens fall naturally at hip level without pulling the neck cord taut.
Care, Display & Holiday Preservation
Keep your Father Christmas heirloom looking fresh for decades with proper seasonal care:
- Display: Display on dry, level indoor surfaces away from open flames, fireplaces, or intense direct sunlight.
- Cleaning: Dust gently with a clean soft makeup brush or a hair dryer on the cool, low setting. For minor spots, dab gently with a damp microfiber cloth and mild soap. Never machine wash.
- Storage: Wrap carefully in acid-free tissue paper and store upright or laid flat in a sturdy storage container. Avoid crushing the pointed hat cone or beard loops during off-season storage.
Frequently Asked Questions
Can I add wire to the arms for poseability?
Yes! If you wish to make Santa’s arms poseable so he can hold a miniature bell, candy cane, or lantern, insert a piece of chenille pipe cleaner or coated craft wire through the shoulder joins before closing the neck.
What is the best way to secure the pom-pom to the hat tip?
Thread the yarn tails of the pom-pom through the 4-stitch opening of Round 1 at the hat tip, tie a secure double knot on the interior side of the hat, and add a tiny dot of fabric glue for permanent security.
Can I crochet the beard with boucle or fluffy yarn instead?
Certainly! If you prefer a fleece-like beard texture rather than defined chain loops, you can work the beard tiers in textured boucle or brushed mohair yarn for an ultra-soft vintage finish.
Looking for more charming Christmas keepsakes? Explore our complete holiday tutorials including the 2-in-1 Christmas Candle Lantern Gnomes Duo and our Classic Standing Holiday Snowman Doll.
Pin This Pattern for Your Holiday Crocheting!
Save this Standing Father Christmas pattern to your favorite Pinterest boards so you have the round-by-round instructions and seamless techniques ready whenever you need them:

