

Embrace Scandinavian holiday charm with the Braided Christmas Elf Girl in Nordic Dress and Mittens—a magnificent, heirloom-quality amigurumi doll standing 25 cm tall (30 cm to the tip of her pompom cap). Adorned with glossy chestnut-brown hair plaited into twin side pigtails tied with crimson bows, a two-tone flared Nordic dress embroidered with crisp snowflake stars, candy cane striped stockings, sturdy buttoned boots, cozy red mittens with fluffy white fleece cuffs, and a festive Fair-Isle stocking cap, this masterclass pattern is a true celebration of holiday crochet artistry.
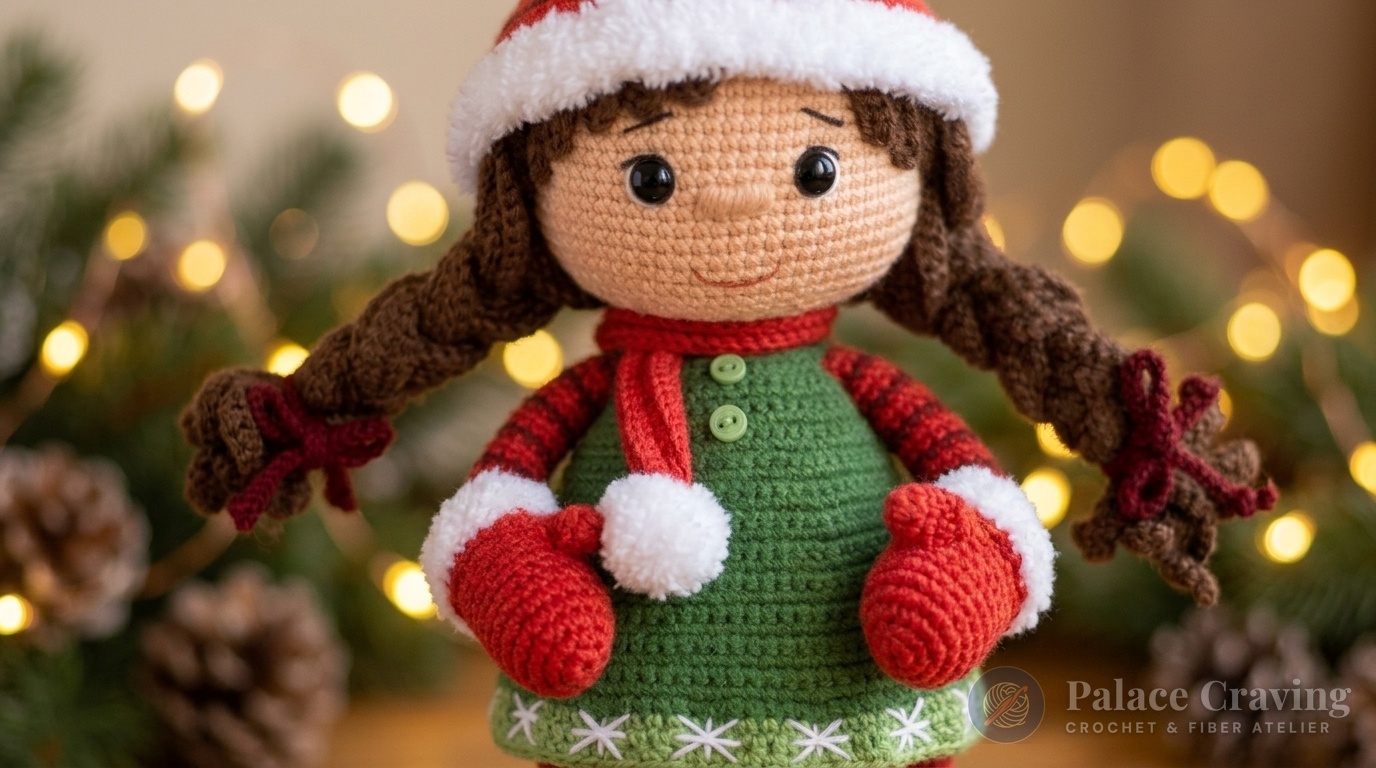
Crafted with a seamless bottom-up body construction and internal wire armature for poseable arms and neck stability, this standing doll features completely removable wardrobe components. The flared dress buttons securely up the back with three handcrafted button loops, allowing crafters to mix, match, and dress the doll for festive seasonal displays, holiday mantle styling, or cherished family heirloom gifting.
Pattern Architecture & Masterclass Specifications
| Technical Parameter | Specification / Measurement | Artisan Notes |
|---|---|---|
| Finished Doll Height | 24–25 cm (29–30 cm with Cap) | Measured from boot soles to peak of pompom cap |
| Gauge (Single Crochet) | 30 sts × 32 rounds = 10 cm (4 in) | Dense tension prevents polyester fiberfill show-through |
| Crochet Hook Size | 1.75 mm (US Steel 4 / 6) | Used throughout doll, wig, wardrobe, cap, and mittens |
| Internal Wire Armature | 0.9–1.0 mm Coated Craft Wire (2× 40 cm) | Reinforces poseable arms and stabilizes neck to head |
| Safety Eyes Hardware | 7–8 mm Solid Black Safety Eyes | Secured into dedicated Rnd 19 eye openings spaced 8 sts apart |
| Wardrobe Modularity | Completely Removable Ensemble | Buttoned Nordic dress, Fair-Isle cap, pompom scarf & mittens |
| Foot Stability | Stiff Plastic / Cardboard Sole Liners | Guarantees free-standing balance in buttoned boots |
Yarn Palette & Essential Notions

To produce clean, crisp stitch definition that withstands years of festive display, we utilize a premium 4-ply sport-weight cotton-acrylic blend (approx. 160 m / 50 g) paired with fluffy boucle yarn for tactile winter cuffs and pompoms:
- Holiday Red (#90): ~50 g for candy cane tights, cap, scarf, mittens, and sleeve stripes.
- Chestnut Brown (#70): ~45 g for 33-strand braided hair wig and sturdy winter boots.
- Dark Forest Green (#35): ~35 g for Nordic dress body, upper skirt, and Fair-Isle cap bands.
- Light Sage Green (#69): ~20 g for snowflake hem band and cap accent stripes.
- Beige / Skin Tone (#73): ~25 g for sculpted head, neck, and hands.
- Dark Crimson Red (#66): ~15 g for candy cane leg stripes and braided hair ribbon ties.
- Snow White (#01): ~15 g for hand-embroidered snowflake stars and eye highlights.
- Fluffy Boucle White (#55): ~15 g for plush mitten cuffs, scarf pompoms, and stocking cap trim.
- Hardware & Notions: 1.75 mm crochet hook, 7–8 mm safety eyes, 2× 40 cm coated floral wire, 2× 5 mm light green buttons (chest), 3× 10 mm dark green buttons (dress back), 2× 10–12 mm wooden buttons (boots), stiff plastic insoles, tapestry needle, gold embroidery scissors, pink pastel for blush, and high-loft fiberfill.
Recommended Notions for Heirloom Holiday Dolls
Tulip Etimo Rose 1.75 mm Ergonomic Crochet Hook
Ultra-smooth polished steel tip that glides effortlessly through tight cotton single crochet stitches without splitting fibers.
Natural Coconut & Wooden Mini Buttons (100 Pcs)
10 mm rustic 2-hole wooden buttons that provide authentic Nordic styling for winter boot cuffs and wardrobe closures.
As an Amazon Associate, Palace Craving earns from qualifying purchases at no added cost to you.
Part 1: Sculpted Head, Eye Sockets & Facial Embroidery
Work the head in continuous spiral rounds with Beige (#73) yarn. Round 19 features built-in chain-space openings that guarantee symmetrical, stress-free safety eye insertion:
- Rnds 1–4 (Crown Base): R1: 6 sc in MR [6]. R2: 6 inc [12]. R3: (inc, 1 sc) × 6 [18]. R4: 1 sc, inc, (2 sc, inc) × 5, 1 sc [24].
- Rnds 5–8: R5: (inc, 3 sc) × 6 [30]. R6: 2 sc, inc, (4 sc, inc) × 5, 2 sc [36]. R7: (inc, 5 sc) × 6 [42]. R8: 3 sc, inc, (6 sc, inc) × 5, 3 sc [48].
- Rnds 9–11: R9: (inc, 7 sc) × 6 [54]. R10: 4 sc, inc, (8 sc, inc) × 5, 4 sc [60]. R11: (inc, 9 sc) × 6 [66].
- Rnds 12–18: 66 sc around (7 rounds even) [66].
- Rnd 19 (Built-in Eye Openings): 28 sc, Ch 1, skip 1 sc (1st eye opening), 8 sc, Ch 1, skip 1 sc (2nd eye opening), 28 sc [66].
- Rnds 20–26: 66 sc around (7 rounds even) [66]. Insert 7–8 mm safety eyes directly into the Rnd 19 chain spaces and secure with washers.
- Rnds 27–30 (Cheek & Jaw Taper): R27: (dec, 9 sc) × 6 [60]. R28: 4 sc, dec, (8 sc, dec) × 5, 4 sc [54]. R29: (dec, 7 sc) × 6 [48]. R30: 3 sc, dec, (6 sc, dec) × 5, 3 sc [42].
- Rnds 31–34 (Neck Opening): R31: (dec, 5 sc) × 6 [36]. R32: 2 sc, dec, (4 sc, dec) × 5, 2 sc [30]. R33: (dec, 3 sc) × 6 [24]. R34: 1 sc, dec, (2 sc, dec) × 5, 1 sc [18]. Fasten off leaving a long sewing tail. Stuff head firmly with fiberfill.
- Facial Needle-Sculpting & Features:
- Eye Indenting: Thread a needle with strong thread and insert at the open neck (Point 1). Exit below the left eye (Point 2), re-enter 2 stitches over (Point 3), pass to below the right eye (Point 4), re-enter 2 stitches over (Point 5), and return to the neck. Pull firmly to create gentle tear-trough sockets and knot securely.
- Nose & Mouth: On Round 20, embroider a small 4-sc horizontal bar with vertical wraps. Embroider white eye sclera along outer edges, stitch 2-ply black eyelashes and soft brown eyebrows, and embroider a sweet red smiling mouth spanning Rnds 24–25. Dust cheeks with soft pink pastel!
Part 2: Braided Hair Wig & Crimson Ties (33 Strands)
The chestnut-brown wig consists of a fitted base cap from which 33 individual strands branch out along Round 21 to create full front bangs and twin plaited side pigtails:
- Wig Cap Base: With Chestnut Brown (#70), work Rnds 1–11 identically to the head (expanding to 66 sc). Work Rnds 12–20: 66 sc around (9 rounds even) [66]. Do not cut yarn; proceed directly into strands:
- Rnd 21 (Strands & Bangs):
- Left Pigtail (12 Long Strands):
(Ch 41; from 2nd ch: 40 sc, 2 sc on base cap) × 12. - Front Bangs (9 Short Strands):
(Ch 11; from 2nd ch: 10 hdc, 2 sc on base cap) × 9. - Right Pigtail (12 Long Strands):
(Ch 41; from 2nd ch: 40 sc, 2 sc on base cap) × 12.
- Left Pigtail (12 Long Strands):
- Wig Styling: Fasten off leaving a long tail. Place cap onto head with bangs framing the forehead. Divide the 12 left strands into 3 sections of 4 strands each, plait into a neat, tight braid, and tie off with brown thread. Repeat on the right side. Pin bangs neatly and stitch the wig cap securely to the head.
- Crimson Ribbon Ties (Make 2): With Dark Crimson Red (#66), Ch 76. Starting in 2nd ch from hook, work 75 slip stitches. Fasten off, knot the ends, and tie in a decorative bow around each braided pigtail!
Part 3: Striped Wire-Framed Arms (Make 2)

Each arm is reinforced with craft wire and worked in alternating stripes of Holiday Red (#90) and Dark Red (#66):
- Hand (In Beige #73): R1: 6 sc in MR [6]. R2: 6 inc [12]. R3: (inc, 3 sc) × 3 [15]. Rnds 4–5: 15 sc (2 rnds). R6: 7 sc, 5-dc Bobble stitch (thumb), 7 sc [15]. Rnds 7–8: 15 sc. R9: (dec, 1 sc) × 5 [10]. R10: 10 sc + 1 shift stitch [10]. Cut Beige yarn.
- Striped Sleeve (Rnds 11–32): Switch to Red (#90): R11: 2 sc, inc, 4 sc, inc, 2 sc [12]. R12: BLO (inc, 5 sc) × 2 [14]. Work 14 sc per round, alternating 1 round Dark Red (#66) and 2 rounds Red (#90): Dark Red on Rnds 13, 16, 19, 22, 25, 28, 31; Red on Rnds 14–15, 17–18, 20–21, 23–24, 26–27, 29–30, and 32.
- Wire Insertion: Loop one end of a 40 cm wire, wrap with tape, insert into hand, and stuff palm lightly. Leave upper arm unstuffed.
- Sleeve Cuff: Join Red (#90) in the unworked front loops of Round 12: work 12 sc clockwise, slip stitch to 1st loop, and fasten off.
Part 4A: Winter Boots & Candy Cane Striped Tights
The doll’s footwear combines realistic boot soles with plastic inserts to support free-standing balance, transitioning directly into candy cane striped tights. Make 2 legs:
- Boot Sole & Foot (Brown #70): Ch 9. From 2nd ch: inc, 6 sc, 3 sc in last ch; opposite side: 7 sc [18]. R2: 2 inc, 6 sc, 3 inc, 6 sc, inc [24]. R3: (1 sc, inc) × 2, 6 sc, (inc, 1 sc) × 3, 7 sc, inc [30]. R4: (2 sc, inc) × 2, 3 sc, 3 hdc, (hdcinc, 2 hdc) × 3, 3 hdc, 5 sc, inc [36] + 3 shift sc to center back heel. Trace boot outline onto plastic and cut 2 matching insoles!
- Boot Shaft: R5: BLO 36 sc. Rnds 6–10: 36 sc (5 rnds) + 1 shift sc. R11: 7 sc, dec, (2 sc, dec) × 5, 7 sc [30]. R12: 6 sc, (hdc2tog, 1 hdc) × 6, 6 sc [24]. Insert plastic insole and stuff foot firmly.
- Striped Tights Transition: Switch to Red (#90): R13: BLO: dec, 6 sc, 4 dec, 6 sc, dec [18]. R14 (Red): 18 sc. R15 (Dark Red): 18 sc. Rnds 16–17 (Red): 18 sc. R18 (Dark Red): 18 sc.
- Leg Shaping (Rnds 19–30): R19 (Red): (inc, 5 sc) × 3 [21]. R20 (Red): 21 sc. R21 (Dark Red): 21 sc. R22 (Red): 21 sc. R23 (Red): 3 sc, inc, (6 sc, inc) × 2, 3 sc [24] + 1 shift sc. R24 (Dark Red): 24 sc. Rnds 25–26 (Red): 24 sc. R27 (Dark Red): (inc, 7 sc) × 3 [27]. Rnds 28–29 (Red): 27 sc. R30 (Dark Red): 27 sc.
- Leg Join Preparation:
- Left Leg: R31 (Red): 19 sc, slip stitch to inner leg. Fasten off both yarns.
- Right Leg: R31 (Red): 27 sc. R32: 6 sc, slip stitch to inner leg. Cut Dark Red, Ch 6, and join to Left Leg slip stitch.
- Boot Outer Cuff: In unworked front loops of Round 13 with Brown (#70): work 24 sc around for 3 rounds. Fasten off and sew a 10–12 mm wooden button to the outer ankle of each boot!
Part 4B: Joined Body, Arm Integration & Neck Assembly
Working in continuous rounds with Red (#90), connect the legs with the 6-chain bridge to create a 66-stitch hip circumference:
- Rnds 1–5: R1: 27 sc on left leg, 6 sc on ch-6, 27 sc on right leg, 6 sc on opposite ch-6 [66]. R2: 63 sc (move marker to center back). Rnds 3–5: 66 sc around (3 rnds). Stuff hips firmly.
- Rnds 6–13 (Torso Taper): R6: (dec, 9 sc) × 6 [60]. Rnds 7–9: 60 sc (3 rnds). R10: 4 sc, dec, (8 sc, dec) × 5, 4 sc [54]. Rnds 11–13: 54 sc (3 rnds) + 1 shift sc.
- Rnds 14–26 (Waist to Chest): R14: (dec, 7 sc) × 6 [48]. Rnds 15–17: 48 sc (3 rnds). R18: 3 sc, dec, (6 sc, dec) × 5, 3 sc [42]. Rnds 19–21: 42 sc (3 rnds). R22: (dec, 5 sc) × 6 [36]. Rnds 23–25: 36 sc (3 rnds). R26: 2 sc, dec, (4 sc, dec) × 5, 2 sc [30].
- Rnds 27–29 (Seamless Arm Join): Position arms with thumbs pointing forward:
- R27: 4 sc on back, 7 sc joining inner Left Arm & Body, 8 sc on front, 7 sc joining inner Right Arm & Body, 4 sc on back [30].
- R28: 4 sc on back, 7 sc on outer Left Arm, 8 sc on front, 7 sc on outer Right Arm, 4 sc on back [30].
- R29: 30 sc around [30]. Twist the two arm wires together into the central neck column, trim to 6 cm, wrap with tape, and pack shoulders firmly with fiberfill!
- Rnds 30–34 (Neck & Collar): R30: (dec, 1 sc) × 10 [20]. R31: 4 sc, dec, 8 sc, dec, 4 sc [18] (leave Red yarn in front). Change to Beige (#73): R32: BLO 18 sc. Rnds 33–34: 18 sc (2 rnds). Fasten off and stuff neck. With the reserved Red yarn in R32 front loops, work 18 sc counterclockwise to form a clean collar ruffle. Sew the sculpted head to the neck opening stitch-for-stitch!
Part 5: Removable Nordic Snowflake Dress

The dress is crocheted in flat turned rows, creating an open back placket with handcrafted button loops that slip easily over the doll’s arms and shoulders:
- Bodice Rows 1–3 (Dark Green #35): Row 1: Ch 37; from 2nd ch: 36 sc, ch 1, turn [36]. Row 2: 3 sc, inc, (5 sc, inc) × 5, 2 sc, ch 1, turn [42]. Row 3: 42 sc across [42].
- Armhole Rows 4–7: Row 4: 5 sc, Ch 12, skip 10 sc (1st armhole), inc, 10 sc, inc, Ch 12, skip 10 sc (2nd armhole), 5 sc, ch 1, turn [48]. Rows 5–7: 48 sc across (3 rows) [48].
- Flared Skirt Rows 8–29: Increase 6 stitches every 4th row:
- Row 8: 4 sc, inc, (7 sc, inc) × 5, 3 sc [54]. Rows 9–11: 54 sc.
- Row 12: 4 sc, inc, (8 sc, inc) × 5, 4 sc [60]. Rows 13–15: 60 sc.
- Row 16: 5 sc, inc, (9 sc, inc) × 5, 4 sc [66]. Rows 17–19: 66 sc.
- Row 20: 5 sc, inc, (10 sc, inc) × 5, 5 sc [72]. Rows 21–23: 72 sc.
- Row 24: 6 sc, inc, (11 sc, inc) × 5, 5 sc [78]. Rows 25–27: 78 sc.
- Row 28: 6 sc, inc, (12 sc, inc) × 5, 6 sc [84]. Row 29: 84 sc [84]. Fasten off Dark Green leaving a 25 cm tail.
- Hem Band (Rows 30–32): Switch to Light Sage Green (#69): work 84 sc across for 3 rows [84]. Fasten off.
- Button Loops & Buttons: Use the 10 cm starting tail at Row 1 to work
Ch 8, sl st in same st(top button loop). Use the 25 cm Row 29 tail to work a second 8-ch loop at the bottom and a third 8-ch loop midway up the placket. Sew 3× 10 mm dark green buttons on the opposite back edge, and sew 2× 5 mm light green decorative buttons to the center-front bodice! - Snowflake Embroidery: With 2-ply split White (#01) thread, embroider 6-point star snowflakes across the Light Green hem band (each snowflake spans 4 sc wide × 3 rows high, spaced 2 sc apart).
Part 6: Pointed Fair-Isle Elf Cap & Fluffy Pompom
Crocheted top-down starting from a plush Alize Softy pompom through 70 rounds of intricate Fair-Isle colorwork bands:
- Pompom (Rnds 1–14): With Fluffy White (#55): R1: 6 sc in MR. R2: 6 inc [12]. R3: (inc, 1 sc) × 6 [18]. R4: (inc, 2 sc) × 6 [24]. R5: (inc, 3 sc) × 6 [30]. R6: (inc, 4 sc) × 6 [36]. Rnds 7–9: 36 sc. R10: (dec, 4 sc) × 6 [30]. R11: (dec, 3 sc) × 6 [24]. R12: (dec, 2 sc) × 6 [18]. R13: (dec, 1 sc) × 6 [12] (stuff firmly). R14: 6 dec [6].
- Cap Cone (Rnds 15–66): Switch to Red (#90) and work top-down expansion, incorporating Fair-Isle tapestry bands of Dark Red, Dark Green, and Light Green every 8 rounds until expanding to 92 stitches at Round 66.
- Fluffy Brim (Rnds 67–70): Switch to Fluffy White (#55): R67: 11 sc, inc, (22 sc, inc) × 3, 11 sc [96]. Rnds 68–70: 96 sc around (3 rnds). Fasten off and embroider white snowflake stars across the Light Green cap band!
Part 7: Ribbed Pompom Scarf & Removable Red Mittens
Complete the winter ensemble with a warm ribbed scarf and cozy mittens with fluffy fleece cuffs:
- Ribbed Scarf: With Red (#90), Ch 131. From 2nd ch: 130 sc. Rows 2–4: Ch 1, turn, BLO 130 sc (3 rows) [130]. Fasten off. Make 2 mini pompoms in Fluffy White (6 sc in MR to 18 sc, stuff lightly, cinch to 6 dec) and stitch firmly to each scarf tail!
- Removable Mittens (Make 2):
- Thumb: In Red (#90): R1: 6 sc in MR [6]. R2: 6 sc. Fasten off.
- Mitten Hand: R1: 6 sc in MR. R2: 6 inc [12]. R3: (inc, 1 sc) × 6 [18]. R4: 4 sc, inc, 8 sc, inc, 4 sc [20]. Rnds 5–7: 20 sc.
- Join Thumb (Rnd 8): 10 sc on hand, 6 sc around thumb, 10 sc on hand [26].
- Palm Taper (Rnds 9–12): R9: 9 sc, dec, 4 sc, dec, 9 sc [24]. R10: 9 sc, dec, 2 sc, dec, 9 sc [22]. R11: 9 sc, 2 dec, 9 sc [20]. R12: 2 sc, inc, (4 sc, inc) × 3, 2 sc [24].
- Fluffy Cuff (Rnds 13–15): Switch to Fluffy White (#55): 24 sc around for 3 rounds. Fasten off. Do not stuff; slide mittens over the doll’s poseable hands!
3 Masterclass Tips for Flawless Doll Presentation
1. Free-Standing Insole Architecture: Ensure your plastic or cardboard sole inserts fit snug against the inner perimeter of Round 4. This prevents the stuffing from rounding the bottom of the boot, giving the doll flat, stable feet capable of balancing unsupported on hard surfaces.
2. Uniform Braid Tension: When plaiting the 12 long strands into side pigtails, keep your braiding tension moderate and even. Tying the ends first with strong sewing thread ensures the braid will not unravel when wrapping the Dark Red ribbon bows.
3. Clean Fluffy Boucle Stitching: When working with Alize Softy or textured boucle yarn on the mitten cuffs and cap brim, count your stitches by feeling the base loops with your fingertips rather than looking for V-shapes. A loose, relaxed tension produces maximum loft and plushness.
Frequently Asked Questions
Can I machine wash this holiday doll?
Due to the internal wire armature, safety eyes, wooden buttons, and delicate surface embroidery, spot cleaning with a damp cloth and mild wool wash detergent is strictly recommended. Never submerge the doll completely in water.
Can I crochet the boots and tights in single colors?
Absolutely! If you prefer solid tights, omit the color changes between Red and Dark Red and crochet continuous rounds in your chosen shade. The short-row heel and boot shaping remain identical.
How do I keep the pointed cap from sliding off the braids?
The cap expands to 96 stitches at the brim, fitting snugly over the braided wig. If desired, you can place a hidden safety pin or tack a single stitch of red yarn inside the cap brim to secure it to the crown of the head.
Pin This Free Masterclass Tutorial for Your Holiday Crochet Board
Save these pins to your Pinterest amigurumi and holiday crochet boards to have this heirloom pattern ready whenever you want to craft a magical handcrafted Christmas gift!

