

Step straight into Santa’s magical workshop with Christmas Elf Chris with Holiday Gift Sack—an enchanting 27.7 cm (10.9 in) heirloom standing holiday amigurumi doll. Featuring spiraled mustard-gold curls peek-a-booing beneath a ribbed stocking cap, pointed elf ears, an emerald green belted tunic with gold buckle accent, festive candy cane striped tights, elf curled shoes with jingle bells, and an authentic patched drawstring toy sack, Chris is ready to deliver boundless holiday cheer to your mantel or festive tablescape.
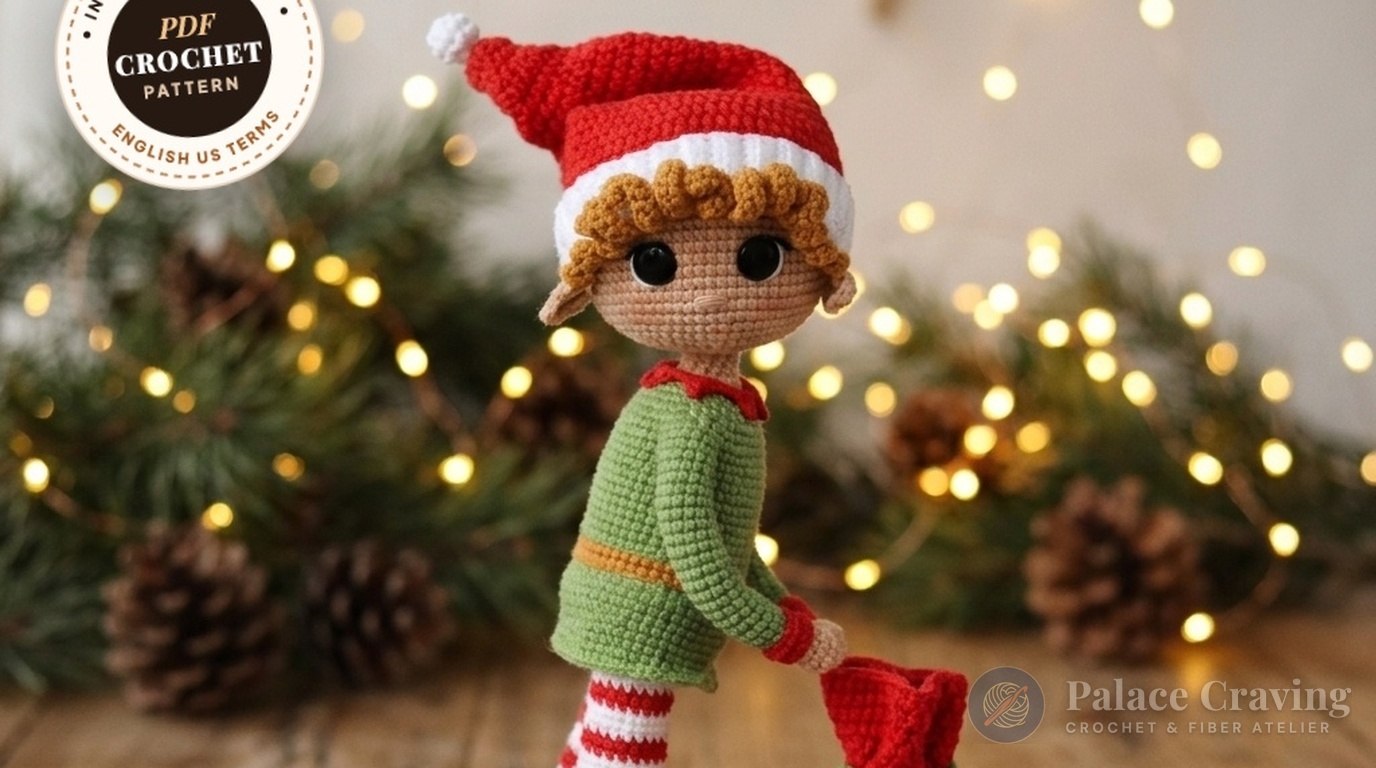
Skillfully designed with an internal aluminum wire skeleton running from the boot tips through the spine, seamless no-sew joined arms, and an innovative recessed neck socket that allows his head to pivot smoothly, Chris poses beautifully beside miniature presents or perched on your holiday shelves. Whether worked as a centerpiece for your holiday decor or gifted as a treasured family keepsake, this detailed masterclass pattern guarantees breathtaking results.
Pattern Architecture & Masterclass Specifications
| Technical Parameter | Specification / Measurement | Artisan Notes |
|---|---|---|
| Finished Doll Height | 27.7 cm (10.9 in) | Measured from boot sole to crown (cap folds gracefully to shoulder) |
| Gauge (Single Crochet) | 28 sts × 30 rounds = 10 cm (4 in) | Tight tension worked with a 1.5 mm hook prevents stuffing show-through |
| Crochet Hook Size | 1.5 mm (US Steel 8 / 7) | Used uniformly across doll body, head, tunic, cap & sack |
| Skeletal Wire Frame | 2 mm aluminum wire (33.7 cm × 2) | Bent into boots and twisted into central spine for freestanding stability |
| Arm Wire Support | 1.5 mm craft wire (25.8 cm) | Continuous arm wire allows poseable hands and gift-sack carrying |
| Safety Eyes Hardware | 12 mm Glossy Black Safety Eyes | Secured between Rounds 16 & 17 spaced 6 single crochet stitches apart |
| Holiday Gift Sack | Joined HDC with Drawstring & Patch | 90-stitch roomy sack perfect for holding small gifts or candy canes |
Yarn Palette & Essential Notions

To produce tight, heirloom-quality stitch definition that preserves every contour of Chris’s curled boots and tunic flare, we recommend premium sport-weight cotton blend yarn (YarnArt Jeans: 50 g / 160 m, 55% cotton, 45% acrylic):
- Pine Green (#69): ~50 g for belted tunic, sleeve cuffs, and patched gift bag accent.
- Festive Red (#90): ~60 g for curled elf boots, candy cane stocking stripes, elf cap, and drawstring gift sack.
- Pure White (#01): ~35 g for stocking stripes, ribbed hat brim, pom-pom, and belt buckle embroidery.
- Warm Beige (#07): ~30 g for sculpted oval head, pointed ears, hands, and neck post.
- Mustard Yellow (#84): ~25 g for curly spiral bangs, waist belt, and boot jingle bells.
- Armature & Hardware: 2 mm aluminum craft wire (two 33.7 cm lengths for legs/spine), 1.5 mm craft wire (25.8 cm for arms), electrical/adhesive tape, and two 12 mm solid black safety eyes with backing washers.
- Tools & Notions: 1.5 mm steel ergonomic crochet hook, tapestry needle, embroidery floss (black, white, light brown), cosmetic blush powder, gold scissors, needle-nose wire pliers, and premium polyester fiberfill.
Recommended Notions for Poseable Elf Dolls
Tulip Etimo Rose 1.50 mm Steel Crochet Hook
Precision polished tip that maneuvers through tight cotton stitches without hand fatigue or wrist strain.
12 mm Solid Black Safety Eyes with Locking Washers (Pack of 50)
Heavy-duty glossy acrylic eyes with grooved safety posts designed specifically for heirloom holiday amigurumi.
As an Amazon Associate, Palace Craving earns from qualifying purchases at no extra cost to you.
Comprehensive Step-by-Step Stitch Guide
Work in continuous spirals unless instructed otherwise. When switching between Red and White yarn on the legs, carry the unworked strand inside the tube to minimize loose ends. For more holiday doll inspiration, don’t miss our Indis Little Christmas Elf with Star, the festive Braided Christmas Elf Girl, and our regal Lucian Tree Hat Elf Doll.

Part 1: Arms & Red Sleeve Cuffs (Make 2)
Work arms from the hands upward. Start with Beige #07 (Skin):
- Rnds 1–3: R1: 5 sc in MR [5] • R2: 5 inc [10] • R3: 10 sc around [10].
- Rnd 4 (Thumb): 1 (3-dc bobble) for thumb, 9 sc around [10].
- Rnds 5–6: R5: (1 dec, 3 sc) × 2 (dec placed over thumb) [8] • R6: 8 sc. Work +3 shift sc on left arm so color join faces inward. Cut Beige, join Red #90 [8].
- Rnds 7–8: In Red: R7: 8 sc [8] • R8: (1 sc, 1 inc) × 4 [12]. Cut Red, join Green #69 [12].
- Rnds 9–29 (21 rnds): R9: BLO 12 sc • Rnds 10–29: 12 sc around [12]. Fasten off.
- Sleeve Cuffs: Attach Red #90 to Rnd 8 FLO: work 3 rounds of 12 sc. Fasten off and weave in end.
Part 2: Curled Elf Boots & Striped Tights (Make 2)
Begin at the upturned pointy toe with Red #90 (do not stuff toe tip):
- Boot Tip (Rnds 1–10): R1: 6 sc in MR [6] • Rnds 2–3: 6 sc [6] • R4: (1 inc, 2 sc) × 2 [8] • R5: 1 sc, inc, 4 sc, inc, 1 sc [10] • R6: 2 sc, inc, 4 sc, inc, 2 sc [12] • Rnds 7–10: 12 sc around [12].
- Heel Turning Rows: Work heel flap back and forth: 6 sc, ch 1, turn (repeat 3 rows). Ch 4, join to 1st sc of row. Work 2 dec across lower heel gap and cinch closed with tapestry needle.
- Rnd 11 (Ankle Join): Rejoin Red at back heel: 4 sc along back, 3 sc on side, 6 sc across instep, 3 sc on side [16] + 2 shift sts. Insert 33.7 cm 2 mm wire bent into boot curve; stuff firmly.
- Rnds 12–15: R12: BLO (2 sc, dec) × 4 [12] • Rnds 13–15: 12 sc [12]. Join White #01.
- Striped Leg (Rnds 16–46): Alternate 3 rnds White / 2 rnds Red while expanding calves systematically: R16–21: 12 sc • R22: (3 sc, inc, 5 sc, inc, 2 sc) [14] • R25: (3 sc, inc, 7 sc, inc, 2 sc) [16] • R28: (5 sc, inc, 7 sc, inc, 2 sc) [18] • R31: (5 sc, inc, 9 sc, inc, 2 sc) [20] • Rnds 32–46: 20 sc even. Stop left leg 2 sc early at inner thigh and fasten off. On right leg, work +6 shift sc to inner thigh, keeping White yarn attached!
- Boot Cuffs & Bells: Join Red to Rnd 11 FLO: (3 sc, inc) × 4 [20], work 4 rounds of 20 sc. In Mustard #84, crochet miniature bells (6 sc in MR for 2 rounds) and sew to curled tips!
Part 3: Body, Mustard Belt & No-Sew Arm Join
Continue directly from the right leg in White #01:
- Rnd 47 (Join Legs): Ch 3 from right leg, sl st to left leg. Twist leg wires into central spine and wrap with adhesive tape. Work: 20 sc on left leg, 3 sc along chain, 20 sc on right leg, 3 sc on chain [46].
- Rnds 48–54: R48: 20 sc, 3 inc, 20 sc, 3 inc [52] • R49: 22 sc, inc, 25 sc, inc, 3 sc [54] • Rnds 50–54: 54 sc [54]. Cut White, join Green #69.
- Rnds 55–61 (Mustard Belt): R55: 54 sc • R56: BLO (7 sc, dec) × 6 [48]. Join Mustard #84: R57: 48 loose sl st • R58: 48 sc worked through R57 BLO sl st & R56 sc together • R59: 48 sc. Resume Green: R60: 48 sl st • R61: 48 sc through R60 BLO & R59 sc together [48].
- Tunic Torso (Rnds 62–70): Rnds 62–68: 48 sc • R69: (6 sc, dec) × 6 [42] • R70: 42 sc.
- Rnd 71 (Join Arms): 4 sc through inner left arm & body, 17 sc across chest, 4 sc through right arm & body, 17 sc across back [42]. Insert 25.8 cm 1.5 mm arm wire behind spine; stuff palms and arms lightly.
- Rnds 72–78 (Shoulders): R72: 8 sc around outer left arm, 17 sc chest, 8 sc around right arm, 17 sc back [50] • R73: dec at each shoulder [48] • R74–77: decrease systematically to [24]. In Red: R78: decrease to [18].
- Neck Post (Rnds 79–89): In Beige #07: R79: BLO (1 sc, dec) × 6 [12] • Rnds 80–88 (9 rnds): 12 sc around neck wire • R89: 6 dec [6]. Stuff neck firmly and close tip.
Part 4: Tunic Skirt & Pointed Collar
These festive layered accents give Chris his authentic Santa’s workshop silhouette:
- Tunic Skirt (R55 FLO): Attach Green #69 to exposed front loops of Round 55: Rnds 1–3: 54 sc • R4: (8 sc, inc) × 6 [60] • Rnds 5–7: 60 sc • R8: (9 sc, inc) × 6 [66] • R9 (Side Flare): 35 sc, 7 inc (aligned over hip), 24 sc [73]. Fasten off and weave in tail.
- Pointed Red Collar: Attach Red #90 to Rnd 78 FLO of neck: work 6 repeating collar points: *(1 sc, ch 4, turn, from 2nd ch: 1 sl st, 1 sc, 1 dc; skip 1 st on neck, 1 sc)* around. Tack points flat to shoulders; embroider crisp White belt buckle over front center of mustard belt.
Part 5: Oval Head with Recessed Swivel Socket
Worked in Beige #07 from an oval foundation chain to create adorable plump cheeks:
- Rnds 1–6 (Ch 13 Base): Ch 13, work around chain to 26 sc • expand systematically to 32, 38, 44, 50, and 56 sc.
- Rnds 7–20: Expand to 60 sc; work 11 rounds even [60]. Insert 12 mm safety eyes between Rounds 16 & 17 spaced 6 sc apart.
- Rnds 21–28 (Crown Decreases): Taper down: 54, 48, 42, 36, 30, 24, 18, and 15 sc.
- Rnds 29–36 (Internal Neck Well): R29: BLO 15 sc • Rnds 30–36: 15 sc [15]. Fasten off. Stuff head firmly, then push Rnds 30–36 up inside head to form a smooth recessed socket that slots snugly over the body’s neck post!
- Pointed Ears (Make 2): In Beige, ch 8; from 3rd ch: 2 dc, 2 hdc, 1 sc, sl st, 1 sc, 2 hdc, 2 dc. Sew to sides of head aligned with eye line. Sculpt facial contours, stitch eyebrows and smile, and dust cheeks with blush.
Part 6: Ribbed Stocking Cap, Spiral Curls & Gift Sack
The signature finishing pieces that bring this holiday helper to life:
- Ribbed Brim: In White #01, ch 6. Work 58 rows of BLO 5 sc. Seam into a ring.
- Hat Crown: Work 60 sc along brim top edge. Join Red #90: R2: FLO 60 hdc (leaving inner loops for hair). Work joined hdc rounds tapering every few rounds down to 6 hdc. Attach a fluffy White pom-pom to the folded tip.
- Mustard Hair Curls (13 Curls): Fold brim upward. Attach Mustard #84 to exposed inner loops of Rnd 2: work 3 side curls (ch 7, 5 hdc down), 7 long bang curls (ch 14, 12 hdc down), and 3 opposite side curls.
- Patched Holiday Gift Sack: In Red #90, work flat circular base in joined hdc expanding to 90 hdc. Work 4 rounds even, then decrease to 40 hdc at drawstring eyelet round. Crochet a Green #69 square patch (8 sc × 8 rows) and stitch to front with cross stitches. Thread a twisted drawstring cord with pom-poms.
3 Artisan Secrets for Flawless Doll Construction
1. Double-Tape the Armature Ends: When working with 2 mm aluminum craft wire, always bend the tip into a small rounded loop and wrap it securely with electrical tape. This prevents the wire ends from poking through your crochet stitches during stuffing or posing.
2. Secure the Swivel Neck Socket: When pushing Rounds 30–36 inward to create the neck cavity, apply firm, even tension. Adding a drop of fabric glue or sewing a few anchoring stitches at the base of the cavity ensures the socket stays permanently recessed when pivoting the doll’s head.
3. Seamless Waist Belt Transition: When executing Rounds 57–61 for the mustard belt, working the slip stitches loosely prevents the doll’s waist from cinching too tightly, keeping the tunic line straight and allowing the skirt flare to drape naturally.
Holiday Display & Mantel Styling Ideas
- Mantel Centerpiece: Pose Chris standing beside pine boughs, miniature fairy lights, and birch logs, holding his patched gift sack open with tiny wrapped wooden blocks or candy canes spilling out.
- Tiered Tray Holiday Accent: Thanks to his 27.7 cm height, Chris perches gracefully on the top tier of a farmhouse holiday tray alongside pinecones, cinnamon sticks, and festive mugs.
- Heirloom Tree Topper or Guardian: Position Chris securely nestled among the sturdy middle branches of your evergreen tree as an industrious guardian elf keeping watch over holiday presents.
Care, Cleaning & Long-Term Preservation
- Spot Cleaning Only: Because Chris contains an internal wire skeleton and delicate facial shading, do not submerge in water. Clean surface stains using a damp microfiber cloth and mild wool wash.
- Reshaping Curls: If the mustard spiral bangs become flattened during storage, simply twist each curl clockwise around your index finger with a touch of steam to instantly revive their bounce.
- Off-Season Storage: Store Chris wrapped in acid-free tissue paper inside a rigid, climate-controlled container with cedar balls to protect the cotton fibers from dust and humidity.
Save to Pinterest: Heirloom Holiday Doll Patterns
Save these high-resolution pin guides to your favorite Holiday Crochet or Amigurumi Patterns boards on Pinterest for quick reference throughout the festive season:

Pin Guide 1: Complete Elf Chris construction and supply breakdown.

Pin Guide 2: Technique guide for curled boots, striped tights, and gift sack.
Finished Heirloom Masterpiece: Meet Chris the Holiday Elf

Frequently Asked Questions (FAQ)
Can I make Elf Chris without the internal wire frame?
Yes! If you are making Chris as a toy for young children, you can omit the wire skeleton entirely and substitute a firmly rolled felt cylinder or wooden skewer encased in fiberfill inside the neck post. The doll will be soft and huggable, though he will require leaning support to stand upright.
What yarn can I substitute for YarnArt Jeans?
Any standard 4-ply sport-weight cotton or cotton-blend yarn works wonderfully. Excellent alternatives include Schachenmayr Catania, Scheepjes Catona, or Paintbox Yarns Cotton DK. Maintain a 1.5 mm to 2.0 mm hook size to keep the stitches tight.
How do I keep the striped tights from spiraling?
To keep the Red and White color blocks perfectly aligned down the leg without diagonal drifting, work the specified shift stitches (working 1 or 2 extra single crochet stitches before starting the new color round) as indicated in the pattern text.
Pin This Holiday Masterpiece for Later!
Ready to bring Santa’s workshop into your craft room? Hover over any image above or click the pin button below to save Christmas Elf Chris to your Pinterest amigurumi board!