

Infuse your home with Scandinavian holiday folklore with Scandinavian Christmas Nisse Magnus Gnome with Curly Beard—an adorable 15 cm (6 inch) heirloom pocket tomte amigurumi. Constructed with an ingenious continuous one-piece body technique from the bottom up, Magnus features sweet red booties, striped arms, a pair of bright red belly buttons, two tiers of spiraling curly white beard strands, a charming bulbous peach nose, and an iconic 81-round striped stocking hat crowned with a plush pom-pom and 5-point star applique.
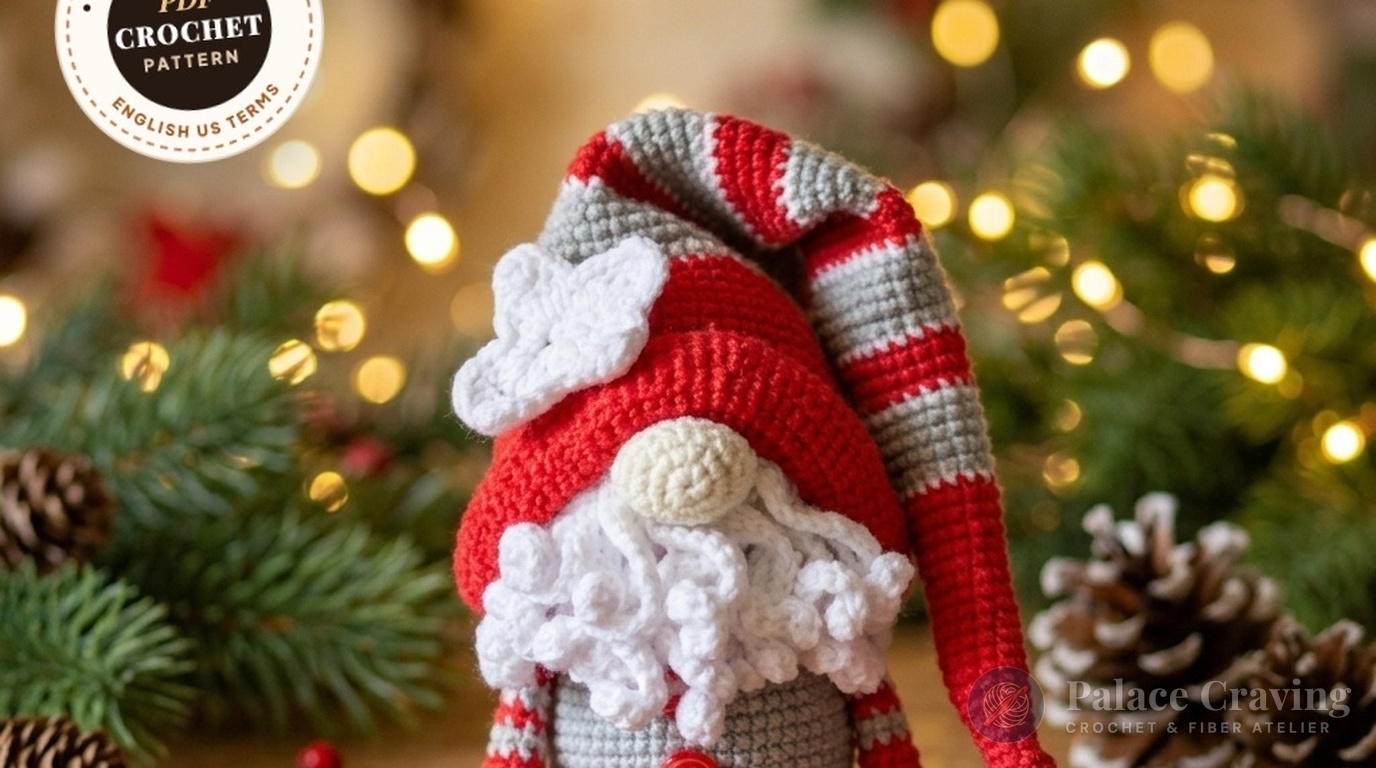
Unlike traditional amigurumi that require tedious piecing and sewing, Nisse Magnus is crocheted almost entirely in one continuous flow. His boots, arms, curly beard strands, and peach nose are seamlessly joined directly into the head and torso as you work your rounds. This creates a sturdy, delightfully weighted holiday companion that perches securely on book edges, tiered trays, or window ledges throughout the festive winter season.
Pattern Architecture & Masterclass Specifications
| Technical Parameter | Specification / Measurement | Artisan Notes |
|---|---|---|
| Finished Doll Height | ~15 cm (6 inches) | Base to top of head (long striped stocking cap extends an extra 20 cm) |
| Gauge (Single Crochet) | 26 sts × 28 rounds = 10 cm (4 in) | Worked firmly with a 1.75 mm hook to produce solid, opaque fabric |
| Crochet Hook Size | 1.75 mm (US Steel 4 / 0) | Maintained uniformly across body, limbs, beard, and striped hat |
| Construction Framework | Continuous Seamless 1-Piece | Legs, body, arms, head, beard, and nose crocheted as you go |
| Curly Beard Technique | Ch-16 Spiral Strands (HS) | 23 total corkscrew strands worked across 2 tiered foundation rounds |
| Belly Hardware Accent | 2× 10 mm Cherry Red Buttons | Sewn vertically down the front center of the grey marl body |
| Stocking Cap Architecture | 81-Round Tapered Cone | Alternates Red, White, and Grey striping with 5-point star applique |
Yarn Palette & Essential Notions

To produce the crisp, heirloom stitch definition essential for Magnus’s corkscrew curls and striped hat, we recommend a sport-weight cotton-acrylic blend (YarnArt Jeans: 50 g / 160 m, 55% cotton, 45% acrylic):
- Festive Red (#90): ~40 g for turned shoes, striped sleeves, and the long stocking cap.
- Slate Grey (#49): ~45 g for the plump torso, arm striping, hat sections, and fluffy pom-pom.
- Snow White (#01): ~35 g for the neck collar, 23 curly beard strands, hat stripes, and 5-point star applique.
- Milk / Soft Beige (#03 / #07): ~20 g for the hands, bulbous nose, and upper head foundation.
- Hardware & Embellishments: Two 10 mm glossy red flat buttons, optional seed beads or gold sequins for the star applique.
- Tools & Notions: 1.75 mm ergonomic crochet hook, wooden stuffing stylus for narrow arm tubes, blunt tapestry needle, sharp thread snips, stitch markers, and resilient polyester fiberfill.
Recommended Tools for Nordic Amigurumi Gnomes
Clover Amour 1.75 mm Steel Crochet Hook
Ultra-smooth elastomer comfort grip that prevents cramping while crocheting tight seamless amigurumi rounds.
10 mm Red 2-Hole Resin Craft Buttons (Pack of 100)
Glossy candy-red craft buttons with smooth edges, perfect for holiday gnome bellies and winter overalls.
As an Amazon Associate, Palace Craving earns from qualifying purchases at no extra cost to you.
Comprehensive Step-by-Step Stitch Guide
Work continuously in tight spirals without turning unless indicated. For seamless color striping on the arms and hat, complete the final yarn-over of the preceding stitch with your new yarn strand. For more seasonal inspiration, explore our newly released Christmas Elf Chris with Gift Sack, our popular Indis Elf Doll with Star, and the regal Lucian Tree Hat Elf.

Part 1: Red Shoes (Make 2) & Bulbous Nose
Prepare these pieces first so they are ready for seamless joining into the body and head rounds:
- Red Shoes (Make 2): In Red: R1: 6 sc in MR [6] • R2: 6 inc [12] • R3: (1 sc, inc) × 6 [18] • Rnds 4–5: 18 sc [18] • R6: (1 sc, dec) × 6 [12]. Stuff sole firmly. R7: Flatten top edge and crochet through both thicknesses: 6 sc across [6]. Fasten off and set aside.
- Bulbous Nose: In Milk / Soft Beige: R1: 6 sc in MR [6] • R2: 6 inc [12] • R3: (1 sc, inc) × 6 [18] • Rnds 4–5: 18 sc [18] • R6: (1 sc, dec) × 6 [12]. Fasten off leaving a short tail. Do not stuff yet—stuffing is added during attachment in Head Rounds 9–10.
Part 2: Striped Arms (Make 2 — Do Not Stuff)
Worked from the hands upward with alternating Red and Grey barber-pole stripes:
- Rnds 1–3 (Hands): In Milk: R1: 6 sc in MR [6] • R2: (1 sc, inc) × 3 [9] • R3: 9 sc [9].
- Rnds 4–7: In Red: Rnds 4–5: 9 sc [9]. Break Milk. In Grey: R6: 9 sc • R7: dec, 7 sc [8].
- Rnds 8–10: In Red: R8: 8 sc [8]. In Grey: R9: 8 sc • R10: dec, 6 sc [7].
- Rnds 11–13: In Red: R11: 7 sc [7]. In Grey: R12: 7 sc • R13: dec, 5 sc [6]. Break Red.
- Rnds 14–17: In Grey: Rnds 14–16: 6 sc [6]. R17: Flatten opening and work 3 sc through both thicknesses [3]. Fasten off. Keep unstuffed for natural, flexible arm drape.
Part 3: Seamless One-Piece Body (Joining Shoes & Arms)
Crochet the plump belly in Slate Grey, locking the shoes into Round 9 and the arms into Round 23:
- Base Expansion (Rnds 1–8): In Grey: R1: 8 sc in MR [8] • R2: 8 inc [16] • R3: (1 sc, inc) × 8 [24] • R4: (2 sc, inc) × 8 [32] • R5: (3 sc, inc) × 8 [40] • R6: (4 sc, inc) × 8 [48] • R7: (5 sc, inc) × 8 [56] • R8: 56 sc [56].
- Rnd 9 (Join Shoes): 20 sc, 6 sc through 1st shoe & body together, 4 sc, 6 sc through 2nd shoe & body together, 20 sc [56]. Both shoes are now permanently locked in place!
- Rnds 10–22 (Torso Tapering): Rnds 10–15: 56 sc • R16: (5 sc, dec) × 8 [48] • Rnds 17–18: 48 sc • R19: (4 sc, dec) × 8 [40] • Rnds 20–21: 40 sc • R22: (3 sc, dec) × 8 [32].
- Rnd 23 (Join Arms): 9 sc, 3 sc through 1st arm & body, 12 sc across front chest, 3 sc through 2nd arm & body, 5 sc [32].
- Rnds 24–27 (Shoulders & Neck): R24: 32 sc • R25: (2 sc, dec) × 8 [24] • R26: 24 sc. Stuff body firmly. Change to White: R27 (Neck): 24 sc [24]. Do not break yarn—continue seamlessly into the head!
Part 4: Head, Two-Tier Curly Beard & Seamless Nose
Here is where Nisse Magnus’s charming character is created. Beard strands (HS) are crocheted directly off the head rounds: HS = Ch 16; from 2nd ch from hook work (inc, 2 sc) × 5 back toward head [20 sts]:
- Head Expansion (Rnds 1–3): In White: R1: 24 inc [48] • Rnds 2–3: 48 sc [48].
- Rnd 4 (Beard Tier 1 – 12 Strands): 16 sc, *(HS, 2 sc)* × 12 across front face, 8 sc [48]. 12 bouncy corkscrews spiral forward!
- Rnds 5–6: Work into head stitches behind the beard strands: 48 sc [48].
- Rnd 7 (Beard Tier 2 – 11 Strands): 17 sc, *(HS, 2 sc)* × 11 nested between the lower curls, 9 sc [48]. 11 additional corkscrews complete the plush beard!
- Rnd 8: 48 sc into head stitches only. Change to Milk, break White [48].
- Rnds 9–10 (Join Nose): Center nose strictly above beard: R9: 24 sc, 6 sc through bottom edge of nose & head, 18 sc [48] • R10: 24 sc, 6 sc through top edge of nose & head (stuff nose firmly before closing!), 18 sc [48].
- Rnds 11–20 (Head Crown): Rnds 11–13: 48 sc • R14: (6 sc, dec) × 6 [42] • R15: (5 sc, dec) × 6 [36] • R16: (4 sc, dec) × 6 [30] • R17: (3 sc, dec) × 6 [24] • R18: (2 sc, dec) × 6 [18], stuff head firmly • R19: (1 sc, dec) × 6 [12] • R20: 6 dec [6]. Cinch closed and fasten off.
Part 5: Long Striped Gnome Hat (Rnds 1–81)
Magnus’s signature long cone hat drapes gracefully down his back:
- Tip & Gradual Expansion (Rnds 1–18): Start in Red: R1: 6 sc in MR • expand gradually every 3–4 rounds to 9, 12, and 15 sc. Work even through Round 18.
- Striped Center Sections (Rnds 19–65): Alternate Red (4 rnds), White (1 rnd), Grey (4 rnds), White (1 rnd) while increasing 3 stitches every 4–5 rounds: expands to 18, 21, 24, 27, 30, 33, 36, 39, 42, 45, and 48 sc.
- Lower Bell & Wide Brim (Rnds 66–81): In Red: Expand to 52, 56 sc, then widen sharply across Rounds 77–81: (3 sc, inc, 3 sc) × 8 [64] • R78: 72 sc • R79: 80 sc • R80: 88 sc • R81: 88 sc. Fasten off.
- Pompom & Star Applique: In Grey, crochet a 24-stitch stuffed sphere for the tip of the hat. In White, crochet a delicate 5-point star applique: 5-sc ring, expand to 15 sts, work 5 points with 3-dc clusters and picot tips. Sew star to front of hat and adorn with golden beads.
- Final Assembly: Place hat over head, pulling down snugly right above the nose and beard. Tack with invisible stitches to hold the stylish curl. Sew two 10 mm red buttons vertically on the front belly.
3 Artisan Secrets for Flawless Gnome Construction
1. Consistent Beard Corkscrew Tension: When working each beard strand (HS), maintain crisp, tight tension on the increase stitches. Working (1 inc, 2 sc) × 5 down the chain forces the strand into an elastic spiral that holds its bouncy corkscrew shape permanently without needing wires or hairspray.
2. Perfect Nose Stuffing Timing: Wait until you have completed Round 9 of the head before stuffing the nose. Stuffing it right before closing Round 10 allows you to pack the fiberfill firmly into a rounded button shape without trapping loose wisps of stuffing in the joining stitches.
3. Hat Shaping and Draping: Before stitching the hat to the head, pin the wide brim just touching the top crease of the nose. Fold the long tip of the hat backward or over one shoulder and add 2–3 tacking stitches through the folds so it retains its effortless, whimsical drape forever.
Nordic Holiday Styling & Display Ideas
- Scandinavian Farmhouse Mantel: Display Nisse Magnus alongside frosted pinecone garlands, rustic wooden stars, and pillar candles on a rustic mantlepiece.
- Festive Shelf Sitter: Position Magnus perched on the edge of a floating bookshelf or tiered kitchen tray with his red booties dangling cheerfully over the ledge.
- Handmade Holiday Stocking Stuffer: At 15 cm tall, Magnus is the perfect heirloom pocket gift to tuck into Christmas stockings for family members and friends.
Care, Washing & Long-Term Preservation
- Spot Cleaning Recommended: Due to the delicate star applique and buttons, spot clean surface dirt with a mild wool detergent and cool water using a damp soft cloth.
- Reviving Beard Curls: If the curly beard strands become pressed or stretched during storage, simply spritz with cool water and wind each curl clockwise around your index finger to restore crisp spirals.
- Off-Season Storage: Store Magnus upright wrapped in acid-free tissue inside a breathable cotton bag away from direct sunlight to maintain yarn vibrancy.
Save to Pinterest: Nordic Gnome Crochet Patterns
Save these high-resolution pin guides to your favorite Holiday Crochet, Christmas Gnomes, or Amigurumi Patterns boards on Pinterest:

Pin Guide 1: Complete Nisse Magnus seamless body, beard, and hat walkthrough.

Pin Guide 2: Technique guide for seamless limbs, curly beard tiers, and star hat.
Finished Heirloom Masterpiece: Meet Nisse Magnus

Frequently Asked Questions (FAQ)
Can I crochet Nisse Magnus in worsted or DK weight acrylic yarn?
Yes! You can use worsted weight acrylic yarn (such as Red Heart Super Saver or Caron Simply Soft) paired with a 2.5 mm to 3.0 mm hook. Your gnome will turn out slightly larger (approx. 20–22 cm), maintaining the same delightful proportions.
How do I keep the curly beard strands from getting tangled while working the head?
When completing Round 4 and Round 7, gently flip all completed beard strands downward toward the body and secure them with a soft silicone hair tie or locking stitch marker. This keeps your working area clear as you crochet the crown of the head.
Do I need to insert wire into the gnome’s arms or hat?
No wire is required! Leaving the arms unstuffed gives them a natural resting posture against the body, and the tapered 81-round construction of the stocking hat allows it to fold gracefully under the weight of the yarn pom-pom.
Pin This Nordic Holiday Gnome for Later!
Ready to add Nordic charm to your winter craft list? Click the pin button below or save any image above to keep Scandinavian Nisse Magnus handy in your holiday amigurumi collection!