

Bring heartwarming Scandinavian holiday tradition to life with the Nordic Christmas Reindeer Boy & Girl Duo—an heirloom pair of standing 21 cm (8.3 in) handcrafted amigurumi reindeer dolls. Worked seamlessly from sturdy graphite boots up through their warm winter legs, both characters feature cloud-soft fluffy boot and sleeve trims, crisscross buttoned suspenders, sculpted 3-branch antlers, curved alert ears, and traditional Scandinavian Fair-Isle chevron colorwork: cuffed shorts for the Reindeer Boy and a pleated holiday skirt for the Reindeer Girl!
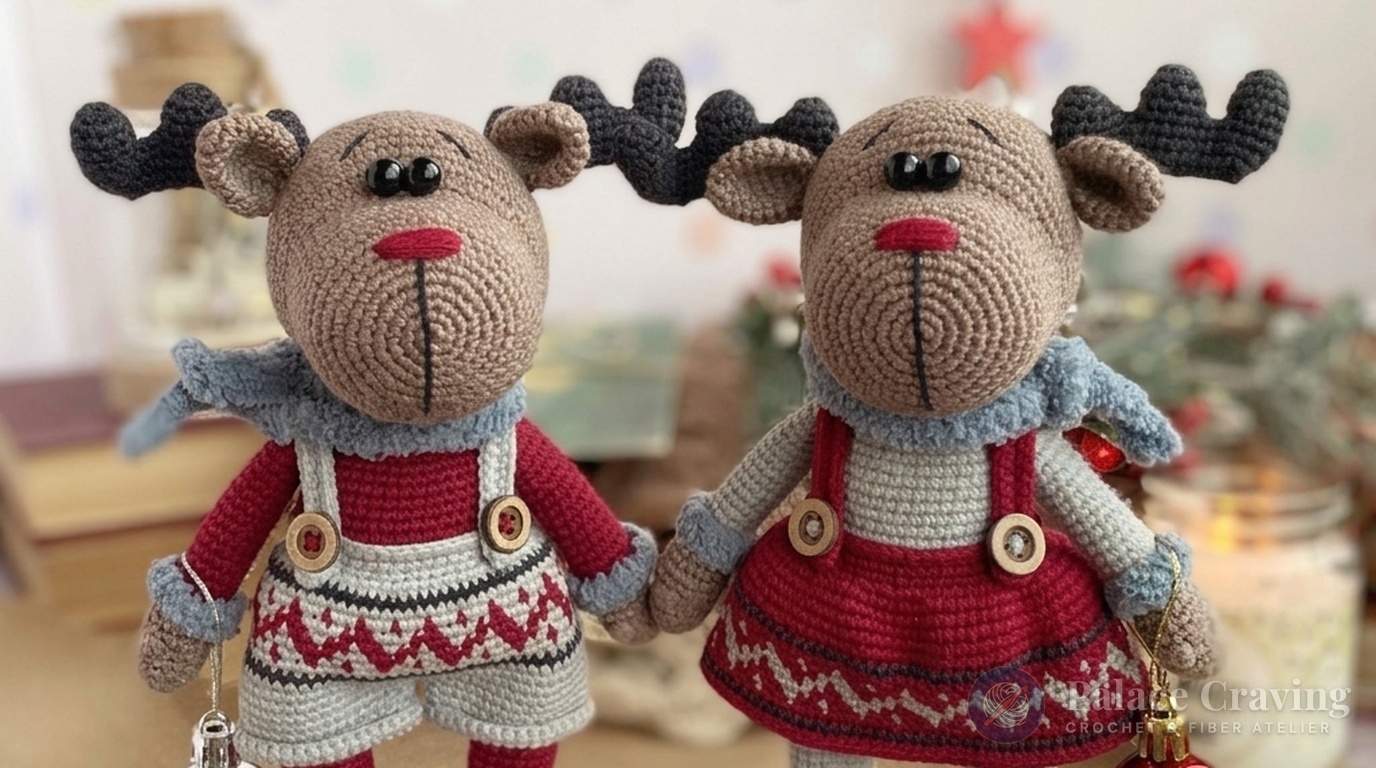
Each reindeer features an ingenious seamless architecture: the boots, stockings, and lower pelvis are joined with a sturdy 10-chain bridge, while the pre-made arms are joined directly into the upper torso at Round 28 without a single stitch of sewing. The clothing is worked directly into the front loops of Round 14, ensuring the Fair-Isle shorts and pleated skirt drape naturally without adding bulk. Complete with sculpted muzzle lines, expressive indented eye sockets, and a cozy wrap-around scarf, this duo makes a breathtaking holiday centerpiece for your home.
Pattern Architecture & Masterclass Specifications
| Technical Parameter | Specification / Measurement | Artisan Notes |
|---|---|---|
| Finished Toy Height | ~21 cm (8.3 inches) | Measured from boot soles to crown of 3-branch antlers |
| Gauge (Single Crochet) | 28 sts × 30 rounds = 10 cm (4 in) | Tight tension worked with a 1.75 mm hook prevents fiberfill show-through |
| Crochet Hook Size | 1.75 mm (US Steel 4 / Clover #2) | Used uniformly across boots, body, clothing, head, antlers & ears |
| Construction Framework | Bottom-Up Boots to Neck + No-Sew Arms | Legs connect via Ch-10 join; arms join seamlessly in Round 28 |
| Fair-Isle Colorwork | Maroon (#66) & Grey (#46) Chevrons | Worked into Rnd 14 FLO with floating yarn carries every 3 stitches |
| Antler Architecture | 3-Part Joined Branches (Graphite #28) | Long, Mid & Short antler tips joined seamlessly in Part 7 |
| Fluffy Accents | Alize Baby Softy Chenille (Grey #119) | Plush cloud-like cuffs on boots, sleeves, and cozy winter scarf |
Yarn Palette & Essential Notions

To produce the crisp stitch definition required for the Fair-Isle geometric motifs and sturdy antler branches, we recommend sport-weight cotton-acrylic yarn paired with plush microfiber chenille (YarnArt Jeans: 50 g / 160 m and Alize Baby Softy: 50 g / 115 m):
- Festive Maroon (#66): 1 full ball (~50 g) for Boy’s sweater/socks and Girl’s Fair-Isle pleated skirt.
- Heather Grey (#46): 1 full ball (~50 g) for Girl’s sweater/socks and Boy’s Fair-Isle shorts.
- Graphite Charcoal (#28): 1/4 ball (~15 g) for boot soles, Fair-Isle accent rows, and 3-branch antlers.
- Alize Cotton Gold Coffee (#688): 1/4 ball (~20 g) for hooves, sculpted reindeer heads, and curved ears.
- Alize Baby Softy Grey (#119): 1/4 ball (~15 g) plush chenille for fluffy boot cuffs, sleeve cuffs, and scarf.
- Hardware & Notions: 1.75 mm crochet hook, four 6–8 mm black round eye beads, four 10 mm rustic wooden buttons for suspenders, stiff plastic or cardboard for boot insoles, black embroidery thread for muzzle and brows, tapestry needle, and premium polyester fiberfill.
Recommended Supplies for Nordic Reindeer Amigurumi
Clover Amour 1.75 mm Steel Crochet Hook
Ultra-smooth polished hook tip with non-slip handle, perfect for firm amigurumi tension and tiny antler branches.
Natural 2-Hole Wooden Buttons Assortment (10 mm)
Authentic rustic wooden buttons with engraved rim, ideal for doll dungarees, suspender bibs, and Scandinavian crafts.
As an Amazon Associate, Palace Craving earns from qualifying purchases at no extra cost to you.
Comprehensive Step-by-Step Stitch Guide
Work in continuous spirals using a stitch marker to track round starts, except where joined rounds are specified. When executing the Nordic Fair-Isle chevron rounds, hold both yarn colors and float the non-working yarn loosely along the back of the work. For more Scandinavian holiday characters, explore our newly published Johnny the Christmas Elf Doll, the charming Nordic Mr. Gnome in Overalls, and our popular Nisse Magnus Gnome with Curly Beard.

Part 1: Hooves, Arms & Fluffy Softy Cuffs (Make 2) • 1.75 mm Hook
Start with Coffee (#688) for the hooves of both Reindeer:
- Rnds 1–2 (Hoof Base): R1: 6 sc in MR [6] • R2: 6 inc around [12].
- Rnds 3–5: R3: (inc, 3 sc) × 3 [15] • Rnds 4–5: 15 sc around (2 rnds) [15].
- Rnds 6–8 (Thumb & Palm): R6: 4 sc, inc, 2 sc, puff stitch (5-dc puff for thumb), 2 sc, inc, 4 sc [17] • Rnds 7–8: 17 sc around (2 rnds) [17].
- Rnd 9 (Color Change): 8 sc, dec, 7 sc [16]. Change to Maroon (#66) for Boy / Grey (#46) for Girl.
- Rnds 10–11: R10: 16 sc [16] • R11: BLO (dec, 6 sc) × 2 [14].
- Rnds 12–28 (Forearm & Sleeve): 14 sc around (17 rounds even). Stuff the bottom two-thirds of the arm firmly; leave top 6 rounds unstuffed so arms lie flat against body. Work +3 sc shift on Left Arm (or +10 sc on Right Arm) to align marker at center back [14].
- Rnd 29: Fold top flat and work 6 sc through both layers to close [6]. Fasten off.
- Fluffy Sleeve Cuff: Rejoin Maroon (Boy) / Grey (Girl) into Rnd 11 FLO: R1: 16 sc, fasten off. Join Baby Softy Grey (#119): Rnds 2–3: 16 sc (2 rnds), fasten off and weave in ends [16].
Part 2: Boots, Legs (Make 2) & Lower Body • 1.75 mm Hook
Start with Graphite (#28) for the boot sole:
- Boot Sole (Rnds 1–5): Ch 8; from 2nd ch from hook: R1: inc, 5 sc, 4 sc in last st, 5 sc along other side of chain, inc [18] • R2: inc, 6 sc, 4 inc, 6 sc, inc [24] • R3: 1 sc, inc, 6 sc, (inc, 1 sc) × 4, 7 sc, inc [30] • R4: 2 sc, inc, 6 sc, (hdc-inc, 2 hdc) × 4, 8 sc, inc [36]. Trace and cut 2 matching rigid plastic/cardboard insoles. R5: BLO 36 sc [36].
- Boot Uppers (Rnds 6–13): Change to Grey (Boy) / Maroon (Girl): R6: BLO 36 sc • Rnds 7–9: 36 sc (3 rnds) [36] • R10: 6 sc, (dec, 2 sc) × 6, 6 sc [30] • R11: 30 sc [30] • R12: 6 sc, (dec, 1 sc) × 6, 6 sc [24] • R13: 24 sc [24]. Insert rigid insole firmly inside sole now.
- Stocking Leg (Rnds 14–32): Change to Maroon (Boy) / Grey (Girl): R14: BLO (dec, 2 sc) × 6 [18] • Rnds 15–32: 18 sc (18 rnds even), +1 sc shift to center marker at back heel [18].
- Boot Fluffy Cuff: In Rnd 14 FLO with Grey (Boy) / Maroon (Girl): R1: 24 sc, fasten off. With Baby Softy Grey (#119): Rnds 2–3: 24 sc (2 rnds), fasten off [24].
- Join Legs (Rnds 33–34):
• Left Leg: R33: 12 sc, sl st, fasten off.
• Right Leg: R33: 18 sc; R34: 4 sc, sl st, ch 10 and join to the slip stitch of Left Leg. - Lower Body (Rnds 1–15): With Maroon (Boy) / Grey (Girl): R1: 18 sc on left leg, 10 sc along ch-10, 18 sc on right leg, 10 sc along opposite side of ch-10 [56] • R2: inc, 16 sc, inc, 10 sc, inc, 16 sc, inc, 10 sc [60] • Rnds 3–8: 60 sc (6 rnds) [60] • R9: 55 sc (leave last 5 sts unworked; new round start) • R10: 4 sc, dec, (8 sc, dec) × 5, 4 sc [54] • Rnds 11–12: 54 sc [54]. Change to Grey (Boy) / Maroon (Girl): R13: 54 sc • R14: BLO (dec, 7 sc) × 6 [48] • R15: 48 sc [48]. Pause body here to crochet Shorts or Skirt into Rnd 14 FLO!
Part 3A: Boy’s Nordic Fair-Isle Shorts (Worked in Rnd 14 FLO)
Join Grey (#46) in Rnd 14 front loops (M = Maroon #66, G = Grey #46):
- Waistband & Base (Rnds 1–3): R1: (inc, 2 sc) × 18 [72] • R2 (Graphite #28): 72 sc around • R3 (Grey #46): 72 sc around [72].
- Nordic Chevron Fair-Isle (Rnds 4–8):
• R4: (1 sc M, 2 sc G) × 24 [72]
• R5: 2 sc M, 3 sc G, (3 sc M, 3 sc G) × 11, 1 sc M [72]
• R6: (1 sc G, 2 sc M) × 24 [72]
• R7: 2 sc G, 3 sc M, (3 sc G, 3 sc M) × 11, 1 sc G [72]
• R8: (1 sc M, 2 sc G) × 24 [72]. - Lower Shorts (Rnds 9–13): R9 (Grey): 72 sc • R10 (Graphite): 72 sc • Rnds 11–13 (Grey): 72 sc (3 rnds) [72].
- Divided Pant Legs (Make 2): Count 35 sc from last st of Rnd 13 and sew the 72nd stitch to the 36th stitch to divide into two 35-st legs. On each leg in Grey: work Rnds 1–7: 35 sc around (7 rnds). Fasten off, fold bottom 2 rounds upward as a neat cuff, and tack in place!
Part 3B: Girl’s Nordic Fair-Isle Skirt (Worked in Rnd 14 FLO)
Join Maroon (#66) in Rnd 14 front loops (M = Maroon #66, G = Grey #46):
- Skirt Expansion (Rnds 1–6): R1: (inc, 1 sc) × 27 [81] • Rnds 2–5: 81 sc around (4 rnds even) [81] • R6: (inc, 26 sc) × 3 [84].
- Border & Chevron (Rnds 7–13): R7 (Graphite #28): 84 sc around • R8 (Maroon #66): 84 sc around [84].
• R9: (1 sc G, 2 sc M) × 28 [84]
• R10: 2 sc G, 3 sc M, (3 sc G, 3 sc M) × 13, 1 sc G [84]
• R11: (1 sc M, 2 sc G) × 28 [84]
• R12: 2 sc M, 3 sc G, (3 sc M, 3 sc G) × 13, 1 sc M [84]
• R13: (1 sc G, 2 sc M) × 28 [84]. - Skirt Hem (Rnds 14–16): R14 (Maroon): 84 sc • R15 (Graphite): 84 sc • R16 (Maroon): 84 sc [84]. Fasten off and weave in ends.
Part 4: Upper Torso, No-Sew Arm Join & Suspenders • 1.75 mm Hook
Resume working the body in Maroon (Boy) / Grey (Girl):
- Torso Decreases (Rnds 16–27): R16: BLO 48 sc • R17: 48 sc [48]. (In Rnd 16 FLO, work 48 sc waist belt in Grey for Boy / Maroon for Girl, fasten off.) • R18: 3 sc, dec, (6 sc, dec) × 5, 3 sc [42] • Rnds 19–23: 42 sc around (5 rnds) [42] • R24: (dec, 5 sc) × 6 [36] • Rnds 25–26: 36 sc (2 rnds) [36] • R27: 2 sc, dec, (4 sc, dec) × 5, 2 sc [30], +1 sc shift [30].
- Rnd 28 (Seamless Arm Join): Join both 6-st closed arms directly into the body round: work 4 sc on back, 6 sc through both Left Arm & Body simultaneously, 9 sc across front chest, 6 sc through both Right Arm & Body simultaneously, 5 sc on back [30].
- Rnd 29: 30 sc around [30]. Fasten off leaving a long tail for sewing head. Stuff body firmly.
- Crisscross Suspenders (Make 2 per toy): With Grey (Boy) / Maroon (Girl), ch 36. From 2nd ch: 34 sc, 3 sc in last st, 34 sc along opposite side of chain, fasten off. Sew a 10 mm rustic wooden button near the rounded 3-sc front tip. Sew back ends inside back waistband, crisscross the two straps over back, and tack front tips securely to front waist!
Part 5: Sculpted Reindeer Head • Coffee #688
Worked in Coffee (#688) with 1.75 mm hook (stuff firmly as you go):
- Snout & Crown (Rnds 1–16): R1: 6 sc in MR [6] • R2: 6 inc [12] • R3: (inc, 1 sc) × 6 [18] • R4: 1 sc, inc, (2 sc, inc) × 5, 1 sc [24] • R5: (inc, 3 sc) × 6 [30] • R6: 2 sc, inc, (4 sc, inc) × 5, 2 sc [36] • R7: (inc, 5 sc) × 6 [42] • R8: 3 sc, inc, (6 sc, inc) × 5, 3 sc [48] • Rnds 9–16: 48 sc around (8 rnds even) [48].
- Forehead Bridge (Rnd 17): 18 sc, 12 hdc-inc (bridges the forehead and creates snout projection), 18 sc [60].
- Cheeks & Eye Foundation (Rnds 18–28): R18: 9 sc, (inc, 2 sc) × 3, 24 sc, (2 sc, inc) × 3, 9 sc [66] • Rnds 19–28: 66 sc around (10 rnds even) [66].
- Head Decreases (Rnds 29–38): R29: (dec, 9 sc) × 6 [60] • R30: 4 sc, dec, (8 sc, dec) × 5, 4 sc [54] • R31: (dec, 7 sc) × 6 [48] • R32: 3 sc, dec, (6 sc, dec) × 5, 3 sc [42] • R33: (dec, 5 sc) × 6 [36] • R34: 2 sc, dec, (4 sc, dec) × 5, 2 sc [30] • R35: (dec, 3 sc) × 6 [24] • R36: 1 sc, dec, (2 sc, dec) × 5, 1 sc [18] • R37: (dec, 1 sc) × 6 [12] • R38: 6 dec [6]. Stuff cheeks very firmly, close opening, and fasten off.
Part 6: Eye Sculpting, Muzzle & Embroidered Nose
- Vertical Muzzle Line: With black embroidery thread, embroider a neat vertical stitch starting 6 rounds below the MR (front tip of snout) down to the chin, and 6 rounds above the MR toward the nose bridge.
- Eye Socket Indentation: Mark eye positions on Rnd 16 (centered above the 12 hdc-inc of Rnd 17, 3 hdc apart). Insert needle at bottom of head, exit under left eye, step across 3 sc, re-enter under right eye, exit at base, pull firmly to sculpt concave eye sockets, and knot securely.
- Bead Eyes & Satin-Stitch Nose: Sew 6–8 mm black round beads into the sculpted sockets. Embroider gentle arched eyebrows above each eye. At the top of the vertical muzzle line, embroider a rich horizontal Maroon (#66) satin-stitch nose (6–8 sc wide × 1 round tall). Sew head firmly to Rnd 29 of the body!
Part 7: 3-Branch Antlers, Curved Ears & Fluffy Scarf
- 3-Part Antlers (Make 2) in Graphite (#28):
• Part 1 (Long Tip): R1: 5 sc in MR [5]; R2: 5 inc [10]; Rnds 3–5: 10 sc (3 rnds), fasten off.
• Part 2 (Mid Tip): R1: 5 sc in MR [5]; R2: 5 inc [10]; Rnds 3–4: 10 sc (2 rnds), fasten off.
• Part 3 (Short Tip): R1: 5 sc in MR [5]; R2: 5 inc [10]; R3: 10 sc [10]. Do not cut yarn!
• Join Antler Branches: From Part 3: ch 2, join to Part 2 with 5 sc, ch 2, join to Part 1 with 5 sc [new marker]. R2: work across all tips and ch-2 bridges [38] • R3: dec, 34 sc, dec [36] • R4: dec, 32 sc, dec [34] • R5: dec, 30 sc, dec [32]. Stuff tips only, fold base flat, and sew through front loops. Sew antlers to crown at Rnd 13 from back closure (18 sc apart). - Curved Ears (Make 2) in Coffee (#688): (Do not stuff) R1: 6 sc in MR [6] • R2: 6 inc [12] • R3: 12 sc • R4: (inc, 1 sc) × 6 [18] • R5: 18 sc • R6: 1 sc, inc, (2 sc, inc) × 5, 1 sc [24] • R7: 24 sc • R8: 1 sc, dec, (2 sc, dec) × 5, 1 sc [18] • R9: (dec, 1 sc) × 6 [12] • R10: fold flat, work 5 sc through both layers, pinch and sew 1st and 5th sc together. Sew directly in front of antlers on Rnd 12 (20 sc apart).
- Fluffy Chenille Scarf: With Baby Softy Grey (#119), ch 111. From 2nd ch: Row 1: 110 sc; Row 2: ch 1, turn, 110 sc [110]. Fasten off and knot around the neck!

3 Artisan Secrets for Flawless Nordic Reindeer
1. Floating Fair-Isle Yarns Without Puckering: When crocheting the chevron rows on the shorts and pleated skirt, hold your working tension relaxed. Catching the floating yarn strand every 3 stitches prevents long loops inside the clothing while keeping the fabric flexible and elastic.
2. Sculpting Deep Concave Eye Sockets: Do not skip needle-sculpting the eye sockets before sewing the eye beads in place! Pulling the needle firmly between the forehead and the base of the neck indents the eye sockets by 3–4 mm, creating the adorable, gentle facial expression characteristic of Scandinavian heirloom toys.
3. Seamless Arm Attachment: In Round 28, make sure the mitten thumbs point forward before crocheting through both the arm edges and the body stitches. This no-sew join creates an exceptionally clean shoulder line that allows the reindeer to hold hands or wrap their arms around holiday mugs.
Holiday Styling & Winter Decor Ideas
- Mantelpiece Storybook Vignette: Pose the reindeer duo standing side-by-side beside frosted pinecones, brass candlesticks, and miniature cedar trees for a warm Scandinavian holiday focal point.
- Christmas Centerpiece Accent: Place the pair on a wooden slice centerpiece surrounded by cranberries, dried orange slices, and fairy lights on your Christmas dinner table.
- Treasured Keepsake Gift: Crocheting both the Boy and Girl reindeer creates an unforgettable heirloom gift set for children, grandchildren, or loved ones that will be brought out every holiday season.
Care, Cleaning & Long-Term Preservation
- Spot Clean Only: Because of the wooden buttons, rigid boot insoles, and plush chenille cuffs, never submerge in water. Gently wipe soiled spots with a damp cloth and mild wool wash.
- Fluffing Chenille Trims: If the Baby Softy cuffs or scarf become flattened, gently brush them with a clean soft toothbrush to restore their fluffy cloud texture.
- Archival Holiday Storage: Store the reindeer standing upright in a rigid storage container lined with acid-free tissue paper and natural cedar blocks to preserve colors and stitch shape year after year.
Save to Pinterest: Nordic Reindeer Crochet Patterns
Save these high-resolution pin guides to your favorite Holiday Crochet, Amigurumi Christmas, or Free Crochet Patterns boards on Pinterest:

Pin Guide 1: Complete Nordic Reindeer Boy & Girl duo pattern architecture and stitch guide.

Pin Guide 2: Technique guide for Fair-Isle colorwork chevrons, 3-branch antlers, and suspenders.
Frequently Asked Questions
Can I make just one of the reindeer, or must I make both?
You can easily make just the Boy or just the Girl! The body, head, antlers, ears, and boots follow identical patterns. The only difference is whether you crochet Part 3A (Boy’s shorts) or Part 3B (Girl’s skirt) into Round 14.
What can I substitute for Alize Baby Softy yarn?
Any lightweight chenille, eyelash, or fleece yarn (such as Bernat Baby Blanket Tiny or King Cole Cuddles DK) will work wonderfully for the fluffy boot cuffs, sleeve trims, and neck scarf.
Do the reindeer stand upright without doll stands?
Yes! Thanks to the wide graphite boot soles reinforced with rigid plastic or cardboard insoles, both reindeer stand securely on flat surfaces on their own.