

Celebrate the holiday season with the heartwarming Christmas Santa Twins Doll Set with Gift Sacks—an heirloom pair of standing 25 cm (9.8 in) handcrafted amigurumi dolls. Featuring twin Santa Claus figures in classic cherry red and evergreen festive suits, each doll boasts dense cascading curly white beards, 3.2 mm craft wire poseable pointed stocking hats with fluffy pom-poms, buckled brown belts with yellow gold buckles, wire-reinforced poseable arms with white cuffs, and individual snowflake-embroidered drawstring gift sacks!
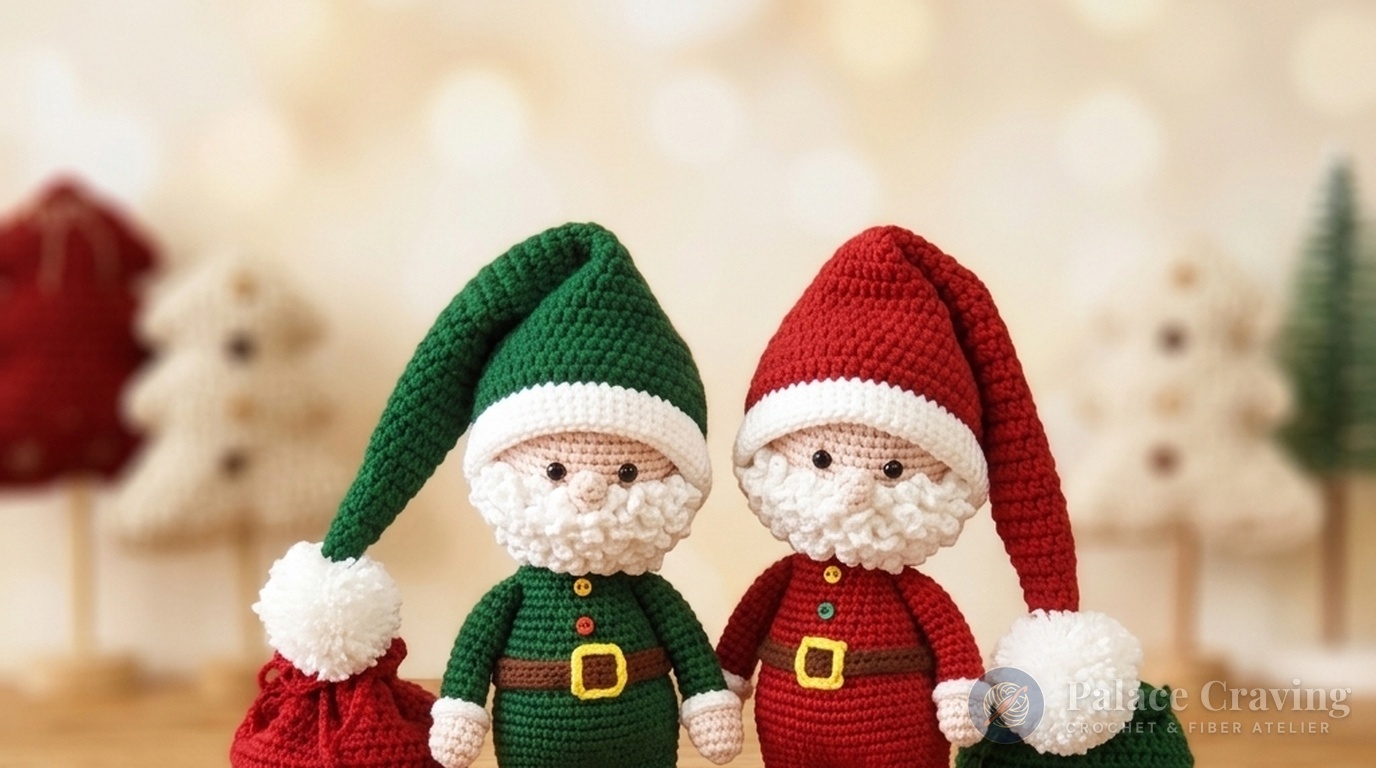
Each Santa twin is constructed with an ingenious seamless architecture: the boots and legs connect directly into the lower torso, while an internal craft wire frame stabilizes the neck and allows the arms to hold holiday accessories or pose dynamically. The curly white beard is created with a stepped foundation and seven exposed ridge rounds worked in (ch 5, sl st) loops that create magnificent springy texture. Accompanied by their matching snowflake gift bags, these twin dolls will become the centerpiece of your family’s Christmas traditions.
Pattern Architecture & Masterclass Specifications
| Technical Parameter | Specification / Measurement | Artisan Notes |
|---|---|---|
| Finished Doll Height | ~25 cm (9.8 inches) without hat | Total height reaches ~35 cm when pointed wire hat is extended |
| Gauge (Single Crochet) | 26 sts × 28 rounds = 10 cm (4 in) | Tight tension worked with a 2.50 mm hook ensures a firm, heirloom body structure |
| Crochet Hook Size | 2.50 mm (US Steel 1 / Clover #4) | Used uniformly across head, body, boots, wired hat, and gift bags |
| Construction Framework | Bottom-Up Boots to Neck + Stuffed Head | Legs connect directly into Round 1 of the body; neck reinforced with wire |
| Cascading Curly Beard | 7 Exposed Ridges (Ch-5 Loops) | Stepped foundation worked in BLO/FLO with 11 to 30 bouncy loop curls |
| Internal Framing | 3.2 mm Craft Wire & Straws | Horizontal arm wire (Rnds 21–22), vertical neck wire, and hat shaping wire |
| Gift Sack Accessories | Drawstring Sack + Snowflake Embroidery | 52-st oval base worked in half-double crochet with an 80-chain cord |
Yarn Palette & Essential Notions

To produce the dense, durable stitch definition required for the curly beard and structured stocking hats, we recommend an 8-ply cotton-acrylic blend yarn (70% Cotton, 15% Rayon, 15% Acrylic, ~50 g / 150 m):
- Festive Red: ~60 g for Classic Red Santa suit, pointed stocking hat, and drawstring gift bag.
- Evergreen Green: ~60 g for Festive Green Twin suit, pointed stocking hat, and drawstring gift bag.
- Snow White: ~50 g for cascading curly beard, folded hat brims, boot cuffs, and sleeve trims.
- Warm Skin Tone / Beige: ~25 g for head spheres, button noses, and hands.
- Chestnut Brown: ~20 g for boots and suit belt bands.
- Bright Gold / Yellow: ~5 g for belt buckles.
- Hardware & Notions: 2.50 mm crochet hook, 7 mm black safety eyes or sew-on beads, 3.2 mm craft wire (for poseable arms, neck support, and hat shaping), four small contrasting chest buttons, tapestry needle, and premium polyester fiberfill.
Recommended Supplies for Heirloom Santa Amigurumi
Clover Amour 2.50 mm Ergonomic Crochet Hook
Ultra-smooth aluminum hook with soft elastomer grip, designed to reduce hand fatigue while working dense holiday spirals.
3.2 mm Flexible Aluminum Craft Wire (10m)
Heavy-duty bendable armature wire that keeps doll necks rigid, arms poseable, and pointy Santa hats bent in charming curves.
As an Amazon Associate, Palace Craving earns from qualifying purchases at no extra cost to you.
Comprehensive Step-by-Step Stitch Guide
Work in continuous spirals using a contrasting scrap of yarn to mark the start of each round. Do not join rounds with slip stitches unless indicated. For more festive holiday designs, explore our newly published Nordic Christmas Reindeer Boy & Girl Duo, the beloved Johnny the Christmas Elf Doll, and our popular Nordic Mr. Gnome in Overalls.

Part 1: Head & Button Nose • Skin Color Yarn • 2.50 mm Hook
Start with Skin Color yarn for the head sphere:
- Head Foundation (Rnds 1–9): R1: 6 sc in MR [6] • R2: 6 inc [12] • R3: (1 sc, inc) × 6 [18] • R4: (2 sc, inc) × 6 [24] • R5: (3 sc, inc) × 6 [30] • R6: (4 sc, inc) × 6 [36] • R7: (5 sc, inc) × 6 [42] • R8: (6 sc, inc) × 6 [48] • R9: (7 sc, inc) × 6 [54].
- Head Midsection (Rnds 10–19): 54 sc around (10 rounds even) [54].
- Head Decreases (Rnds 20–26): R20: (7 sc, dec) × 6 [48] • R21: (6 sc, dec) × 6 [42] • R22: (5 sc, dec) × 6 [36] • R23: (4 sc, dec) × 6 [30] • R24: (3 sc, dec) × 6 [24] • R25: (2 sc, dec) × 6 [18] • R26: (1 sc, dec) × 6 [12]. Stuff head very firmly with fiberfill, sl st in next st, and fasten off.
- Button Nose: In Skin Color: R1: 5 sc in MR [5] • R2: 5 inc [10] • R3: 5 dec [5]. Fasten off leaving a long tail for sewing between Rounds 16–17 of the head.
Part 2: Santa’s Cascading Curly Beard • Snow White Yarn
Worked in rows with alternating BLO and FLO ridges, then looped with (ch 5, sl st) curls:
- Foundation & Base Rows (Rows 1–8): Ch 31. From 2nd ch: Row 1: 30 sc, turn, ch 1 [30] • Row 2: FLO 30 sc, turn, ch 1 [30] • Row 3: BLO (3 sc, dec) × 6, turn, ch 1 [24] • Row 4: FLO 24 sc, turn, ch 1 [24] • Row 5: BLO (2 sc, dec) × 6, turn, ch 1 [18] • Row 6: FLO 18 sc, turn, ch 1 [18] • Row 7: BLO (1 sc, dec) × 6, turn, ch 1 [12] • Row 8: FLO 12 sc, turn, ch 5 [12]. Do not cut yarn!
- Working the 7-Tier Curls: Slip stitch into the first sc of each exposed ridge and work (ch 5, sl st into next st):
• Round 8 BLO: (ch 5, sl st) × 11 [11 curly loops]
• Round 7 FLO: (ch 5, sl st) × 12 [12 curly loops]
• Round 6 BLO: (ch 5, sl st) × 18 [18 curly loops]
• Round 5 FLO: (ch 5, sl st) × 18 [18 curly loops]
• Round 4 BLO: (ch 5, sl st) × 24 [24 curly loops]
• Round 3 FLO: (ch 5, sl st) × 24 [24 curly loops]
• Round 2 BLO: (ch 5, sl st) × 30 [30 curly loops]. Fasten off with a long sewing tail.
Part 3: Pointed Wired Hat • Green or Red & White Yarn
Work with half-double crochet for a soft, graceful drape:
- Hat Crown (Rnds 1–35): With Green or Red: R1: 6 sc in MR [6] • R2: 6 hdc [6] • R3: (1 hdc, hdc-inc) × 3 [9] • R4: 9 hdc [9] • R5: (2 hdc, hdc-inc) × 3 [12] • R6: 12 hdc [12] • R7: (3 hdc, hdc-inc) × 3 [15] • R8: 15 hdc [15] • R9: (4 hdc, hdc-inc) × 3 [18] • R10: 18 hdc [18]. Expand by +3 stitches every 2 rounds up to Round 33: (16 hdc, hdc-inc) × 3 [54] • Rnds 34–35: 54 hdc around (2 rnds) [54].
- Folded White Brim (Rnds 36–45): Join Snow White: Rnds 36–39: 54 sc around (4 rnds) [54] • R40: FLO 54 sc [54] • Rnds 41–45: 54 sc around (5 rnds) [54]. Fasten off.
- Hat Shaping & Pompom: Fold the white brim upward along Round 40 FLO. Insert a 30 cm piece of craft wire inside the tip, curve the hat into an expressive wave, and sew a 3.5 cm white pom-pom securely to the crown tip!
Part 4: Boots & Striped Legs (Make 2) • 2.50 mm Hook
Start with Brown (or Red) yarn for the boots:
- Boot Soles (Rnds 1–7): R1: 6 sc in MR [6] • R2: 6 inc [12] • R3: (1 sc, inc) × 6 [18] • R4: (2 sc, inc) × 6 [24] • R5: BLO 24 sc [24] • Rnds 6–7: 24 sc around (2 rnds) [24].
- Boot Decreases (Rnds 8–11): R8: 6 sc, 6 dec, 6 sc [18] • R9: 6 sc, 3 dec, 6 sc [15] • Rnds 10–11: 15 sc around (2 rnds) [15].
- White Band & Pants Leg (Rnds 12–18): Change to White: R12: 15 sc [15]. Change to Red (or Green): R13: BLO 15 sc [15] • R14: 15 sc [15] • R16: (4 sc, inc) × 3 [18] • R17: 18 sc [18] • R18: (5 sc, inc) × 3 [21].
- White Boot Cuff: Rejoin White in Rnd 13 FLO: Row 1: 15 hdc [15] • Row 2: BLO 15 hdc, fasten off [15].
- Leg Join Rule: On the first leg, fasten off. On the second leg, do not cut yarn—proceed directly into joining the body!
Part 5: Joined Suit Body • Red or Green Yarn • 2.50 mm Hook
Seamlessly joined from both legs:
- Leg Join (Rnd 1): From second leg: 7 sc on second leg, join to 16th st of first leg, work 21 sc around first leg, then 14 sc on remaining stitches of second leg [42]. Work 7 extra sc on second leg to move marker to center back!
- Pelvis & Tummy (Rnds 2–10): R2: 15 sc, (1 sc, inc) × 6, 15 sc [48] • Rnds 3–8: 48 sc (6 rnds even) [48] • R9: (6 sc, dec) × 6 [42] • R10: 42 sc [42].
- Belt Position & Chest (Rnds 11–22): R11: BLO 42 sc (creates the belt ridge) [42] • R12: (5 sc, dec) × 6 [36] • Rnds 13–14: 36 sc (2 rnds) [36] • R15: (4 sc, dec) × 6 [30] • Rnds 16–17: 30 sc (2 rnds) [30] • R18: (3 sc, dec) × 6 [24] • Rnds 19–21: 24 sc (3 rnds) [24] • R22: (2 sc, dec) × 6 [18].
- Neckline (Rnds 23–25): Change to Skin Color: R23: BLO 18 sc [18] • R24: 18 sc [18] • R25: (1 sc, dec) × 6, fasten off with long sewing tail [12]. (In Rnd 23 FLO with Red/Green: work 18 sc for the jacket collar trim, fasten off.)
- Belt & Buckle: In Brown, ch 49; work 48 sc, 47 sl st; sew around Round 11 belt ridge. In Yellow, ch 16; fold into a 4×4 chain square and sew over center front of belt!
Part 6: Arms & Snowflake Gift Bags
- Arms (Make 2): In Skin Color: R1: 6 sc in MR [6] • R2: 6 inc [12] • Rnds 3–5: 12 sc [12] • R6: (4 sc, dec) × 2 [10]. Change to Red or Green: R7: BLO 10 sc [10] • Rnds 8–17: 10 sc (10 rnds) [10] • R18: 5 dec [5]. In Rnd 7 FLO with White: work 10 hdc for cuff [10].
- Drawstring Gift Bag: With Red or Green: ch 26. From 2nd ch: R1: 24 sc, 3 sc in last st, 23 sc on opposite side, inc [52] • Rnds 2–21: 52 hdc around (20 rnds even), fasten off [52]. Make an 80-chain drawstring cord, weave through top rounds, stuff bag lightly, and embroider white snowflakes around the base!

3 Artisan Secrets for Flawless Santa Twins
1. Dual-Axis Wire Armature: To keep these 25 cm dolls perfectly upright, insert a horizontal 3.2 mm craft wire through Rounds 21–22 of the body for the arms, and a vertical wire through the neck into the head. This prevents the head from wobbling under the weight of the long pointed hat.
2. Shaping the 7-Tier Curly Beard: Before sewing the curly beard between Rounds 17 and 18, use tailor pins to shape the arched cheeks symmetrically. Gently pulling each (ch 5, sl st) curl with your fingers tightens the spirals and gives the beard its rich, cloud-like texture.
3. Aligning the Feet Forward: Because individual tension varies when working continuous spirals, check foot alignment before completing Round 1 of the body join. Adjust the join stitch forward or backward by 1 stitch if needed so both boot toes point straight ahead.
Holiday Styling & Winter Decor Ideas
- Mantelpiece Storybook Vignette: Pose the Santa Twins on opposite sides of your fireplace mantel or standing together beside cedar garlands, wooden reindeer, and fairy lights.
- Holiday Tiered Tray Focal Point: Stand one Santa on your holiday kitchen tiered tray holding his snowflake gift sack filled with cinnamon sticks or wrapped peppermint candies.
- Heirloom Family Keepsake: Crocheting both the Red and Green Santa twins makes an unforgettable handmade gift set that will be cherished and displayed year after year.
Care, Cleaning & Long-Term Preservation
- Spot Clean Only: Because of the internal craft wire and delicate curly beards, do not submerge in water. Clean gently using a damp white cloth and mild detergent.
- Reviving Curly Beards: If the beard curls become compressed during storage, spritz lightly with distilled water and twirl each curl around a crochet hook handle to restore springiness.
- Archival Holiday Storage: Store the Santa Twins standing upright in a rigid storage container wrapped in acid-free tissue paper with cedar blocks to protect against dust and moisture.
Save to Pinterest: Christmas Santa Crochet Patterns
Save these high-resolution pin guides to your favorite Holiday Crochet, Santa Claus Patterns, or Free Amigurumi boards on Pinterest:

Pin Guide 1: Complete Christmas Santa Twins doll set pattern architecture and stitch walkthrough.

Pin Guide 2: Technique guide for cascading curly beards, wired hats, and snowflake gift bags.
Frequently Asked Questions
Can I make just one Santa doll instead of the twins?
Yes! You can choose to crochet only the Classic Red Santa or the Festive Green Santa. Both follow identical patterns—simply select your preferred suit and hat color.
Is craft wire mandatory for this pattern?
While you can make the dolls without wire by stuffing the neck very firmly, 3.2 mm craft wire is highly recommended to keep the heavy hatted head upright and make the arms and hat bendable.
What can I put inside the drawstring gift bags?
You can stuff the gift sacks lightly with polyester fiberfill as decorative props, or leave them hollow to hold small holiday surprises, wrapped chocolates, or gift cards!