

Embrace irresistible holiday sweetness with the Plush Christmas Elves Boy & Girl Duo—an heirloom pair of standing 31–32 cm (12–12.6 in) handcrafted holiday elf dolls crocheted in super-soft velvet chenille yarn. Featuring curled-toe elf boots, candy-cane striped stockings, double-folded pointed pixie ears, dense spiral-curl wigs, delicate embroidered facial expressions with sculpted eye sockets, and oversized slouchy pom-pom stocking hats, this adorable pair brings cozy warmth to every Christmas hearth!
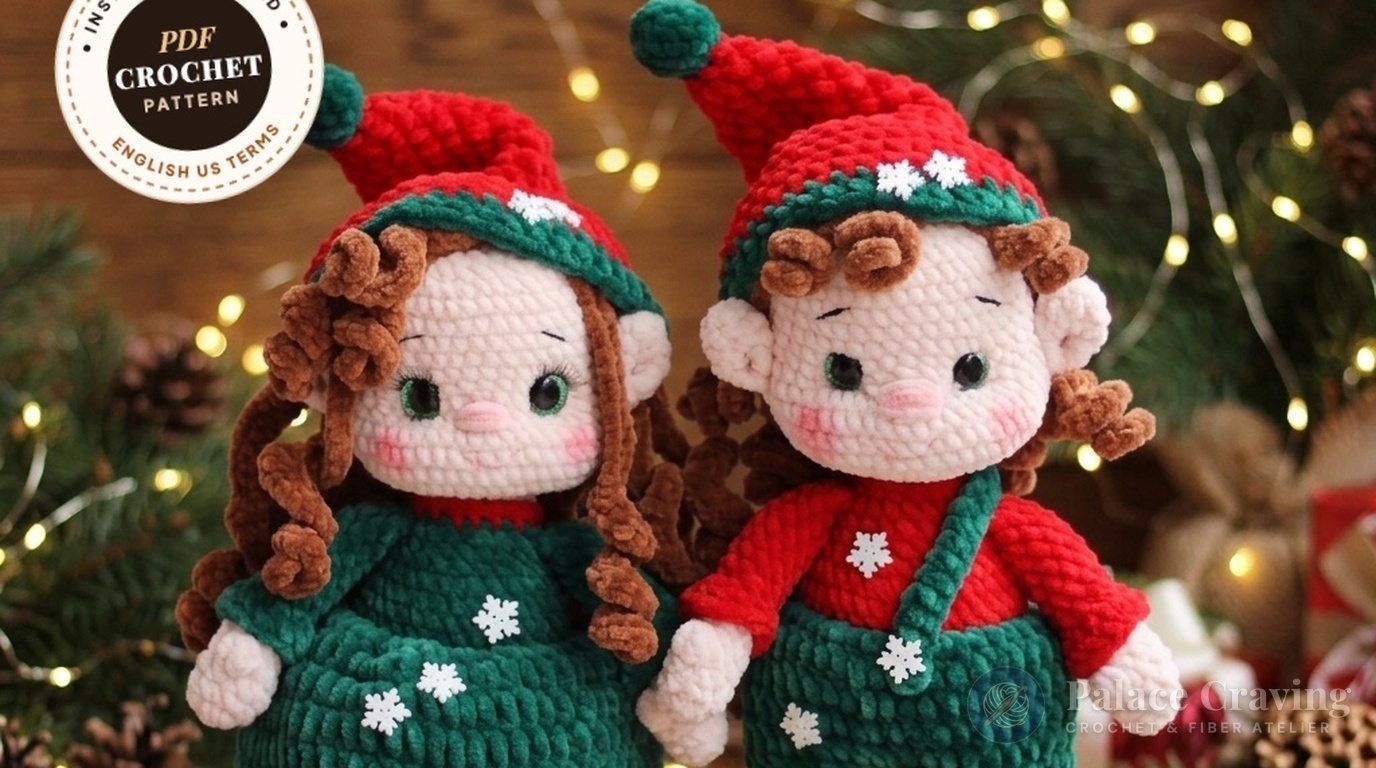
Skillfully worked from the curled boots seamlessly upward into the candy-striped legs, body, and head in one continuous piece, this pattern eliminates tedious sewing with no-sew joined arms at Round 17. The Girl elf features a festive green ruffled double-crochet dress with a picot-look edge, while the Boy elf wears a smart tunic and shorts with a green suspender strap and snowflake buttons. An internal 4-strand twisted wire armature ensures the neck supports the heavy head perfectly while allowing the arms and slouchy hats to pose playfully.
Pattern Architecture & Masterclass Specifications
| Technical Parameter | Specification / Measurement | Artisan Notes |
|---|---|---|
| Finished Doll Height | ~31–32 cm (12–12.6 inches) | Large, huggable heirloom standing stature from boot soles to crown |
| Gauge (Single Crochet) | 14 sts × 16 rounds = 10 cm (4 in) | Tight tension worked with a 4.0 mm hook prevents stuffing from peeking through chenille |
| Crochet Hook Sizes | 4.0 mm (US G/6 for Doll) & 6.0 mm (US J/10 for Hat) | Dual-hook technique provides structure for the body while giving the hat a soft, slouchy drape |
| Construction Framework | Continuous Boots-to-Head Architecture | Curled boots, legs, body, neck, and head worked seamlessly without neck sewing |
| Internal Framing | 70 cm Twisted Wire Core (4-Strand Bundle) | Taped wire bundle runs through the torso and neck to stabilize the plush head |
| Outfit Architecture | Ruffled Dress (Girl) & Suspender Shorts (Boy) | Worked directly into the front loops of Round 11 of the body foundation |
| Curly Hair Wigs | 23 Curls (Girl) & 15 Curls (Boy) | Cascading spiral curls crocheted directly around a 30-stitch crown foundation cap |
Yarn Palette & Essential Notions

To produce the ultra-soft, cloud-like texture characteristic of modern boutique plushies, we recommend #6 Super Bulky chenille yarn (Himalaya Dolphin Baby or Wolans Bunny Baby: 100 g / 120 m, 100% Micro Polyester) paired with sport-weight cotton yarn for fine face detailing:
- Emerald Green (#80331): 1 full skein (~100 g) for boots, elf hats, and Girl’s ruffled dress.
- Festive Red (#80318): 1 full skein (~100 g) for striped stockings, Boy’s tunic, and elf hat cones.
- Warm Chestnut Brown (#80337): 1 skein for Girl’s 23-curl wig / 0.5 skein for Boy’s 15-curl wig.
- Powder Skin Pink (#80353): ~50 g for hands, seamless head, and pointed elf ears.
- Snow White (#80301): ~30 g for the crisp candy-cane stocking stripes.
- Face Detailing Cotton (YarnArt Jeans): Black (#53) for arched brows, Pink (#36) for sweet smiles, and Peach (#73) for double-strand eye socket sculpting.
- Hardware & Notions: 4.0 mm (US G/6) and 6.0 mm (US J/10) crochet hooks, two pairs of 16 mm black safety eyes, false eyelashes and craft glue (for the Girl elf), 70 cm (28 in) flexible craft wire with tape or adhesive bandage, 5 white wooden or resin snowflake buttons, dry pink pastel for blushing, and premium polyester fiberfill.
Recommended Supplies for Plush Chenille Amigurumi
Clover Amour 4.0 mm Ergonomic Crochet Hook
Ultra-smooth aluminum head that glides effortlessly through plush chenille fibers without snagging or shedding fuzz.
16 mm Glitter & Black Safety Eyes for Plushies
Large glossy safety eyes with deep ridged backings, sized perfectly for super bulky velvet yarn toys and amigurumi dolls.
As an Amazon Associate, Palace Craving earns from qualifying purchases at no extra cost to you.
Comprehensive Step-by-Step Stitch Guide
Work in continuous spirals using a stitch marker to track round starts, except where joined rounds or turned rows are specified. When changing colors in chenille yarn, burn the yarn tip with a lighter for a fraction of a second or knot the fluffy ends firmly to prevent unraveling. For more holiday magic, explore our newly published Christmas Reindeer Pair & Holiday Sleigh Set, the charming Christmas Santa Twins Doll Set, and the beloved Nordic Christmas Reindeer Boy & Girl Duo.

Part 1: Hands, Sleeves & Flared Cuffs (Make 2) • 4.0 mm Hook
Start in Powder (#80353) plush yarn (stuff hand only; leave top 3 rounds unstuffed):
- Hand & Thumb (Rnds 1–7): R1: 5 sc in MR [5] • R2: 5 inc [10] • Rnds 3–4: 10 sc around (2 rnds) [10] • R5 (Thumb): 1 bobble stitch (3-dc cluster in same st), 9 sc [10] • R6: (dec, 3 sc) × 2 [8] • R7: 8 sc around [8]. Cut Powder yarn.
- Sleeve (Rnds 8–16): Change to Green (Girl) / Red (Boy): R8: (inc, 3 sc) × 2 [10] • R9: BLO 10 sc [10] • Rnds 10–16: 10 sc around (7 rnds even) [10]. Work +3 sc shift, fold top flat, and crochet 5 sc through both sides to close [5]. Fasten off.
- Flared Sleeve Cuff: Hold arm with hand pointing down. Join Green (Girl) / Red (Boy) in 1st stitch of Rnd 9 FLO: R1 FLO: (1 sc, inc) × 5 [15] • R2: 15 sc around, sl st, and fasten off [15].
Part 2: Curled Elf Boots & Striped Stocking Legs (Make 2) • 4.0 mm Hook
Start in Green (#80331) plush yarn. Leave a 15 cm starting tail pulled to the outside of the MR to tack the curled toe later:
- Curled Elf Boot (Rnds 1–10): R1: 4 sc in MR [4] • Rnds 2–3: 4 sc [4] • R4: (1 sc, inc) × 2 [6] • R5: 6 sc [6] • R6: (2 sc, inc) × 2 [8] • R7: (3 sc, inc) × 2 [10] • R8: (4 sc, inc) × 2 [12] • R9: (5 sc, inc) × 2 [14] • R10: 14 sc around [14].
- Ankle Opening & Heel (Rnds 11–13): R11: 1 sc, ch 4, skip 4 sc of previous round, 9 sc (creates a 4-st × 4-ch opening) [14] • R12: 14 sc around (working 4 sc along the ch-4 bridge) [14] • R13: 7 dec [7]. Stuff heel flat (leave toe tip unstuffed), close opening through FLO, and weave in tail.
- Stocking Leg Base (Rnds 1–3): Point toe toward you; attach Green at right corner of ankle opening: R1: 4 sc across lower edge, 1 sc in corner, 4 sc across upper edge, 1 sc in corner [10] • R2: 10 sc [10]. Change to Red (cut Green): R3: BLO 10 sc [10].
- Candy-Striped Stockings (Rnds 4–11): Alternate White and Red every round:
• R4 (White): (inc, 4 sc) × 2 [12] • R5 (Red): 12 sc • R6 (White): 12 sc [12]
• R7 (Red): 1 sc, inc, 5 sc, inc, 4 sc [14] • R8 (White): 14 sc [14]
• R9 (Red): 2 sc, inc, 6 sc, inc, 4 sc [16]
• R10 (White): 3 sc, inc, 7 sc, inc, 4 sc [18]. Cut White!
• R11 (Red): 18 sc around [18]. - Left Leg vs. Right Leg:
• Left Leg Rnd 12 (Red): 13 sc (sl st sits at inner-left side when toe points forward), sl st, fasten off with tail. Mark this stitch!
• Right Leg Rnd 12 (Red): 18 sc. Do not cut yarn! Count 6 stitches back and mark the 6th stitch at inner-right side. - Boot Cuff & Curled Toe Tack: Join Green in Leg Rnd 3 FLO: R1 FLO: (1 sc, inc) × 5 [15] • R2: 15 sc, sl st, fasten off. Thread the 15 cm MR tail on a tapestry needle, curve the pointed toe upward against the front boot shaft, and tack securely!
Part 3: Joined Body, Girl’s Ruffled Dress & Boy’s Suspender Tunic
Continue directly from Right Leg in Red (#80318):
- Leg Join & Pelvis (Rnds 1–7): Work 6 sc on Right Leg, join Left Leg at marked slip stitch and work 18 sc around Left Leg, then 12 sc around remaining stitches of Right Leg [36] • R2: 6 sc, inc, (8 sc, inc) × 3, 2 sc [40] • Rnds 3–7: 40 sc around (5 rnds even) [40].
- Waist & Color Transitions (Rnds 8–10): R8: (2 sc, dec) × 2, 4 sc, dec, 2 sc, dec, 22 sc [36] • R9: 36 sc. Change to Green (cut Red for Girl; keep Red attached for Boy): R10: 36 sc [36].
- Torso & No-Sew Arm Join (Rnds 11–17): Keep Green for Girl / switch to Red for Boy: R11: BLO 36 sc [36] • Rnds 12–13: 36 sc • R14: (4 sc, dec) × 6 [30] • R15: (3 sc, dec) × 6 [24] • R16: 24 sc, +6 sc shift to center back [24] • R17 (Join Arms): work 4 sc on back, 5 sc through 1st Arm & Body simultaneously, 7 sc across chest, 5 sc through 2nd Arm & Body simultaneously, 3 sc on back [24].
- Neckline (Rnds 18–21): Change Girl to Red (Boy stays Red): R18: (2 sc, dec) × 6 [18]. Change to Powder (pull Red forward): R19: BLO (4 sc, dec) × 3 [15] • Rnds 20–21: 15 sc [15]. (In Rnd 19 FLO with Red: work 15 sl st for collar trim, fasten off.) Powder yarn continues into Head!
- Girl’s Ruffled Dress (Rnd 11 FLO): Hold doll upside down; join Green in Rnd 11 FLO: R1 FLO: ch 3, (1 dc, dc-inc) × 18, sl st to join [54] • Rnds 2–5: ch 3, 54 dc around, sl st (4 rnds) [54] • R6 (Ruffle Edge): (ch 1, sl st in next st) × 54, fasten off [54].
- Boy’s Shorts & Suspender Strap: Join Green in Rnd 11 FLO: R1 FLO: ch 3, (5 dc, dc-inc) × 6, sl st [42] • Rnds 2–5: ch 3, 42 dc, sl st (4 rnds) [42] • R6: ch 3, (5 dc, dc-dec) × 6, sl st [36] • R7: ch 3, 36 dc, sl st [36] • R8: ch 1, 36 sc, sl st [36]. Sew center 2 sts front-to-back between legs to divide shorts! For the Suspender Strap: in Green, ch 27; from 3rd ch work 25 hdc, fasten off, and sew over left shoulder.
Part 4: Seamless Head, Neck Wire Support, Lashes & Pointed Ears
Continue in Powder (#80353) plush yarn directly from Neck Round 21:
- Head Expansion & Cheeks (Rnds 1–10): R1: 15 inc [30] • R2: (2 sc, inc) × 10 [40] • R3: 40 sc • R4: (3 sc, inc) × 10 [50] • Rnds 5–9: 50 sc around (5 rnds) [50] • R10 (Cheeks): 14 sc, (dec, 3 sc) × 4, dec, 14 sc [45].
- Eye Placement & Wire Support (Rnds 11–17): Rnds 11–16: 45 sc around (6 rnds) [45] • R17: (7 sc, dec) × 5 [40].
• Glue false eyelashes onto 16 mm safety eyes (for the Girl elf) and insert between Rounds 10–11, spaced 8 stitches apart.
• Fold a 70 cm piece of craft wire in half twice (creating a rigid 4-strand bundle), wrap the cut wire ends with tape, and insert vertically through the neck into the torso and head. Stuff neck very firmly with fiberfill! - Head Crown Closure (Rnds 18–22): R18: (3 sc, dec) × 8 [32] • R19: (2 sc, dec) × 8 [24] • R20: (2 sc, dec) × 6 [18] • R21: (1 sc, dec) × 6 [12] • R22: 6 dec [6]. Cinch opening closed through FLO and hide tail inside head.
- Double-Strand Eye Socket Sculpting: Using a long tapestry needle with double-strand Peach cotton yarn (#73), insert from the base of the neck, exit at lower inner eye corner, re-enter at lower outer corner, and pull firmly out at neck to indent the eye socket. Knot and hide ends.
- Face Embroidery: Embroider a small plush nose (6–8 horizontal stitches over 3 sts) between Rounds 9–10. Embroider black cotton eyebrows on Round 14 and a cheerful pink smile on Round 6. Brush cheeks with dry pink pastel!
- Pointed Pixie Ears (Make 2): In Powder (do not stuff): R1: 4 sc in MR [4] • R2: (1 sc, inc) × 2 [6] • R3: (1 sc, inc) × 3 [9] • R4: (2 sc, inc) × 3 [12]. Fold in half and work 6 sc across; fold in half again and work 3 sc across [3]. Fasten off with a long tail and sew to head at Rounds 8–10 (5 stitches out from eyes).
Part 5: Spiral Curl Hair Wigs (Girl & Boy Versions) • Brown #80337
- Shared Crown Cap (Rnds 1–5): R1: 6 sc in MR [6] • R2: 6 inc [12] • R3: (1 sc, inc) × 6 [18] • R4: (2 sc, inc) × 6 [24] • R5: (3 sc, inc) × 6 [30]. Do not cut yarn—continue directly into curls around Round 5!
- Girl’s 23-Curl Wig:
• Curls #1–8 (8 Long Curls): Each ch 46; from 2nd ch: (1 sc, inc) × 15, 15 sc; sl st in next st of Rnd 5.
• Curls #9–10 (2 Mid Curls): Ch 41 and ch 36 with (1 sc, inc) spiral increases.
• Curls #11–13 (3 Forelock Bangs): Each ch 21; from 2nd ch: (1 sc, inc) × 9, 2 sc; sl st in next st.
• Curls #14–23 (10 Long Curls): Mirrored long and mid curls around remaining perimeter. Pin cap to crown, sew perimeter, and arrange long curls cascading down back and shoulders! - Boy’s 15-Curl Wig: From 30-st cap:
• Curls #1–6 (6 Side/Back Curls): Each ch 26; from 2nd ch: 10 inc, 15 sc; skip 1 st, sl st in next st.
• Curls #7–9 (3 Forehead Bangs): Each ch 13; from 2nd ch: 10 inc, 2 sc; skip 1 st, sl st.
• Curls #10–15 (6 Side/Back Curls): Each ch 26; 10 inc, 15 sc. Sew cap to head, arrange curls over ears, and tack short bangs across center forehead!
Part 6: Oversized Pompom Elf Hats & Snowflake Buttons
- Pompom (Rnds 1–5): With Green (#80331) and 4.0 mm hook: R1: 6 sc in MR [6] • R2: 6 inc [12] • Rnds 3–4: 12 sc [12] • R5: 6 dec [6]. Stuff pompom lightly and cut Green yarn.
- Hat Cone (Rnds 6–25): Change to Red (#80318) and switch to 6.0 mm hook (US J/10) for soft drape: R6: 6 sc [6] • R7: (1 sc, inc) × 3 [9] • expand by +3 stitches every 2 rounds across Rnds 8–20 up to 30 sc [30] • R21: 2 sc, (inc, 4 sc) × 5, inc, 2 sc [36] • R22: (5 sc, inc) × 6 [42] • Rnds 23–25: 42 sc around (3 rnds) [42].
- Green Folded Brim (Rnds 26–27): Change to Green (#80331): Rnds 26–27: 42 sc around, sl st, and fasten off [42]. Fold brim upward and sew white wooden snowflake buttons onto the brim, dress bodice, and suspender straps!

3 Artisan Secrets for Flawless Chenille Amigurumi
1. Dual-Hook Technique for Perfect Drape: Working the doll body and boots with a 4.0 mm hook ensures tight, gap-free stitches that keep stuffing inside, while switching to a 6.0 mm hook for the elf hats allows the bulky chenille yarn to drape softly over the hair without feeling stiff or cone-like.
2. 4-Strand Twisted Wire Neck Frame: Because chenille plush heads are large and top-heavy with spiral curls and hats, a single wire strand can bend. Folding a 70 cm length of wire into four parallel strands, twisting them together, and taping the ends creates an unbreakable internal spine that holds the head upright forever.
3. Securing False Eyelashes: When attaching false lashes to the Girl’s 16 mm safety eyes, apply a thin line of flexible waterproof craft glue along the plastic eye washer rim, position the lash band snugly against the curve, and allow to dry completely for 20 minutes before inserting into the face.
Holiday Styling & Winter Decor Ideas
- Mantelpiece Storybook Vignette: Perch the elf duo on opposite sides of your fireplace mantel or sitting side-by-side with their curled boots dangling over pine garlands, cedar sprigs, and fairy lights.
- Nursery Holiday Accent: Because these dolls are crafted in ultra-soft chenille yarn, they make delightful cuddle companions and comforting nursery decor throughout the Christmas season.
- Cherished Heirloom Gift Set: Making both the Boy and Girl elves creates a breathtaking keepsake gift for children, grandchildren, or loved ones that will be brought out with excitement year after year.
Care, Cleaning & Long-Term Preservation
- Spot Clean Only: Because of the internal wire frame, safety eyes with lashes, and delicate chenille pile, do not submerge in water. Wipe gently with a damp microfiber cloth and mild soap.
- Reviving Crushed Chenille Curls: If the spiral hair curls or velvet hats become flattened during storage, steam lightly with a handheld garment steamer held 3 inches away and shake gently to restore fluffiness.
- Archival Holiday Storage: Store the plush elves in a breathable cotton storage bag or acid-free box with cedar blocks to protect against dust and moisture while preserving fabric softness.
Save to Pinterest: Plush Christmas Elf Crochet Patterns
Save these high-resolution pin guides to your favorite Holiday Crochet, Chenille Amigurumi, or Free Crochet Patterns boards on Pinterest:

Pin Guide 1: Complete Plush Christmas Elves Boy & Girl duo pattern architecture and stitch guide.

Pin Guide 2: Technique guide for curled-toe boots, candy-cane stockings, and spiral curl wigs.
Frequently Asked Questions
Can I make these elves using worsted weight acrylic yarn instead of chenille?
Yes! You can use worsted weight acrylic or cotton yarn with a 2.5 mm or 3.0 mm hook. Note that your elves will turn out smaller (approximately 20–22 cm tall), and you will need 10 mm safety eyes instead of 16 mm.
Can I make just the Boy elf or just the Girl elf?
Absolutely! Both elves share the same boots, legs, and head structure. The only difference is the outfit (ruffled dress vs. suspender shorts), hair curl lengths, and hat color accents.
How do I keep the curled elf boot toe from unbending?
When starting Round 1 of the boot, leave a 15 cm tail outside the magic ring. After finishing the boot, thread this tail through the curved toe tip and sew it directly to the front boot shaft to permanently lock the curl!