

Step into an enchanted Scandinavian winter forest with this heirloom Christmas Dwarf Girl Doll with Holiday Lantern crochet pattern. Standing approximately 19 cm (7.5 inches) tall without her magnificent peaked bonnet, this whimsical holiday amigurumi combines rustic folklore charm with sophisticated couture craftsmanship. From her sturdy cream-soled red booties and vintage striped tights up to her tiered green tunic dress and voluminous four-tiered cream curly wig, every detail is engineered to create an enduring festive keepsake. Complete with an internal shoulder wire armature that lets her hold a glowing brass lantern to light the winter solstice, she brings warmth and storytelling wonder to any holiday tablescape or hearth.
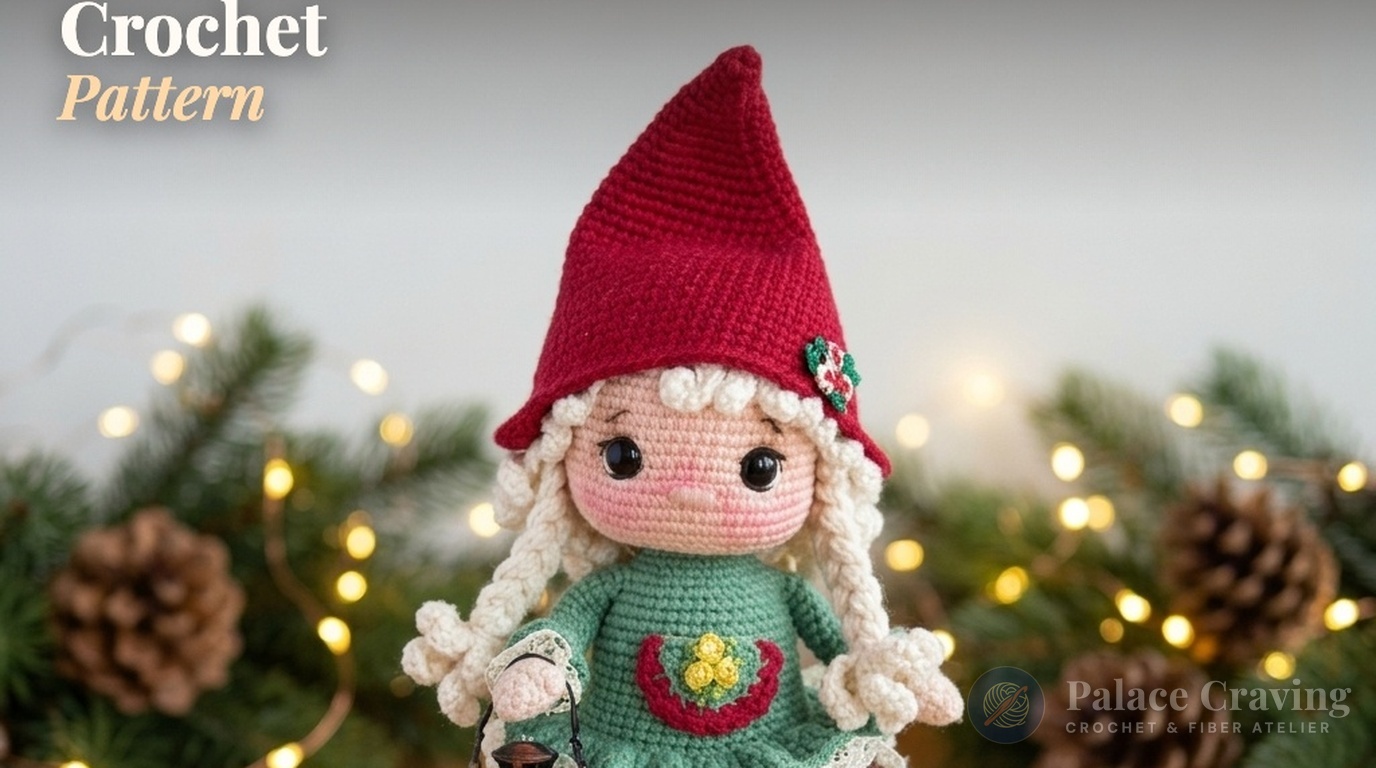
In traditional Nordic folklore, female dwarves and tomte maidens protect rural winter homesteads, bringing quiet blessings and safe passage through long polar nights. This pattern brings that heritage to life through thoughtful structural techniques. The lower body is worked bottom-up with reinforced plastic insoles inside the booties, allowing your dwarf maiden to stand upright on rustic timber shelves. The legs transition seamlessly through candy-stripe tights and ruffled bloomers into a single continuous torso, while the arms are joined directly into the yoke without tricky sewing. Sculpted eye sockets, delicate hand embroidery, and a grand 33-round gradual cone cap complete a masterwork project that amigurumi crafters will treasure for generations.
Why You’ll Love Crocheting This Dwarf Girl Doll
- Stable Self-Standing Architecture: Internal plastic soles and weighted pellet bases ensure your dwarf doll balances gracefully beside pine garlands without leaning or falling over.
- Ingenious No-Sew Arm & Leg Joining: Say goodbye to misaligned shoulder seams! The legs are joined with a crisp 4-chain bridge, and the arms are crocheted directly into rounds 51–52 of the body.
- Poseable Internal Wire Armature: A single continuous 18 cm U-shaped wire bridge runs through both arms and the upper torso, allowing her to hold mini brass lanterns, pine sprigs, or cinnamon sticks.
- Breathtaking 4-Tier Spiral Hair Wig: Fifty bouncy spiral ringlets worked in concentric back-loop rounds frame her needle-sculpted face with whimsical Victorian beauty.
- Double Tiered Dress & Genuine Lace Accents: Featuring a 104-stitch lower cocoa flounce and a 96-stitch emerald flounce lined with cotton lace, paired with a functional patch pocket and jingle bell shoes.
Key Materials & Palette Specifications

- Alize Cotton Gold Sport Weight Yarn (55% Cotton, 45% Acrylic; 100g / 330m):
- Peach (#401): ~35g for needle-sculpted head, nose, ears, and hands.
- Dark Red (#390): ~45g for boots, pocket scallop trim, and the tall 33-round dwarf bonnet.
- Forest Green (#694): ~35g for sleeves, tunic dress yoke, upper flounce, and patch pocket.
- Earthy Brown (#493): ~25g for bloomers, leg ruffles, and the full 104-dc lower dress flounce.
- Cream (#458): ~10g for boot soles.
- White (#55) & Heather Gray (#533): ~15g each for alternating striped stocking rounds.
- YarnArt Baby Cotton (50g / 165m): Cream (#401) for the multi-tier spiral wig cap and 50 bouncy curls.
- Crochet Hooks: 1.75 mm steel / ergonomic hook (Tulip Etimo or Clover Amour) for tight, sem-X body fabric, plus a 2.0 mm hook for the flowing cap.
- Hardware & Accessories: One pair of 9 mm black safety eyes, 18 cm of 1.5 mm vinyl-wrapped craft wire for arms, rigid plastic lid/cutting mat for boot soles, 2 mini metal jingle bells (6 mm), narrow scalloped cotton lace trim, 1 miniature wooden flower button, and a mini brass tea-light lantern.
- Embroidering Notions: Black, white, and chestnut embroidery floss, dry pink artist pastel chalk with a soft blending brush, fiberfill stuffing, stitch markers, and a bent-tip tapestry needle.
Comprehensive Step-by-Step Crochet Instructions
Part 1: Hands, Sleeves & Vintage Lace Cuffs (Make 2)
Worked from the fingers up to the shoulders. Stuff the palm firmly, but leave the upper sleeve unstuffed to ensure the arms rest naturally against the body. Use a 1.75 mm hook.
- Rnds 1–4 (Peach #401): 6 sc in MR (6). R2: (1 sc, inc) × 3 (9). R3: (2 sc, inc) × 3 (12). R4: 12 sc around (12).
- Rnd 5 (Thumb Round): Work one 3-dc Bobble stitch in the first stitch (3 incomplete dc cluster closed together in one st), 11 sc around (12). Push the bobble firmly outward to form a clean, rounded thumb.
- Rnds 6–7: R6: (dec, 4 sc) × 2 (10). R7 (Shift Round): 6 sc so your marker aligns squarely opposite the thumb; place new round marker here. Fasten off Peach; join Forest Green (#694). (10)
- Rnds 8–20 (13 rounds): R8 (Green): 10 sc. R9: In back loops only (BLO), 10 sc. Rnds 10–20 (11 rounds): 10 sc around. Fasten off and weave in starting green end. (10)
- Sleeve Ruffle & Lace Trim: Hold the arm with the palm facing away. Attach Forest Green (#694) to the exposed front loops of Rnd 8 (R8 FLO): work
(ch 2, 1 sc) × 10around, slip stitch to join, fasten off. Using white sewing thread, whipstitch a gathered 12 cm strip of narrow scalloped white cotton lace directly beneath the green ruffle.
Part 2A: Sculpted Booties, Candy-Striped Tights & Bloomers (Make 2)
Worked from the sole upwards. Stuff the foot and ankle very firmly as you progress to create a solid, stable foundation.
- Rnds 1–4 (Sole – Cream #458):
- R1: Ch 6; starting in 2nd ch from hook: 4 sc, 3 sc in last chain; turn to work down opposite side of chain foundation: 3 sc, inc in final loop (12).
- R2: Inc, 3 sc, 3 inc, 3 sc, 2 inc (18).
- R3: 1 sc, inc, 3 sc, (1 sc, inc) × 3, 3 sc, (1 sc, inc) × 2 (24).
- R4: 2 sc, inc, 3 sc, (2 sc, inc) × 3, 3 sc, (2 sc, inc) × 2 (30).
- Trace around the soles onto a clean plastic container lid or rigid cardboard; cut out two identical plastic insoles. Cut Cream yarn; join Dark Red (#390).
- Rnds 5–11 (Boot Wall & Vamp – Dark Red #390):
- R5: In BLO, 30 sc around (30).
- Rnds 6–7: 30 sc around (2 rounds).
- R8 (Heel Alignment): Work ~29 sc so the marker sits exactly at center back of the heel.
- R9 (Toe Decreases): 6 sc, (1 sc, dec) × 6, 6 sc (24). Press your trimmed plastic insole flat into the bottom of the boot and pack fiberfill firmly around the toe cavity.
- R10: 6 sc, 6 dec, 6 sc (18).
- R11: 6 sc, 3 dec, 6 sc (15). Bring Dark Red yarn to the exterior front of the work (do not cut); join White (#55).
- Rnds 12–15 (Tights & Bootie Trim):
- R12 (White #55): In BLO, 15 sc around (15).
- R13: 15 sc. Join Gray (#533), carrying White yarn inside your stitches.
- R14 (Gray): (4 sc, inc) × 3 (18).
- R15 (Gray): 18 sc. Switch back to White.
- Boot Cuff Trim: With the Dark Red yarn held in front at Rnd 11 FLO, work
(ch 2, 1 sc) × 15around the boot rim, sl st, fasten off. Sew a tiny 6 mm brass jingle bell to the outer ankle of each boot!
- Rnds 16–23 (Striped Leg Stockings):
- Rnds 16–17 (White): 18 sc around (2 rounds).
- Rnds 18–19 (Gray): 18 sc around (2 rounds).
- R20 (White – Knee Shaping): (dec, 4 sc) × 3 (15).
- R21 (White – Calf Expansion): 6 sc, 3 inc, 6 sc (18).
- R22 (Gray): 8 sc, dec, 8 sc (17).
- R23 (Gray): 3 sc, inc, 9 sc, inc, 3 sc (19). Cut White and Gray; join Earthy Brown (#493).
- Rnds 24–29 (Brown Bloomers & Ruffle):
- R24 (Brown #493): 4 sc, inc, 9 sc, inc, 4 sc (21).
- R25: In BLO: 5 sc, (inc, 4 sc) × 2, inc, 5 sc (24).
- Rnds 26–29 (4 rounds): 24 sc around (24). Work shift stitches as needed (+6 sc) so your working yarn finishes on the inner thigh.
- Bloomer Pant Ruffle: Turn the leg upside down. In Rnd 24 FLO, attach Brown (#493) and work
(ch 2, 1 sc) × 21around; fasten off. - Fasten off the Right Leg. Do NOT cut yarn on the Left Leg!

Part 2B: Seamless Leg Join, Torso & No-Sew Arm Insertion
- Rnd 30 (Joining Legs): From the Left Leg in Brown (#493): work 12 sc along the Left Leg, ch 4, join with 1 sc into the marked inner stitch of the Right Leg, work 23 more sc around the Right Leg (24 total on right leg), work 4 sc across the loops of the ch-4 bridge, and work 12 sc across remaining stitches of Left Leg (56 sts total).
- Rnds 31–35 (5 rounds): 56 sc around (56).
- Rnd 36 (Waist Decrease): (dec, 12 sc) × 4 (52). Cut Brown; join Forest Green (#694).
- Rnds 37–40 (Bodice & Skirt Foundation):
- R37 (Green #694): In BLO, 52 sc around (52). (The exposed front loops will anchor the lower dress flounce).
- R38: (dec, 11 sc) × 4 (48).
- R39: In BLO, 48 sc around (48). (The exposed front loops will anchor the upper green flounce).
- R40: 48 sc around (48).
- R41: 3 sc, dec, (6 sc, dec) × 5, 3 sc (42).
- Rnds 42–49 (8 rounds): 42 sc around (42).
- R50 (Short Round): Work ~33 sc so your stitch marker rests centered at the spine.
- Rnds 51–52 (No-Sew Arm Joining): Align both arms at her sides with the thumbs pointing directly forward.
- R51: 8 sc on back, 5 sc through inner arm and body stitches simultaneously on Left Arm, 16 sc across chest, 5 sc through inner arm and body on Right Arm, 8 sc on back (42).
- R52: 8 sc on back, 5 sc across the outer free stitches of Left Arm, 16 sc on chest, 5 sc across outer free stitches of Right Arm, 8 sc on back (42).
- Wire Frame & Neck Yoke: Bend an 18 cm length of 1.5 mm craft wire into a smooth U-shaped shoulder bridge. Wrap both wire tips with medical tape to eliminate sharp edges. Slide the ends into each arm channel through the chest cavity. Stuff the torso firmly with premium polyester fiberfill.
- R53: (5 sc, dec) × 6 (36).
- R54: 2 sc, dec, (4 sc, dec) × 5, 2 sc (30).
- R55: (3 sc, dec) × 6 (24). Cut Green; join Peach (#401).
- R56: In BLO, 24 sc around (24).
- R57: 24 sc around, sl st, fasten off leaving a long 40 cm tail for head attachment. (24)
Part 3: Double Dress Flounces, Lace Underskirt & Floral Pocket
- Lower Cocoa Flounce (Rnd 37 FLO): Hold doll upside down with legs pointed toward you. Attach Earthy Brown (#493) to the center back exposed front loops of Rnd 37:
- R1: Ch 2, 52 dc-inc around (2 dc in each front loop), sl st into initial dc (104).
- R2: Ch 2, 104 dc around, sl st, fasten off and weave in ends (104).
- Upper Forest Green Flounce (Rnd 39 FLO): Hold doll upside down. Attach Forest Green (#694) to the center back exposed front loops of Rnd 39:
- R1: Ch 2, 48 dc-inc around, sl st into initial dc (96).
- R2: Ch 2, 96 dc around, sl st, fasten off (96).
- Lace Hem: Sew a 30 cm strip of narrow scalloped white cotton lace along the underside hemline of the green flounce so only 5 mm of lace peeks out.
- Front Patch Pocket & Appliqué: Worked in turning rows with Forest Green (#694):
- Row 1: 5 sc in MR (do not pull into a closed ring), ch 1, turn (5).
- Row 2: 5 inc across, ch 1, turn (10).
- Row 3: 10 sc across; then work 6 sc evenly along the flat upper edge, ch 1, turn.
- Row 4 (Dark Red Trim): Join Dark Red (#390) along the rounded edge: in BLO, work
(ch 2, 1 sc) × 10, fasten off. - Sew the miniature wooden flower button (or embroider a French knot blossom) at the center of the pocket. Sew the pocket squarely on the upper bodice between Rnds 42–47.
Part 4: Sculpted Head, Safety Eyes, Cheeks & Elven Ears
- Rnds 1–17 (Head Sphere – Peach #401):
- R1: 6 sc in MR (6).
- R2: 6 inc (12).
- R3: (1 sc, inc) × 6 (18).
- R4: 1 sc, inc, (2 sc, inc) × 5, 1 sc (24).
- R5: (3 sc, inc) × 6 (30).
- R6: 2 sc, inc, (4 sc, inc) × 5, 2 sc (36).
- R7: (5 sc, inc) × 6 (42).
- R8: 3 sc, inc, (6 sc, inc) × 5, 3 sc (48).
- R9: 48 sc around (48).
- R10: (7 sc, inc) × 6 (54).
- R11: 4 sc, inc, (8 sc, inc) × 5, 4 sc (60).
- Rnds 12–17 (6 rounds): 60 sc around (60).
- Rnd 18 (Eye Openings): 24 sc, ch 1, skip 1 st (left eye socket), 10 sc, ch 1, skip 1 st (right eye socket), 24 sc (60).
- Rnds 19–24 (Cheek Shaping & Eye Insertion):
- R19: 60 sc around (60).
- R20 (Rosy Cheeks Expansion): 22 sc, (1 sc, inc) × 3, 4 sc, (inc, 1 sc) × 3, 22 sc (66).
- Rnds 21–23 (3 rounds): 66 sc around. Insert 9 mm safety eyes into the Rnd 18 chain gaps; press safety washers securely into place!
- R24: 22 sc, (1 sc, dec) × 3, 4 sc, (dec, 1 sc) × 3, 22 sc (60).
- Rnds 25–30 (Tapered Neck Base):
- R25: 4 sc, dec, (8 sc, dec) × 5, 4 sc (54).
- R26: (7 sc, dec) × 6 (48).
- R27: 3 sc, dec, (6 sc, dec) × 5, 3 sc (42).
- R28: (5 sc, dec) × 6 (36).
- R29: 2 sc, dec, (4 sc, dec) × 5, 2 sc (30). Pack fiberfill firmly into the sculpted cheeks.
- R30: (3 sc, dec) × 6, sl st, fasten off (24).
- Ears (Make 2): In Peach (#401), leave a 20 cm starting tail, work 5 sc into a MR. Do not close into a complete ring; fasten off leaving an ending tail. Pin ears between Rnds 18–21, spaced 8 stitches back from the eye outer edge.
6-Point Expressive Eye Socket Sculpting
Thread a long tapestry needle with double-strand Peach (#401) yarn. Mark Point 5 and Point 6 at the open neck base (Rnd 30). Mark Point 1 (outer lower left eye), Point 2 (inner lower left eye), Point 3 (inner lower right eye), and Point 4 (outer lower right eye).
- Insert needle at Point 5 at the neck base, exit at Point 1.
- Re-enter at Point 2, exit at Point 6 at the neck base. Pull gently until the left eye recedes into a natural almond hollow.
- Insert needle at Point 5, exit at Point 4. Re-enter at Point 3, exit at Point 6. Pull firmly to match the depth of the left eye.
- Knot both yarn tails securely together inside the neck cavity.
- Facial Detailing: With white embroidery floss, make a delicate crescent stitch along the outer lower border of each eye. With black thread, embroider fine winged eyelashes and upper eyeliner. With chestnut brown floss, stitch soft arched eyebrows two rounds above the eyes. Embroider a small 4-stitch nose between Rnds 20–21 with 2 horizontal passes of peach yarn wrapped tightly. Dust cheeks and nose with dry pink pastel chalk.
Part 5: 4-Tier Spiral Hair Wig (50 Ringlet Curls!)
Worked with YarnArt Baby Cotton Cream (#401) using a 1.75 mm hook. Each tier creates cascading, bouncy corkscrew ringlets.
- Wig Foundation Cap:
- R1: 9 sc in MR (9).
- R2: In BLO, 9 inc (18).
- R3: In BLO, (1 sc, inc) × 9 (27).
- R4: In BLO, (2 sc, inc) × 9 (36).
- Tier 1 (Outer Perimeter – Rnd 4):
- 12 Back Long Strands (uses 24 base sts):
(Ch 30; starting in 2nd ch from hook: 29 sc, skip 1 st on base, 1 sc in next base st) × 12. - 12 Front Bang Strands (worked across remaining 12 consecutive sts without skipping):
- 1 strand: Ch 25, 24 sc, 1 sc in next base st.
- 1 strand: Ch 20, 19 sc, 1 sc in next base st.
- 2 strands: Ch 15, 14 sc, 1 sc in next base st each.
- 4 strands: Ch 12, 11 sc, 1 sc in next base st each (center forehead fringe).
- 2 strands: Ch 15, 14 sc, 1 sc in next base st each.
- 1 strand: Ch 20, 19 sc, 1 sc in next base st.
- 1 strand: Ch 25, 24 sc, 1 sc in next base st.
- 12 Back Long Strands (uses 24 base sts):
- Tier 2 (Rnd 3 FLO): Slip stitch up to the exposed front loops of Rnd 3: work
(Ch 30; starting in 2nd ch: 29 sc, skip 1 loop on base, 1 sc) × 13(13 curls). - Tier 3 (Rnd 2 FLO): Slip stitch up to the front loops of Rnd 2: work
(Ch 30; 29 sc, skip 1 loop, 1 sc) × 9(9 curls). - Tier 4 (Rnd 1 FLO): Slip stitch up to the front loops of Rnd 1: work
(Ch 30; 29 sc, skip 1 loop, 1 sc) × 4(4 curls). Fasten off and weave in ends. - Styling & Neck Assembly: Place the wig cap over the crown, centering the short bangs across the forehead. Tuck the longest Ch-25 side bang strands gracefully behind the elf ears. Pin the remaining curls in place, tacking them lightly to the scalp with cream yarn. Push extra fiberfill into the neck opening, position the head onto Rnd 57 of the body, and whipstitch securely around the 24 joining stitches.
Part 6: Tall Pointed Dwarf Cap (33 Rounds of Cone Perfection)
Worked with Dark Red (#390) and a 2.0 mm hook for a flexible, elegant drape. The cap expands by exactly 2 stitches every round, creating a long, slender fairytale silhouette.
- Rnds 1–6 (Peak Tip): R1: 6 sc in MR (6). R2: 6 sc. R3: (2 sc, inc) × 2 (8). R4: (3 sc, inc) × 2 (10). R5: (4 sc, inc) × 2 (12). R6: (5 sc, inc) × 2 (14).
- Rnds 7–14: R7: (6 sc, inc) × 2 (16). R8: (7 sc, inc) × 2 (18). R9: (8 sc, inc) × 2 (20). R10: (9 sc, inc) × 2 (22). R11: (10 sc, inc) × 2 (24). R12: (11 sc, inc) × 2 (26). R13: (12 sc, inc) × 2 (28). R14: (13 sc, inc) × 2 (30).
- Rnds 15–22: R15: (14 sc, inc) × 2 (32). R16: (15 sc, inc) × 2 (34). R17: (16 sc, inc) × 2 (36). R18: (17 sc, inc) × 2 (38). R19: (18 sc, inc) × 2 (40). R20: (19 sc, inc) × 2 (42). R21: (20 sc, inc) × 2 (44). R22: (21 sc, inc) × 2 (46).
- Rnds 23–30: R23: (22 sc, inc) × 2 (48). R24: (23 sc, inc) × 2 (50). R25: (24 sc, inc) × 2 (52). R26: (25 sc, inc) × 2 (54). R27: (26 sc, inc) × 2 (56). R28: (27 sc, inc) × 2 (58). R29: (28 sc, inc) × 2 (60). R30: (29 sc, inc) × 2 (62).
- Rnds 31–33 (Flared Brim & Holly Appliqué):
- R31: 29 sc, hdc, dc-inc, hdc, 28 sc, hdc, dc-inc (64).
- R32: Hdc, 27 sc, hdc, 2 dc, dc-inc, 2 dc, hdc, 25 sc, hdc, 2 dc, dc-inc (66).
- R33 (Short Finish): 2 dc, hdc, 1 sc, sl st; fasten off and weave in ends.
- Embroider or sew a tiny holly leaf with red berry beads to the flared side brim. Place the cap over her curls at a slight jaunty tilt, and secure her brass holiday lantern into her right hand!
3 Atelier Secrets for Masterclass Amigurumi Results
- The Semi-X Stitch Technique for Zero Stuffing Show-Through: When working the doll’s head and body, yarn under first, then yarn over to complete your single crochet (the Semi-X stitch). This creates dense, square-shaped micro-stitches that eliminate unwanted gaps when firm stuffing is packed into the cheeks and torso.
- Pre-Curling the 50 Hair Ringlets: Because each hair strand is worked as
(ch 30, 29 sc), the strand naturally curls as you work into the foundation chain. Once completed, gently wrap each ringlet around a wooden knitting needle or smooth skewer and mist with clean water; allow to dry before stitching onto the doll for bouncy, uniform corkscrew ringlets. - Balancing the Lantern Hand: The 1.5 mm wire armature allows you to crook her left or right arm into a gentle 90-degree bend. Loop the handle of the miniature brass lantern over her wrist or fingers, then place a tiny dot of clear craft glue or a single stitch of invisible nylon thread to hold the lantern securely during display.
Festive Styling & Winter Display Ideas

- Heirloom Fireplace Mantels: Nestle her amongst frosted cedar pine garlands, battery-powered fairy lights, and polished brass candlesticks for an authentic Scandinavian holiday display.
- Holiday Tea & Dining Centerpiece: Group her alongside wooden nutcrackers, gingerbread houses, and porcelain teacups to create a storybook winter centerpiece.
- Storybook Christmas Gift: Pair this handmade doll with a hardcover collection of classic Hans Christian Andersen or Astrid Lindgren winter tales for a magical children’s heirloom keepsake.
Curated Tools & Notions for Amigurumi Success
To help you achieve professional tension and seamless finishes, here are the exact atelier tools and notions featured in this masterclass project:
Ergonomic comfort grips with smooth polished aluminum tips that glide effortlessly through sport-weight cotton yarn without splitting fine fibers.
Authentic 5 cm miniature metal lanterns with working wire handles, perfectly scaled for 18–25 cm holiday amigurumi dolls.
FTC Disclosure: Palace Craving Atelier participates in affiliate programs. If you purchase through our links, we may earn a modest commission at zero additional cost to you.
Storage, Care & Heirloom Preservation
- Dust Protection: Spot clean gently using a soft white cloth dipped in lukewarm water and mild wool detergent. Never submerge the doll in water, as moisture can soften the internal plastic insoles or tarnish the internal wire frame.
- Preserving Corkscrew Curls: Before packing away for the season, lightly coil the cream ringlets in tissue paper to protect them from tangling or flattening.
- Off-Season Storage: Store in an airtight container with clean acid-free tissue paper and natural cedar sachets away from direct sun and humidity.
Save & Pin This Festive Pattern
Keep this comprehensive heirloom pattern at your fingertips for your holiday crafting schedule! Save these beautifully formatted tutorial pins directly to your favorite Pinterest crochet boards:


Frequently Asked Questions
Can I use acrylic yarn instead of cotton-acrylic blend?
Yes! You can substitute any high-quality DK or sport-weight acrylic (such as Brava Sport or Stylecraft Special DK). Be sure to drop down 0.5 mm in hook size (e.g. 1.5 mm) to keep your stitch tension very dense and prevent stuffing from showing through.
How do I ensure the dwarf girl stands upright on her own?
The secret lies in the rigid plastic insoles cut for Rnd 4 of the booties, combined with dense fiberfill packing in the lower boots. For added ballast, you can place a small pouch of clean glass beads or poly-pellets into the lower torso cavity during Rnds 31–35.
Is the wire armature safe for young children?
If crafting this doll as a toy for a child under age 3, omit the internal wire armature and replace safety eyes with securely embroidered French knots. The arms can be stuffed lightly with fiberfill instead.
Pin This Pattern to Your Holiday Boards
Have you fallen in love with this Nordic Christmas dwarf girl? Save this pin to your Holiday & Christmas Crochet board today so you have every row count and assembly diagram ready when the festive spirit strikes!