

Bring the heartwarming cheer of Santa’s North Pole workshop into your home with the Christmas Elf Boy in Wire Glasses with Lantern, Sleigh & Gift—a masterclass amigurumi project featuring a 24 cm (9.45 inch) poseable doll dressed in candy cane striped sleeves, emerald green speckled overalls, curled jingle-bell slippers, a slouchy striped stocking cap, and charming handcrafted round wire-rimmed spectacles. Accompanied by three authentic holiday props—a wire-runner wooden sled, a tied gift parcel, and a glowing amber holiday lantern—this comprehensive tutorial delivers museum-quality doll artistry straight to your crochet hook.
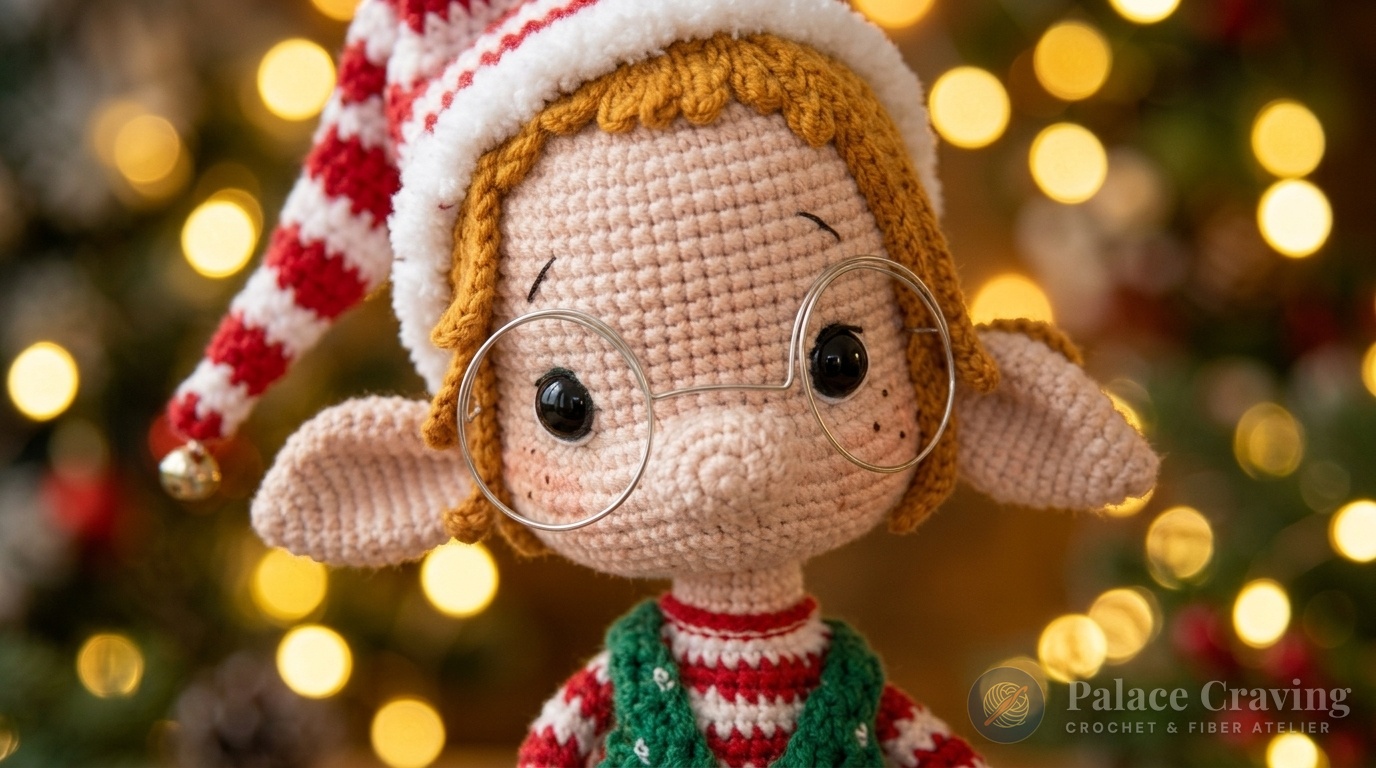
Engineered with an articulated soft craft-wire skeleton, this little holiday artisan can bend his knees, sit comfortably upon his rustic sleigh, hold his glowing candle lantern aloft, or strike dynamic storytelling poses across your mantelpiece or tabletop holiday vignette. Every round in this guide is derived directly from authentic pattern mathematics, incorporating facial needle-sculpting, a 51-strand layered mustard hair wig, and a clever seamless shoulder join that integrates the arms without sewing.
Pattern Architecture & Masterclass Specifications
| Technical Parameter | Specification / Measurement | Artisan Notes |
|---|---|---|
| Finished Doll Height | 24 cm (9.45 inches) | Measured from slipper soles to peak of head |
| Gauge (Single Crochet) | 30 sts × 32 rounds = 10 cm (4 in) | Tight tension prevents fiberfill from peeking through stitches |
| Crochet Hook Size | 1.75 mm (US Steel 4 / 6) | Used throughout doll, wig, wardrobe, sleigh & lantern |
| Internal Wire Armature | 0.8 mm Soft Aluminum Craft Wire | Frames legs, arms, spine, wire glasses & sleigh runners |
| Safety Eyes Hardware | 10 mm Solid Black Safety Eyes | Secured between Rnds 23 & 24 spaced 10–12 sts apart |
| Wardrobe Articulation | Removable Speckled Jumpsuit Overalls | Crisscross straps with 2 red buttons; curled jingle slippers |
| Included Holiday Props | Sleigh, Lantern & Gift Parcel | Full wire-reinforced wooden sled, tied box, and amber lantern |
Yarn Palette & Essential Notions

For optimum crispness and stitch definition, we recommend a premium 4-ply sport-weight cotton-acrylic blend (approx. 160 m / 50 g or 330 m / 100 g). The matte cotton texture provides sculptural rigidity while the acrylic core maintains flex and vivid, long-lasting holiday color:
- Flesh / Peach Tone (#282): ~35 g for sculpted head, pointed elf ears, cute round nose, and hands.
- Festive Crimson Red (#56): ~50 g for candy cane sweater stripes, stockings, stocking cap, gift parcel, and slipper accents.
- Snow White (#55): ~45 g for sweater stripes, cap stripes, gift ribbon + small amount of fluffy boucle yarn for cap trim.
- Emerald Green (#52): ~45 g for speckled jumpsuit overalls and curled elf slippers.
- Mustard Yellow (#84): ~25 g for 51-strand layered hair wig.
- Rustic Sand / Light Brown (#07): ~20 g for wooden sleigh planks, skids, and crossbars.
- Slate Gray (#28) & Amber Yellow (#187): ~15 g total for lantern base, roof, and glowing internal globe.
- Notions & Tools: 1.75 mm crochet hook, 10 mm safety eyes, 3 golden jingle bells (slippers & cap tip), 2 red buttons, 0.8 mm craft wire (~1.5 meters total), round jewelry pliers, wire cutters, adhesive tape, orange soft pastel, brown/white acrylic paint (for freckles and overall speckles), high-loft fiberfill, and tapestry needle.
Recommended Tools for Poseable Holiday Amigurumi
0.8 mm (20 Gauge) Anodized Craft Wire & Plier Set
Flexible yet strong aluminum wire that bends smoothly for custom spectacles, poseable limbs, and sleigh runners without snapping.
10 mm Glossy Safety Eyes with Metal Washers (50 Pairs)
Deep-set black safety eyes with industrial locking washers designed to withstand firm facial needle-sculpting.
As an Amazon Associate, Palace Craving earns from qualifying purchases at no added cost to you.
Part 1: Sculpted Head, Deep Eye Indenting, Pointed Ears & Nose
The elf boy’s head features prominent chubby cheek increases concentrated on Round 26. Work in continuous spiral rounds with Flesh (#282) yarn and a 1.75 mm hook:
- Rnds 1–11 (Crown Expansion): R1: 6 sc in MR [6]. R2: 6 inc [12]. R3: (sc, inc) × 6 [18]. R4: (2 sc, inc) × 6 [24]. R5: (3 sc, inc) × 6 [30]. R6: 2 sc, inc, (4 sc, inc) × 5, 2 sc [36]. R7: (5 sc, inc) × 6 [42]. R8: 3 sc, inc, (6 sc, inc) × 5, 3 sc [48]. R9: (7 sc, inc) × 6 [54]. R10: 4 sc, inc, (8 sc, inc) × 5, 4 sc [60]. R11: (9 sc, inc) × 6 [66].
- Rnds 12–25: 66 sc around (14 rounds even) [66]. Place a contrasting guide thread at center front between Rnds 23–25 (33 sc, marker, 33 sc).
- Rnd 26 (Cheek Sculpting): 23 sc, 6 inc, 8 sc, 6 inc, 23 sc [78]. (The two 6-inc clusters form prominent apple cheeks!)
- Rnds 27–29: 78 sc around (3 rounds even) [78].
- Rnds 30–34: R30: (11 sc, dec) × 6 [72]. R31: 5 sc, dec, (10 sc, dec) × 5, 5 sc [66]. R32: (9 sc, dec) × 6 [60]. R33: 4 sc, dec, (8 sc, dec) × 5, 4 sc [54]. R34: (7 sc, dec) × 6 [48].
- Eye Insertion & Stuffing: Insert 10 mm black safety eyes between Rnds 23 & 24 spaced 10–12 stitches apart (centered directly over the cheek increases). Fasten washers and start stuffing the cranial sphere firmly.
- Rnds 35–39 (Neck Taper): R35: 3 sc, dec, (6 sc, dec) × 5, 3 sc [42]. R36: (5 sc, dec) × 6 [36]. R37: 2 sc, dec, (4 sc, dec) × 5, 2 sc [30]. R38: (3 sc, dec) × 6 [24]. R39: (2 sc, dec) × 6 [18]. Fasten off, leaving an 18-stitch neck opening. Stuff cheeks firmly.
- Pointed Elf Ears (Make 2 in Flesh #282): R1: 6 sc in MR [6]. R2: 6 sc [6]. R3: 6 inc [12]. R4: 12 sc [12]. R5: (sc, inc) × 6 [18]. R6: 18 sc [18]. R7: (2 sc, inc) × 6 [24]. Rnds 8–11: 24 sc around (4 rounds) [24]. R12: (2 sc, dec) × 6 [18]. R13: (sc, dec) × 6 [12]. R14: 12 sc [12]. Fasten off leaving a long sewing tail. Do not stuff; pinch flat.
- Cute Round Nose: In Flesh (#282): R1: 6 sc in MR [6]. R2: 6 inc [12]. R3: (sc, inc) × 6 [18]. R4: 18 sc [18]. Fasten off. Lightly stuff and sew centered between eyes at Rnd 26.
- Facial Needle Sculpting & Freckles: Thread a long needle with strong thread and enter through the neck opening. Catch the inner corner of the safety eye, exit neck, pull firmly to indent the eye socket, and tie a secure knot. Repeat for the second eye. Embroider white crescent highlights along outer eye contours, stitch delicate black brows, sew ears along Rnds 22–26 (aligned with eye horizon), shade cheeks with warm orange pastel, and dot tiny brown freckles across his nose!
Part 2: Two-Layer Mustard Hair Wig & Custom Wire Glasses
The boy’s vibrant mustard-yellow hair is engineered across 51 individual strands worked directly into a circular 5-round base cap, eliminating bare spots while accommodating his pointed elf ears:
- Wig Cap Base: With Mustard (#84): R1: 6 sc in MR [6]. R2: 6 inc [12]. R3: (sc, inc) × 6 [18]. R4: (2 sc, inc) × 6 [24]. R5: (3 sc, inc) × 6 [30]. Do not cut yarn; continue into strands:
- Back & Side Locks (40 Strands Total): Worked across 20 stitches of Round 5 (2 strands per stitch): Repeat 20 times:
[Ch 26; from 2nd ch: 25 sl st, sl st in base; Ch 26; from 2nd ch: 25 sl st, sl st in next base sc]. - Front Bangs (11 Strands Total): Worked across the remaining 10 stitches of Round 5:
- Step 7: Ch 21; from 2nd ch: 20 sl st, sl st in base (1 strand).
- Step 8: Ch 16; from 2nd ch: 15 sl st, sl st in base (1 strand).
- Step 9: Ch 7; from 2nd ch: 6 sl st, sl st in base (1 strand).
- Steps 10–14 (5 Center Bangs): Ch 5; from 2nd ch: 4 sl st, sl st in base (5 short fringe strands).
- Step 15: Ch 7; 6 sl st, sl st in base.
- Step 16: Ch 16; 15 sl st, sl st in base.
- Step 17: Ch 21; 20 sl st, sl st in base. Fasten off leaving a long tail.
- Hair Assembly: Align the magic ring of the wig with the crown of the head. Pin the bottom layer of the 2-strand pairs against the head, then layer the top strands over them for lush volume. Pin the bangs across the forehead and anchor securely with neat stitches.
- Shaping Custom Wire Glasses: Cut a 55 cm piece of 0.8 mm craft wire. Using round jewelry pliers or a cylindrical marker (approx. 18 mm diameter):
- Bend a 4 cm left temple arm with a curved ear hook.
- Wrap the wire 1.5 times around the cylinder to form the left circular lens.
- Bend a 1 cm arched nose bridge.
- Wrap the wire 1.5 times around the cylinder in the opposite direction for the right circular lens.
- Bend a 4 cm right temple arm, curve the ear hook, and trim excess wire. Slide the glasses over his ears and rest the bridge snugly on his nose!
Part 3: Hands & Striped Sweater Arms

Work 2 identical arms in continuous rounds, alternating Crimson Red (#56) and Snow White (#55) in crisp 2-round stripes:
- Hand (In Flesh #282): R1: 6 sc in MR [6]. R2: (sc, inc) × 3 [9]. R3: sc, inc, (2 sc, inc) × 2, sc [12]. R4: 12 sc [12]. R5: 5 sc, dec, 5 sc [11]. R6: 5 sc, dc3tog bobble (thumb), 5 sc [11]. R7: 4 sc, dec, 3 sc, dec [9]. Insert a 22 cm wire loop into the palm, stuff hand lightly. R8: 9 sc [9]. R9: 4 sc, dec, 3 sc [8]. R10: 8 sc [8]. Cut Flesh yarn.
- Striped Arm (Rnds 11–25): Work 8 sc per round in 2-round stripes: R11–12 (Red), R13–14 (White), R15–16 (Red), R17–18 (White), R19–20 (Red), R21–22 (White), R23–24 (Red), R25 (White) [8]. Fasten off. Do not stuff arms; wire provides full articulation!
Part 4: Striped Stocking Legs with Short-Row Heels
The legs feature realistic turned heels that curve into slender striped stockings. Make 2 legs:
- Foot Base (Red #56): Ch 8. Starting in 2nd ch: 3 sc in 1st ch, 5 sc, working down opposite side: 3 sc in last ch, 5 sc [16]. R2: 3 inc, 5 sc, 3 inc, 5 sc [22]. R3 (Red): 22 sc. R4–5 (White): 22 sc (2 rnds). R6–7 (Red): 22 sc (2 rnds).
- Foot Tapering: R8 (White): 2 sc, dec, 9 sc, dec, 7 sc [20]. R9 (White): 20 sc. R10 (Red): sc, dec, 8 sc, dec, 7 sc [18]. R11 (Red): 18 sc. R12 (White): sc, dec, 7 sc, dec, 6 sc [16]. R13 (White): 16 sc. R14 (Red): 16 sc.
- Heel Rows (Red Short Rows): Row 15: ch 1, 5 sc. Row 16: ch 1, turn, 5 sc. Row 17: ch 1, turn, dec, 3 sc [4]. Row 18: ch 1, turn, 2 sc, dec [3]. Insert a 38 cm wire loop into foot and stuff firmly.
- Ankle Turn: Resume rounds: R19 (Red): 3 sc along side of heel, 2 dec, 3 sc across instep, 2 dec, 6 sc along other side [16]. R20 (White): sc, dec, 7 sc, dec, 4 sc [14]. R21 (White): dec, sc, 5 sl st, dec, 4 sc [12].
- Striped Leg Shaft (Rnds 22–42): Work 12 sc per round in 2-round stripes: R22–23 Red, R24–25 White, R26–27 Red, R28–29 White, R30–31 Red, R32–33 White, R34–35 Red, R36–37 White, R38–39 Red, R40–41 White, R42 (Red) [12].
- Leg 1: Fasten off and mark the 8th sc of Rnd 42 (inner thigh).
- Leg 2: Work 5 additional sc in Red to align at inner thigh. Do not cut yarn!
Part 5: Striped Torso, Seamless Arm Join & Neck Ruffle
We connect the two legs with a 15-chain bridge, establishing a sturdy 54-stitch hip circumference that tapers up into the striped sweater:
- Rnds 1–2 (Hip Connection): From active loop on Leg 2 in Red, Ch 15. Join to marked 8th stitch of Leg 1. R2: 12 sc around Leg 1, 15 sc along one side of ch-15, 12 sc around Leg 2, 15 sc along opposite side of ch-15 [54]. Twist leg wires together along center spine.
- Rnds 3–8: R3–4 (White): 54 sc. R5–6 (Red): 54 sc. R7–8 (White): 54 sc [54].
- Rnds 9–16 (Torso Taper): R9 (Red): 6 sc, dec, 24 sc, dec, 20 sc [52]. R10 (Red): 52 sc. R11 (White): 5 sc, dec, 23 sc, dec, 20 sc [50]. R12 (White): 50 sc. R13 (Red): 5 sc, dec, 22 sc, dec, 19 sc [48]. R14 (Red): 48 sc. R15 (White): 3 sc, dec, (6 sc, dec) × 5, 3 sc [42]. R16 (White): 42 sc.
- Rnds 17–26 (Upper Chest): R17 (Red): (5 sc, dec) × 6 [36]. R18 (Red): 36 sc. R19 (White): 2 sc, dec, (4 sc, dec) × 5, 2 sc [30]. R20 (White): 30 sc. R21 (Red): (3 sc, dec) × 6 [24]. R22 (Red): 24 sc. R23 (White): (10 sc, dec) × 2 [22]. R24 (White): 22 sc. R25 (Red): (9 sc, dec) × 2 [20]. R26 (Red): 20 sc. Stuff torso firmly.
- Rnds 27–28 (Seamless Hand Integration): Switch to White (#55) with bobble thumbs facing forward: R27: 3 sc on back, 4 sc through inner loops of Right Hand & Body simultaneously, 6 sc across chest, 4 sc through inner loops of Left Hand & Body simultaneously, 3 sc on back [20]. R28: 3 sc, 4 sc on outer loops of Right Hand, 6 sc, 4 sc on outer loops of Left Hand, 3 sc [20]. Twist arm wires securely into the central spinal armature.
- Rnds 29–32 (Neck & Collar): Leave a 50 cm Red tail outside before cutting Red; switch to Flesh (#282): R29: BLO (8 sc, dec) × 2 [18]. Rnds 30–32: 18 sc around (3 rnds) [18]. Stuff firmly and fasten off. Using the reserved Red tail in R29 front loops, work 20 sl st around neckline to form a sweater collar. Sew the sculpted head securely to the neck opening!
Part 6: Speckled Green Jumpsuit Overalls with Red Buttons

The slouchy green overalls are crocheted in half-double crochet to create a relaxed, authentic workshop aesthetic:
- Pant Legs (Make 2 in Green #52): Ch 22, join into ring. R2–3: 22 sc (2 rnds) [22]. R4: FLO (hdc, hdcinc) × 11 [33]. R5: hdcinc, (hdc, hdcinc) × 16 [50]. Rnds 6–11: 50 hdc around (6 rounds) [50]. Fasten off 1st leg; keep 2nd leg active.
- Join Pants (Rnds 12–21): R12: Join directly to 1st leg and work 50 hdc on 1st leg, 50 hdc on 2nd leg [100]. R13: (3 hdc, hdcdec) × 20 [80]. R14: 80 hdc [80]. R15: (2 hdc, hdcdec) × 20 [60]. R16: 60 hdc [60]. R17: (3 hdc, hdcdec) × 12 [48]. Rnds 18–21: 48 hdc around (4 rounds) [48]. Fasten off.
- Bib Straps & Red Buttons: Locate the 14 center-front stitches of Round 21 (7 stitches per strap). Join Green yarn to the first 7-st section:
- Row 1: Ch 2, 7 hdc [7].
- Row 2: Ch 2, turn, hdcdec, 3 hdc, hdcdec [5].
- Row 3: Ch 2, turn, hdcdec, 1 hdc, hdcdec [3].
- Row 4: Ch 2, turn, hdcdec, 1 hdc [2].
- Rows 5–14: Ch 2, turn, 2 hdc across (10 rows) [2]. Fasten off leaving a tail.
- Repeat identically on the adjacent 7 stitches for the second strap.
- Slip overalls onto the doll, crisscross straps across his back, and sew to back waistband. Dip a wooden toothpick in white acrylic paint to dab tiny flecks across the fabric, and sew 2 red buttons to the front strap anchors!
Part 7: Curled Elf Slippers with Golden Jingle Bells
Work 2 curved green slippers that slide snugly over his stocking feet:
- Curled Toe: With Green (#52): R1: 6 sc in MR [6]. R2: 6 sc [6]. R3: sc, inc, sc, 3 hdc [7]. R4: sc, 2 inc, sc, 3 hdc [9]. R5: hdc, sc, inc, 3 sc, 3 hdc [10]. R6: hdc, sc, 4 sl st, sc, 3 hdc [10]. R7: hdc, 6 sc, 3 hdc [10]. R8: 2 sc, inc, 4 sc, inc, 2 sc [12]. R9: 12 sc. R10: (2 sc, inc) × 4 [16]. R11: (3 sc, inc) × 4 [20]. R12: (3 sc, inc) × 5 [25].
- Foot & Heel: Rnds 13–20: 25 sc around (8 rnds) [25]. Fold flat with curled toe pointing upward; work heel in turned rows: Rows 21–23: ch 1, turn, 10 sc (3 rows) [10]. Row 24: ch 1, turn, dec, 6 sc, dec [8]. Row 25: ch 1, turn, dec, 4 sc, dec [6]. Row 26: ch 1, turn, 6 sc [6]. Work slip stitches around the ankle collar to finish, fasten off, and stitch a tiny golden jingle bell firmly to each upturned toe!
Part 8: Striped Holiday Elf Cap with Fluffy Brim & Bell
This dramatic stocking cap measures over 30 cm long and drapes whimsically down the elf’s back:
- Work in 2-round stripes of Red (#56) and White (#55) in half-double crochet:
- R1–4: 6 hdc [6].
- R5–8: (hdc, hdcinc) × 3 [9] → 9 hdc.
- R9–12: (hdc, hdcinc) × 4, hdc [13] → 13 hdc.
- R13–16: (hdc, hdcinc) × 6, hdc [19] → 19 hdc.
- R17–20: (2 hdc, hdcinc) × 6, hdc [25] → 25 hdc.
- R21–24: (2 hdc, hdcinc) × 8, hdc [33] → 33 hdc.
- R25–28: (2 hdc, hdcinc) × 11 [44] → 44 hdc.
- R29–32: (2 hdc, hdcinc) × 14, 2 hdc [58] → 58 hdc.
- Rnds 33–34 (Red): 58 hdc around [58].
- Fluffy Brim (Round 35): Join Fluffy White boucle yarn: 58 sc around [58]. Fasten off and sew the third golden jingle bell to the cap’s pointed tip!
Part 9: Wire-Framed Sand Sleigh & Tied Gift Box
The rustic wooden sleigh is constructed from three wire-reinforced sand-colored planks mounted onto curved wire skids:
- Sleigh Planks (Make 3 in Sand #07): Row 1: Ch 22; starting in 3rd ch: 20 hdc [20]. Row 2: Ch 2, turn, FLO 20 sc [20]. Row 3: Ch 2, turn, BLO 20 hdc [20]. Row 4: Fold plank in half lengthwise, insert an 18 cm wire inside, and close the long seam with 20 slip stitches [20].
- Sleigh Skids (Make 2 in Sand #07): R1: 6 sc in MR [6]. Rnds 2–26: 6 sc around (25 rounds) [6]. Insert wire, close tip, and bend the front upward into a graceful curved runner.
- Connecting U-Brackets (Make 2): R1: 6 sc in MR [6]. Rnds 2–16: 6 sc around (15 rounds) [6]. Insert wire and bend both ends at 90-degree right angles into U-brackets. Assemble sleigh by joining the 3 planks side-by-side, securing the U-brackets underneath, mounting the skids, and tying a white cord pull-rope to the front!
- Holiday Gift Box: With Red (#56), work a 32-stitch cube: R1: 8 sc in MR. R2: (3 sc in 1 st, sc) × 4 [16]. R3: (sc, 3 sc in 1 st, 2 sc) × 4 [24]. R4: (2 sc, 3 sc in 1 st, 3 sc) × 4 [32]. R5: BLO 32 sc. Rnds 6–12: 32 sc (7 rnds). R13: BLO (4 sc, sc3tog, sc) × 4 [24]. R14: (2 sc, sc3tog, sc) × 4 [16]. R15: (sc3tog, sc) × 4 [8]. Stuff firmly, cinch closed, and wrap with a 100-chain White yarn ribbon tied with a festive bow!
Part 10: Glowing Amber Holiday Lantern with Wire Cage
The miniature lantern features an amber glowing core enclosed in a gray cage with a hanging loop that slides over the elf’s poseable thumb:
- Base (Gray #28): R1: 8 sc in MR [8]. R2: (3 sc in 1 st, sc) × 4 [16]. R3: (sc, 3 sc in 1 st, 2 sc) × 4 [24]. R4: BLO 24 sc [24].
- Glowing Globe (Yellow #187): Rnds 5–6: 24 sc [24]. R7: 2 sc, inc, (5 sc, inc) × 3, 3 sc [28]. Rnds 8–9: 28 sc [28]. R10: 2 sc, inc, (6 sc, inc) × 3, 4 sc [32]. R11: 32 sc [32].
- Lantern Roof (Gray #28): R12: 32 sc [32]. R13: BLO (4 sc, sc3tog, sc) × 4 [24]. R14: (2 sc, dec) × 6 [18]. R15: (sc, dec) × 6 [12]. R16: 6 dec [6]. Cinch closed leaving an 80 cm Gray tail.
- Cage Embroidery & Handle: At the roof peak, work Ch 16 and join to form a hanging loop. Thread the remaining Gray tail and embroider 4 vertical corner posts and decorative crisscross X-bars across the amber globe!
3 Masterclass Secrets for Flawless Doll Presentation
1. Dual-Layer Eye Indenting: Pulling the eye-sculpting threads directly downward into the neck opening (rather than out through the back of the head) creates deep, lifelike tear-trough sockets that lock the safety eyes firmly in place even when wire glasses are resting on the bridge.
2. Reinforced Wire Spinal Architecture: Twist the 2 leg wires together for at least 8 cm inside the central torso cavity, then wrap the joint securely with adhesive tape before twisting the arm wires into the same column. This eliminates floppy hips and ensures the elf stands completely upright.
3. Crisp Sleigh Runner Curvature: When bending the wire inside the sleigh skids, use round jewelry pliers to form a gentle 180-degree upward loop at the front. Coat the wire tips with a dab of hot glue before inserting to prevent the metal from poking through the crochet fabric.
Frequently Asked Questions
Can I make the elf glasses from yarn instead of wire?
Yes! If you prefer a child-safe alternative without wire, crochet two rings of Ch 12, sl st to join in Dark Gray yarn, join them with a 2-ch bridge, and work 15 chains for each temple arm.
How do I get the overalls to fit smoothly over the striped sweater?
The half-double crochet stitch in the overalls naturally yields greater stretch than single crochet. Try the jumpsuit on the doll as soon as you finish Round 21 before crocheting the bib straps to verify the waist fit.
Is the sleigh sturdy enough to hold the elf?
Yes! The 3 wire-reinforced planks and double crossbars easily support the weight of the elf sitting down with his boots resting on the runners.
Pin This Free Holiday Masterclass Tutorial
Save these pins to your Pinterest crochet and amigurumi boards so you always have this heirloom holiday elf pattern at your fingertips!

