

Bring cozy Nordic woodland charm to your festive holiday decor with Christmas Mister Gnome in Belted Coat & Boots—a masterfully crafted freestanding heirloom holiday dwarf amigurumi doll. Featuring sturdy double-sole brown boots with internal plastic stabilizer insoles, articulated 5-finger poseable wired hands, candy cane striped stockings, a tailored grey wool-blend coat with flared hem and golden brass belt buckle, sculpted round cheeks, and an ultra-plush latched white acrylic beard crowned with a ribbed post-stitch stocking cap and giant pom-pom, Mister Gnome is the ultimate centerpiece for your winter mantel.
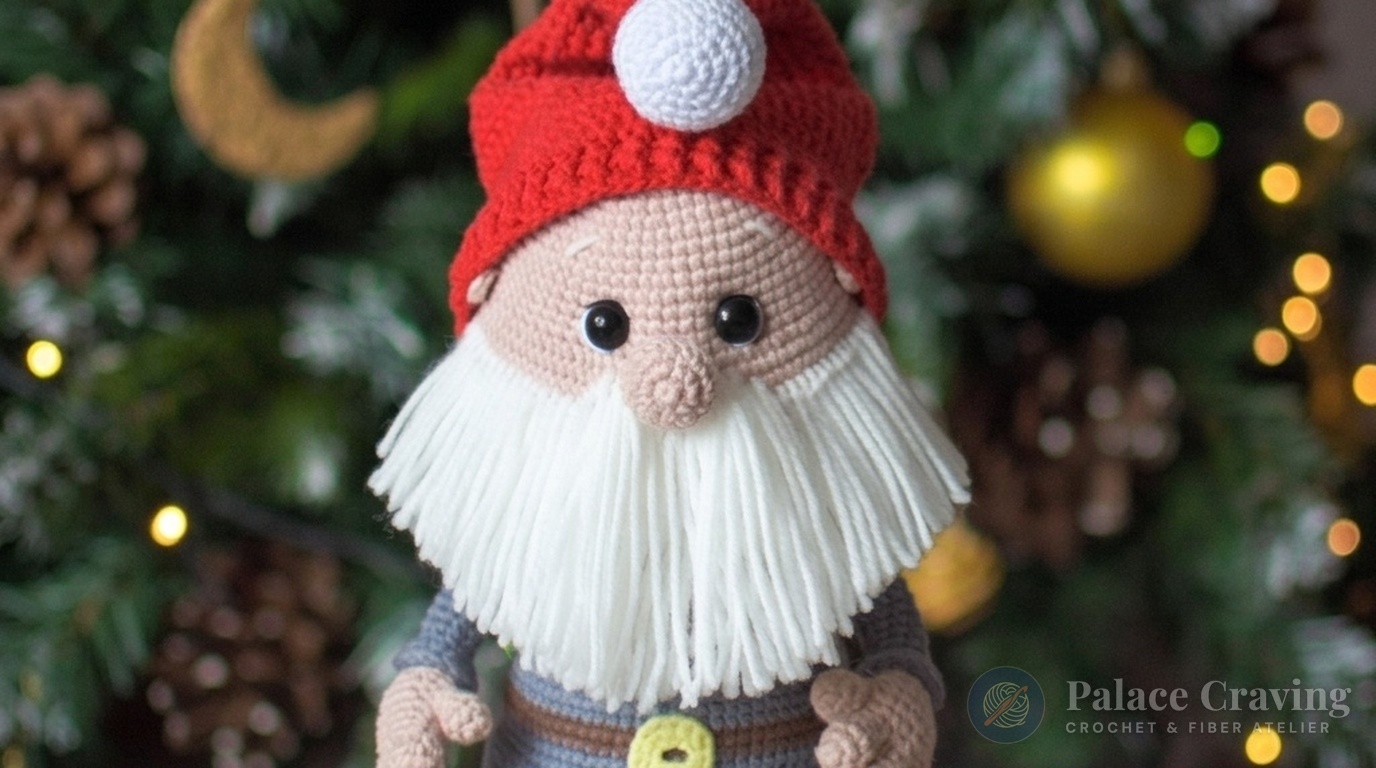
Engineered for perfect freestanding stability, Mister Gnome combines a heavy-duty 2.5 mm aluminum leg armature sandwiched between reinforced double-layered boot soles with a seamless torso join and poseable 5-finger hands. His tailored coat skirt drapes naturally over the candy cane striped tights, while the plush brushed beard gives him a jolly, distinguished personality that will delight family and guests season after season.
Pattern Architecture & Masterclass Specifications
| Technical Parameter | Specification / Measurement | Artisan Notes |
|---|---|---|
| Finished Doll Height | ~26 cm (10.2 inches) | Base of boots to crown (ribbed cap extends extra 18 cm) |
| Gauge (Single Crochet) | 27 sts × 29 rounds = 10 cm (4 in) | Tight tension worked with a 2.0 mm hook prevents stuffing show-through |
| Crochet Hook Size | 2.0 mm (US Steel 4 / Clover #2) | Used uniformly across boots, body, coat, hands & cap |
| Freestanding Boot System | Double-Layered Soles with Plastic Insoles | Soles worked wrong-sides together around rigid plastic base |
| Hand Construction | 5 Separately Worked Articulated Fingers | Joined into palm with internal 2 mm wire frame for holding gifts |
| Coat & Belt Structure | Flared Skirt (R16 FLO) & Buckle | 96-stitch flared hem worked directly onto body loops with yellow buckle |
| Beard Technique | Latched Fringe (Lark’s Head Knots) | 44 strands per round across 3 alternate rounds; brushed for fluffiness |
Yarn Palette & Essential Notions

To produce the crisp, structured stitch definition needed for the boots, coat, and fingers, we recommend a sport-weight cotton-acrylic blend (Alize Cotton Gold: 100 g / 330 m, 55% cotton, 45% acrylic):
- Earthy Brown (#493): ~50 g for the sturdy double soles, boot uppers, boot cuffs, and waist belt.
- Heather Gray (#87): ~60 g for the tailored coat torso, flared coat skirt, and sleeve cuffs.
- Festive Red (#56): ~55 g for the candy cane sock stripes, lower torso base, and ribbed post-stitch hat.
- Pure White (#55): ~40 g for sock stripes, lower torso stripes, and hat pom-pom.
- Powdery Skin Tone (#161): ~35 g for the sculpted cheek head, 5-finger hands, bulbous nose, and ears.
- Sunflower Yellow: ~10 g for the front rectangular belt buckle.
- Plush Beard Yarn: 100% white acrylic yarn (e.g., Pehorka New Kid’s, 50 g / 200 m) cut into 15 cm strands for the latched beard and mustache.
- Hardware & Armature: 2.5 mm aluminum wire (two 35 cm pieces for legs/spine), 2.0 mm wire for fingers/arms, sheet plastic for insoles, two 10 mm black half-bead or safety eyes, two decorative red boot buttons, electrical tape, and premium polyester fiberfill.
Recommended Supplies for Freestanding Holiday Gnomes
Clover Amour 2.00 mm Steel Crochet Hook
Ultra-smooth polished hook tip with comfort elastomer handle, perfect for tight double-sole boot stitches.
2.5 mm Aluminum Armature Craft Wire (50 Feet)
Flexible yet rigid rust-proof craft wire that bends cleanly into boot soles and supports standing amigurumi dolls.
As an Amazon Associate, Palace Craving earns from qualifying purchases at no extra cost to you.
Comprehensive Step-by-Step Stitch Guide
Work in continuous spirals using a stitch marker to track the beginning of each round. When working color transitions on the striped socks and coat, execute the final yarn-over with the incoming shade. For more heirloom holiday character guides, explore our Scandinavian Nisse Magnus Gnome, the poseable Christmas Elf Chris with Gift Sack, and the adorable Indis Little Elf with Star.

Part 1: Double-Sole Boots & Striped Legs (Make 2)
Each boot features two identical soles sandwiched around rigid plastic for true freestanding balance:
- Soles (Make 4 – 2 per boot): In Brown #493, ch 8. From 2nd ch: R1: 6 sc, 3 sc in last ch, 5 sc, inc [16] • R2: inc, 4 sc, 5 inc, 4 sc, 2 inc [24] • R3: expand evenly to 32 sc • R4: expand to 40 sc. Fasten off 1st sole; do not cut yarn on 2nd sole.
- Rnd 5 (Join Soles): Trace sole onto stiff plastic sheet and cut out. Sandwich plastic between both soles (wrong sides facing). Work 40 sc through back loops of lower sole and both loops of upper sole to seal the firm insole [40].
- Boot Upper (Rnds 6–15): Rnds 6–9: 40 sc even • R10: 6 sc, dec, (2 sc, dec) × 6, 8 sc [33] • R11: 33 sc • R12: 8 sc, dec, (1 sc, dec) × 4, 11 sc [28] • R13: 7 sc, 5 dec, 11 sc [23] • R14: 5 sc, 5 dec, 8 sc [18]. Change to Red #56: R15: BLO (2 sc, dec, (4 sc, dec) × 2, 2 sc) [15]. Insert 35 cm 2.5 mm wire bent to foot length; stuff boot firmly.
- Striped Socks (Rnds 16–26): Alternate 2 rnds Red and 2 rnds White: Rnds 16–25: 15 sc even. R26 (White): Right leg: 15 sc + 1 shift st, fo; Left leg: 8 sc, fo. Stuff firmly.
- Boot Cuffs: Attach Brown to Rnd 14 FLO: work 4 rounds of 18 sc, then 18 sl st. Sew a red decorative button to the outer ankle of each boot.
Part 2: 5-Finger Poseable Hands, Arms & Cuffs (Make 2)
Each hand is constructed with individual crocheted fingers joined together around an articulated wire frame:
- Thumb (Make 2): In Powdery Skin Tone: R1: 6 sc in MR [6] • R2: (1 sc, inc) × 3 [9] • R3: 9 sc [9] • R4: (1 sc, dec) × 3 [6]. Fasten off.
- Fingers (Make 6 – 3 per hand): In Skin Tone: R1: 6 sc in MR • R2: (1 sc, inc) × 3 [9] • R3: 9 sc • R4: (1 sc, dec) × 3 [6] • R5: 6 sc [6]. Cut yarn on first two fingers; keep active yarn on 3rd finger!
- Palm Join (Rnds 6–7): R6: 3 sc on 1st finger, 3 sc on 2nd finger, 6 sc around 3rd finger, 3 sc across other side of 2nd finger, 3 sc across other side of 1st finger [18] • R7: 18 sc around [18].
- Join Thumb (Rnds 8–10): Lock thumb into palm: R8: work across palm and inner 2 loops of thumb [18] • R9: work across outer 4 loops of thumb [20] • R10: execute 2 dec at thumb base [18].
- Wire Hand Insert: Twist three folded 15 cm 2 mm finger wires onto a 30 cm arm wire, tape joint, insert into fingers/palm, and stuff palm lightly. Taper wrist down: R11: 12 sc • R12: 10 sc • R13: 10 sc.
- Coat Sleeves (Rnds 14–31): In Heather Gray #87: R14: 10 sc • R15: BLO 10 sc • Rnds 16–31 (16 rnds): 10 sc around. Fasten off. Attach Gray to Rnd 14 FLO to work a 3-round flared sleeve cuff (15 sts).
Part 3: Striped Lower Body, Belted Gray Coat & Arm Joins
The body begins from a circular base in Red and White stripes before transitioning into the grey coat:
- Base Expansion (Rnds 1–6): Alternate 2 rnds Red and 2 rnds White expanding from 6 sc to 36 sc.
- Rnds 7–8 (Join Legs): In White: expand to 42 sc. Work across body and inner 6 sts of Left Leg, across front belly, inner 6 sts of Right Leg, and across back [48]. In Red: R8: work 54 sc around body and outer leg loops [54]. Twist leg wires into central spine and wrap with electrical tape.
- Rnds 9–20 (Waist & Belt): Expand systematically to 72 sc. In Heather Gray #87: R16: 72 sc • R17: BLO 72 sc (leave FLO for coat skirt) • R18: 72 sc. In Earthy Brown #493: Rnds 19–20 (Belt): 72 sc [72].
- Rnds 21–35 (Coat Torso): In Heather Gray: work even, then decrease systematically by 6 sts every 2 rounds down to 30 sc [30].
- Rnds 36–42 (Join Arms & Neck): R36: 4 sc back, 5 sc through inner left arm & body, 12 sc chest, 5 sc through inner right arm & body, 4 sc back [30]. R37: 30 sc around body and outer arm loops. Twist arm wires onto spine, trim excess leaving 5 cm above neck. Taper shoulders down to 18 sc across Rnds 38–42. Stuff body firmly.
Part 4: Flared Coat Skirt & Golden Belt Buckle
These tailored details give Mister Gnome his signature distinguished winter coat:
- Coat Skirt (R16 FLO): Attach Heather Gray #87 to exposed front loops of Round 16: R1: (11 sc, inc) × 6 [78] • R2: 78 sc • R3: (12 sc, inc) × 6 [84] • R4: 84 sc • R5: (13 sc, inc) × 6 [90] • R6: 90 sc • R7: (14 sc, inc) × 6 [96] • R8: 96 sc • R9: 96 sl st. Fasten off and weave in tail.
- Belt Buckle: In Sunflower Yellow, ch 10, sl st to form ring: work ch 1, 1 sc, inc, 2 sc, inc, 1 sc, inc, 2 sc, inc, sl st [14]. Sew centered over the brown belt rounds.
Part 5: Sculpted Cheek Head, Nose & Eye Sockets
Worked in Powdery Skin Tone #161 with dramatic cheek expansions for a jolly, plump facial structure:
- Head Expansion (Rnds 1–18): Expand from 6 sc in MR to 66 sc. Work 5 rounds even [66].
- Rnds 19–25 (Cheek Expansions): R19: 16 sc, inc, (1 sc, inc) × 8, place nose marker, (inc, 1 sc) × 8, inc, 16 sc [84]. Work 6 rounds even at 84 sc [84] to create adorable rounded cheeks!
- Rnds 26–36 (Taper to Neck): Decrease systematically down from 84 to 18 sc. Fasten off.
- Nose & Ears: Bulbous Nose: 6 sc to 18 sc for 5 rounds, taper to 12 sc. Stuff firmly and sew over Rounds 17–22 centered on cheek marker. Ears (make 2): 6 sc in MR, sew symmetrically on Rounds 16–20.
- Socket Sculpting: Cinch needle between eye markers to deeply indent eye sockets. Install 10 mm black eyes, embroider white crescents, white eyebrows, and blush cheeks with cosmetic powder. Slide head over neck wire and sew securely to body!
Part 6: Latched Fringe Beard & Ribbed Post-Stitch Cap
The crowning glory of Mister Gnome—a luxurious brushed beard and warm ribbed winter cap:
- Latched Beard Fringe: Cut 15 cm strands of 100% white acrylic yarn. Fold strands in half, insert hook under a head stitch, and pull ends through loop (lark’s head knot). Attach 44 strands across Round 22 from ear to ear, repeat across Round 20 and Round 18. Attach a small mustache row directly under the nose. Brush out gently with a pet slicker brush for ultra-plush fullness!
- Ribbed Post-Stitch Cap: In Festive Red #56: Work 4 rounds expanding to 24 dc. Transition to ribbed post-stitch pattern alternating 1 FPDC (front post double crochet) and 1 BPDC (back post double crochet) around, expanding gradually every 4 rounds to fit head circumference. Finish with a plush 6 cm white yarn pom-pom and tack tip downward.
3 Artisan Secrets for Flawless Freestanding Gnomes
1. Sandwich the Plastic Insoles Firmly: When crocheting Round 5 of the boots through both soles, pull the joining single crochet stitches tightly around the plastic edge. This locks the internal stabilizer into a flat, rigid plane so your gnome stands perfectly upright on table surfaces without wobbling.
2. Wire Finger Insertion Technique: Before sliding the 2 mm wire frame into the small fingers, wrap each wire tip with white medical tape. This prevents the wire tips from puncturing the tight cotton stitches and creates a smooth friction fit inside each finger tube.
3. Gentle Slicker Beard Brushing: When brushing the latched white acrylic beard, hold the base of the knots firmly with your thumb and gently brush from the tips upward toward the roots. This releases the acrylic fibers into a cloud-like texture without pulling the lark’s head knots loose.
Holiday Styling & Winter Decor Ideas
- Mantel Centerpiece: Position Mister Gnome standing beside evergreen pine boughs, brass taper candlesticks, and pinecones on a natural wood fireplace mantel.
- Artisan Shelf Display: Thanks to his poseable wired fingers, Mister Gnome can hold miniature wooden skis, a tiny holiday lantern, or a rolled festive scroll on a farmhouse bookshelf.
- Entryway Welcome Accent: Place Mister Gnome on an entryway console table paired with a bowl of cinnamon ornaments to greet holiday guests with handmade Scandinavian warmth.
Care, Cleaning & Long-Term Preservation
- Spot Clean Only: Because of the internal wire armature and double-sole plastic inserts, do not submerge in water. Clean dusty areas with a dry, soft bristle brush.
- Reviving Beard Volume: After seasonal storage, simply run a wide-tooth comb or clean pet slicker brush through the white acrylic beard to instantly fluff it back to full volume.
- Safe Storage: Wrap Mister Gnome in acid-free tissue paper and store standing upright in a rigid storage box with cedar blocks to safeguard the cotton-acrylic blend.
Save to Pinterest: Freestanding Holiday Gnome Patterns
Save these high-resolution pin guides to your favorite Holiday Crochet, Nordic Gnomes, or Amigurumi Patterns boards on Pinterest:

Pin Guide 1: Complete Mister Gnome construction, double-sole boots, and coat.

Pin Guide 2: Technique guide for wired fingers, latched beard, and ribbed cap.
Finished Heirloom Masterpiece: Meet Christmas Mister Gnome

Frequently Asked Questions (FAQ)
What can I use for the plastic boot insoles?
Recycled plastic lids from takeout containers, yogurt tubs, or flexible plastic cutting mats work perfectly. Simply trace your crocheted Round 4 sole onto the plastic and trim slightly inside the line.
Can I use faux fur yarn instead of latched acrylic strands for the beard?
Yes! If you prefer not to latch individual yarn strands, you can sew a piece of faux fur fabric cut into a triangular beard shape directly onto the head before attaching the nose and cap.
Are the 5-finger hands difficult for beginners?
Working the 6-stitch finger tubes requires patience and good lighting. If you find small fingers challenging, you can substitute a simple mitten hand (working a 3-dc bobble thumb on Round 4 of an oval hand) while keeping the rest of the pattern identical.
Pin This Freestanding Holiday Gnome for Later!
Ready to craft a freestanding holiday heirloom? Click the pin button below or save any photo above to keep Christmas Mister Gnome ready on your Pinterest board!