

Bring heartwarming storybook wonder and ultra-cozy tactile softness to your seasonal decor with the Festive Plush Mouse in Christmas Present Box. Standing approximately 20.3 cm (8 inches) tall, this irresistible holiday amigurumi features a cuddly silver grey mouse peeking out from inside a mint green, ribbon-wrapped Christmas gift box. Worked in cloud-soft #6 Super Bulky chunky chenille yarn with a 5.5 mm hook, this project combines rapid, rewarding stitch progress with clever structural details: two plump bobble paws clutching the front rim, expressive 18 mm safety eyes, wide double-layer pink-and-silver ears, and a matching gift box lid perched atop the head crowned with a scarlet red bow.
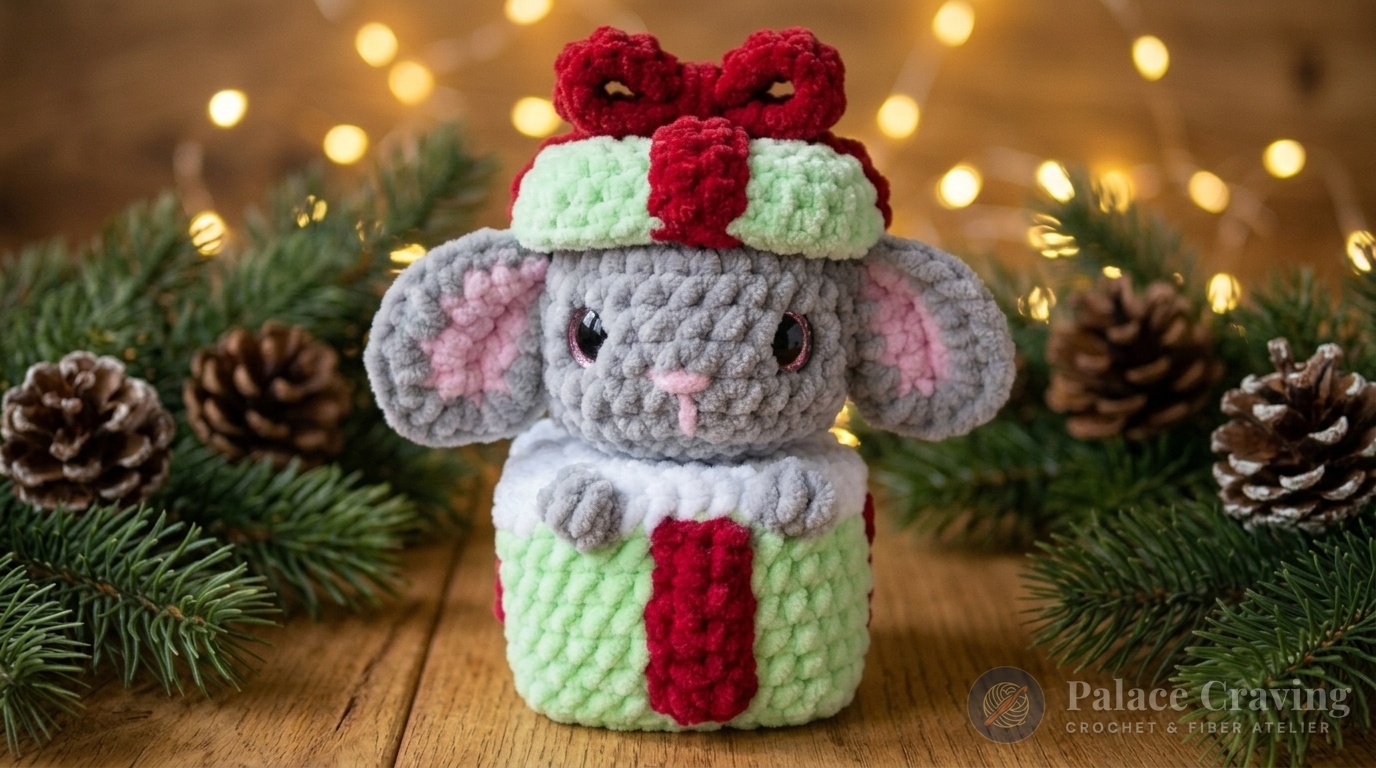
Working with plush chenille yarn requires a specialized approach: traditional single crochets can warp corners if tension isn’t controlled, and sewing bulky limbs can create unsightly lumps. This pattern eliminates those hurdles through clever structural design. By utilizing 3-sc corner expansions, back-post single crochet (BPsc) perimeter ridges, and an integrated lid-to-head technique where the silver grey head is worked directly from the unworked back loops (BLO) of the mint lid, this pattern minimizes sewing while producing sharp, professional architectural angles. In this complete guide, you will master the dimensional box geometry, bobble paw joinery, double-layer pinched ears, and ribbon wrapping.
Anatomy of a Plush Surprise: Low-Sew Structural Engineering
What makes this festive mouse so satisfying to crochet is its seamless modular architecture:
- Square Box Foundation (Rounds 1–5): Beginning with 8 single crochets in a magic ring, four distinct 90-degree corners are created by working 3 single crochets into every second stitch. Over five expanding rounds, the flat square base widens symmetrically to 40 stitches without curving or puckering.
- Perpendicular Wall Step-Up (Round 6 BPsc): Instead of a standard loop transition, Round 6 is worked entirely in Back Post Single Crochet (BPsc) around the 40 perimeter stitches. This wraps the bulky chenille around the base posts, forcing the fabric sharply upward at a crisp 90-degree right angle to create flat tabletop stability.
- Integrated Bobble Paws (Round 12): After transitioning from Mint Green to Crisp White to simulate folded tissue paper inside the box, two 4-stitch bobble paws worked in Silver Grey are integrated directly into the front rim, eliminating the need to crochet and sew separate paws.
- Integrated Lid-to-Head Architecture: The mint green lid begins with 8 sc and expands to 40 sts. Crucially, Round 3 is worked in Front Loops Only (FLO), leaving the back loops (BLO) of Round 2 completely exposed. The silver grey mouse head is joined directly into these exposed loops, anchoring the lid securely to the crown of the head with zero extra seaming!
- Pinched Double-Layer Ears: Each ear consists of a soft baby pink inner panel and a silver grey outer panel crocheted together with a contrasting border, then folded and pinched at the base for expressive three-dimensional posture.
Crafters who enjoyed building the dimensional candy lid on our Christmas Gingerbread House Candy Holder Box or folding the clever pocket pouch of the 3-in-1 Christmas Folding Shopping Bags will love how effortlessly this gift box takes shape.
Why You’ll Love Crocheting This Plush Holiday Mouse
- Super Bulky Speed: Thanks to #6 Super Bulky chenille yarn and a 5.5 mm hook, this substantial 20 cm holiday plush works up in just 3 to 4 hours—making it the ultimate last-minute holiday gift.
- Velvety Heirloom Texture: The cloud-like chenille fiber offers irresistible tactile softness that children and adults instantly fall in love with.
- Smart Low-Sew Construction: Bobble paws are crocheted right into the box rim, and the mouse head is worked directly from the lid, drastically cutting down tedious assembly.
- Festive Mantelpiece Showpiece: With its square reinforced base, this festive mouse sits upright independently on mantels, bookshelves, or tucked under the Christmas tree amidst wrapped gifts.
Materials, Color Breakdown & Notions

For this project, choose a premium #6 Super Bulky plush chenille yarn (100 g / 120 m / 131 yds per ball). The plush pile gives the mouse a velvety toy finish while maintaining crisp stitch definition when worked with a 5.5 mm (US I-9) ergonomic hook.
| Component & Application | Yarn Color / Material Specification | Recommended Quantity |
|---|---|---|
| Square Gift Box & Lid (Color A) | Hint of Mint Green (#6 Super Bulky Chenille) | 1 ball (~100 g) |
| Box Inner Rim / Tissue Peek (Color B) | Snow White (#6 Super Bulky Chenille) | Small ball (~25 g) |
| Mouse Head, Paws & Outer Ears (Color C) | Silver Grey (#6 Super Bulky Chenille) | 1 ball (~80 g) |
| Inner Ears & Embroidered Nose (Color D) | Soft Baby Pink (#6 Super Bulky Chenille) | Small ball (~20 g) |
| Gift Ribbons & Big Top Bow (Color E) | Scarlet Crimson Red (#6 Super Bulky Chenille) | 1 ball (~50 g) |
| Safety Eyes & Fiberfill | Pair of 18 mm glossy black safety eyes + premium polyester fiberfill | Essential for facial charm & structure |
| Toolbox Notions | 5.5 mm ergonomic hook, blunt yarn darning needle, pearl-head pins, scissors | Crafting essentials |
Pro-Tips for Crocheting with Super Bulky Chenille
- Gentle Magic Ring Closure: Chenille yarn can snap or strip its outer pile if pulled aggressively. To close the starting magic ring smoothly, make a loose loop, work your 8 stitches, and gently ease the yarn tail millimeter by millimeter while guiding the base of the stitches with your thumb.
- Tactile Stitch Counting: Because chenille fluff hides individual stitch loops, feel for the stitch openings with your non-hook finger tips or use locking stitch markers every 10 stitches to stay on track.
- Tight Stuffing Technique: When filling the square box, pack fiberfill firmly into the four lower corners first using your thumbs. Shape the walls outward into flat planes as you stuff before working the decreases.
Part 1: The Square Gift Box with Integrated Bobble Paws

Work with a 5.5 mm hook in continuous spiral rounds without slip stitch joins, moving your stitch marker up each round. Start with Color A (Mint Green).
Square Base Expansion (Rounds 1–5)
- Round 1: Work 8 sc into an adjustable magic ring. Gently cinch closed. [8 sts]
- Round 2 (Forming 4 Corners): [1 sc, 3 sc in the next st] × 4 times around. The 3-sc groups form the four square corners. [16 sts]
- Round 3: 2 sc, 3 sc in next st, [3 sc, 3 sc in next st] × 3, 1 sc. [24 sts]
- Round 4: 3 sc, 3 sc in next st, [5 sc, 3 sc in next st] × 3, 2 sc. [32 sts]
- Round 5: 4 sc, 3 sc in next st, [7 sc, 3 sc in next st] × 3, 3 sc. [40 sts]
Box Walls & Bobble Paws (Rounds 6–17)
- Round 6 (The 90-Degree Ridge): Work BPsc (Back Post Single Crochet) around all 40 stitches. Insert hook from back to front, around the post of the stitch, and back to the rear; yarn over and pull up loop, yarn over and draw through both loops. This turns the walls crisply upward. [40 sts]
- Rounds 7–11 (5 rounds): Work 40 sc in each round in Mint Green. [40 sts per round]
- Round 12 (Tissue Rim & Bobble Paws): Switch to Color B (White), keeping Color C (Silver Grey) ready for the paws: Work 7 sc in White, switch to Color C and work a 4-dc Bobble Stitch (yarn over, insert hook into next st, pull up loop, yarn over, pull through 2 loops; repeat 3 more times until 5 loops on hook, yarn over and draw through all 5 loops), switch to White and work 5 sc, switch to Color C and work a second 4-dc Bobble Stitch, switch to White and work 26 sc to end of round. [40 sts / 2 bobble paws formed]
- Round 13: In White, work BPsc around all 40 stitches to create an upper folded-edge shelf. [40 sts]
- Round 14: 3 sc, [dec × 2, 6 sc] × 3, dec × 2, 3 sc. [32 sts]
- Round 15: 2 sc, [dec × 2, 4 sc] × 3, dec × 2, 2 sc. [24 sts]
- Stuffing Checkpoint: Stuff the gift box firmly with fiberfill, pressing stuffing into all four corners to shape clean flat walls.
- Round 16: 1 sc, [dec × 2, 2 sc] × 3, dec × 2, 1 sc. [16 sts]
- Round 17: Work 8 decreases around. Fasten off, weave tail through remaining 8 front loops, pull tight, and knot securely inside. [8 sts]
Part 2: The Gift Box Lid & Integrated Mouse Head
Crocheting the Lid (Rounds 1–7)
- With Color A (Mint Green): Round 1: 8 sc in MR [8 sts]. Round 2: [1 sc, 3 sc in next st] × 4 [16 sts].
- Round 3 (Crucial FLO Round): Worked in Front Loops Only (FLO): 2 sc, 3 sc in next st, [3 sc, 3 sc in next st] × 3, 1 sc [24 sts]. Place a bright locking stitch marker on the exposed unworked back loops (BLO) of Round 2—this is where your mouse head will emerge!
- Round 4: Working through both loops normally: 3 sc, 3 sc in next st, [5 sc, 3 sc in next st] × 3, 2 sc. [32 sts]
- Round 5: 4 sc, 3 sc in next st, [7 sc, 3 sc in next st] × 3, 3 sc. [40 sts]
- Round 6: Work BPsc in all 40 stitches around to form the lid skirt. [40 sts]
- Round 7: Work 40 sc around. Fasten off Mint Green and weave in yarn tail. [40 sts]
Crocheting the Mouse Head Directly from Lid BLOs
- Head Round 1: Flip the lid over so the inside faces you. Join Color C (Silver Grey) into the 16 unworked back loops (BLOs) from Round 2 marked earlier. Work 16 sc around the circle. [16 sts]
- Head Round 2: Work 2 sc in each st around (16 increases). [32 sts]
- Head Rounds 3–5 (3 rounds): Work 32 sc in each round. [32 sts per round]
- Head Round 6: [7 sc, inc] × 4 [36 sts]. Safety Eye Placement: Insert two 18 mm black safety eyes between Rounds 6 and 7, spaced 6 stitches apart. Snap washer backs on tightly.
- Head Rounds 7–8 (2 rounds): Work 36 sc in each round. [36 sts per round]
- Head Round 9: [1 sc, dec] × 12. [24 sts]
- Head Round 10: [2 sc, dec] × 6. [18 sts]. Fasten off, leaving a long 40 cm tail of Silver Grey chenille for sewing the head to the gift box top!
Part 3: Double-Layer Ears, Ribbons & Scarlet Bow
- Inner Ears (Make 2 in Color D – Light Pink): Chain 5. Row 1: Sc in 2nd ch from hook and next 2 ch, 3 hdc in last ch; continue down opposite side of chain: 3 sc, ch 1, turn [9 sts]. Row 2: 3 sc, [hdc-inc] × 3, 3 sc [12 sts]. Fasten off.
- Outer Ears (Make 2 in Color C – Silver Grey): Repeat Inner Ear Rows 1–2 in Silver Grey (12 sts). Chain 1, but do not fasten off.
- Ear Edging & Pinch Fold: Place Pink Inner Ear and Silver Outer Ear wrong sides together. Working through both thicknesses in Color C: Work 3 sc, 6 inc, 3 sc around curved edge [18 sts]. Ch 1, pinch the bottom straight edge in half, and work 1 sc through both folded corners to lock in a permanent concave cupped shape! Fasten off leaving sewing tail.
- Box Ribbon Strips (Make 4 in Color E – Scarlet Red): Chain 7. Row 1: Sc in 2nd ch from hook and next 5 ch, ch 1, turn (6). Row 2: 6 sc across. Fasten off leaving long sewing tail. [6 sts]
- Lid Ribbon Strips: Make one Long Strip (ch 17, 16 sc across) and two Small Strips (ch 7, 6 sc across) in Scarlet Red.
- Top Gift Bow: In Scarlet Red, chain 43. Row 1: Sc in 2nd ch from hook and next 41 ch (42 sc). Fasten off and weave in ends. Tie the flat strip into a balanced bow with two fluffy loops and tails, knotting the center firmly.
Part 4: Step-by-Step Assembly & Finishing Guide

- Step 1 (Attaching Head to Box): Stuff the mouse head firmly with fiberfill through its Round 10 opening. Pin the 18-stitch open neck centrally onto the flat top of the stuffed gift box, positioned directly behind the two silver bobble paws. Sew around the neck securely with Silver Grey chenille; add a final pinch of fiberfill before closing so the head stands proud and upright without wobbling.
- Step 2 (Attaching Ears): Pin the pinched bases of both double-layer ears to each side of the head at Round 4, positioned 1 stitch behind the safety eyes. Sew through the pinched bases so the ears flare expressively outward.
- Step 3 (Box Vertical Ribbons): Pin the 4 Box Ribbon Strips vertically down the center of each of the 4 sides of the mint gift box. On the front side, position the ribbon centered between the two bobble paws. Sew flat along the ribbon edges and weave in ends.
- Step 4 (Lid Ribbons & Bow): Sew the Long Lid Ribbon horizontally across the center of the gift box lid. Sew the two Small Lid Ribbons vertically on either side so their ends meet the horizontal strip. Place the Scarlet Red Bow directly over the center ribbon intersection and stitch securely through the knot.
- Step 5 (Embroidering the Face): With Color D (Light Pink), embroider a sweet T-shaped nose centered between the safety eyes (a horizontal bar 3 stitches wide with a short vertical downward stroke). Add gentle pink pastel blush to the cheeks if desired!
Display your completed festive mouse alongside our Interactive Peek-a-Boo Reindeer in Gift Sack and Peek-a-Boo Santa in Chimney for a whimsical holiday collection that delights everyone who enters your home.
Pin This Plush Christmas Mouse Pattern for Later
Save this cuddly holiday amigurumi tutorial directly to your favorite Pinterest boards so you have the round-by-round counts and assembly diagrams ready whenever holiday crafting season strikes!

