

Wrap your winter crafting in heartwarming storybook nostalgia with this heirloom Little Emma Winter Christmas Doll with Teddy Bear free crochet pattern. Standing approximately 14 to 15 cm (5.5 to 5.9 inches) tall, this charming holiday amigurumi captures the pure enchantment of childhood snow days. Dressed in cozy red booties, vintage grey tights, and a stranded Fair-Isle winter sweater under a snowy picot-ruffled skirt, Little Emma comes complete with her own removable tailored grey overcoat—adorned with genuine 12-double-crochet swirled peppermint candy pockets and a fluffy 23-loop loopy fleece collar—plus a festive earflap beanie hat and her miniature companion teddy bear!
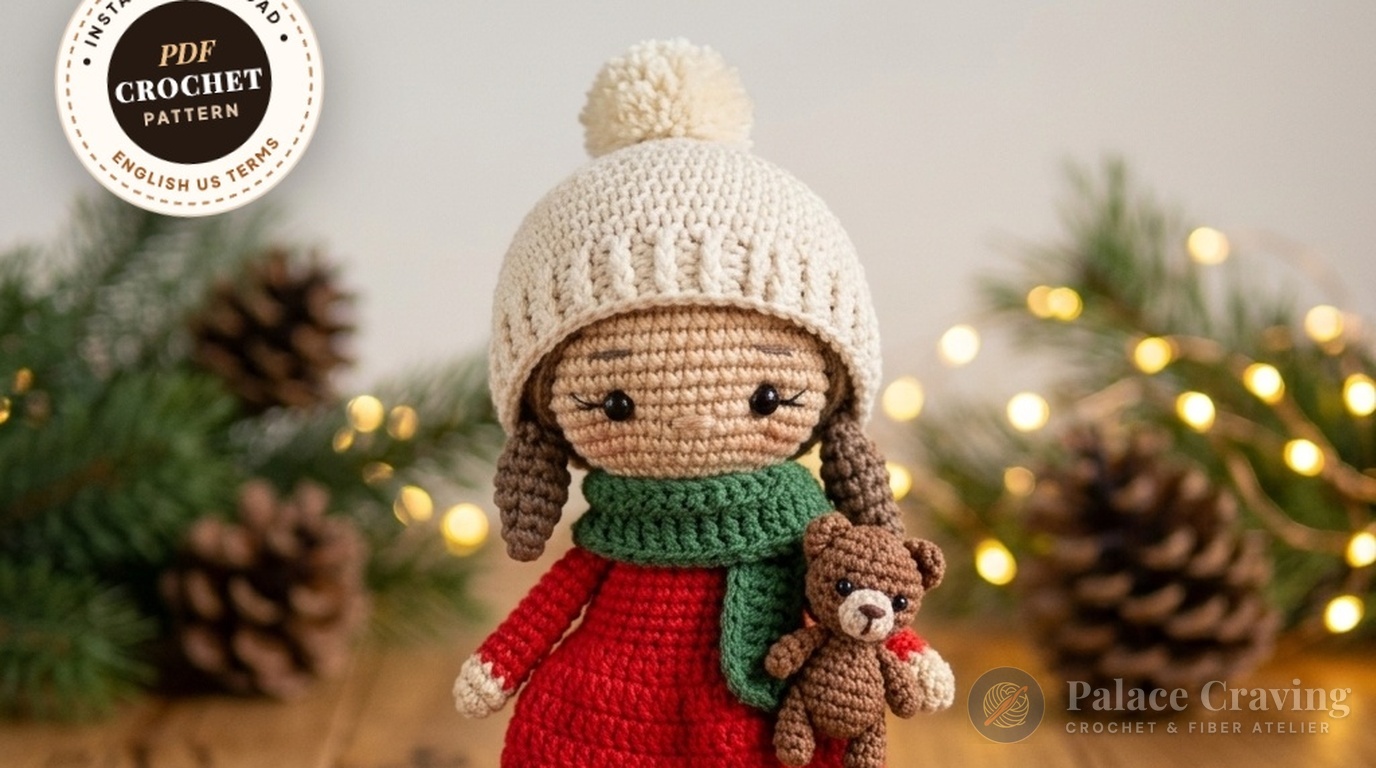
Engineered with couture amigurumi techniques, Little Emma is worked seamlessly from the toes upward. Her sturdy red booties transition into grey tights through back-loop rounds, joined smoothly with a 3-chain bridge into a single continuous torso. The sweater features authentic stranded colorwork at Round 23, creating a crisp Nordic geometric band across her chest, before tapering through a delicate red neckline collar into a fully integrated head. The removable winter coat is crafted in tailored raglan rows with dedicated armhole gaps, a functional buttonhole loop with an 8 mm red coat button, and two-color peppermint candies that make this ensemble a true showpiece for holiday collectors.
Why You’ll Love Crocheting Little Emma
- Seamless Bottom-Up Construction: Legs, hip bridge, Fair-Isle sweater, collar, and head are crocheted as one continuous structural unit, ensuring structural stability without floppy neck seams.
- Removable Tailored Winter Coat: A full miniature outerwear wardrobe featuring raglan armhole construction, set-in sleeves, a 23-loop textured fleece collar, and a functional button fastening.
- Swirled Peppermint Candy Pockets: Two clever 12-stitch two-color double crochet pinwheels worked in a magic ring that look good enough to eat!
- Pointed Red Earflap Beanie with Braided Ties: Worked in half double crochet with 6-row tapered earflaps, a crisp white perimeter border, and 15-chain braided cord ties.
- Chestnut Pigtails & Shaped Bangs Wig: A tailored brown wig cap with varied-height front bangs (single, half double, and double crochets) finished with two bouncy side ponytails.
Key Materials & Palette Specifications

- Sport / DK Cotton-Acrylic Blend Yarn (e.g., YarnArt Jeans, 50g / 160m; or Alize Cotton Gold):
- Beige (#07): ~35g for skin (hands, neck base, and needle-sculpted head).
- Ruby Red (#90): ~40g for boots, sweater colorwork, neckline collar, and the pointed earflap beanie hat.
- Heather Grey (#46): ~45g for tights and the tailored raglan winter coat.
- Snow White (#01): ~35g for sweater torso, sleeves, picot skirt, boot cuffs, and loopy fleece collar.
- Chestnut Brown (#70): ~25g for shaped hair wig cap, side pigtails, and the mini pocket teddy bear.
- Crochet Hook: 1.75 mm steel or ergonomic hook (Tulip Etimo or Clover Amour) to maintain dense, gap-free stitches.
- Notions & Fastenings: One pair of 6 mm glossy black button or safety eyes, one 8 mm red coat button, black and brown embroidery floss for lashes and brows, dry pink pastel for cheek blushing, polyester fiberfill stuffing, and a tapestry needle.
Comprehensive Step-by-Step Crochet Instructions
Part 1: Boots, Legs, Joined Torso, Collar & Head (Rnds 1–54)
Worked continuously from the red booties up to the crown of the head. Stuff legs, hip bridge, and neck rock-solid as you progress. Use a 1.75 mm hook.
- Legs (Make 2 – Rnds 1–13):
- Start with Ruby Red: R1: 6 sc in MR (6). R2: 6 inc (12). Rnds 3–8 (6 rounds): 12 sc around (12).
- Switch to Heather Grey: R9: In back loops only (BLO), 12 sc (12). (Exposed front loops will hold the white boot cuffs).
- Rnds 10–13 (4 rounds): 12 sc around (12).
- Fasten off Left Leg. Work Right Leg identically, then work +3 extra sc at end of Rnd 13 to align marker with inner thigh; do not cut yarn!
- Leg Join & Hip Shaping (Rnds 14–18):
- R14: Ch 3, join into Left Leg with 1 sc: 11 more sc around Left Leg (12 total on left leg), 3 sc along loops of ch-3 bridge, 12 sc around Right Leg, 3 sc along opposite side of ch-3 bridge (30 sts total; place round marker at center back).
- R15 (Hip Increases): 1 inc, 10 sc, 1 inc, 3 sc, 1 inc, 10 sc, 1 inc, 3 sc (34).
- R16: 12 sc, 1 inc, 5 sc, 1 inc, 15 sc (36).
- R17: 36 sc around (36). Change to Snow White: R18: 36 sc (36). Stuff legs firmly.
- Fair-Isle Sweater Torso (Rnds 19–25):
- R19 (White): In BLO, 36 sc around (36). (Exposed front loops will hold the ruffled skirt).
- R20 (White): 1 dec, 26 sc, 1 dec, 6 sc (34). Join Ruby Red (carry White inside stitches).
- R21 (Red): 34 sc around (34). Switch back to White.
- R22 (White): 1 dec, 25 sc, 1 dec, 5 sc (32).
- R23 (Stranded Colorwork Band): Work
(Red 1 sc, White 1 sc) × 16around (32). - R24 (White): 5 sc, 1 dec, 15 sc, 1 dec, 8 sc (30).
- R25 (Red): 4 sc, 1 dec, 15 sc, 1 dec, 7 sc (28). Cut Red yarn; continue in White.
- Upper Bodice & Red Collar (Rnds 26–32):
- R26 (White): 4 sc, 1 dec, 14 sc, 1 dec, 6 sc (26).
- R27: 4 sc, 1 dec, 12 sc, 1 dec, 6 sc (24).
- R28: 24 sc around (24).
- R29: (2 sc, dec) × 6 (18).
- R30: (1 sc, dec) × 6 (12). Cut White; join Beige.
- R31 (Neck Base): In BLO, 12 sc around (12).
- R32 (Head Expansion): 12 inc (24). Pause here to crochet the Red Collar!
- Red Neckline Collar: Hold doll upside down with back facing you. Attach Ruby Red to the exposed front loops of Rnd 31: work ch 1, 1 sc in same st, 10 sc, 1 inc, sl st (13 sts), fasten off and weave in tails.
- Continuous Head (Rnds 33–54):
- Resume with Beige: R33: (3 sc, inc) × 6 (30). R34: (2 sc, inc, 2 sc) × 6 (36). R35: (5 sc, inc) × 6 (42). R36: (3 sc, inc, 3 sc) × 6 (48). R37: (7 sc, inc) × 6 (54). Pack the neck column very densely with fiberfill to prevent wobbling!
- Rnds 38–46 (9 rounds): 54 sc around (54). Insert 6 mm eyes between Rnds 38 and 39, spaced 10 stitches apart (8 stitches visible between inserted eyes).
- Rnds 47–54 (Crown Decreases): R47: (7 sc, dec) × 6 (48). R48: (6 sc, dec) × 6 (42). R49: (5 sc, dec) × 6 (36). R50: (4 sc, dec) × 6 (30). R51: (3 sc, dec) × 6 (24). R52: (2 sc, dec) × 6 (18). R53: (1 sc, dec) × 6 (12). R54: 6 dec (6). Weave through front loops of remaining 6 stitches, pull tight to cinch, and bury yarn tail.

Part 2: Arms, Picot Skirt, Boot Cuffs, Wig & Pigtails
- Arms (Make 2 – Rnds 1–14): Start with Beige: R1: 6 sc in MR (6). R2: (1 sc, inc) × 3 (9). R3: 9 sc (9). Switch to Snow White: R4: 9 sc (9). R5: 1 dec, 7 sc (8). Rnds 6–14 (9 rounds): 8 sc around (8). Stuff only the lower hand, flatten the top opening, and work 4 sc through both layers simultaneously; fasten off leaving a long sewing tail. Sew arms symmetrically to the sides of Rnd 29.
- Snow White Picot-Ruffled Skirt: Hold doll upside down with back facing you. Attach Snow White to the first exposed front loop of Body Rnd 19:
- Rnd 1: Ch 2, (1 hdc, 1 hdc-inc) × 18, sl st to top of ch-2 (54).
- Rnd 2: Ch 2, 54 hdc around, sl st (54).
- Rnd 3 (Picot Hem): Work
(1 sc, ch 2)into every stitch around (54 picot scallops), sl st, fasten off and weave in ends.
- Folded White Boot Cuffs: Hold doll upside down. Attach Snow White to Rnd 9 FLO on each boot: work ch 1, 1 sc in same st, 10 sc, 1 inc, sl st (13 sts), fasten off and hide ends.
- Brown Shaped Hair Wig Cap:
- With Chestnut Brown: R1: 6 sc in MR (6). R2: 6 inc (12). R3: (1 sc, inc) × 6 (18). R4: (2 sc, inc) × 6 (24). R5: (3 sc, inc) × 6 (30). R6: (4 sc, inc) × 6 (36). R7: (5 sc, inc) × 6 (42). R8: (6 sc, inc) × 6 (48). R9: (7 sc, inc) × 6 (54).
- Rnds 10–19 (10 rounds): 54 sc around (54).
- Rnd 20 (Sculpted Bangs & Part): 2 sc, 9 hdc, 10 dc, 2 hdc, 1 sc, 2 hdc, 14 dc, 6 hdc, 8 sc (54). R21: 2 sl st; fasten off leaving a long tail. Place over head with the double-crochet fringe framing her forehead and stitch securely into place.
- Side Pigtails (Make 2 – Rnds 1–8): In Chestnut Brown (do not stuff): R1: 6 sc in MR (6). R2: 6 sc (6). R3: (1 sc, inc) × 3 (9). R4: (2 sc, inc) × 3 (12). R5: 12 sc (12). R6: (2 sc, dec) × 3 (9). R7: (1 sc, dec) × 3 (6). R8: 2 dec (4). Fasten off leaving a tail. Sew to both sides of the wig cap level with Rnd 38.
Part 3: Red Pointed Earflap Beanie Hat with Braided Ties
Worked from the pointed crown tip downward in half double crochet using Ruby Red and a 1.75 mm hook.
- Hat Cone Foundation (Rnds 1–17):
- R1: 6 hdc in MR (6). R2: 6 hdc (6). R3: (1 hdc, hdc-inc) × 3 (9). R4: (2 hdc, hdc-inc) × 3 (12).
- R5: (1 hdc, hdc-inc) × 6 (18). R6: (2 hdc, hdc-inc) × 6 (24). R7: (3 hdc, hdc-inc) × 6 (30).
- R8: (4 hdc, hdc-inc) × 6 (36). R9: (5 hdc, hdc-inc) × 6 (42). R10: (6 hdc, hdc-inc) × 6 (48). R11: (7 hdc, hdc-inc) × 6 (54).
- Rnds 12–16 (5 rounds): 54 hdc around (54). R17: 2 sc, fasten off (54).
- Earflaps (Make 2 in Turning Rows):
- Right Earflap: Count 8 stitches from last st of Rnd 17; join Ruby Red in next stitch: Row 1: ch 1, 8 sc across (8), ch 1, turn. Row 2: 1 dec, 4 sc, 1 dec (6), ch 1, turn. Row 3: 1 dec, 2 sc, 1 dec (4), ch 1, turn. Row 4: 4 sc (4), ch 1, turn. Row 5: 2 dec (2), ch 1, turn. Row 6: 1 dec (1), fasten off.
- Left Earflap: Count 22 stitches forward across the forehead opening from the right earflap; join Ruby Red in next stitch and repeat Rows 1–6.
- White Scalloped Edging & Braided Ties: Attach Snow White after last sc of R17 and single crochet around entire hat perimeter: 8 sc, 5 sc up side of first earflap, 3 sc in point, 5 sc down other side, 22 sc across front forehead, 5 sc up second flap, 3 sc in point, 5 sc down side, 8 sc to finish (66 sc total), sl st, fasten off. Fold a 60 cm White yarn strand in half, loop through each earflap tip, and chain 15 with doubled strands to form cozy braided chin ties!
Part 4: Removable Tailored Grey Winter Coat & Loopy Collar
Worked in raglan rows from the neckline downward using Heather Grey and a 1.75 mm hook.
- Neck Yoke & Armhole Openings (Rows 1–5): Ch 25; starting in 2nd ch from hook:
- Rows 1–2: 24 sc across, ch 1, turn (24).
- Row 3 (Armhole Gaps): 1 inc, 2 sc, ch 6, skip 6 sts, 1 inc, 4 sc, 1 inc, ch 6, skip 6 sts, 2 sc, 1 inc (28 sts + two ch-6 loops), ch 1, turn.
- Row 4: 2 sc, 1 inc, 1 sc, 6 sc across ch-6 bridge, 2 sc, 1 inc, 2 sc, 1 inc, 2 sc, 6 sc across ch-6 bridge, 1 sc, 1 inc, 2 sc (32), ch 1, turn.
- Row 5: (3 sc, inc) × 8 (40), ch 1, turn.
- Coat Body & Buttonhole Loop (Rows 6–14):
- Row 6: 40 sc across, ch 1, turn (40).
- Row 7: (7 sc, inc) × 5 (45), ch 1, turn (45).
- Rows 8–13 (6 rows): 45 sc across, ch 1, turn (45).
- Row 14: 44 sc, 1 inc (46). Do not cut yarn: work 14 sc evenly up the right front opening, then chain 7–8 and slip stitch to corner to create a functional button loop, fasten off. Attach Grey at Row 1 of left front edge and work 13 sc, 1 inc down edge; fasten off.
- Set-In Sleeves (Make 2 – Rnds 1–9): Join Heather Grey at underarm corner of Row 3 armhole: R1: ch 1, 5 sc along underarm, 1 sc in corner, 6 sc along top of armhole, 1 sc in opposite corner (14 sts). R2: (6 sc, inc) × 2 (16). Rnds 3–4: 16 sc. R5: (7 sc, inc) × 2 (18). Rnds 6–7: 18 sc. R8: (7 sc, dec) × 2 (16). R9: 16 sl st around cuff; fasten off and weave in ends.
- Loopy Fleece Neckline Collar: Attach Snow White to first stitch of Row 1 at coat neckline: work
(ch 5, 1 sc in next st) × 22, ch 5, sl st into final stitch (23 fluffy loops total!). Sew the 8 mm red button onto the left front coat lapel.
Part 5: Swirled Peppermint Candies (×2) & Final Assembly
- Two-Color Peppermint Candy Appliqués: Worked in a single round of 12 alternating double crochets in a magic ring:
- With Snow White, make a MR and ch 2. Join Ruby Red and work 1 more ch (counts as 1st White dc with Red top loop).
- Work 2nd dc in Red, pulling White through the final 2 loops to finish.
- Work 3rd dc in White, pulling Red through final 2 loops.
- Continue alternating colors until you have 12 dc total (6 White, 6 Red). Pull MR tight, sl st to close round, and fasten off leaving a 20 cm tail.
- Sew both peppermint candies onto the lower front panels of the grey coat as sweet holiday pocket decorations!
- Facial Embroidery & Blushing: Embroider a 2-stitch horizontal Beige nose centered between Rnds 37 and 38. With black embroidery thread, stitch delicate curved upper eyelashes. With chestnut brown floss, stitch soft arched eyebrows 3 rounds above the eyes. Dust cheeks gently with dry pink artist pastel using a soft makeup brush.
- Mini Pocket Teddy Bear: Worked in rich Chestnut Brown using simple ball increases and bobble ears, Little Emma holds her pocket bear safely in her arms.
3 Atelier Secrets for Masterclass Amigurumi Results
- Crisp Stranded Colorwork Without Tightness: When executing Round 23’s alternating Red and White stitches on the sweater, keep the non-working yarn float relaxed along the back. If floats are pulled too tightly, the waist will pucker and prevent the doll from standing smoothly.
- Fluffing the Loopy Fleece Collar: After working the 23 chain-5 loops along the coat neckline, roll each loop between your fingers or gently comb with a clean dry toothbrush to bloom the yarn fibers into an authentic shearling fleece texture.
- Perfect Peppermint Color Changes: Always complete the final yarn-over of each double crochet with the new contrasting color. This ensures the top loop of the stitch matches the upcoming column, resulting in razor-sharp peppermint pinwheel spirals.
Festive Styling & Winter Display Ideas

- Storybook Winter Mantle: Pose Emma alongside brass candlesticks, faux cedar garlands, and small pinecones to recreate a warm European alpine vignette.
- Interactive Holiday Play Set: Because her tailored coat and earflap beanie are fully removable, she makes an enchanting dress-up doll for children ages 4 and up.
- Heirloom Christmas Stocking Stuffer: Tuck Little Emma and her mini teddy bear into a velvet Christmas stocking for a heartwarming holiday morning keepsake.
Curated Tools & Notions for Amigurumi Success
To help you achieve professional tension and seamless finishes, here are the exact atelier tools and notions featured in this masterclass project:
Ultra-fine polished steel hook with ergonomic soft grip, specifically engineered for tight amigurumi tension in sport-weight cotton yarn.
Classic glossy black shank and safety eyes with snap-lock washers, ideal for expressive 14–18 cm doll faces.
FTC Disclosure: Palace Craving Atelier participates in affiliate programs. If you purchase through our links, we may earn a modest commission at zero additional cost to you.
Storage, Care & Heirloom Preservation
- Gentle Surface Cleaning: Spot clean using lukewarm water with a tiny droplet of wool-safe liquid detergent. Avoid saturating the internal fiberfill or soaking the facial embroidery.
- Preserving Wardrobe Pieces: Store the removable coat flat or lightly padded with tissue paper to prevent wrinkling along the raglan shoulder seams.
- Off-Season Storage: Place Emma and her accessories in an acid-free keepsake box with a small cedar sachet away from damp basements and direct sunlight.
Save & Pin This Festive Pattern
Keep this comprehensive heirloom pattern at your fingertips for your holiday crafting schedule! Save these tutorial pins directly to your favorite Pinterest crochet boards:


Frequently Asked Questions
Can I use 100% mercerized cotton instead of a cotton-acrylic blend?
Yes! Mercerized cotton like Schachenmayr Catania or Scheepjes Catona yields crisp stitch definition and vivid colors. Just ensure you use a 1.75 mm or 2.0 mm hook to maintain tight gauge.
How do I ensure the coat fits properly over her sweater?
The coat is designed with built-in positive ease (+4 stitches around chest and armholes). Try the coat on Little Emma after completing Row 7 of the body before moving on to the sleeves.
Can I make the teddy bear freestanding?
The miniature teddy bear is designed as a lightweight pocket companion. To make him freestanding, insert a coin or flat plastic disc into the base of his body during construction.
Pin This Pattern to Your Holiday Boards
Have you fallen in love with Little Emma and her mini teddy bear? Save this pin to your Holiday & Christmas Crochet board today so you have every row count and assembly photo ready whenever inspiration strikes!