

Bring festive storybook charm into the palm of your hand with this adorable Mini Pocket Pine Tree Girl Doll in Ruffled Hat free crochet pattern. Standing just 13 to 14 cm (about 5.5 inches) tall, this sweet pocket-sized holiday amigurumi combines clever structural techniques with timeless Christmas styling. From her chubby needle-sculpted cheeks and ginger bob wig with playful forehead curls to her flared double-crochet evergreen dress and magnificent three-tiered ruffled pine tree hat tipped with a glowing red holiday berry, she is the ultimate holiday gift, stocking stuffer, or tabletop mascot for the winter season.
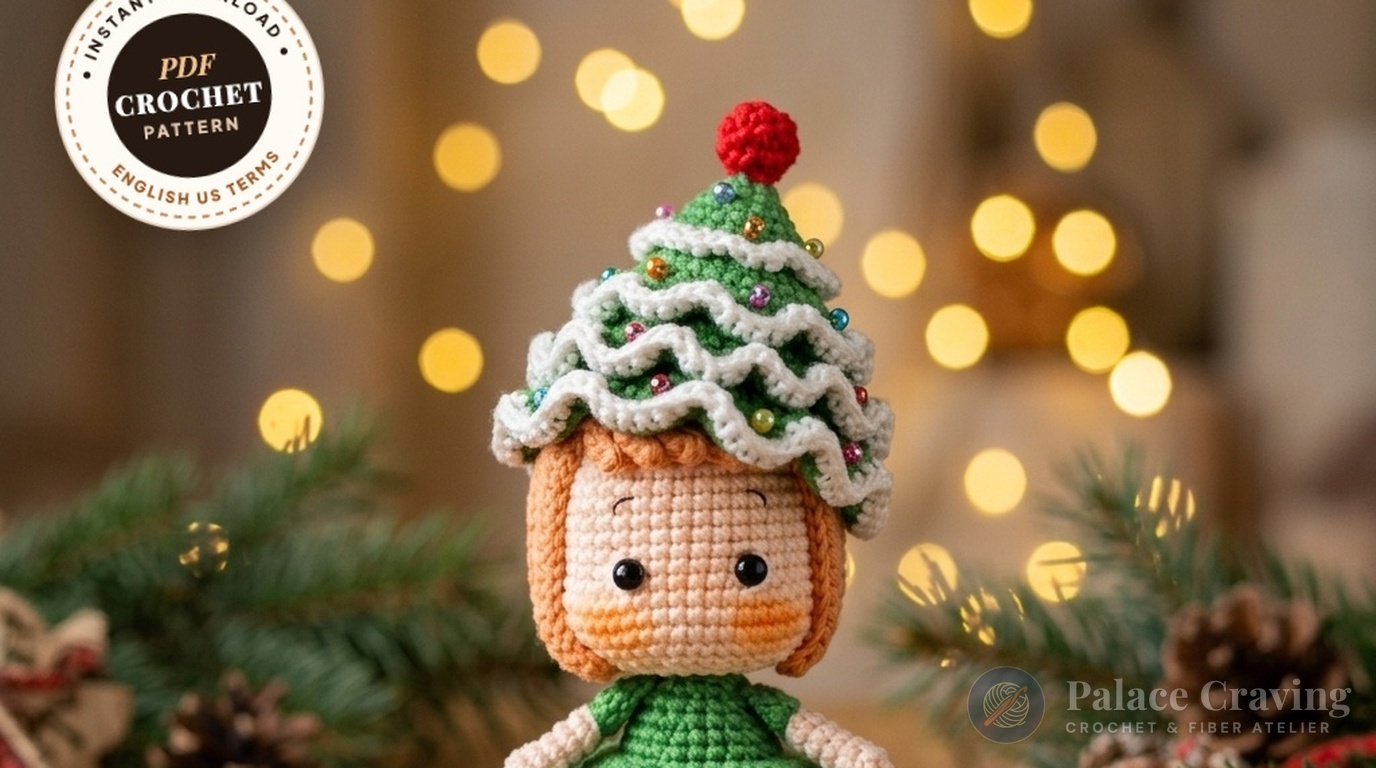
What makes this petite amigurumi doll truly exceptional is its innovative swivel-neck engineering. Rather than a floppy or stiff standard neck seam, the head features an inverted inner neck tube that slides smoothly over an extended neck post on the torso, allowing her head to tilt and swivel with lifelike expression. Meanwhile, the three-tiered Christmas tree hat uses front-loop double-crochet shells edged with snowy ecru single crochets, producing lush boughs that evoke a fresh snowfall in the alpine woods. Whether hanging as a luxury tree ornament or perched on a festive tiered tray, she is a joy to crochet in just a few cozy holiday evenings.
Why You’ll Love Crocheting This Pocket Tree Doll
- Quick & Addictive Weekend Project: At just 14 cm tall, she works up swiftly using small amounts of sport-weight cotton yarn—ideal for festive stash-busting and quick teacher or hostess gifts!
- Ingenious Swivel-Neck Mechanics: The recessed neck socket design eliminates neck wobble completely while allowing her head to pose and tilt naturally.
- Flawless 3-Tier Pine Bough Hat: Structured with 45, 81, and 99 double crochets across three concentric tiers, every branch tier is outlined with a frosty ecru snow rim and crowned with a bright red berry topper.
- Charming Ginger Bob Wig: Worked in a single continuous piece from a central crown ring, featuring 12 bouncy half-double crochet curls and 6 mini front forehead fringe ringlets.
- Heirloom Detail in Miniature: Includes oval-soled brown boots with folded cuffs, puffed sleeve arms, and a picot-ruffled holiday skirt.
Key Materials & Palette Specifications

- Schachenmayr Catania Originals (100% Mercerized Cotton; 50g / 125m):
- Skin Tone (#Tr263): ~20g for head, neck socket, neck post, arms, and upper legs.
- Pine Green (#412): ~30g for lower torso, flared skirt, puffed sleeve caps, and the tiered tree hat cone.
- Ecru / Snowy White (#105): ~10g for the snowy hat ruffle trim borders.
- Holiday Red (#115): ~5g for the spherical tree light topper.
- Rich Brown (#162): ~10g for the ankle boots and folded boot cuffs.
- Gazzal Giza Matte Cotton (50g / 165m): Light Orange / Ginger (#5593) for the 18-strand bob wig and front bang curls.
- Crochet Hook: 2.20 mm ergonomic crochet hook (Tulip Etimo or Clover Amour) for tight, structured single crochet stitches.
- Eyes & Hardware: One pair of 6 mm glossy black safety eyes with secure locking washers.
- Sundries & Notions: Polyester fiberfill stuffing, soft pink/peach artist pastel chalk or colored pencil for blushing, tapestry needle, stitch markers, and sharp embroidery scissors.
Comprehensive Step-by-Step Crochet Instructions
Part 1: Chubby-Cheeked Head with Inverted Neck Socket
Worked from the crown down through the neck tube using Skin (#Tr263) and a 2.20 mm hook. Stuff firmly as you crochet.
- Rnds 1–3: R1: 6 sc in MR (6). R2: 6 inc (12). R3: (1 sc, inc) × 6 (18).
- Rnds 4–7: R4: (2 sc, inc) × 6 (24). R5: (3 sc, inc) × 6 (30). R6: 2 sc, inc, (4 sc, inc) × 5, 2 sc (36). R7: (5 sc, inc) × 6 (42).
- Rnds 8–15 (8 rounds): 42 sc around (42).
- Rnd 16 (Cheek Sculpting Increases): 15 sc, (3 inc, 6 sc) × 2, 9 sc (48). (The two clusters of 3 increases form the protruding chubby front cheeks).
- Rnds 17–19 (3 rounds): 48 sc around (48).
- Safety Eye Insertion: Insert 6 mm safety eyes between Rnds 15 and 16, leaving 4 stitches visible between them, placed directly above the inner cheek increases. Push backings on firmly!
- Rnds 20–24 (Lower Chin Decreases):
- R20: (6 sc, dec) × 6 (42).
- R21: (5 sc, dec) × 6 (36).
- R22: (4 sc, dec) × 6 (30).
- R23: (3 sc, dec) × 6 (24).
- R24: (2 sc, dec) × 6 (18). Pack fiberfill firmly into the cheeks and upper crown.
- Rnds 25–31 (Inner Neck Socket Tube): 18 sc around for 7 rounds even (18). Cut yarn leaving the tube opening ungathered. Using your thumb or a wooden dowel, push Rnds 25–31 directly upward into the head cavity. This creates a recessed interior pocket socket that stabilizes the head!
Part 2: Dress Bodice & Built-In Neck Post
Worked from the lower body up through the neck post using Pine Green (#412) and Skin (#Tr263).
- Rnds 1–6 (Pine Green #412): R1: 6 sc in MR (6). R2: 6 inc (12). R3: (1 sc, inc) × 6 (18). R4: (2 sc, inc) × 6 (24). R5: (3 sc, inc) × 6 (30). R6: (4 sc, inc) × 6 (36).
- Rnds 7–11 (5 rounds): 36 sc around (36).
- Rnd 12: (4 sc, dec) × 6 (30).
- Rnd 13 (Skirt Anchor): In back loops only (BLO), 30 sc around (30). (The exposed front loops will hold the flared dress skirt).
- Rnds 14–18 (Bodice Taper):
- R14: (3 sc, dec) × 6 (24).
- R15: 24 sc around (24).
- R16: (2 sc, dec) × 6 (18).
- R17: 18 sc around (18).
- R18: (1 sc, dec) × 6 (12). Stuff lower torso very firmly.
- Rnds 19–27 (Reinforced Neck Post): Switch to Skin (#Tr263):
- R19: In BLO, 12 slip stitches around (12).
- R20: In BLO, 12 sc around (12).
- Rnds 21–27 (7 rounds): 12 sc around (12). Cut yarn, pack the neck column rock-solid with fiberfill, and weave the needle through the front loops of all 12 stitches to cinch tightly closed.

Part 3: Brown Booties & Legs (Make 2)
- Rnds 1–2 (Sole – Rich Brown #162): Ch 5; starting in 2nd ch from hook: 1 inc, 2 sc, 3 sc in the end chain loop; turn down opposite side: 3 sc (10), sl st, ch 1. R2: (2 inc, 3 sc) × 2 (14).
- Rnds 3–4: R3: In BLO, 14 sc, sl st (14). R4: 14 sc, sl st, ch 1 (14).
- Rnds 5–7 (Vamp Decreases): R5: 6 sc, (dec, 1 sc) × 2, 2 sc (12). R6: 4 sc, 4 dec (8). R7: 8 sc around (8).
- Rnds 8–11 (Skin #Tr263 & Boot Cuff):
- R8: In BLO, (3 sc, inc) × 2 (10).
- R9: (4 sc, inc) × 2 (12).
- R10: 12 sc around (12).
- R11: 2 sc, 1 sl st; fasten off leaving a long tail. Stuff foot firmly.
- Folded Boot Cuff: Join Rich Brown (#162) into Rnd 8 FLO: work
(3 sc, inc) × 2 = 10 sc, sl st, fasten off and weave in ends. Sew legs to underside of body centered over Rnds 3–5.
Part 4: Flared Evergreen Dress Skirt & Puffed-Sleeve Arms
- Flared Dress Skirt (Body Rnd 13 FLO): Hold doll upside down with feet pointing upward. Attach Pine Green (#412) to the center back exposed front loops of Body Rnd 13:
- Rnd 1: (1 dc, dc-inc) × 15 = 45 dc, join with sl st to first dc, ch 2 (45).
- Rnds 2–3: 45 dc around, sl st, ch 2 (45).
- Rnd 4 (Picot-Ruffle Hem):
(Ch 2, 1 sc in next st) × 45around. Sl st, fasten off and weave in ends.
- Puffed-Sleeve Arms (Make 2 – Do Not Stuff):
- Start with Skin (#Tr263): R1: 8 sc in MR (8). R2: 8 sc. R3: (2 sc, dec) × 2 (6). Rnds 4–5: 6 sc around (6).
- Switch to Pine Green (#412) for puffed shoulder sleeve: R6: In BLO, 6 slip stitches (6). R7: In BLO, 6 inc (12). R8: 6 dec (6). Fasten off leaving a 25 cm sewing tail. Flatten upper edge and sew to body sides directly below Rnd 18.
- Swivel-Head Attachment: Slide the body’s stuffed neck post up into the head’s recessed socket. Thread a long doll needle with double-strand Skin yarn. Pass the needle straight down through the top crown of the head, through the internal neck post core, and out the opposite side of the crown. Repeat 3 times, pull snug so the head swivels smoothly without wobbling, knot securely on top of the head (hidden under the wig), and weave in tails.
Part 5: Ginger Bob Wig with Curled Forehead Bangs
Worked with Gazzal Giza Matte Light Orange (#5593) using a 2.20 mm hook. All strands branch directly off a central crown ring.
- Wig Foundation Cap: R1: 8 sc in MR (8). R2: 8 inc (16). Do NOT cut yarn—immediately branch into the hair strands across the 16 base stitches:
- Side Strand 1: Ch 20; starting in 3rd ch from hook: 18 hdc back down the chain, sl st into next st of Rnd 2 (1 strand).
- Front Forehead Bangs (6 Mini Curls across 3 Base Stitches):
*(Ch 8; starting in 2nd ch: 7 sl st, 1 sl st in same base st; Ch 8; 7 sl st, 1 sl st in next base st)* × 3. This produces 6 dainty face-framing curl tendrils!
- Back & Side Strands (11 Strands):
(Ch 20; starting in 3rd ch: 18 hdc down chain, sl st into next st of Rnd 2) × 11. Fasten off leaving a long tail. - Wig Assembly: Place the wig onto the head with the wrong side facing out (which creates rich textured hair waves). Center the 6 short bangs over the forehead, pin the 12 long bob strands evenly around the sides and back, and secure with matching orange thread or clear craft glue.
Part 6: 3-Tier Ruffled Pine Tree Hat & Berry Light Topper
The centerpiece of the doll! Worked with Pine Green (#412) and Ecru (#105) using a 2.20 mm hook. Each round is joined with a slip stitch and chain 1.
- Hat Cone Foundation (Pine Green #412):
- R1: 6 sc in MR, sl st, ch 1 (6).
- R2: (1 sc, inc) × 3, sl st, ch 1 (9).
- R3: (2 sc, inc) × 3, sl st, ch 1 (12).
- R4 (Upper Ruffle BLO Anchor): In BLO, (3 sc, inc) × 3, sl st, ch 1 (15).
- Rnds 5–7: R5: (4 sc, inc) × 3 (18). R6: (5 sc, inc) × 3 (21). R7: (6 sc, inc) × 3 (24).
- R8 (Middle Ruffle BLO Anchor): In BLO, (7 sc, inc) × 3, sl st, ch 1 (27).
- Rnds 9–10: R9: (8 sc, inc) × 3 (30). R10: (9 sc, inc) × 3, sl st, ch 1 (33).
- Tier 1: Bottom Ruffle (Rnd 11 FLO):
- In FLO of Rnd 10: work 33
dcw(3 double crochets in each of the 33 front loops = 99 dc), sl st, ch 1. - Change to Ecru (#105): work 99 sc around the ruffled perimeter, sl st, fasten off and weave in ends.
- In FLO of Rnd 10: work 33
- Tier 2: Middle Ruffle (Rnd 8 FLO):
- Join Pine Green (#412) in Rnd 8 FLO: ch 2, work 27
dcw(3 dc in each of the 27 front loops = 81 dc), sl st, ch 1. - Change to Ecru (#105): work 81 sc around edge, sl st, fasten off.
- Join Pine Green (#412) in Rnd 8 FLO: ch 2, work 27
- Tier 3: Upper Ruffle (Rnd 4 FLO):
- Join Pine Green in Rnd 4 FLO: ch 2, work 15
dcw(3 dc in each of the 15 loops = 45 dc), sl st, ch 1. - Change to Ecru (#105): work 45 sc around edge, sl st, fasten off.
- Join Pine Green in Rnd 4 FLO: ch 2, work 15
- Red Tree Light Topper:
- With Holiday Red (#115): R1: 6 sc in MR (6). R2: 6 inc (12). R3: 12 sc (12). R4: 6 dec (6). Sl st, fasten off, and sew squarely to the hat cone tip!
3 Atelier Secrets for Masterclass Amigurumi Results
- The Inverted Neck Tube Trick: When pushing Rnds 25–31 up into the head cavity, ensure you insert a finger to keep the tube straight and hollow. This creates a reinforced double-wall neck joint that prevents the head from wobbling while allowing 360-degree rotation!
- Curling the Front Bangs: Because the 6 mini bang curls are worked as slip stitches into foundation chains, gently twist them clockwise with your fingertips after crocheting. A touch of hairspray or diluted craft glue keeps them perfectly coiled over her forehead.
- Fluffing the 3-Tier Pine Hat: After edging each ruffle tier with Ecru single crochet, use your thumbs to steam-block or press the ripples outward like real pine boughs. Pin the hat at a slight jaunty tilt onto the ginger bob wig so the bangs remain visible!
Festive Styling & Winter Display Ideas

- Luxury Christmas Tree Ornament: Attach an invisible nylon thread or golden metallic loop through the hat peak to suspend her as a boutique heirloom ornament.
- Festive Tiered-Tray Accents: Perch her among rustic ceramic mugs, candy canes, and gingerbread figurines on holiday tiered kitchen trays.
- Pocket Companion Gift: Tuck her into a winter gift basket with artisan hot cocoa mix, marshmallows, and cozy hand-knit mittens for a cherished holiday surprise.
Curated Tools & Notions for Amigurumi Success
To help you achieve professional tension and seamless finishes, here are the exact atelier tools and notions featured in this masterclass project:
Ultra-smooth elastomer rubber grip designed to eliminate hand fatigue during intricate micro-amigurumi and multi-tier ruffle work.
Glossy deep-black safety eyes with ribbed stems and heavy-duty locking washers, perfectly scaled for pocket dolls and small amigurumi.
FTC Disclosure: Palace Craving Atelier participates in affiliate programs. If you purchase through our links, we may earn a modest commission at zero additional cost to you.
Storage, Care & Heirloom Preservation
- Cleaning: Spot clean with a clean cotton swab dampened in mild wool wash. Do not immerse in water to preserve the internal stuffing tension and facial blushing.
- Protecting the Tree Ruffles: Store the hat unstuffed or lightly lined with tissue paper so the 3 tiers of ruffles retain their dimensional volume.
- Off-Season Storage: Store in an airtight keepsake box with natural cedar chips to protect mercerized cotton fibers from moth damage and humidity.
Save & Pin This Festive Pattern
Keep this comprehensive heirloom pattern handy for your winter crafting schedule! Save these tutorial pins directly to your favorite Pinterest crochet boards:


Frequently Asked Questions
Can I use DK weight acrylic yarn instead of sport cotton?
Yes! You can use lightweight DK yarn such as Stylecraft Special DK or Paintbox Simply DK with a 2.5 mm hook. The finished doll will be slightly larger (~16 cm tall) and equally adorable.
Why is the wig worked with the wrong side facing out?
Crocheting half double crochets on the wrong side creates subtle horizontal ridges that mimic natural hair texture and wave, giving her ginger bob a dimensional, fairytale appearance.
Can I make the hat removable?
Yes! The hat is sized to fit snugly over her ginger bob wig. If you prefer to make it removable for children’s play, do not tack it down with thread; simply slip it on and off her curls as desired.
Pin This Pattern to Your Holiday Boards
Love this pocket-sized holiday maiden? Save this pin to your Holiday & Christmas Crochet board today so you can easily reference every row count and assembly photo whenever you’re ready to crochet!