

Step into a whimsical winter wonderland with the Winter Snowflake Girl Doll in Ruffled Hood and Dress—an exquisite, heirloom-grade holiday amigurumi crafted with delicate curly blonde locks, a dramatic ruffled scarlet bonnet, a pleated snowflake-embroidered skirt, and laced red winter boots. Measuring approximately 26 cm (10.25 inches) tall from her ruffled boots to the crown of her bonnet, this pattern brings museum-quality doll artistry into your hands through an ingenious seamless body-to-head construction and completely removable holiday wardrobe pieces.
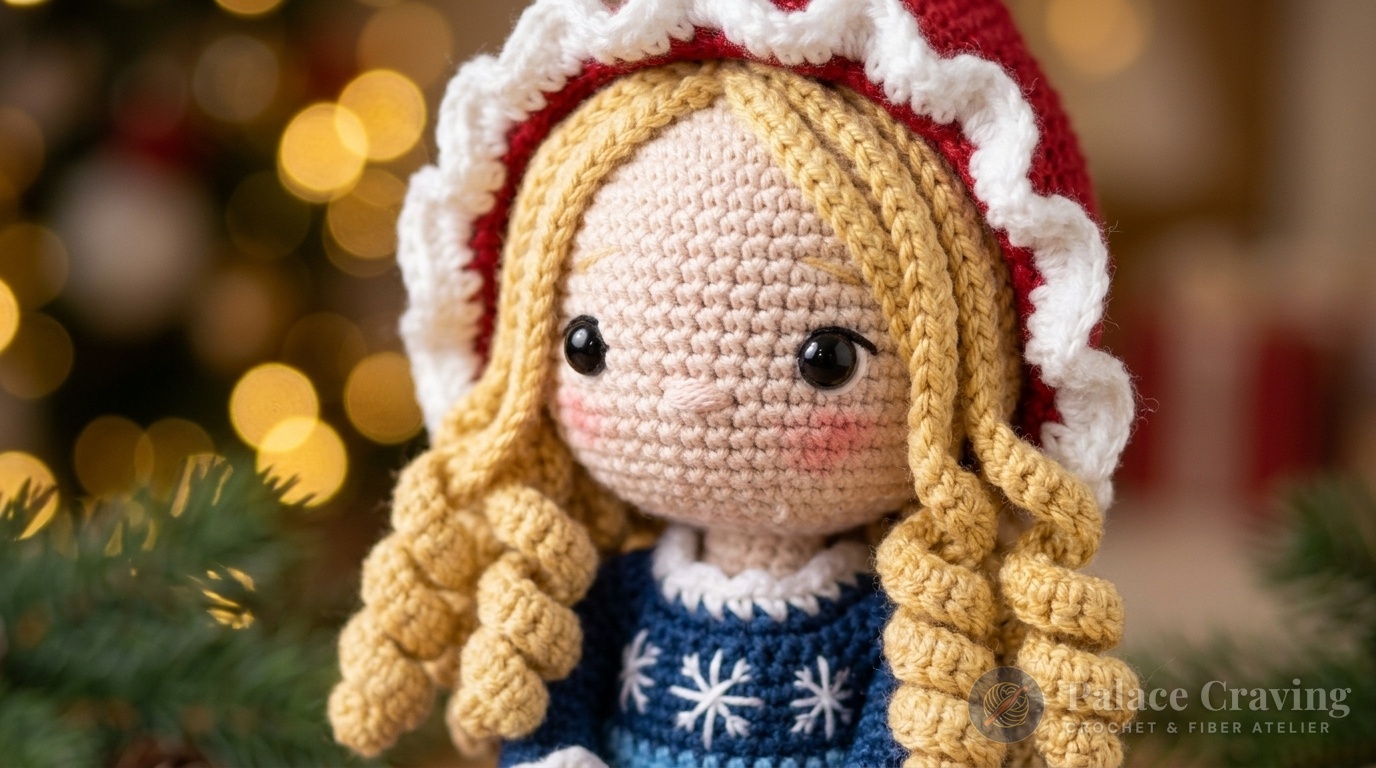
Unlike conventional stuffed toys that require hours of fiddly limb seaming, this masterclass doll is worked in a continuous, flowing architecture from the soles of her boots up through the legs, joined seamlessly at the hips, through the waist, shoulders, neck, and sculpted head. Designed for intermediate to advanced crocheters, the pattern combines structural wire framing with delicate surface embroidery and multi-layered lace ruffles to create an articulated display piece that stands proudly on holiday mantels, tabletop vignettes, or beneath the Christmas tree.
Pattern Architecture & Masterclass Specifications
| Technical Parameter | Specification / Measurement | Artisan Notes |
|---|---|---|
| Finished Doll Height | 26 cm (10.25 inches) | Measured from boot soles to peak of ruffled bonnet |
| Gauge (Single Crochet) | 28 sts × 30 rounds = 10 cm (4 in) | Tight tension prevents fiberfill from showing through stitches |
| Crochet Hook Size | 2.0 mm (US 0 / Steel #4) | Used throughout body, wig, dress, bonnet, and props |
| Doll Construction Style | Seamless Bottom-Up (Legs to Head) | Zero-sew hip join; arms joined directly in Rnd 41 |
| Internal Armature | 2.0 mm Soft Aluminum Craft Wire (~22 cm) | Provides poseable legs and stable neck-to-torso support |
| Safety Eyes Hardware | 7.0 mm Solid Black Safety Eyes | Secured between Rnds 57 & 58 spaced 8 sts apart |
| Wardrobe Articulation | Removable Multi-Layer Ensemble | Separate buttoned petticoat, dress, bonnet & bauble prop |
Yarn Palette & Essential Notions

To achieve clean stitch definition and heirloom durability, choose a premium sport-weight (4-ply) cotton-acrylic blend (approx. 160 m / 50 g or 330 m / 100 g). The cotton core provides stitch crispness while the acrylic adds softness and colorfast vibrancy across the festive palette:
- Skin Tone (Beige/Peach #07): ~45 g for head, neck, torso, arms, and legs.
- Festive Scarlet Red (#51): ~65 g for laced boots, dress bodice/ruffles, bonnet, and bauble.
- Clean Snow White (#06): ~35 g for boot cuffs, dress waist stripe, underskirt petticoat, and hood edging.
- Deep Navy Blue (#44): ~25 g for dress skirt base and snowflake surface embroidery.
- Ice / Light Blue (#14): ~15 g for collar trim and delicate skirt piping.
- Golden Sandy Beige (#18 / #07): ~30 g for 30-strand spiral curly hair wig and outer boot soles.
- Bright Gold / Yellow (#187): ~5 g for metallic bauble cap and hanging accent.
- Notions & Tools: 2.0 mm ergonomic hook, 7 mm safety eyes, 2.0 mm soft craft wire, 8 mm wooden button, tapestry needle, sharp embroidery scissors, pink soft pastel (for blushing cheeks), and premium high-loft polyester fiberfill.
Recommended Tools & Hardware for Heirloom Amigurumi
Clover Amour 2.0 mm Ergonomic Crochet Hook
The ultra-smooth aluminum head and comfort grip prevent hand fatigue through high-density sport cotton stitch work.
7 mm Solid Black Safety Eyes with Washers (100 Pcs)
Glossy, defect-free safety eyes with secure locking backings designed specifically for fine amigurumi doll faces.
As an Amazon Associate, Palace Craving earns from qualifying purchases at no added cost to you.
Part 1: Arms, Laced Red Boots, Soles & Poseable Legs
We begin by preparing the arms (worked first so they can be seamlessly incorporated into the upper torso in Round 41) followed by the boots and legs. The boot construction features a specialized double-layered sole technique that creates flat, sturdy feet capable of free-standing balance.
Arms (Make 2 – In Skin Tone #07)
Work in continuous spiral rounds. Do not stuff the arms, as craft wire will be threaded through them during torso assembly:
- Rnd 1: 7 sc in Magic Ring [7].
- Rnds 2–17: 7 sc around (16 rounds even) [7].
- Fasten off leaving a short tail for securing during torso integration.
Left Boot & Leg (Scarlet Red #51 & Skin #07)
- Rnd 1: With Scarlet Red (#51), Ch 5. Starting in 2nd ch from hook: 3 sc, 3 sc in last chain, working down opposite side of chain: 2 sc, 2 sc in final st [10].
- Rnd 2: Inc, 2 sc, 3 inc, 2 sc, 2 inc [16].
- Rnd 3: BLO 16 sc around [16]. (Note: Leave front loops unworked for joining outer sole later).
- Rnd 4: 16 sc around [16].
- Rnd 5 (Toe Shaping): 5 sc, 3 dec, 5 sc [13].
- Rnd 6: 4 sc, 2 dec, 5 sc [11].
- Rnds 7–11: 11 sc around (5 rounds even) [11].
- Rnd 12: Switch to Skin Tone (#07): BLO 11 sc around [11]. (Leave front loops unworked for white ruffle cuff).
- Wire Insertion: Cut a 22 cm piece of 2.0 mm craft wire, fold a 1 cm loop at one end, wrap with adhesive tape, and insert into foot base. Stuff foot firmly around wire.
- Rnds 13–15: 11 sc around (3 rounds) [11].
- Rnd 16 (Knee Shaping): sc, dec, 3 sc, 2 inc, 3 sc [12]. (Knee increases face forward).
- Rnd 17: sc, dec, 3 sc, dec, 4 sc [10].
- Rnd 18: 10 sc around [10].
- Rnd 19: sc, inc, 8 sc [11].
- Rnd 20: 2 sc, inc, 8 sc [12].
- Rnds 21–27: 12 sc around (7 rounds even) [12]. Work 2 additional sc to align at inner thigh. Fasten off Left Leg and stuff firmly.
White Boot Ruffle Cuff & Outer Beige Sole
White Ruffle Cuff: Attach White (#06) yarn to the unworked front loops of Round 12. Work (sc, ch 2) × 11 around [33 loops]. Fasten off and weave in ends.
Outer Beige Sole (Make 2 – Beige #07): Work Rnds 1 & 2 identically to the boot base (16 sts). Place this flat oval against the bottom of the red boot, aligning stitch-for-stitch with the exposed front loops of Round 3. Working through both the sole edge and Round 3 front loops simultaneously, execute 16 slip stitches around. This creates a crisp, raised welt that ensures the doll stands upright with rock-solid stability.
Right Boot & Leg
Repeat Rnds 1–27, the White Boot Cuff, and the Outer Beige Sole identically to the Left Leg. At the end of Rnd 27, change to Scarlet Red (#51) and work 8 additional sc to reach the exact center inner thigh. Do not fasten off! We will join legs directly from this active loop.
Part 2: Seamless Body, Arm Join & Sculpted Head

Connecting the legs seamlessly creates a smooth underpants structure that transitions flawlessly into the doll’s torso. Follow the exact round breakdown below:
- Rnd 28 (Seamless Hip Join): From active loop on Right Leg with Red (#51), Ch 3. Join to Left Leg (3rd stitch past Rnd 27 endpoint): 12 sc around Left Leg, 3 sc along one side of Ch-3 bridge, 12 sc around Right Leg, 3 sc along opposite side of Ch-3 [30].
- Rnd 29: Inc, 25 sc, inc, 3 sc [32].
- Rnds 30–31: 32 sc around (2 rounds) [32].
- Rnd 32: 16 dec around [16]. Stuff hips firmly around the two wires, twist wires together at torso center, and switch to Skin Tone (#07).
- Rnd 33: BLO 16 sc around [16].
- Rnds 34–40: 16 sc around (7 rounds even) [16].
- Rnd 41 (Arm Integration): 4 sc on back, 7 sc around 1st Arm, 8 sc across chest, 7 sc around 2nd Arm, 4 sc on back [30]. (Pass wire loop through each arm before crocheting).
- Rnd 42 (Shoulder Shaping): 3 sc, (2 sc, dec) × 6, 3 sc [24].
- Rnd 43: (sc, dec) × 8 [16].
- Rnd 44: 8 dec [8].
- Rnd 45: (2 sc, dec) × 2 [6].
- Rnds 46–47 (Neck): 6 sc around (2 rounds even) [6]. Continue immediately to head!
Sculpted Head (Rnds 48–70)
- Rnd 48: FLO 6 inc [12].
- Rnd 49: (sc, inc) × 6 [18].
- Rnd 50: (sc, inc, sc) × 6 [24].
- Rnd 51: (3 sc, inc) × 6 [30].
- Rnd 52: (2 sc, inc, 2 sc) × 6 [36].
- Rnd 53: (5 sc, inc) × 6 [42].
- Rnd 54: (7 sc, inc, 6 sc) × 3 [45].
- Rnds 55–63: 45 sc around (9 rounds even) [45].
- Rnd 64: (7 sc, dec, 6 sc) × 3 [42].
- Rnd 65: (5 sc, dec) × 6 [36].
- Rnd 66: (2 sc, dec, 2 sc) × 6 [30].
- Eye Placement: Insert 7.0 mm black safety eyes between Rnds 57 & 58 spaced 8 stitches apart. Stuff head firmly with fiberfill, ensuring wire extends into the cranial core for structural stability.
- Rnd 67: (3 sc, dec) × 6 [24].
- Rnd 68: (sc, dec, sc) × 6 [18].
- Rnd 69: (sc, dec) × 6 [12].
- Rnd 70: 6 dec [6]. Fasten off, weave tail through FLO of remaining 6 stitches, pull tight and secure.
- Ears (Make 2): 6 sc in Magic Ring [6]. Sew to head between Rnds 57 & 58, positioned 6 stitches laterally from each eye. Use embroidery floss to stitch delicate upper eyelashes and gentle brow arcs, then shade cheeks with soft pink pastel.
Part 3: Two-Layer Curly Hair Wig (30 Cascading Strands)
The doll’s lush head of bouncy golden curls is engineered across two tiered layers worked into a single circular base cap, creating voluminous dimension without excessive bulk under her holiday bonnet:
- Base Cap: With Sandy Beige (#18/#07): R1: 6 sc in MR [6]. R2: 6 inc [12]. R3: FLO (sc, inc) × 6 [18]. Do not cut yarn; begin Layer 1 strands directly into the 18 active stitches of Round 3.
- Strand 1 (Left Side Cheek Curl): Ch 30; starting in 2nd ch: 1 slst, (3 sc, inc) × 3, 16 sc. Slst in next st of base [32].
- Strands 2–5 (8 Short Bangs): Work 2 strands into each of the next 4 stitches (8 bangs total): For each strand: Ch 10; from 2nd ch: 9 sc, slst in base.
- Strand 6 (Right Side Cheek Curl): Ch 30; from 2nd ch: 1 slst, (3 sc, inc) × 3, 16 sc. Slst in next st of base [32].
- Strands 7–11 (5 Side/Back Curls): 1 strand per st across next 5 sts: Ch 40; from 2nd ch: 1 slst, (3 sc, inc) × 3, 26 sc. Slst in next st [42].
- Strands 12–13 (4 Center-Back Curls): 2 strands into each of next 2 sts: Ch 40; from 2nd ch: 1 slst, (3 sc, inc) × 3, 26 sc. Slst in base [42].
- Strands 14–18 (5 Back Curls): 1 strand per st across last 5 sts: Ch 40; from 2nd ch: 1 slst, (3 sc, inc) × 3, 26 sc. Slst in base [42].
- Layer 2 (6 Upper Crown Curls): Transition without cutting yarn into the unworked back loops (BLO) of Round 2: Work 6 cascading curls of [Ch 40; 1 slst, (3 sc, inc) × 3, 26 sc]. Fasten off.
- Wig Assembly: Place cap on the crown of the head with the wrong side facing outward (curls spiral naturally outward). Pin the 8 bangs gently across the brow line, position the two side framing curls against the cheeks, and use clear textile glue or neat tack stitches to anchor the wig permanently.
Part 4: Embroidered Snowflake Dress & Ruffled Petticoat
The winter dress features an alternating front-loop/back-loop increase technique in Round 10 that generates crisp, pleated box pleats reminiscent of Victorian winter gowns. A separate buttoned petticoat ensures the skirt flares gracefully.
Ruffled White Petticoat Underskirt
- With White (#06), Ch 24. Start in 7th ch from hook (skipped 6 chains form buttonhole loop): work 18 inc-dc across chain, join with slst to 1st dc [36].
- Rnds 2–4: Ch 2 (does not count as st), 36 dc around, slst in 1st dc (3 rounds even) [36].
- Rnd 5 (Full Ruffle): Ch 2, BLO 36 inc3-dc around (3 dc in every back loop) [108]. Slst to join, fasten off and sew an 8 mm button opposite the buttonhole loop.
Snowflake Holiday Dress
- Row 1: With White (#06), Ch 13. From 2nd ch: (sc, inc) × 6, ch 1, turn [18].
- Row 2: (2 sc, inc) × 6, ch 1, turn [24].
- Row 3: 2 sc, (sc, inc) × 10, 2 sc [34]. Switch to Scarlet Red (#51).
- Row 4 (Armholes): BLO 4 sc, Ch 2, skip 9 sts (1st armhole), BLO 8 sc, Ch 2, skip 9 sts (2nd armhole), BLO 4 sc, ch 1, turn [20].
- Row 5: 4 sc, 2 sc (on ch-2 bridge), 8 sc, 2 sc (on ch-2 bridge), 4 sc, ch 1, turn [20].
- Rows 6–9: 20 sc across (4 rows even) [20].
- Row 10 (Pleated Skirt Flare): Work
(FLO inc3-dc, BLO inc3-dc) × 10across [60 dc]. Join with slst to work in continuous rounds. - Rnds 11–12: With Scarlet Red (#51), 60 dc around (2 rounds) [60].
- Rnds 13–14: Switch to White (#06), 60 dc around (2 rounds) [60].
- Rnd 15: Switch to Light Blue (#14):
(sc, ch 1) × 60around [120]. - Rnd 16: Switch to Dark Navy Blue (#44):
(sc, ch 1) × 60around [120]. Fasten off. - Collar Accent: Join Light Blue (#14) in unworked FLO of Row 4 around neck: Row 1:
(sc, ch 1) × 20[40]. Row 2: Join Navy Blue (#44):(sc, ch 1) × 20[40]. Fasten off. - Snowflake Embroidery: With Dark Navy Blue embroidery thread, hand-stitch 8 evenly spaced 6-point snowflakes around the white skirt band (Rnds 13–14). Add tiny V-ticks to the tips of each snowflake spoke for delicate winter frost styling.
Part 5: Dramatic Ruffled Red Bonnet & Chin Ties

The scarlet bonnet frames the doll’s face with dramatic flair. It features an open back neck arc and an explosive ruffled brim edged in pure white slip stitches:
- Rnd 1: With Scarlet Red (#51), Ch 2, 10 dc in Magic Ring, slst to join [10].
- Rnd 2: Ch 2, 10 inc-dc around [20].
- Rnd 3: Ch 2, (dc, inc-dc) × 10 [30].
- Rnd 4: Ch 2, (2 dc, inc-dc) × 10, slst to join [40].
- Row 5 (Neck Opening – Turned Rows): Leaving the last 5 stitches unworked for neck comfort: Ch 2, (3 dc, inc-dc) × 7, ch 2, turn [35].
- Row 6: 35 dc across, ch 2, turn [35].
- Row 7 (Flared Ruffle Brim): BLO 35 inc3-dc across (3 dc in every back loop) [105]. Fasten off Red.
- White Ruffle Edging: Join White (#06) to the first stitch of Row 7 and work 105 loose slip stitches along the entire ruffled edge. Fasten off.
- Chin Tie Strings: With Scarlet Red, make a slip knot and Ch 20 (first tie string). Work 35 slst evenly along the bottom raw neck edge of the hood, then Ch 20 (second tie string). Fasten off.
Part 6: Christmas Bauble Ornament & Dressing the Doll
To complete the holiday masterclass, crochet a miniature Christmas tree bauble to hang from the doll’s poseable hand:
- Bauble Ball: With Red (#51): R1: 6 sc in MR [6]. R2: 6 inc [12]. R3: (sc, inc) × 6 [18]. Rnds 4–5: 18 sc around [18]. R6: (sc, dec) × 6 [12] (stuff firmly). R7: 6 dec [6]. Fasten off and weave tail through front loops to cinch closed.
- Gold Cap & Hanging Loop: With Yellow/Gold (#187): 6 sc in MR [6]. Leave a 25 cm tail. Sew cap centered on top of bauble and loop the remaining thread to create a 3 cm hanging cord.
- Assembly & Dressing:
- Slip the White Ruffled Petticoat up over the doll’s legs and button securely at back waist.
- Dress the doll in her Embroidered Snowflake Gown, feeding poseable arms through armholes, and tie a tiny bow at back neck.
- Place the Ruffled Red Bonnet over her curly hair, tie the scarlet ribbons beneath her chin, and hook the gold bauble loop onto her right hand.
3 Masterclass Tips for Flawless Doll Presentation
1. Steam-Blocking the Pleated Skirt: After completing the snowflake embroidery, use a handheld garment steamer held 10 cm away from the skirt pleats to relax the cotton-acrylic fibers. Lightly finger-press each box pleat while warm for razor-sharp drapery.
2. Defined, Frizz-Free Spiral Curls: When completing each strand of the hair wig, roll the curl tightly around a wooden pencil or chopstick and mist with a 50/50 mixture of water and fabric stiffener. Allow to dry completely before gluing the cap to the head.
3. Sturdy Free-Standing Sole Technique: Ensure the 16 slip stitches connecting the outer beige sole to Round 3 are worked with consistent, snug tension. This creates a firm outer perimeter ring that prevents the doll’s feet from rounding out under the weight of her body.
Frequently Asked Questions
Can I make this doll without internal wire?
Yes! The doll can be made without craft wire as a soft, cuddle-safe play toy for small children. If omitting the wire, ensure you stuff the neck and thigh joints extremely firmly with dense fiberfill clusters to prevent head wobble.
What yarn weight works best if I cannot find Sport 4-ply?
You can substitute DK (Light Worsted / 3-weight) yarn paired with a 2.5 mm hook. The finished doll will measure approximately 30 cm (12 inches) tall and require slightly larger 8 mm or 9 mm safety eyes.
How do I wash and care for this handcrafted doll?
Because of the internal wire armature and delicate surface embroidery, spot clean gently with a damp cotton cloth and mild wool wash detergent. Never submerge the doll completely in water or machine wash.
Pin This Free Masterclass Tutorial for Your Holiday Crochet Board
Save these pins to your Pinterest amigurumi and holiday crochet boards to have this comprehensive pattern ready whenever you want to create a breathtaking handmade heirloom gift!

