

You have spent dozens of hours selecting yarn, maintaining tension, and weaving in every last yarn tail. Yet when you lay your finished crochet blanket (like our chunky ribbed throw blanket) or motif flat on the table, the edges curl inward, the corners flare, and the geometry looks slightly distorted. Do not panic—this is entirely normal. The defining technique that separates home hobby crafts from luxurious, boutique-grade knitwear is a single transformative finishing step: blocking. In this comprehensive guide, we teach you how to wet block, steam block, and edge-finish your crochet makes into razor-sharp, heirloom perfection.
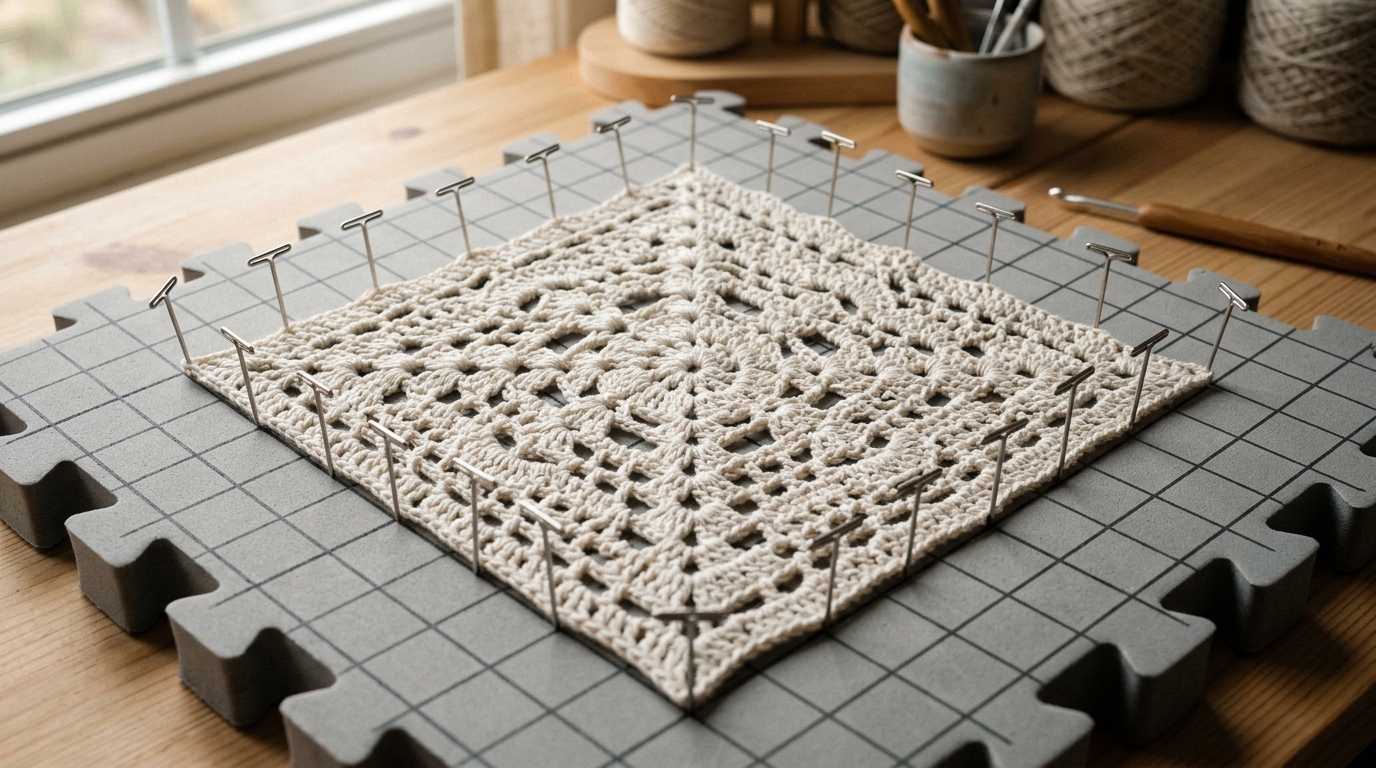
Blocking is the controlled process of introducing moisture and gentle heat to relax fiber crimp, evening out minor tension inconsistencies across rows and setting your fabric to exact finished dimensions. Once dried in position, the yarn’s molecular structure retains its crisp shape permanently.
Why Blocking is Non-Negotiable for Quality Makes
- Eliminates Edge Curling: Naturally relaxing the tension on row edges prevents fabric from rolling inward on scarves, cotton dishcloths, and blankets.
- Unlocks Lace & Texture: Stitches bloom open, revealing the intricate openwork and negative space that remains compressed while on the hook.
- Guarantees Flawless Seaming: Squaring motifs to identical measurements makes joining effortless (see our stitch directory to understand stitch heights).
- Softens Handfeel: Cleansing and blooming natural fibers removes manufacturing spin oils and relaxes harsh acrylic finishes.
The Professional Blocking Toolkit

Equipping your studio with dedicated blocking essentials protects your delicate stitches from water damage and rust:
- Interlocking Foam Grid Mats: High-density EVA foam mats with 1-inch printed gridlines allow you to measure dimensions accurately and build custom shapes for blankets of any size.
- Rust-Proof Stainless Steel T-Pins: Never use everyday sewing dressmaker pins, as moisture will cause them to rust and leave permanent orange stains on your yarn! Always specify nickel-plated stainless steel T-pins.
- No-Rinse Gentle Wool Wash: Formulated with natural lanolin and essential oils to hydrate animal fibers without requiring aggressive rinsing.
- Handheld Garment Steamer: The fastest, most controlled tool for steam blocking acrylic, cotton, and delicate blends.
Blocking Methods by Fiber Type: Wet vs. Steam
Different fibers respond to moisture and heat in fundamentally different ways (refer to our yarn weight and fiber guide). Selecting the wrong method can scorch fibers or fail to set shape:
Method 1: Wet Blocking (Best for Wool, Alpaca & Natural Fibers)
Submerge your finished piece in lukewarm water infused with a drop of no-rinse wool wash for 15 to 20 minutes. Gently press out excess water by rolling the piece inside a clean bath towel—never wring or twist! Transfer to your grid mats, gently pat to shape, and insert T-pins every 1 to 2 inches along the border. Allow to air dry completely away from direct heat or sunlight.

Method 2: Steam Blocking (Best for Acrylic, Cotton & Blends)
Pin your dry project to your grid mats at your desired final dimensions. Power on your garment steamer and hover the nozzle approximately 1.5 to 2 inches above the fabric, allowing the steam plume to penetrate the stitches. Crucial Fiber Warning: Acrylic is plastic; if the metal head of a steamer touches acrylic yarn, it will melt (“kill”) the fibers permanently into a shiny, limp mess. Keep the head hovering, then gently pat the warm stitches with your hands and let cool.
The Fiber-by-Fiber Blocking Matrix
| Yarn Fiber | Recommended Method | Heat Tolerance | Drying Time | Key Rule |
|---|---|---|---|---|
| 100% Wool / Merino | Wet Blocking | Warm water (no agitation) | 24 to 48 hours | Never wring or agitate (prevents felting) |
| 100% Cotton / Linen | Wet or Steam | High heat tolerant | 12 to 24 hours | Pull firmly to set shape; fibers soften |
| 100% Acrylic | Steam Blocking Only | Low / Hover only | 1 to 2 hours | Never touch iron to fiber; avoid killing |
| Wool / Acrylic Blend | Steam or Spray | Moderate hover | 6 to 12 hours | Test on a small gauge swatch first |
4 Clean Edge Finishing Borders

A pristine border frames your project like a tailored matte on fine art:
1. The Stabilizing Single Crochet Base: Always work one round of evenly spaced single crochets around your entire project before adding decorative borders. Work 3 single crochets into every 90-degree corner to keep edges flat.
2. The Crab Stitch (Reverse Single Crochet): Worked from left to right instead of right to left. It creates a dense, twisted corded rim that prevents any future edge rolling on blankets and baskets.
3. The Delicate Picot Border: Work [1 SC, CH 3, slip stitch into first chain, 1 SC]. This creates tiny decorative droplets that lend vintage romantic flair to baby blankets and placemats.
4. The Classic Shell Border: Work 5 double crochets into a single stitch, skip 2 stitches, slip stitch, skip 2 stitches, and repeat. Perfect for softening geometric lines with fluid scallops.
Frequently Asked Questions
Do I have to re-block my crochet project every time I wash it?
Natural animal fibers (wool, alpaca) benefit from being pinned or laid flat to dry after each laundering. Acrylic, once steam blocked, retains its memory through machine washings permanently.
Can I block crochet without expensive blocking mats?
Yes! You can use clean interlocking children’s playroom foam floor tiles, a folded yoga mat, or a thick bath towel layered over a mattress. Just ensure you use rust-proof T-pins.
Why are my granny squares not square after blocking?
Make sure you are measuring diagonal distances from corner to opposite corner on your grid mat. If both diagonals are identical, your square is guaranteed true 90-degree square.
Pin This Blocking & Edge Finishing Guide
Save this complete visual finishing guide to your craft board on Pinterest so you always have the fiber matrix and border tutorials when finishing your next heirloom piece!

