

There is something undeniably heart-melting about a winter snowman bundled up against the frosty cold, and this adorable Christmas Snowman in Reindeer Earmuffs takes holiday cuteness to an entirely new level. Standing approximately 13 cm (5.1 inches) tall, this whimsical amigurumi features expressive sculpted eye sockets and chubby rosy cheeks, a pointed carrot nose, double-layered blue reindeer earmuffs with miniature dark brown antlers, a cozy crimson scarf, and matching blue snowflake boots and mittens with fluffy white cuffs. Crafted with an intuitive seamless head-and-body construction and thread-jointed posable limbs, this free pattern also includes a bonus plush-cuffed Holiday Mitten Gift Pouch!
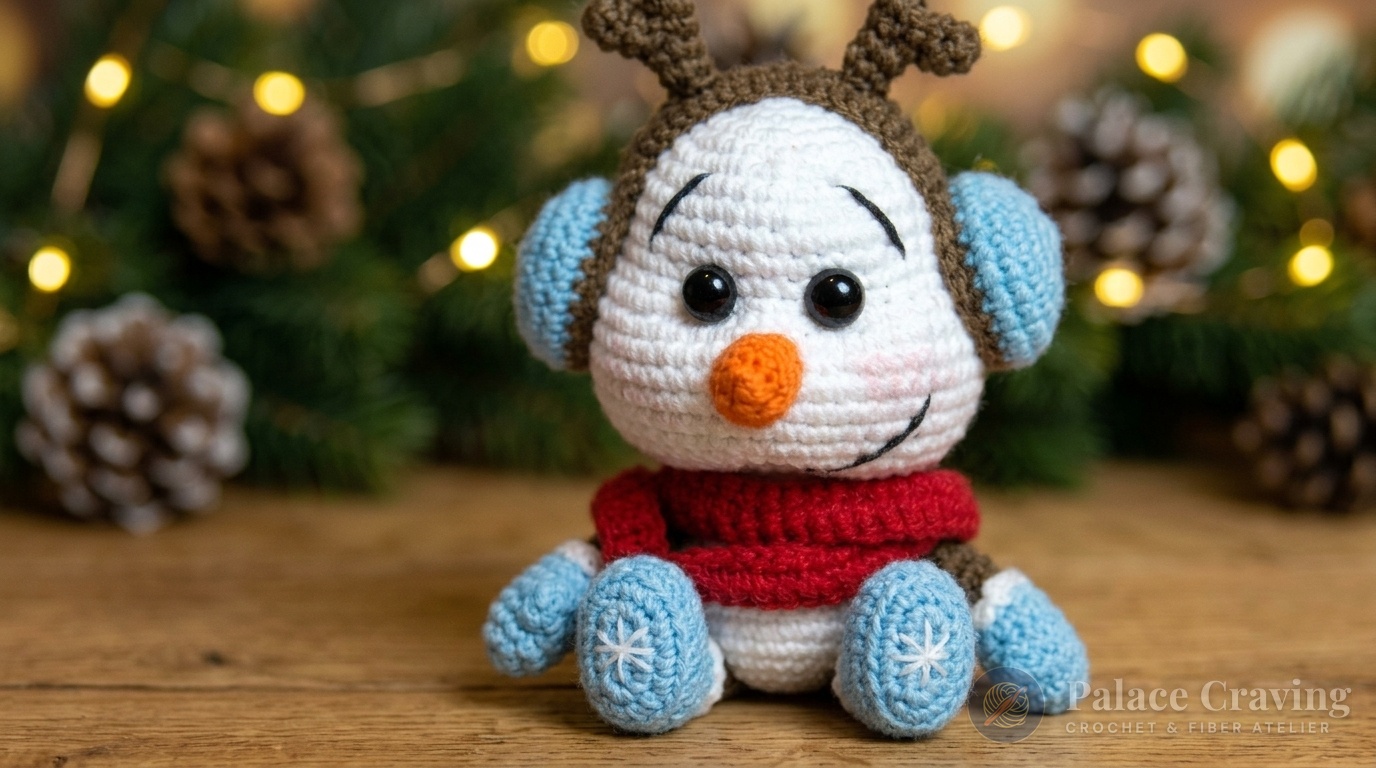
Unlike generic cylindrical snowman dolls, this design utilizes needle sculpting techniques to create concave eye sockets and lifted, chubby cheeks that give the snowman an endearing storybook personality. The arms and boots are thread-jointed directly through the torso, allowing the snowman to sit naturally on a winter mantel or stand alert beside holiday greenery. Display your snowman alongside our magnificent Festive Gingerbread & Holly Door Wreath, our huggable Plush Chibi Christmas Reindeer, or our shelf-sitting Cozy Nordic Holiday Gnomes to create an enchanting handmade Christmas showcase in your home.
Why You’ll Love Making This Sculpted Holiday Snowman
- Seamless Head & Body Flow: The entire central snowman is crocheted in one continuous piece from the crown of the head straight down through the round base without separate neck seaming.
- Expressive Needle Facial Sculpting: Simple needle passes between 6 facial points indent the eye sockets and plump the cheeks, giving your snowman a professional, high-end toy finish.
- Posable Thread-Jointed Limbs: Instead of stiffly sewing the mittens and snowflake boots flat, durable internal thread joints allow your snowman’s arms and legs to rotate and pose playfully.
- Whimsical Reindeer Earmuffs: Double-layered ear cups with 2-pronged dark brown antlers slip snugly onto the snowman’s head like a cozy winter crown.
- Bonus Mitten Gift Pouch: The pattern includes a matching plush-cuffed Christmas mitten that doubles as a festive gift card holder or tree ornament!
Anatomy & Stitch Count Breakdown
Precision stitch tension shapes the dramatic cheek flare and tapered waistline. Here are the core technical specifications from the studio bench:
Curated Materials & Studio Swaps

- Yarn Selection: 55% Cotton / 45% Acrylic DK yarn (approx. 50g / 160m per skein). This blend offers smooth, fuzz-free stitch clarity with enough flex for tight needle sculpting:
- Snow White: 1 full skein (50g) for the head, body, and cuff trims.
- Sky Blue: 25g for the earmuff cups, mittens, and boots.
- Dark Chocolate Brown: 20g for the headband, reindeer antlers, and twig limbs.
- Cherry Red: 15g for the long wrapped winter scarf.
- Carrot Orange: 5g scrap for the conical carrot nose.
- White Plush Chenille (Bonus Pouch): 15g of chunky white velvet yarn (worked on a 3.5mm hook) for the mitten cuff.
- Crochet Hooks: 1.5 mm (US size 7/8 steel) for the snowman body and accessories to create an impenetrable, dense stitch fabric. 3.5 mm (US E/4) for the bonus plush mitten cuff.
- Notions & Tools: Pair of 8 mm black glossy safety eyes, polyester fiberfill stuffing, pink dry pastel chalk or blush powder with soft makeup brush, long doll-making tapestry needle, and scissors.
Clover Amour Ergonomic Steel 1.5mm Crochet Hook
When crocheting tight amigurumi stitches with fine cotton yarn, an ergonomic rubber handle prevents hand fatigue and ensures smooth gliding through miniature single crochet loops.
View 1.5mm Ergonomic Hook on Amazon →As an Amazon Associate, Palace Craving earns from qualifying purchases at no extra cost to you.
Complete Step-by-Step Pattern Instructions
Standard US Crochet Terminology. Stitches are worked in continuous spiral rounds without joining slip stitches. Use a locking stitch marker in the first stitch of every round.
Part 1: Carrot Nose & Sculpted Head
Carrot Nose:
- With Carrot Orange yarn and a 1.5mm hook:
- Rnd 1: 4 sc in Magic Ring (4 sts).
- Rnd 2:
(1 sc, inc)× 2 (6 sts). - Rnd 3: 6 sc around (6 sts).
- Rnd 4:
(1 sc, inc)× 3 (9 sts). - Rnds 5–6: 9 sc around (2 rounds even). Fasten off, leaving a long sewing tail.
Sculpted Head (Rnds 1–27):
- With Snow White yarn and 1.5mm hook:
- Rnd 1: 6 sc in Magic Ring (6 sts).
- Rnd 2: 6 inc around (12 sts).
- Rnd 3:
(1 sc, inc)× 6 (18 sts). - Rnd 4: 1 sc, inc,
(2 sc, inc)× 5, 1 sc (24 sts). - Rnd 5:
(3 sc, inc)× 6 (30 sts). - Rnd 6: 2 sc, inc,
(4 sc, inc)× 5, 2 sc (36 sts). - Rnd 7:
(5 sc, inc)× 6 (42 sts). - Rnds 8–12: 42 sc around (5 rounds even) (42 sts).
- Rnd 13 (Chubby Cheek Flare):
(1 sc, inc)× 12 times across the front face, then 18 sc across the back of the head (54 sts). - Rnds 14–18: 54 sc around (5 rounds even) (54 sts).
- Rnd 19:
(7 sc, dec)× 6 around (48 sts). - Rnd 20: 48 sc around (48 sts).
- Eye Placement: Insert 8 mm black safety eyes centered directly above the cheek increases between Rounds 11 and 12, spaced 4 stitches apart.
- Rnd 21: 3 sc, dec,
(6 sc, dec)× 5, 3 sc (42 sts). - Rnd 22:
(5 sc, dec)× 6 around (36 sts). - Rnd 23: 2 sc, dec,
(4 sc, dec)× 5, 2 sc (30 sts). - Rnd 24:
(3 sc, dec)× 6 around (24 sts). - Rnd 25: 1 sc, dec,
(2 sc, dec)× 5, 1 sc (18 sts). - Rnd 26: 18 sc around (18 sts).
- Rnd 27:
(2 sc, inc)× 6 around (24 sts). Stuff the head firmly, taking care to push fiberfill deep into the chubby cheek pockets!
Part 2: 6-Point Facial Sculpting & Seamless Body
Needle Sculpting the Eyes & Cheeks:
- Mark Points 1 & 2 under the chin between Rounds 23 and 24 (approx. 1 stitch apart).
- Mark Points 3 & 4 at the outer corners of the left and right eyes. Mark Points 5 & 6 at the inner corners.
- Thread a long doll needle with strong white cotton yarn: Insert at Pt 1 → exit at Pt 3 (outer left eye), cross over the eye to enter Pt 5 (inner left eye) → exit at Pt 2 under chin. Pull firmly to indent the left eye socket!
- Repeat for the right eye: Insert at Pt 1 → exit at Pt 4 (outer right eye), cross to enter Pt 6 (inner right eye) → exit at Pt 2 under chin. Pull both yarn tails firmly until deep, expressive sockets and raised chubby cheeks appear. Tie a secure square knot under the chin and bury the ends inside the head.
- Stuff and sew the Carrot Nose centered between the eyes. With black embroidery thread, stitch curved sleepy eyebrows and a cheerful sideways smile!
Seamless Body (Continue in White from Rnd 27):
- Rnd 28: 24 sc around (24 sts).
- Rnd 29:
(3 sc, inc)× 6 around (30 sts). - Rnd 30:
(4 sc, inc)× 6 around (36 sts). - Rnd 31: 36 sc around (36 sts).
- Rnd 32:
(5 sc, inc)× 6 around (42 sts). - Rnds 33–36: 42 sc around (4 rounds even) (42 sts).
- Rnd 37:
(6 sc, inc)× 6 around (48 sts). - Rnds 38–41: 48 sc around (4 rounds even for a round belly) (48 sts).
- Rnd 42: 3 sc, dec,
(6 sc, dec)× 5, 3 sc (42 sts). - Rnd 43:
(5 sc, dec)× 6 around (36 sts). - Rnd 44: 2 sc, dec,
(4 sc, dec)× 5, 2 sc (30 sts). - Rnd 45:
(3 sc, dec)× 6 around (24 sts). Stuff the neck and torso firmly. - Rnd 46: 1 sc, dec,
(2 sc, dec)× 5, 1 sc (18 sts). - Rnd 47:
(1 sc, dec)× 6 around (12 sts). - Rnd 48:
dec6 times around (6 sts). Cinch closed and bury tail inside.

Part 3: Snowflake Boots & Mittens
Snowflake Boots (Make 2 in Blue & Dark Brown):
- With Sky Blue yarn: R1: 6 sc in MR (6). R2: 6 inc (12). R3:
(1 sc, inc)× 6 (18). Rnds 4–6: 18 sc (3 rnds). R7: 3 dec, 12 sc (15). R8: 3 dec, 9 sc (12). R9: 12 sc (12). - Change to Dark Brown: R10: In Back Loops Only (BLO):
(2 sc, dec)× 3 (9). Rnds 11–14: 9 sc (4 rnds). R15:(1 sc, dec)× 3 (6). Fasten off. - White Cuff: Join Snow White yarn into the unused Front Loops of Round 9; work 12 sc around. Embroider white snowflake cross-stitches on the toe!
Front Mittens & Twig Arms (Make 2):
- With Sky Blue yarn: R1: 7 sc in MR (7). R2: 7 inc (14). Rnds 3–4: 14 sc (2 rnds). R5: 4-dc bobble stitch (thumb), 13 sc (14). R6: 14 sc. R7: dec, 5 sc, dec, 5 sc (12). Stuff mitten.
- Change to Dark Brown: R8: BLO
(1 sc, dec)× 4 (8). Rnds 9–15: 8 sc (7 rnds). R16: 4 dec (4). Close opening. Join White in Rnd 7 FLO and work 12 sc cuff. Thread-joint all 4 limbs through the body with strong yarn so they rotate freely!
Part 4: Reindeer Earmuffs & Red Scarf
Earmuff Cups (Make 2 Sets):
- Outer Cup (Blue): R1: 6 sc in MR. R2: 6 inc (12). R3:
(1 sc, inc)× 6 (18). R4:(2 sc, inc)× 6 (24). Rnds 5–6: 24 sc (2 rnds). Fasten off. - Inner Cup (Dark Brown): Work Rnds 1–4 same as Outer Cup (24 sts). Do not cut yarn—place wrong sides together with the Blue cup and single-crochet through both layers simultaneously around the perimeter (24 sts).
Headband & Reindeer Horns:
- Headband: With Dark Brown, crochet 2 strips of 21 sc (ch 22 base). Sandwich together and single-crochet around perimeter. Sew ends to the earmuff cups.
- Reindeer Horns (Make 2): Small tip (6 sc MR, 2 rnds of 6 sc). Main branch (6 sc MR, 3 rnds of 6 sc). Join small tip to side of main branch at Rnd 5, work 3 rounds of 6 sc. Sew above the earmuffs.
- Red Winter Scarf: With Cherry Red yarn, chain 96. Work 2 rows of 95 single crochets. Wrap twice around the snowman’s neck and tie loosely!
Part 5: Bonus Holiday Gift Mitten Pouch
- With Red or Sky Blue DK yarn and a 1.5mm hook, crochet the thumb (expanding to 30 sts over 14 rnds).
- Crochet the main mitten palm starting with 6 sc in MR, expanding to 66 sts across Rnds 1–16. Work even through Rnd 24.
- Rnd 25 (Join Thumb): Hold thumb against mitten body and work 15 sc through both layers together, then 51 sc around the mitten body (66 sts). Decrease over Rnds 27–33 down to 60 sts.
- Plush Chenille Cuff: Switch to White Plush Chenille Yarn and a 3.5mm hook: work
(1 sc, skip 1 st)30 times (30 sts). Work 8 rounds of 30 sc. Fold cuff over, sew hanging loop at back, and embroider crisp white snowflakes!
Assembly, Blushing & Display Inspirations

Complete the character styling with a soft dusting of pink dry pastel or cosmetic blush across the chubby cheeks using a small makeup brush. Because the limbs are thread-jointed, these snowmen offer versatile display choices:
- Fireplace Hearth Perch: Position them seated with boots dangling over a mantelpiece ledge alongside glowing candles.
- Whimsical Tree Trimming: Fasten a fine gold cord to the center of the earmuff headband to hang them directly from Christmas tree boughs.
- Holiday Gift Pairing: Slip holiday chocolates or a gift card into the companion Mitten Pouch and place the snowman right beside it under the tree!
Frequently Asked Questions
What is thread jointing and why is it better for amigurumi limbs?
Thread jointing connects limbs using a single long strand of strong yarn or buttonhole thread passed straight through the body from one limb to the other and back again. When knotted tightly inside, the friction allows both arms and legs to swivel 360 degrees so the toy can sit, stand, or wave!
How do I keep the snowman standing stably without tipping?
Before closing Round 48 at the base of the body, insert a small flat circle cut from plastic craft canvas or place a tablespoon of plastic poly-pellets in a nylon pouch at the bottom. This flat, weighted foundation prevents wobbling.
Can I make the snowman in worsted weight yarn instead?
Yes! If you switch to worsted weight yarn with a 2.75mm hook following the identical stitch counts, your snowman will measure approximately 8 inches (20 cm) tall!
Save & Pin This Festive Snowman Pattern
Planning your holiday handmade list? Save these pins to your Holiday & Christmas Crochet boards so you have the complete free tutorial whenever you’re ready to crochet!

