

There is nothing quite as cozy or comforting during the holidays as a squishy, super-soft plush amigurumi, and this delightful Plush Chibi Christmas Reindeer captures the absolute sweet spot of festive charm. Measuring approximately 6 inches (15 cm) tall in velvety chenille yarn with an oversized chibi head, branched dark chocolate antlers, a cream snout tipped with a fluffy cherry red Rudolph pom-pom nose, and a crimson ribbon bow under its chin, this free pattern is designed with crafters’ sanity in mind. Engineered with an ingenious no-sew body-to-head construction, you work seamlessly from the bottom hooves straight up through the crown of the head with zero neck seaming required!
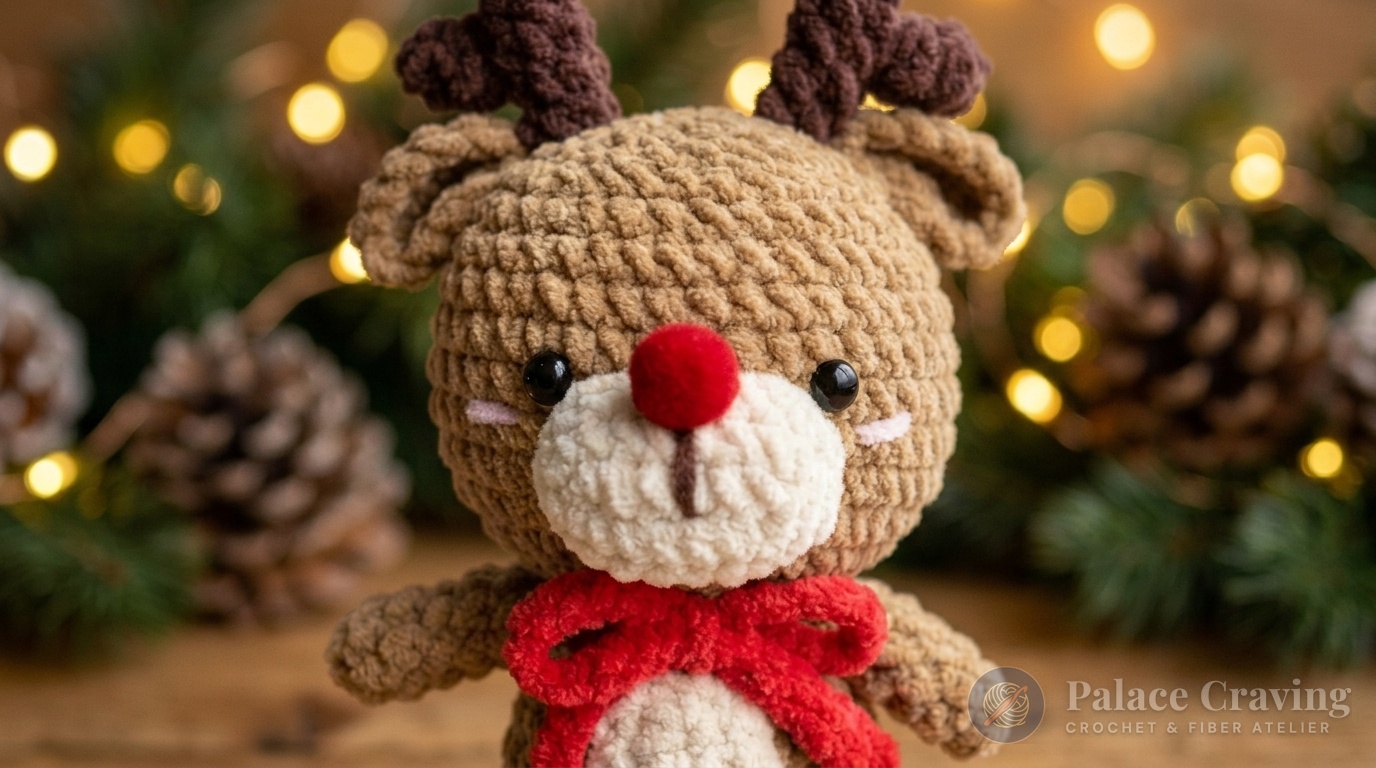
Most traditional amigurumi reindeer require tedious sewing: stitching legs to torso, wobbling heads onto necks, and aligning tiny appendages with endless pins. This pattern eliminates that frustration entirely. The hooves and legs are joined using a simple 3-chain bridge, forming the tummy and torso in continuous rounds before expanding into the head via Front Loop Only (FLO) increases. Pair your finished plush reindeer alongside our shelf-sitting Cozy Nordic Holiday Gnomes, our jolly Mini Crochet Santa Amigurumi, or our heirloom Cable Christmas Stocking to create a heartwarming handmade Christmas collection.
Why You’ll Love Making This Chibi Velvet Reindeer
- 100% No-Sew Body & Head: You start from the bottom hooves, join both legs together seamlessly with a chain bridge, crochet up the torso, and immediately expand into the chubby chibi head without ever cutting your yarn or sewing a neck seam!
- Ultra-Fast 1-Hour Project: Super bulky (#6) chenille velvet yarn works up remarkably fast on a 3.5mm hook, producing a plump, dense plushie in just one relaxing evening sitting.
- Irresistibly Soft Velvet Texture: The chenille fiber gives this amigurumi a cloud-like velvety sheen that looks luxurious under glowing Christmas tree fairy lights.
- Iconic Rudolph Red Nose: A plush 18mm red pom-pom brings Santa’s favorite reindeer immediately to life without delicate needlework.
- Perfect Holiday Gift & Stocking Stuffer: Durable, squishy, and child-safe (when using securely fastened safety eyes or embroidered sleepy eyes), this is the quintessential holiday gift for little ones.
Anatomy & Stitch Count Breakdown
Proportion is what gives chibi characters their signature cuteness—an oversized head sitting atop a compact, chubby body. Here is how the stitches are engineered from the ground up:
Curated Materials & Studio Swaps

- Yarn Selection: Super Bulky / Category 6 Chenille Velvet Yarn (approx. 100g / 120m per skein). This fiber gives the reindeer its irresistible plush toy feel:
- Light Honey Brown: 65g for the main body, seamless head, arms, and outer ears.
- Dark Chocolate Brown: 20g for the hooves, 2-branched antlers, and embroidered mouth line.
- Soft Cream / Oatmeal: 15g for the oval belly patch and snout muzzle.
- Festive Crimson Red: 10g for the neck bow collar.
- Crochet Hook: 3.5 mm (US E/4). Downsizing hook with bulky chenille guarantees tight, closed stitches so stuffing never shows through.
- Notions & Eyes: Pair of 10 mm black safety eyes (or cabochon backings), 18 mm red fluffy pom-pom for the nose, polyester fiberfill stuffing, locking stitch marker, large-eye tapestry needle, and scissors.
Himalaya Dolphin Baby / Bernat Blanket Chenille Velvet Yarn
The gold standard for plush amigurumi. Microfiber chenille provides an ultra-dense, buttery soft texture that conceals stitch holes and withstands repeated cuddling without shedding.
View Chenille Velvet Yarn on Amazon →As an Amazon Associate, Palace Craving earns from qualifying purchases at no extra cost to you.
Complete Step-by-Step Pattern Instructions
Standard US Crochet Terminology. Stitches are worked in continuous spiral rounds without joining slip stitches. Use a locking stitch marker in the first stitch of every round.
Part 1: Hooves, Legs & Seamless Body Join
First Leg:
- With Dark Chocolate Brown yarn (hoof), work 5 sc in a Magic Ring (5 sts).
- Rnd 2: Work 2 sc in each st around (10 sts).
- Rnds 3–4: Change to Light Honey Brown yarn: 10 sc around (2 rounds even) (10 sts). Fasten off and stuff lightly.
Second Leg & Joining Bridge:
- Repeat Rounds 1–4 identically for the second leg, but DO NOT cut the yarn on the second leg!
- Stuff both legs firmly. From the working loop of the second leg, chain 3.
- Body Rnd 1 (Join): Join into the first leg: work 10 sc around the first leg, work 3 sc along the top ridges of the ch-3 bridge, work 10 sc around the second leg, and work 3 sc in the remaining bottom loops of the ch-3 bridge (26 sts total).
- Body Rnd 2: 11 sc, inc, 12 sc, inc, 1 sc (28 sts).
- Body Rnd 3: 5 sc, inc, 12 sc, inc, 9 sc (30 sts).
- Body Rnd 4: 30 sc around (30 sts).
- Body Rnd 5: Working in Back Loops Only (BLO): 30 sc around (creates the bottom sitting rim) (30 sts).
- Body Rnd 6:
(8 sc, dec)× 3 around (27 sts). - Body Rnd 7:
(7 sc, dec)× 3 around (24 sts). - Body Rnd 8:
(4 sc, dec)× 4 around (20 sts). - Body Rnd 9:
(3 sc, dec)× 4 around (16 sts). - Body Rnd 10:
(2 sc, dec)× 4 around (12 sts). Stuff the lower body and belly firmly with fiberfill!
Part 2: Seamless No-Sew Chibi Head Expansion
Continue crocheting directly from Round 10 with Light Honey Brown yarn:
- Rnd 11: Working in Front Loops Only (FLO) in all 12 stitches: 12 inc around (24 sts). (This sharp flare creates the dramatic chibi cheek overhang without any neck seaming!)
- Rnd 12:
(1 sc, inc)× 12 around (36 sts). - Rnd 13: 36 sc around (36 sts).
- Rnd 14:
(5 sc, inc)× 6 around (42 sts). - Rnds 15–20: 42 sc around (6 rounds even for chubby cheeks) (42 sts).
- Eye Insertion: Insert 10 mm safety eyes on Round 17, spaced 7 stitches apart.
- Rnd 21:
(5 sc, dec)× 6 around (36 sts). - Rnd 22:
(4 sc, dec)× 6 around (30 sts). - Rnd 23:
(3 sc, dec)× 6 around (24 sts). - Rnd 24:
(2 sc, dec)× 6 around (18 sts). Stuff the head firmly, taking care to fill out the cheeks symmetrically. - Rnd 25:
(1 sc, dec)× 6 around (12 sts). Finish stuffing the crown. - Rnd 26:
dec6 times around (6 sts). Fasten off, weave the yarn tail through the remaining 6 front loops, cinch closed, and bury the tail inside the head.

Part 3: Hands, Branched Antlers & Ears
Hands / Arms (Make 2):
- With Light Honey Brown yarn, work 6 sc in Magic Ring (6 sts).
- Rnd 2:
(2 sc, inc)× 2 around (8 sts). - Rnds 3–6: 8 sc around (4 rounds even) (8 sts).
- Rnd 7:
(2 sc, dec)× 2 (6 sts). Fasten off, flatten opening, and sew symmetrically to the sides of the upper torso at Round 9.
2-Branched Antlers (Make 2):
- Short Branch: With Dark Chocolate Brown yarn, work 5 sc in Magic Ring. Rnds 2–3: 5 sc around (2 rounds even). Fasten off leaving a sewing tail.
- Main Stem: With Dark Chocolate Brown yarn, work 5 sc in Magic Ring. Rnds 2–5: 5 sc around (4 rounds even). Fasten off leaving a long tail.
- Sew the short branch onto the side of the main stem at Round 4, creating an authentic 2-pronged antler. Attach both antlers to the crown of the head at Rounds 23–24.
Cupped Ears (Make 2):
- With Light Honey Brown yarn: 6 sc in Magic Ring (do not join into round; turn).
- Row 2: Ch 1, turn, work 2 sc in each st across (12 sts).
- Row 3: Ch 1, turn, 12 sc across (12 sts). Fasten off, pinch bottom corners together to form a cupped leaf ear, and sew just below the antlers at Rounds 22–23.
Part 4: Muzzle, Belly Patch & Red Ribbon Bow
Oval Snout Muzzle:
- With Soft Cream yarn, chain 7.
- Rnd 1: Start in 2nd ch from hook: inc, 4 sc, 4 sc in last ch, rotate along bottom of chain: 4 sc, inc (16 sts).
- Rnd 2: 1 sc, inc, 4 sc,
(1 sc, inc)× 2, 4 sc, 1 sc, inc (20 sts). - Rnd 3: 20 sc around (20 sts). Fasten off, leaving a sewing tail.
Oval Belly Patch:
- With Soft Cream yarn, chain 5.
- Rnd 1: 2nd ch from hook: inc, 2 sc, 4 sc in last ch, along opposite side: 2 sc, inc (12 sts).
- Rnd 2: 1 sc, inc, 2 sc,
(1 sc, inc)× 2, 2 sc, 1 sc, inc (16 sts). Fasten off. Sew centered onto the front tummy across Rounds 3–8.
Festive Red Bow:
- With Festive Crimson yarn, chain 40.
- Starting in 2nd ch from hook, work 39 slip stitches back across the chain. Fasten off, tie into a neat bow, and secure under the chin at the front neck seam!
Assembly & Rudolph Face Detailing
- Snout Positioning: Lightly stuff the Cream Oval Muzzle with fiberfill. Center it horizontally on the lower face spanning Rounds 13–17, nestled between the safety eyes. Sew securely around the edge.
- Rudolph Pom-Pom Nose: Using a dab of non-toxic craft glue or a yarn needle, secure the 18 mm Red Pom-Pom Nose at the upper center of the cream muzzle. With Dark Chocolate yarn, embroider a delicate vertical philtrum stitch running from beneath the nose down to Round 3 of the muzzle.
- Rosy Cheeks: Using a soft cosmetic brush, apply a light dusting of pink powder blush just beneath the outer corners of each eye for that cheerful winter frostbite glow.
- Collar Bow: Fasten the completed Crimson Red crochet bow snugly around the neck at Round 10.
Holiday Styling & Gift Presentation

Because chenille velvet yarn yields a soft, self-supporting structure, these chibi reindeer sit upright naturally without needing interior wires. Display them across your holiday home:
- Mantelpiece Vignette: Perch your reindeer alongside evergreen garlands and fairy lights for an inviting woodland atmosphere.
- Christmas Tree Topper Companion: Place this cuddly Rudolph among tree branches near the tree skirt for toddlers to safely hug.
- Gift Basket Centerpiece: Tuck into a holiday hot cocoa mug gift basket wrapped in cellophane with peppermint sticks.
Frequently Asked Questions
How do I prevent chenille yarn from shedding when crocheting?
Chenille fibers can shed at the cut raw edge. A smart studio hack is to briefly pass a flame from a lighter near the cut end (or dab a dot of clear craft glue) to melt the core polyester threads, sealing the fluffy tufts completely before chaining!
Can I embroider sleepy eyes instead of safety eyes for a baby?
Yes! If this plushie is intended for an infant under 3 years old, omit safety eyes and the glued pom-pom. Instead, embroider closed curved sleeping eye arches and a soft red satin-stitch nose directly onto the face using Dark Chocolate and Red DK cotton yarn.
Can I make this in worsted weight yarn instead of super bulky chenille?
Certainly! If you use standard worsted #4 yarn with a 2.75mm hook following the identical stitch math, your finished reindeer will measure approximately 3.5 inches tall—perfect as a lightweight tree ornament!
Pin This Cozy Reindeer Pattern for Christmas
Saving patterns for your holiday gift schedule? Pin these high-resolution graphics to your Holiday & Christmas Crochet boards so you have the complete free tutorial whenever you’re ready to crochet!

