

Transform your fireplace mantel into a scene of pure storybook holiday enchantment with the Santa in a Brick Chimney Christmas Stocking. Combining textured dimensional colorwork with whimsical 3D character amigurumi, this heirloom holiday project reimagines Santa Claus caught mid-delivery as he descends down an architectural brick chimney. Worked toe-up in sturdy worsted weight yarn, the stocking features a solid midnight black toe and heel flap, an intricate crimson red and snowy white brick-textured foot and leg sculpted using Front Post Treble Crochet (FpTrc) mortar stitches, a folded black Santa belt cuff accented with a brilliant golden yellow buckle, and an expressive 3D amigurumi Santa Claus topper complete with a voluminous curly loop-stitch beard, handlebar mustache, bulbous pink nose, and green mittens merrily gripping the top of the chimney.
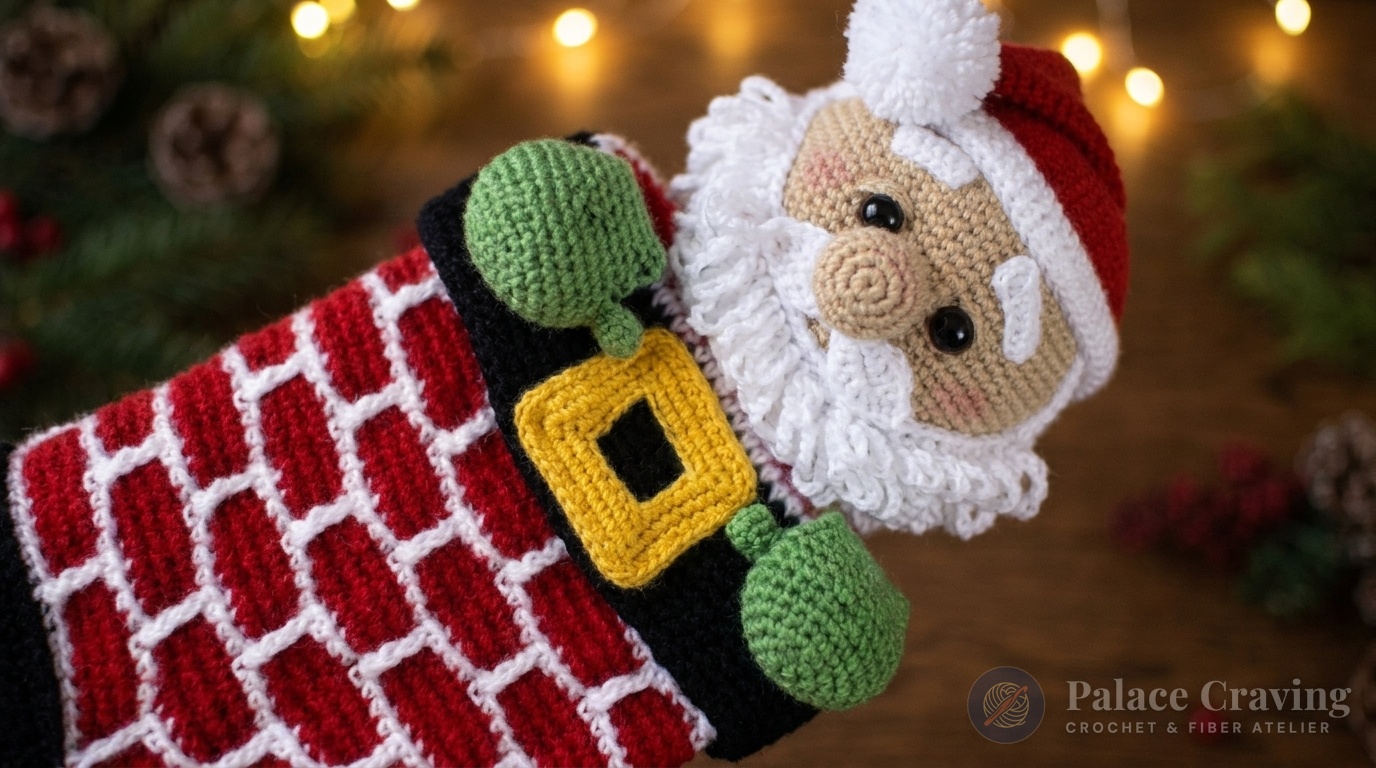
Unlike flat novelty stockings that lose their charm once filled with gifts, this design incorporates structural worsted weight yarn and dimensional relief stitches that preserve their architectural silhouette season after season. The realistic brickwork is engineered through a calculated alternation of single crochet rounds worked in Back Loops Only (BLO) and elongated post stitches that reach four rounds downward to form crisp vertical mortar joints. Paired with an integrated short-row heel turn and a sturdy hanging loop mounted securely to Santa’s head, this stocking is as durable and functional as it is charming. In this complete master guide, you will find authentic stitch calculations, round-by-round instructions, and professional assembly secrets.
Structural Architecture: Brick Mortar Engineering & 3D Character Topping
The Santa in a Brick Chimney Stocking achieves its distinct vintage holiday aesthetic through five foundational construction layers:
- Toe-Up Foundation & 64-Stitch Silhouette: Beginning with a 6-sc magic ring worked in Black, the toe expands evenly through 11 rounds to establish a spacious 64-stitch circumference (10 cm / 4″ toe width) that comfortably holds stocking stuffers of all shapes.
- Textured Front Post Mortar Relief: The chimney foot and leg (Rounds 16–72) alternate three rounds of Crimson Red worked in BLO with one round of Mortar White. In every white round, Front Post Treble Crochets (FpTrc) are worked around the post of stitches four rounds below, staggered across 8-stitch repeats to mimic real masonry running bond brickwork without complex intarsia or color stranding.
- Short-Row Heel & Folded Belt Cuff: A dedicated 21-row heel flap in Black provides a smooth 90-degree turn for the foot, while Rounds 73–85 form a deep folded-down cuff resembling Santa’s leather waist belt, completed with a white mortar rim and an appliqued golden yellow buckle.
- Sculpted 3D Santa Head & Loop-Stitch Beard: Crocheted in warm Camel skin tone using a smaller 4.25 mm hook for high stitch density, Santa’s head features glossy 12 mm safety eyes, a bulbous stuffed nose, sculpted eyelids, a scalloped white hair cape, and a lush 8-row loop-stitch beard that adds touchable vintage charm.
- Gripping Green Mittens & Floppy Santa Hat: Two emerald green amigurumi mittens with distinct crocheted thumbs are wrapped over the top edge of the chimney cuff, making Santa appear to playfully hoist himself up, finished with a classic tapered crimson hat and fluffy pom-pom.
Makers who loved crafting the interactive character elements in our Festive Plush Mouse in Christmas Present Box or the classic festive cheer of the 5-in-1 Christmas Holiday Cupcakes Set will find this fireplace stocking to be a centerpiece holiday showstopper.
Why You’ll Love Crocheting This Chimney Stocking
- Heirloom Fireplace Presence: Measuring approximately 48 cm (19 inches) from Santa’s pom-pom to the toe, this substantial stocking makes an immediate visual impact hanging from any holiday mantelpiece.
- Zero Color Float Snagging: Because the vertical mortar lines are formed by surface front post treble stitches rather than stranded tapestry crochet, the interior of the stocking remains completely snag-free for gifts and goodies.
- Multi-Technique Crafting Joy: Combines amigurumi sculpting, post stitch texture, loop-stitch pile work, and classic sock heel shaping into a varied, engaging project that never gets monotonous.
- Year-After-Year Keepsake: Built with robust worsted weight acrylic or wool-blend yarn, this stocking stands up to heavy holiday use while retaining its crisp architectural geometry.
Materials, Yarn Palette & Essential Notions

To ensure crisp stitch definition and robust structural hold, we recommend a premium #4 Medium Worsted weight yarn (such as Caron Simply Soft, Bernat Satin, or Lion Brand Heartland). Two crochet hook sizes are used: a 5.0 mm (US H/8) hook for the stocking body to ensure smooth drape, and a 4.25 mm (US G/7) hook for the amigurumi topper parts to produce dense, gap-free fabric that conceals all fiberfill stuffing.
| Component & Role | Yarn Color / Material Specification | Yardage & Weight |
|---|---|---|
| Toe, Heel Flap & Belt Cuff (THC) | Midnight Black Worsted Weight #4 | ~100 yds (~55 g) |
| Chimney Brickwork & Santa Hat | Crimson Holiday Red Worsted Weight #4 | ~150 yds (~85 g) |
| Mortar Lines, Beard & Hat Trim | Crisp Snow White Worsted Weight #4 | ~50 yds (~30 g) |
| 3D Santa Head & Nose | Camel / Warm Beige Skin Tone Worsted #4 | ~120 yds (~65 g) |
| Gripping Mittens | Emerald Holiday Green Worsted #4 | ~30 yds (~18 g) |
| Santa Belt Buckle | Golden Yellow Worsted Weight #4 | ~15 yds (~10 g) |
| Eyes, Stuffing & Tools | 12 mm black safety eyes (1 pair), polyfill, 5.0 mm & 4.25 mm hooks, stitch markers, tapestry needle | Essential Notions |
Sizing, Gauge & Finished Blueprint
| Stocking Dimension | Finished Measurement (Inches & Centimeters) | Gauge Verification Standard |
|---|---|---|
| Total Length (Top to Toe) | 19 inches (48 cm) with Santa topper fully mounted | Stocking: 5.0 mm hook (Rnds 1–6 Toe = 2.5″ / 6.3 cm diameter) |
| Chimney Sock Leg Width | 6.5 inches (16.5 cm) flat across (13″ / 33 cm circumference) | Amigurumi: 4.25 mm hook (Rnds 1–5 Mitt Base = 1.75″ / 4.4 cm diameter) |
| Foot Length (Heel to Toe) | 10 inches (25.5 cm) along base | 16 sts and 18 rounds in BLO single crochet = 4 inches (10 cm) |
| 3D Santa Head Dimensions | 5.5 inches (14 cm) wide x 4.5 inches (11.5 cm) tall | Firm stuffing tension; flatten bottom edge with 12 closing sc |
Special Crochet Stitches & Abbreviations (US Terms)
- MR: Magic Ring (adjustable yarn loop).
- sc / hdc / dc: Single crochet / half double crochet / double crochet.
- sc2tog: Single crochet 2 together (invisible decrease recommended for amigurumi).
- BLO / FLO: Back loop only / front loop only. Working in BLO creates subtle horizontal brick ledges on the stocking.
- FpTrc (Front Post Treble Crochet): Yarn over twice, insert hook from right to left around the vertical post of the designated single crochet stitch 4 rounds below, pull up a tall loop, [YO, pull through 2 loops] 3 times. Keep tension relaxed so the fabric does not pucker.
- LpSt (Loop Stitch): Insert hook into next stitch. Wrap yarn from front to back over your extended left index finger to create a 1-inch loop. Catch both strands behind your finger with the hook, pull through the stitch, yarn over and draw through both loops on the hook. Gently slide your finger out to release the secure loop pile.
Step-by-Step Tutorial Walkthrough
Part 1A: Stocking Toe & Brick-Stitch Foot (Rounds 1–36)
Using the 5.0 mm (H) hook and Black (THC) yarn, work in continuous spiral rounds without joining.
- Round 1: 6 sc in Magic Ring (6 sts).
- Round 2: 2 sc in each st around (12 sts).
- Round 3: [2 sc in next st, 1 sc] 6 times (18 sts).
- Round 4: [2 sc in next st, 2 sc] 6 times (24 sts).
- Round 5: [2 sc in next st, 3 sc] 6 times (30 sts).
- Round 6: [2 sc in next st, 4 sc] 6 times (36 sts). (Diameter should measure 2.5 inches / 6.3 cm).
- Round 7: [2 sc in next st, 5 sc] 6 times (42 sts).
- Round 8: [2 sc in next st, 6 sc] 6 times (48 sts).
- Round 9: [2 sc in next st, 7 sc] 6 times (54 sts).
- Round 10: [2 sc in next st, 8 sc] 6 times (60 sts).
- Round 11: [2 sc in next st, 9 sc] 2 times, 10 sc, [2 sc in next st, 9 sc] 2 times, 10 sc (64 sts).
- Rounds 12–15: 1 sc in each st around (64 sts for 4 rounds). Do not fasten off; attach Mortar (White).
- Round 16 (Mortar White): Working in Back Loops Only (BLO), 1 sc in each st around (64 sts). Switch to Brick (Crimson Red). (Note: All subsequent Foot rounds are worked in BLO unless specified).
- Rounds 17–19 (Crimson Red): In BLO, 1 sc in each st around (64 sts for 3 rounds). Change to Mortar (White) at end of Round 19.
- Round 20 (Mortar White): [FpTrc around the stitch 4 rounds down, in BLO 7 sc] repeat 8 times around (64 sts). Change to Crimson Red.
- Rounds 21–23 (Crimson Red): In BLO, 1 sc in each st around (64 sts for 3 rounds). Change to Mortar White.
- Round 24 (Mortar White – Staggered Bricks): [In BLO 4 sc, FpTrc around the stitch 4 rounds down, in BLO 3 sc] repeat 8 times around (64 sts). (Notice how this perfectly centers the new vertical mortar line between the two mortar lines below!) Change to Crimson Red.
- Rounds 25–32: Repeat Rounds 17–24 once more (64 sts).
- Rounds 33–36: Repeat Rounds 17–20 once more (64 sts). After Round 36, slip stitch in next st and cut White yarn. Carry Crimson Red inside the work for the upcoming Leg.

Part 1B: Short-Row Heel, Brick Leg & Folded Cuff (Rounds 36–85)
The heel is worked in turned rows across 36 stitches of the stocking circumference, leaving 28 instep stitches unworked.
- Heel Setup: Count 28 stitches forward from the end of Round 36; join Black (THC) yarn in the 29th stitch with a long sewing tail.
- Row 1: 36 sc across, ch 1, turn (36 sts).
- Rows 2–9 (Heel Decrease Phase): Work sc2tog at the beginning and end of each row:
• Row 2: sc2tog, 32 sc, sc2tog, ch 1, turn (34 sts).
• Row 3: sc2tog, 30 sc, sc2tog, ch 1, turn (32 sts).
• Row 4: sc2tog, 28 sc, sc2tog, ch 1, turn (30 sts).
• Row 5: sc2tog, 26 sc, sc2tog, ch 1, turn (28 sts).
• Row 6: sc2tog, 24 sc, sc2tog, ch 1, turn (26 sts).
• Row 7: sc2tog, 22 sc, sc2tog, ch 1, turn (24 sts).
• Row 8: sc2tog, 20 sc, sc2tog, ch 1, turn (22 sts).
• Row 9: sc2tog, 18 sc, sc2tog, ch 1, turn (20 sts). - Rows 10–12 (Heel Cup Turn): Row 10: [sc2tog] 10 times, ch 1, turn (10 sts). Rows 11–12: 10 sc across, ch 1, turn (10 sts).
- Rows 13–20 (Heel Expansion Phase):
• Row 13: 2 sc in each st across, ch 1, turn (20 sts).
• Row 14: 2 sc in first st, 18 sc, 2 sc in last st, ch 1, turn (22 sts).
• Row 15: 2 sc in first st, 20 sc, 2 sc in last st, ch 1, turn (24 sts).
• Row 16: 2 sc in first st, 22 sc, 2 sc in last st, ch 1, turn (26 sts).
• Row 17: 2 sc in first st, 24 sc, 2 sc in last st, ch 1, turn (28 sts).
• Row 18: 2 sc in first st, 26 sc, 2 sc in last st, ch 1, turn (30 sts).
• Row 19: 2 sc in first st, 28 sc, 2 sc in last st, ch 1, turn (32 sts).
• Row 20: 2 sc in first st, 30 sc, 2 sc in last st, ch 1, turn (34 sts). - Row 21 (Mortar White): Switch to White in BLO: 2 sc in first st, 32 sc, 2 sc in last st (36 sts). Fasten off Black yarn only. Do not cut White!
- Leg Round 36 (Rejoining in the Round): Fold Row 21 of the heel down so its sides meet Row 1; slip stitch to the 1st stitch of Foot Round 36. Switch to Crimson Red (in BLO): sc in same st as slst, 27 sc across instep, sc in 1st st of Heel Row 21, 35 sc across remaining heel stitches (64 sts total restored).
- Rounds 37–39: Repeat Foot Rounds 22–24 (64 sts).
- Rounds 40–72 (Chimney Leg): Repeat Foot Rounds 17–24 four consecutive times (32 rounds of alternating crimson brick and white staggered mortar lines, 64 sts).
- Rounds 73–84 (Folded Belt Cuff): Turn work so the Right Side faces away from you (when folded down, the Right Side will show proudly): with Black (THC), work 64 sc around for 12 rounds. Cut Black.
- Round 85 (Mortar Rim): With Mortar White in BLO, 64 sc around (64 sts). Slip stitch to first st and fasten off with an 8-inch tail. Fold the cuff down over the chimney leg and sew the small side slits of the heel closed using the yarn tails.
Part 2A: 3D Santa Head (Camel Skin Tone)
Using the 4.25 mm (G) hook and Camel skin-tone yarn, work in continuous rounds starting from a center oval chain:
- Round 1: Chain 9. Starting in 2nd ch from hook: 7 sc, 3 sc in last chain; turn to work down opposite side of foundation chain: 6 sc, 2 sc in last st (18 sts).
- Round 2: 2 sc in next st, 6 sc, [2 sc in next st] 3 times, 6 sc, [2 sc in next st] 2 times (24 sts).
- Round 3: 1 sc, 2 sc in next st, 6 sc, [1 sc, 2 sc in next st] 3 times, 6 sc, [1 sc, 2 sc in next st] 2 times (30 sts).
- Round 4: 2 sc, 2 sc in next st, 6 sc, [2 sc, 2 sc in next st] 3 times, 6 sc, [2 sc, 2 sc in next st] 2 times (36 sts).
- Round 5: 3 sc, 2 sc in next st, 6 sc, [3 sc, 2 sc in next st] 3 times, 6 sc, [3 sc, 2 sc in next st] 2 times (42 sts).
- Round 6: 4 sc, 2 sc in next st, 6 sc, [4 sc, 2 sc in next st] 3 times, 6 sc, [4 sc, 2 sc in next st] 2 times (48 sts).
- Round 7: 1 sc in each st around (48 sts).
- Round 8: 5 sc, 2 sc in next st, 6 sc, [5 sc, 2 sc in next st] 3 times, 6 sc, [5 sc, 2 sc in next st] 2 times (54 sts).
- Round 9: 6 sc, 2 sc in next st, 6 sc, [6 sc, 2 sc in next st] 3 times, 6 sc, [6 sc, 2 sc in next st] 2 times (60 sts).
- Round 10: 1 sc in each st around (60 sts).
- Round 11: 7 sc, 2 sc in next st, 6 sc, [7 sc, 2 sc in next st] 3 times, 6 sc, [7 sc, 2 sc in next st] 2 times (66 sts).
- Rounds 12–23: 1 sc in each st around (66 sts for 12 rounds).
- Round 24 (Decrease Phase): sc2tog, 7 sc, sc2tog, 6 sc, [7 sc, sc2tog] 3 times, 13 sc, sc2tog, 7 sc (60 sts).
- Round 25: 1 sc in each st around (60 sts).
- Round 26: sc2tog, 6 sc, sc2tog, 6 sc, [6 sc, sc2tog] 3 times, 12 sc, sc2tog, 6 sc (54 sts).
- Round 27: sc2tog, 5 sc, sc2tog, 6 sc, [5 sc, sc2tog] 3 times, 11 sc, sc2tog, 5 sc (48 sts).
- Round 28: 1 sc in each st around (48 sts).
- Round 29: sc2tog, 4 sc, sc2tog, 6 sc, [4 sc, sc2tog] 3 times, 10 sc, sc2tog, 4 sc (42 sts).
- Round 30: sc2tog, 3 sc, sc2tog, 6 sc, [3 sc, sc2tog] 3 times, 9 sc, sc2tog, 3 sc (36 sts).
- Round 31: sc2tog, 2 sc, sc2tog, 6 sc, [2 sc, sc2tog] 3 times, 8 sc, sc2tog, 2 sc (30 sts).
- Round 32: sc2tog, 1 sc, sc2tog, 6 sc, [1 sc, sc2tog] 3 times, 7 sc, sc2tog, 1 sc (24 sts).
- Finishing & Eyes: Insert the 12 mm safety eyes between Rounds 15 and 16, approximately 6 stitches apart. Stuff the head lightly and evenly. Flatten the bottom opening and work approximately 12 sc through both layers simultaneously to seal the base shut. Fasten off with a 14-inch sewing tail.
Part 2B: Loop-Stitch Beard, Mustache, Bulbous Nose & Hair
All facial details are worked with the 4.25 mm (G) hook:
- Loop Beard (White in Rows):
• Row 1: Ch 33; from 2nd ch from hook: 32 sc across, ch 1, turn (32 sts).
• Row 2: 32 LpSt across, ch 1, turn (32 sts).
• Row 3: 32 sc across, ch 1, turn (32 sts).
• Row 4: 32 LpSt across, ch 1, turn (32 sts).
• Row 5: [sc2tog] 2 times, 24 sc, [sc2tog] 2 times, ch 1, turn (28 sts).
• Row 6: 28 LpSt across, ch 1, turn (28 sts).
• Row 7: [sc2tog] 2 times, 20 sc, [sc2tog] 2 times, ch 1, turn (24 sts).
• Row 8: 24 LpSt across (24 sts). Fasten off with a 14-inch tail. Position the beard so the top ends align below the eyes, centered 7 rounds below eyes, and sew firmly along Row 1 and outer edges. - Curled Handlebar Mustache (White): Chain 17. Starting in 2nd ch from hook: [slst, 1 sc, 1 hdc, 2 dc, 1 hdc, 1 sc, 2 slst, 1 sc, 1 hdc, 2 dc, 1 hdc, 1 sc, 1 slst, ch 2]. Repeat this exact sequence along the opposite side of the foundation chain; slst in 1st st to join. Fasten off with an 8-inch tail. Sew 2 rounds below eyes, overlapping the top edge of the beard.
- Bulbous Nose & Eyelids (Camel):
• R1: 6 sc in MR (6).
• R2: 2 sc in each st (12).
• R3: [1 sc, 2 sc in next st] 6 times (18).
• R4: [5 sc, 2 sc in next st] 3 times (21).
• R5: [5 sc, sc2tog] 3 times (18).
• R6: [1 sc, sc2tog] 6 times (12). Fasten off with 12-inch tail. Stuff lightly, sew centered over the mustache 1 round below the eyes, and use the yarn tail to embroider slanted double-thread upper eyelids above each safety eye! - Eyebrows (Make 2 – White): Ch 7. From 2nd ch: 3 sc, 3 hdc (6 sts). Fasten off; sew 2 rounds above each eye at a cheerful slight angle.
- Scalloped Back Hair Piece (White in Rows):
• Row 1: Ch 39; from 2nd ch: 38 sc, ch 1, turn (38 sts).
• Rows 2–7: 38 sc across, ch 1, turn (38 sts for 6 rows).
• Row 8 (Shell Scallop Edge): slst in 1st st, [skip 1 st, 5 dc in next st, skip 1 st, slst in next st] 9 times, slst in last st (56 sts). Fasten off with a 12-inch tail; sew across the back of the head along Rounds 9–11.
Part 3: Green Mittens, Yellow Belt Buckle & Hanging Loop
- Mitten Thumbs (Make 2 – Green):
• R1: 6 sc in MR (6).
• Rnds 2–3: 6 sc around (6). Fasten off; set aside to join into Round 9. - Mitten Palm & Cuff (Make 2 – Green):
• R1: 6 sc in MR (6).
• R2: 2 sc in each st (12).
• R3: [1 sc, 2 sc in next st] 6 times (18).
• R4: [2 sc, 2 sc in next st] 6 times (24).
• R5: [3 sc, 2 sc in next st] 6 times (30 sts). (Diameter = 1.75″ / 4.4 cm).
• Rnds 6–8: 30 sc around (30 sts for 3 rounds).
• Rnd 9 (Thumb Join): 27 sc, flatten the thumb and work the next 3 sc through both layers of the thumb and the mitten body simultaneously (30 sts).
• Rnd 10: [3 sc, sc2tog] 6 times (24 sts).
• Rnd 11: [2 sc, sc2tog] 6 times (18 sts).
• Rnds 12–13: 18 sc around. Stuff the mitten palm lightly. Flatten the opening and work 9 sc across both layers, then continue in turned rows:
• Rows 14–17: 9 sc across, ch 1, turn (9 sts for 4 rows). Fasten off with an 8-inch tail. - Yellow Belt Buckle (Joined Rounds in Gold/Yellow):
• R1: Ch 24, slip stitch in 1st ch to form ring, ch 1 (24 sts).
• R2: [3 sc in next st, 6 sc, 3 sc in next st, 4 sc] 2 times, slst to join, ch 1 (32 sts).
• R3: 1 sc, 3 sc in next st, 8 sc, 3 sc in next st, 6 sc, 3 sc in next st, 8 sc, 3 sc in next st, 5 sc, slst, ch 1 (40 sts).
• R4: 2 sc, 3 sc in next st, 10 sc, 3 sc in next st, 8 sc, 3 sc in next st, 10 sc, 3 sc in next st, 6 sc, slst (48 sts). Fasten off with a 12-inch tail. - Hanging Loop: With Crimson Red, ch 15; from 2nd ch: 14 slst across. Fasten off with 6-inch tails.
Part 4: Santa Hat & Complete Stocking Assembly
- Santa Hat Cone (Crimson Red):
• R1: 6 sc in MR (6). R2: 6 sc.
• R3: [2 sc, 2 sc in next st] 2 times (8). R4: 8 sc.
• R5: [3 sc, 2 sc in next st] 2 times (10). R6: 10 sc.
• R7: [4 sc, 2 sc in next st] 2 times (12). R8: 12 sc.
• R9: [5 sc, 2 sc in next st] 2 times (14). R10: 14 sc.
• R11: [6 sc, 2 sc in next st] 2 times (16). R12: 16 sc.
• R13: [7 sc, 2 sc in next st] 2 times (18). R14: 18 sc.
• Rnds 15–20: Increase 2 sts every round: R15 (20 sts), R16 (22 sts), R17 (24 sts), R18 (26 sts), R19 (28 sts), R20 (30 sts).
• R21: [4 sc, inc] 6 times (36 sts). R22: 36 sc.
• R23: [5 sc, inc] 6 times (42 sts). R24: [6 sc, inc] 6 times (48 sts).
• R25: [7 sc, inc] 6 times (54 sts). R26: [8 sc, inc] 6 times (60 sts).
• R27: [9 sc, inc] 6 times (66 sts).
• Rnds 28–31: 66 sc around (4 rounds). Switch to White. - Folded White Hat Brim:
• R32: 66 sc around, slst in next st, ch 1.
• R33: In Front Loops Only (FLO), 66 sc, slst, ch 1 (66 sts).
• Rnds 34–35: In both loops, 66 sc, slst (66 sts). Fasten off with a 16-inch tail. Fold the brim upwards along Round 33. Fit the hat snugly over Santa’s head, covering the upper edge of the scalloped hair piece, and sew in place along Round 33. Attach a fluffy 2-inch white pom-pom to the tip of Round 1. - Mounting to Stocking Chimney Cuff:
1. Hanging Loop: Securely stitch both ends of the hanging cord to the back of Santa’s head along Rounds 6–7, spaced 8 stitches apart.
2. Santa Head: Center Santa’s head along the back top edge of the black stocking cuff. Stitch through the 12 bottom closing stitches of the head directly into the cuff rim using strong double-stranded yarn.
3. Gripping Green Mittens: Place the two mittens on the front rim of the cuff, spaced 14–16 stitches apart. Fold Rows 14–17 of each mitten over the top rim into the inside of the cuff and sew securely so the thumbs and palms clutch the outer front edge.
4. Belt Buckle: Center the yellow buckle on the front of the black cuff between the two mittens and stitch along Round 4.

3 Master Finishing Secrets for Flawless Holiday Stockings
To ensure your handcrafted stocking achieves a pristine, boutique-quality finish that lasts for decades, follow these three artisan techniques:
- 1. Perfecting the Loop-Stitch Beard Density: When crocheting the Loop Stitch (LpSt), maintain uniform index-finger loop sizing by keeping your tension finger parallel to the hook shaft. After completing the beard and sewing it to Santa’s face, gently run a clean wide-tooth comb or your fingertips upward through the loop pile to separate and fluff the loops into a cloud-like texture without pulling the base knots loose.
- 2. Maintaining Crisp Vertical Mortar Alignment: The Front Post Treble Crochet (FpTrc) stitches must be worked with relaxed vertical tension. Pull up the initial loop of the treble so it comfortably reaches the current working round before pulling through your loops. If your post stitches pull too tightly, the chimney rounds will pucker horizontally; if they are too loose, the mortar lines will sag. Working the single crochet rounds in BLO gives the brick fabric flexibility that keeps the post stitches sitting cleanly on the surface.
- 3. Counter-Balancing the 3D Character Topper: Because the 3D Santa head and stuffed mittens add weight to the top rim of the stocking, sew the hanging loop directly into the dense fabric at the back of Santa’s head rather than to the stocking cuff. When hung, gravity naturally balances the forward pull of the head, ensuring the stocking hangs perfectly straight against the fireplace wall or mantel hook.
Heirloom Care & Off-Season Storage Guidelines
Because of the 3D stuffed character elements, loop-stitch beard, and metallic post stitches, this stocking should be cared for with gentle hand-washing methods:
- Spot Cleaning: Spot-treat small smudges or dirt using a clean microfiber cloth dampened with cool water and a drop of gentle wool detergent. Dab gently without rubbing the loop-stitch beard.
- Hand Washing: If thorough cleaning is needed after the holiday season, submerge the stocking in a basin of lukewarm water with mild fiber wash. Press gently to saturate, rinse thoroughly with cool water, and roll in a dry terrycloth towel to remove excess moisture. Never wring or twist.
- Drying: Reshape the brick foot, fold the belt cuff cleanly down, and lay flat on a drying rack away from direct heat or intense sunlight. Reshape Santa’s nose and hat cone while damp.
- Off-Season Storage: Stuff the toe and Santa’s head with acid-free tissue paper to prevent creasing, place inside a breathable cotton storage bag, and store in a cool, dry closet. Avoid plastic bins that trap moisture.
Frequently Asked Questions
Can I line the stocking with fabric for heavy gift loading?
Yes! While the non-stranded post stitch technique ensures there are no interior yarn floats to snag, sewing a lightweight cotton fabric lining into the interior of the chimney leg and foot provides extra support if you plan to fill the stocking with heavy gifts, fruit, or hard toys.
Can I customize the brick and cuff colors?
Absolutely. While classic Crimson Red and White mortar creates a traditional storybook holiday look, you can crochet the bricks in rustic terracotta, slate grey, or deep forest green. You can also customize Santa’s mittens in red or mittens with fair isle stripes to match your family’s personal Christmas decor.
How do I ensure the front post treble stitches don’t pull the fabric?
The secret lies in the height of the treble stitch. Because you are reaching 4 rounds down, make sure to draw up the working loop until it is completely flush with your current row before executing your yarn-overs. Doing so prevents any vertical bunching or pulling in the brick rounds.
Looking for more charming Christmas keepsakes? Explore our complete holiday tutorials including the Christmas Guardian Angel Doll with Silver Wings and our Heirloom Crochet Cable Christmas Stocking.
Pin This Pattern for Your Holiday Crocheting!
Save this festive heirloom stocking to your favorite Pinterest boards so you have the round-by-round instructions and stitch math ready whenever you start your holiday crafting:

