

Welcome timeless winter nostalgia into your festive home with the Classic Standing Holiday Snowman Amigurumi Doll. Measuring an impressive 38 to 40 cm (15 to 16 inches) in height and weighing approximately 400 grams of cuddly heirloom craftsmanship, this large poseable snowman is worked seamlessly from the top of the crown straight down through the elongated oval torso. Crocheted in pristine white worsted weight yarn using a tight 2.5 mm hook to create an impenetrable, gap-free fabric, this gentle character features deep needle-sculpted eye sockets holding glossy 10 mm black safety eyes, a dimensional textured orange carrot nose, an embroidered sweet smile, thread-jointed poseable arms, double-layered flat-soled feet reinforced with internal plastic insoles for rock-solid freestanding balance, and a vibrant fringed holiday red scarf.
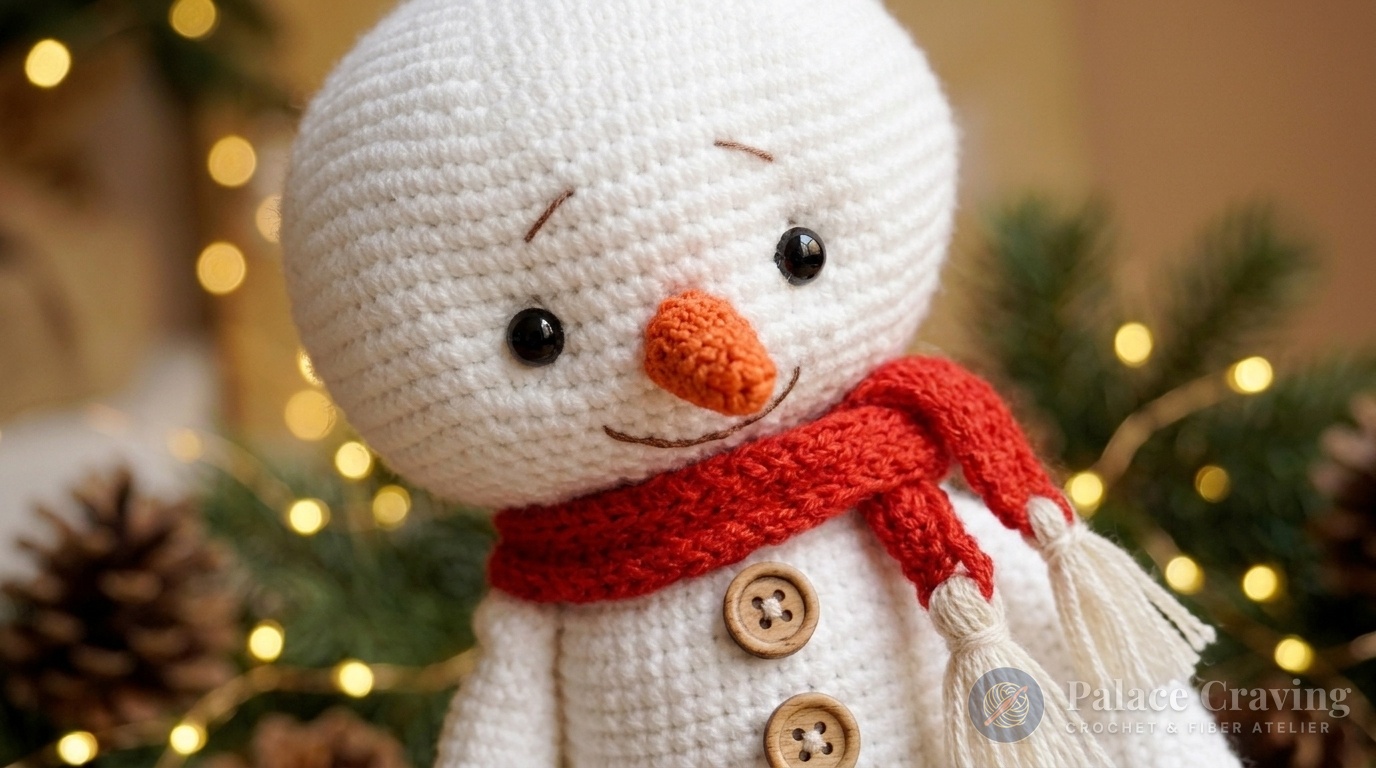
Unlike miniature tree ornaments or floppy decorative plushes that slump over without a wall prop, this full-sized snowman doll is structurally engineered to stand proudly on its own two feet. By combining double-layered crochet soles with lightweight plastic foot inserts (cut from common craft plastic or flexible cutting mats) and attaching the legs with pinched hip-joint stitches, the doll achieves both freestanding stability and full sitting articulation. In this extensive master pattern, you will discover the complete round-by-round stitch counts, the neck-down seamless transition, the eye-socket sculpting technique, and the movable thread-jointing methods.
Structural Anatomy: Seamless Geometry & Freestanding Engineering
What sets this Classic Standing Snowman apart as an heirloom display piece is its thoughtful balance of sculptural softness and internal balance:
- Continuous Head-to-Torso Construction (Rounds 1–77): Rather than crocheting separate spheres that must be uncomfortably sewn together with wobbly neck seams, the head expands smoothly to 90 stitches, decreases to a 21-stitch neck collar (Round 34), and immediately flows into the oval torso. This creates an unyielding structural neck that never droops or leans sideways.
- Needle-Sculpted Facial Expression: By inserting an extra-long tapestry needle through the open neckline and wrapping tension strands behind the 10 mm safety eyes, the eye sockets are drawn inward to form expressive, three-dimensional orbital hollows that give this snowman a tender, lifelike personality.
- Double-Layered Reinforced Foot Bases: Each foot consists of an identical 49-stitch Sole and Top Piece whipstitched together around a 9 x 6 cm plastic insole. This firm, flat platform anchors the 19 cm leg shafts, distributing the doll’s 400 g weight evenly across any tabletop, console, or mantel.
- Thread-Jointed Poseable Limbs: Both the arms and the legs feature pinched joint points that are attached through the torso using heavy-duty thread-jointing. This allows the limbs to rotate smoothly 360 degrees—letting your snowman sit neatly on a shelf with dangling legs or stand tall as an upright holiday sentinel!
- Classic Festive Accents: Topped with a spiraled orange carrot nose, warm wooden buttons down the belly, and a cozy red scarf with knotted fringes, this snowman captures the beloved magic of vintage storybook winters.
Crafters who enjoyed the textured holiday architecture of our Santa in a Brick Chimney Christmas Stocking or the celestial elegance of the Christmas Guardian Angel Doll with Silver Wings will find this snowman to be a deeply satisfying, heirloom-grade holiday centerpiece.
Why You’ll Love Crocheting This Standing Snowman
- Impressive 38–40 cm Display Scale: Large enough to command immediate attention on your entryway table, fireplace hearth, or under the Christmas tree alongside wrapped presents.
- Zero-Wobble Freestanding Stance: Reinforced plastic-insole foot engineering eliminates the need for unsightly doll stands or hidden wooden dowels.
- Seamless Neckline Strength: Eliminates awkward neck assembly seams while preserving a clean, unbroken silhouette from crown to hip.
- Interactive Poseability: Thread-jointed hips and shoulders mean kids and collectors alike can pose the snowman holding holiday greenery, sitting cross-legged, or waving hello.
Materials, Proportions & Essential Hardware

To produce an amigurumi fabric dense enough to withstand firm fiberfill packing without stretching open, we pair a #4 Medium Worsted weight yarn (such as Bernat Satin or Lion Brand Pound of Love) with an undersized 2.5 mm (US B/1 or C/2) hook. This creates rigid, tight stitches essential for a self-supporting freestanding toy.
| Component & Role | Yarn Color / Material Specification | Quantity & Weight |
|---|---|---|
| Head, Seamless Torso, Arms & Legs | Crisp Snow White Worsted Weight #4 (~100 m / 50 g) | ~150 g (3 balls) |
| Textured Carrot Nose | Vibrant Tangerine Orange Worsted Yarn | ~2 g scrap yarn |
| Facial Details & Brows | Dark Espresso Brown or Black Embroidery Floss | ~2 g strand |
| Fringed Winter Scarf | Holiday Crimson Red Worsted Weight Yarn | ~25 g (~50 m) |
| Hardware & Eyes | 10 mm black glossy safety eyes with lock washers (1 pair) | 2 pieces |
| Foot Reinforcements | Flexible craft plastic or plastic lid cut into 2 oval insoles (9 x 6 cm) | 2 plastic insoles |
| Stuffing & Needles | Premium hollow polyester fiberfill (~200 g total), 2.5 mm hook, extra-long needle | Essential Hardware |
Dimensional Blueprint & Gauge Standard
| Anatomical Section | Finished Measurement | Gauge & Density Verification |
|---|---|---|
| Total Standing Height | 38–40 cm (15–16 inches) from crown to sole | 2.5 mm hook with #4 worsted yarn: 22 sc x 24 rounds = 4 inches (10 cm) |
| Head Circumference | 38–40 cm (Height = 16.5–17 cm) | At Round 15 (90 sts), flat hexagon diameter should measure 13–14 cm |
| Body Torso Dimensions | Belly Girth = 25–26 cm (Height = 17–18 cm) | Firmly stuffed oval shape; packed evenly to support upright weight |
| Legs & Foot Sole | Leg Length = 19 cm (Foot Sole = 9 x 6 cm) | Sole at Round 7 must match the 9 x 6 cm plastic insole precisely |
Special Crochet Terms & Abbreviations (US Standards)
- MR: Magic Ring (adjustable starting loop).
- SC: Single Crochet stitch.
- sl st: Slip stitch.
- SC2tog: Single crochet 2 together (invisible decrease worked through front loops only).
- FLO / BLO: Front loop only / back loop only.
- Surface sl st: A decorative or structural stitch worked directly onto the surface of existing crochet fabric. Hold working yarn on the interior/back of the piece, insert hook through the fabric from the front, yarn over from behind, and draw loop up through both the fabric and the active loop on your hook.
Step-by-Step Tutorial Walkthrough
Part 1: Rounded Snowman Head (Rounds 1–34)
Using the 2.5 mm hook and Crisp White worsted yarn, work in continuous spiral rounds:
- Round 1: 6 SC in Magic Ring, pull tight (6 sts).
- Round 2: 2 SC in each st around (12 sts).
- Round 3: [1 SC, 2 SC in next st] 6 times (18 sts).
- Round 4: [2 SC, 2 SC in next st] 6 times (24 sts).
- Round 5: [3 SC, 2 SC in next st] 6 times (30 sts).
- Round 6: [4 SC, 2 SC in next st] 6 times (36 sts).
- Round 7: [5 SC, 2 SC in next st] 6 times (42 sts).
- Round 8: [6 SC, 2 SC in next st] 6 times (48 sts).
- Round 9: [7 SC, 2 SC in next st] 6 times (54 sts).
- Round 10: [8 SC, 2 SC in next st] 6 times (60 sts).
- Round 11: [9 SC, 2 SC in next st] 6 times (66 sts).
- Round 12: [10 SC, 2 SC in next st] 6 times (72 sts).
- Round 13: [11 SC, 2 SC in next st] 6 times (78 sts).
- Round 14: [12 SC, 2 SC in next st] 6 times (84 sts).
- Round 15: [13 SC, 2 SC in next st] 6 times (90 sts). (Measure flat diameter: must be 13–14 cm across).
- Rounds 16–22: 1 SC in each st around (90 sts for 7 rounds even).
- Round 23: [13 SC, SC2tog] 6 times (84 sts).
- Round 24: [12 SC, SC2tog] 6 times (78 sts). (Insert 10 mm black safety eyes between Rounds 23 and 24, spaced 10 stitches apart).
- Round 25: [11 SC, SC2tog] 6 times (72 sts).
- Round 26: [10 SC, SC2tog] 6 times (66 sts).
- Round 27: [9 SC, SC2tog] 6 times (60 sts).
- Round 28: [8 SC, SC2tog] 6 times (54 sts).
- Round 29: [7 SC, SC2tog] 6 times (48 sts).
- Round 30: [6 SC, SC2tog] 6 times (42 sts).
- Round 31: [5 SC, SC2tog] 6 times (36 sts).
- Round 32: [4 SC, SC2tog] 6 times (30 sts).
- Round 33: [3 SC, SC2tog] 6 times (24 sts).
- Round 34 (Neck Opening): [4 SC, SC2tog, 2 SC] 3 times (21 sts). Do not cut yarn! Continue directly into the seamless body.

Part 2: Seamless Oval Body Torso (Rounds 35–77)
Continuing with the active yarn loop at the 21-stitch neckline:
- Round 35 (Neckline Transition): 1 SC in each st around (21 sts).
- Round 36: [4 SC, 2 SC in next st, 2 SC] 3 times (24 sts).
- Round 37: [3 SC, 2 SC in next st] 6 times (30 sts).
- Round 38: [4 SC, 2 SC in next st] 6 times (36 sts).
- Round 39: [5 SC, 2 SC in next st] 6 times (42 sts). (Stop and firmly pack the head with ~80 g of fiberfill, shaping it into a smooth 38 cm ball).
- Round 40: 1 SC in each st around (42 sts).
- Round 41: [6 SC, 2 SC in next st] 6 times (48 sts).
- Rounds 42–70 (Torso Depth): 1 SC in each st around (48 sts for 29 rounds even, forming an elongated oval silhouette).
- Round 71 (Lower Body Decreases): [6 SC, SC2tog] 6 times (42 sts).
- Round 72: [5 SC, SC2tog] 6 times (36 sts).
- Round 73: [4 SC, SC2tog] 6 times (30 sts). (Begin firmly stuffing the torso with fiberfill).
- Round 74: [3 SC, SC2tog] 6 times (24 sts).
- Round 75: [2 SC, SC2tog] 6 times (18 sts).
- Round 76: [1 SC, SC2tog] 6 times (12 sts). (Pack the lower body very firmly so the torso reaches 17–18 cm in height and 25–26 cm in girth, gently pressing it into an oval shape).
- Round 77: [SC2tog] 6 times (6 sts). Fasten off, weave tail through Front Loops Only of remaining 6 sts, pull tightly closed, and bury tail inside.
Part 3: Poseable Arms with Pinched Shoulders (Make 2)
- Round 1: With White yarn, 6 SC in MR (6 sts).
- Round 2: 2 SC in each st around (12 sts).
- Round 3: [1 SC, 2 SC in next st] 6 times (18 sts).
- Rounds 4–7: 1 SC in each st around (18 sts for 4 rounds, forming rounded hand).
- Round 8 (Wrist Taper): [SC2tog] 2 times, SC in next 14 sts (16 sts).
- Round 9: SC2tog, SC in next 14 sts (15 sts).
- Rounds 10–29 (Arm Shaft): 1 SC in each st around (15 sts for 20 rounds).
- Shoulder Pinching: Stuff the arm firmly. Thread the yarn tail onto a needle, pass through the FLO of all 15 sts, and pull tight. Stitch back and forth horizontally through the top 1 cm of the arm 3 times to squeeze a flat, flexible “shoulder joint point.” Leave a 14-inch tail attached for thread-jointing to the body.
Part 4: Flat-Soled Standing Feet (Make 2 Soles + 2 Tops) & Legs
Each foot is constructed in joined rounds (the starting Ch 1 does not count as a stitch):
- Foot Sole (Make 2):
• Rd 1: Chain 9 (9 sts).
• Rd 2: SC in 2nd ch from hook, SC in next 6 ch, 4 SC in last ch; turn to work down opposite side: SC in next 6 ch, 2 SC in next st, sl st to 1st st (20 sts).
• Rd 3: Ch 1, SC in next 8 sts, 2 SC in each of next 2 sts, SC in next 8 sts, 2 SC in next st, SC in sl st of previous rd, sl st to 1st st (24 sts).
• Rd 4: Ch 1, SC in next 8 sts, 2 SC in next st, SC in next 2 sts, 2 SC in next st, SC in next 8 sts, 2 SC in next st, SC in next 2 sts, SC in sl st of prev rd, sl st to 1st st (28 sts).
• Rd 5: Ch 1, SC in next 8 sts, 2 SC in next st, 1 SC, [2 SC in next st] 2 times, 1 SC, 2 SC in next st, SC in next 8 sts, 2 SC in next st, 1 SC, [2 SC in next st] 2 times, 1 SC, SC in sl st of prev rd, sl st (36 sts).
• Rd 6: Ch 1, SC in next 10 sts, 2 SC in next st, 1 SC, 2 SC in next st, 2 SC, 2 SC in next st, 1 SC, 2 SC in next st, SC in next 10 sts, 2 SC in next st, 1 SC, 2 SC in next st, 2 SC, 2 SC in next st, 1 SC, SC in sl st, sl st (44 sts).
• Rd 7: Ch 1, SC in next 11 sts, 2 SC in next st, 4 SC, 2 SC in next st, 4 SC, 2 SC in next st, SC in next 11 sts, 2 SC in next st, 4 SC, 2 SC in next st, 4 SC, sl st to 1st st (49 sts). (Check dimensions: must be precisely 9 x 6 cm / 3.5 x 2.3 in). Fasten off with an 18-inch sewing tail. - Foot Top Piece (Make 2): Work Rounds 1–7 exactly as the Foot Sole (49 sts), then add:
• Rounds 8–9: Ch 1, 1 SC in each st around, sl st to 1st st (49 sts for 2 wall rounds). Fasten off. - Sole Assembly: Place 1 Sole against 1 Top Piece (wrong sides facing). Using the yarn tail, whipstitch the outer perimeter loops together around three-quarters of the edge. Insert the pre-cut 9 x 6 cm plastic insole into the base, stuff the foot firmly with fiberfill over the insole, and whipstitch the remaining edge closed.
- Leg Shaft (Make 2):
• Round 1: On the top center of the assembled foot, work a circle of 16 surface slip stitches through the top fabric (16 sts).
• Rounds 2–27: Work 16 SC in each st around in continuous rounds (16 sts for 26 rounds, producing a 19 cm long leg). Stuff firmly. Weave tail through FLO of last 16 sts, pull tight, and stitch back and forth horizontally through the top 1 cm of the leg to pinch a flat “hip joint point.” Leave a 14-inch tail for jointing.
Part 5: Carrot Nose, Facial Sculpting & Joint Assembly
- Textured Carrot Nose (Orange):
• Round 1: 6 SC in MR (6 sts).
• Round 2: [1 SC, 2 SC in next st] 3 times (9 sts).
• Rounds 3–5: 9 SC around (9 sts for 3 rounds).
• Round 6: [1 SC, 2 SC in next st] 3 times, 3 SC (12 sts).
• Rounds 7–8: 12 SC around (12 sts for 2 rounds).
• Round 9: 11 SC, sl st in next st (12 sts). Stuff lightly, fasten off with a 12-inch tail. - Eye Socket Sculpting: Thread a 25 cm strand of strong white yarn on an extra-long needle. Insert from the front neckline opening up to the outer corner of the right safety eye. Pass over the rim of the eye to the inner corner (nesting the thread behind the eye’s black disk) and exit back down at the neckline. Repeat for the left eye. Pull both pairs of tails firmly downward: the eye sockets will indent deeply, giving the face realistic dimension. Secure with a double knot at the neck and weave the ends into the torso.
- Facial Embroidery: Pin the carrot nose centered directly between the safety eyes and stitch securely around Round 9 using a running stitch. Using dark brown embroidery floss, stitch a charming 2-stitch diagonal smile 2 rounds below the nose, and embroider two arched eyebrows 2 rounds above each eye.
- Attaching Poseable Arms: Position the arms 5–6 rounds below the neckline. Thread the long tail on an extra-long tapestry needle, pass horizontally through the left shoulder pinch point, straight through the middle of the chest to the right shoulder pinch point, and back again several times. Pull with firm, even tension so the arms are held securely flush against the body while rotating freely 360 degrees!
- Attaching Poseable Legs: Position the legs 11 rounds up from the bottom of the body, spaced evenly on either side of the lower torso. Thread-joint both hip points horizontally through the lower body in the exact same manner.
- Fringed Winter Scarf: With Crimson Red yarn, chain 100. From 2nd ch: work 1 hdc in each ch across. Fasten off. Cut twelve 8 cm red yarn strands and knot three fringed tassels to each short end. Wrap snugly twice around the snowman’s neck!

3 Master Finishing Secrets for Flawless Freestanding Amigurumi
To ensure your handcrafted holiday snowman stands with pristine balance and boutique quality, apply these three artisan guidelines:
- 1. Choosing the Right Foot Insole Material: Never use heavy cardboard for shoe insoles, as humidity and cleaning will warp or degrade it over time. Instead, repurpose thin flexible plastic cutting mats, polypropylene plastic folder dividers, or clear plastic takeout container lids. Trace the Round 7 foot sole outline, cut inside the pen line by 2 mm, and sand any sharp edges smooth with a nail buffer before slipping the insole into the foot.
- 2. Balancing Density Between Upper and Lower Torso: When stuffing the snowman, pack the lower third of the body (Rounds 65–76) and the foot soles with firm, compressed fiberfill. Keep the stuffing in the upper torso and head slightly lighter. This concentrates the doll’s center of gravity close to the feet, ensuring it remains stable and resistant to tipping over on shelves.
- 3. Mastering the Dual-Needle Thread Joint: When thread-jointing the hips and shoulders, use a doubled strand of nylon upholstery thread or strong mercerized cotton. Tie the finishing knot underneath the inner arm or inside leg pinch point so it remains completely hidden from view. Test the rotation before tying off to guarantee smooth posing.
Care, Display & Holiday Preservation
Crafted from durable worsted weight yarn and reinforced components, your Classic Standing Snowman can be cherished for decades with proper seasonal care:
- Display Placement: Display your snowman on flat, level indoor surfaces away from open fireplace flames, hot radiators, or damp window sills.
- Cleaning: Dust lightly before holiday decorating using a soft-bristled brush or a hairdryer on the cool, low setting. For minor surface stains on the white yarn, spot-clean gently with a damp microfiber cloth and mild soap. Do not machine wash or soak.
- Off-Season Storage: Place the snowman in a clean, breathable cotton pillowcase or fabric storage container with cedar blocks to protect against dust and moths. Store standing or laid flat without heavy objects stacked on top of the sculpted head.
Frequently Asked Questions
Can I make this snowman smaller or larger?
Yes! You can scale this design up or down simply by adjusting your yarn weight and hook size. Using bulky chenille/plush yarn with a 4.5 mm hook produces a giant cuddly floor plush (over 60 cm tall), while using sport-weight cotton with a 1.75 mm hook yields a charming 20 cm tabletop miniature.
Why is the 2.5 mm hook recommended for worsted weight yarn?
Standard crochet instructions usually call for a 5.0 mm hook with worsted yarn. However, amigurumi toys require an exceptionally tight, dense fabric so that the white polyester fiberfill never peeks through between the stitches when the piece is firmly stuffed. A 2.5 mm hook produces firm, sculptural fabric that holds its shape indefinitely.
How do I ensure the legs are attached at the exact same height?
Before sewing, use pearl-headed quilting pins to temporarily anchor both legs at Round 11 of the lower body. Stand the snowman upright on a flat table: if the doll wobbles or leans, adjust the pin position by one stitch until both soles rest completely flat against the tabletop before executing the permanent thread joint.
Looking for more cozy holiday crochet inspiration? Explore our detailed tutorials for the Santa in a Brick Chimney Christmas Stocking and the Kawaii Plush Potted Christmas Tree with Golden Star.
Pin This Pattern for Your Winter Crocheting!
Save this freestanding snowman pattern to your favorite Pinterest boards so you have the round-by-round stitch guide and sculpting tips ready whenever inspiration strikes:

