

Infuse whimsical warmth, comforting softness, and playful holiday cheer into your seasonal home decor with the Kawaii Plush Potted Christmas Tree with Golden Star. Standing an impressive 30 cm (12 inches) tall, this huggable amigurumi creation brings a magical cartoon forest right to your holiday mantelpiece. Crafted from cloud-like #6 Super Bulky chunky chenille yarn with a 5.0 mm hook, this project features three cascading evergreen pine tiers linked through hidden loop transitions, vibrant mustard yellow surface bobble ornaments, a crisp five-pointed golden star topper, and a charming smiling planter sack complete with 20 mm safety eyes, chocolate soil, and a festive scarlet side bow.
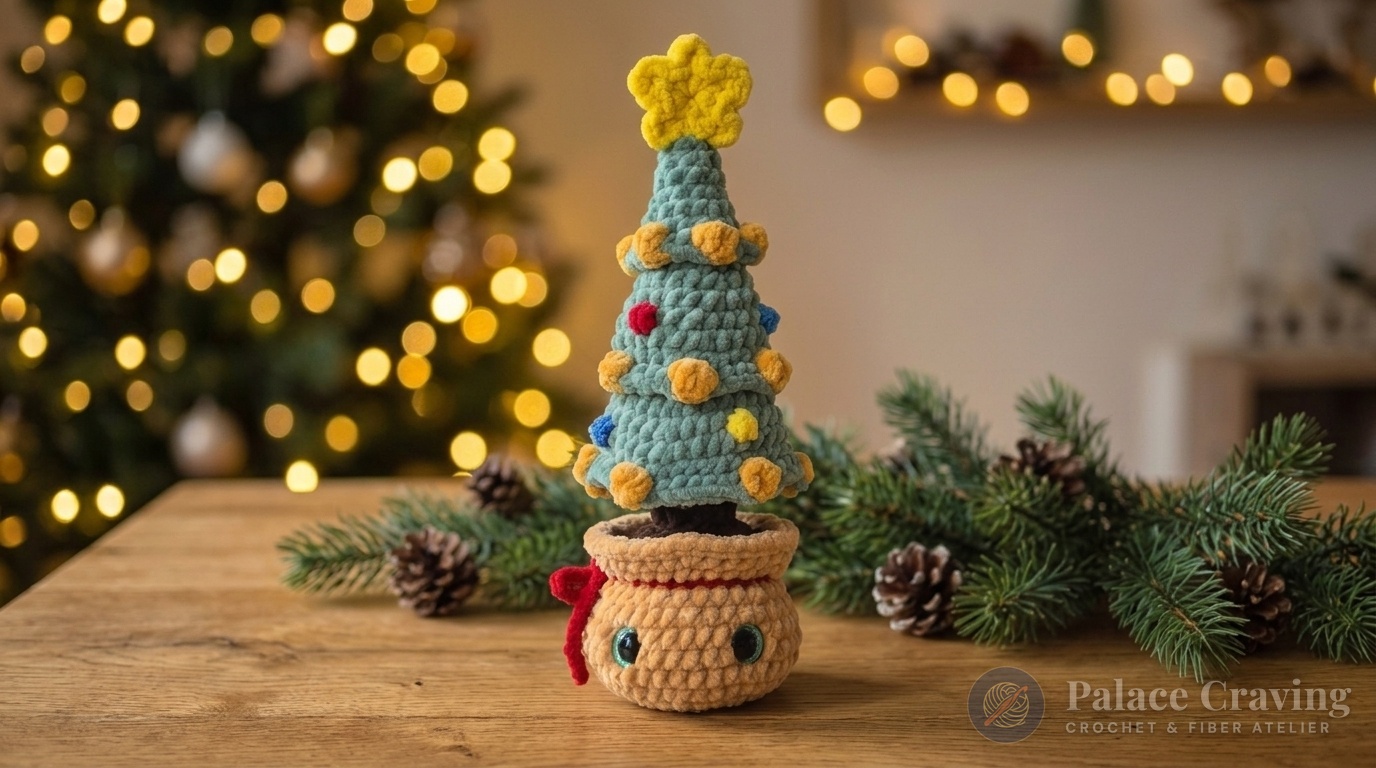
Traditional amigurumi trees often require stiff floral wire, cardboard inserts, or endless separate leaf motifs that take days to seam together. This modern pattern revolutionizes holiday tree construction through an ingenious single-piece tiered architecture. By utilizing alternating Back Loop Only (BLO) and Front Loop Only (FLO) transition rounds, each lower pine tier branches directly from the internal core of the tier above it. The yellow baubles are worked as 4-double-crochet bobble stitches straight into the exposed outer ridges, eliminating messy applique sewing. In this comprehensive pattern guide, you will master the tiered cone math, the no-sew surface bauble technique, the structured planter sack, and the golden star assembly.
Anatomy of a Tiered Plush Tree: Seamless Branch Engineering
What sets this 30 cm potted tree apart from standard cone ornaments is its thoughtful multi-tier structural design:
- Top Tier (Rounds 1–9): Begins with 6 single crochets in an adjustable magic ring and widens symmetrically over six rounds to 18 stitches. Round 7 is worked in Back Loops Only (BLO), leaving the outer front loops exposed for surface baubles, while Round 8 BLO decreases to 12 stitches, leaving its front loops available to sprout the Middle Tier!
- Middle Tier (Rounds 10–19): Reattaches Spearmint Green directly into the 18 exposed front loops of Round 8, expanding outward from 18 to 30 stitches over five rounds. Round 16 BLO leaves outer loops for Tier 2 baubles, and Round 17 BLO sets up the anchor loops for the Base Tier.
- Base Tier (Rounds 20–28): Anchors into the 30 exposed loops of Round 17, flaring out to a generous 42 stitches across the lower boughs. Round 25 BLO creates the final bauble rim before the bottom base closes flat around the central trunk.
- Integrated Surface Baubles: After the three tiers are finished, a contrasting Mustard Yellow yarn is joined into the exposed outer FLO ridges, working clean 4-dc bobble stitches spaced evenly around each tier (6 on Tier 1, 6 on Tier 2, and 6 on Tier 3) that pop against the evergreen background.
- Planter Sack & Soil Foundation: The smiling planter pot expands from 8 sc to 42 sts in Vanilla Fudge yarn, features 20 mm safety eyes, and incorporates a folded red collar. The chocolate brown soil insert is worked directly into the inner back loops of Round 11, holding the stuffed tree trunk firmly upright.
Crafters who loved the velvety texture of our Festive Plush Mouse in Christmas Present Box or assembled the multi-tiered designs in the 5-in-1 Christmas Holiday Festive Cupcakes Set will appreciate the clever engineering of this potted holiday pine.
Why You’ll Love Crocheting This Plush Christmas Tree
- Impressive 30 cm (12 in) Centerpiece: Substantial enough to serve as the main focal decor on your holiday coffee table, office desk, entryway credenza, or nursery shelf.
- Low-Sew Modular Construction: All three pine tiers sprout seamlessly from loop transitions, and the baubles are worked right into the fabric—saving hours of hand-sewing individual pieces.
- Cloud-Soft Chunky Chenille: Worked with #6 Super Bulky velvet chenille yarn, each stitch is plump, soft, and tactile, working up quickly in just 4 to 5 relaxing hours.
- Irresistible Kawaii Expression: The combination of large glossy 20 mm safety eyes, an embroidered smiling mouth, soft pink cheeks, and a scarlet side bow brings pure warmth and joy to every room.
Materials, Yarn Breakdown & Essential Notions

For this project, choose a premium #6 Super Bulky chenille yarn (100 g / 120 m / 131 yds per ball). Paired with an ergonomic 5.0 mm (US H-8) crochet hook, this creates a dense, plush fabric that holds its conical shape firmly without fiberfill peeking through.
| Component & Application | Yarn Color / Material Specification | Recommended Quantity |
|---|---|---|
| 3-Tiered Pine Tree (Colour A) | Spearmint / Forest Green (#6 Super Bulky Chenille) | 1 ball (~100 g) |
| Surface Bauble Bobbles (Colour B) | Mustard / Ochre Yellow Chenille | Small ball (~25 g) |
| Smiling Planter Pot / Sack (Colour C) | Vanilla Fudge / Warm Oatmeal Chenille | 1 ball (~70 g) |
| Pot Collar Accent & Side Bow (Colour D) | Scarlet Crimson Red Chenille | Small ball (~20 g) |
| Soil Insert & Trunk Stump (Colour E) | Rich Chocolate Brown Chenille | Small ball (~30 g) |
| 5-Point Star Topper (Colour F) | Primrose Golden Yellow Chenille | Small scrap skein (~15 g) |
| Safety Eyes & Notions | Pair of 20 mm black safety eyes, locking stitch markers, 5.0 mm hook, fiberfill | Essential crafting supplies |
Part 1: The 3-Tiered Evergreen Pine Tree Body

Work in continuous spiral rounds without joining, using locking stitch markers on all transition rounds. Start with Colour A (Spearmint Green) and a 5.0 mm hook.
Top Pine Tier (Rounds 1–9)
- Round 1: 6 sc into an adjustable magic ring. Gently cinch closed. [6 sts]
- Round 2: 6 sc around. [6 sts]
- Round 3: [1 sc, inc] × 3. [9 sts]
- Round 4: [2 sc, inc] × 3. [12 sts]
- Round 5: [3 sc, inc] × 3. [15 sts]
- Round 6: [4 sc, inc] × 3. [18 sts]
- Round 7 (Bauble Ridge): Work in BLO around all 18 stitches. This leaves 18 exposed front loops on the exterior for Tier 1 baubles. [18 sts]
- Round 8 (Internal Anchor): Work in BLO: [1 sc, dec] × 6. Place a bright locking stitch marker into the 1st unworked front loop of this round—this is where the Middle Tier will sprout! Stuff the top tier lightly with fiberfill. [12 sts]
- Round 9: Work 6 decreases around [6 sts]. Fasten off, weave tail through the remaining 6 loops, pull closed, and tuck the end securely inside.
Middle Pine Tier (Rounds 10–19)
- Round 10: Reattach Colour A into the 18 exposed front loops (FLOs) of Round 8 marked earlier. Work 18 sc around. [18 sts]
- Round 11: [5 sc, inc] × 3. [21 sts]
- Round 12: [6 sc, inc] × 3. [24 sts]
- Round 13: 24 sc around. [24 sts]
- Round 14: [7 sc, inc] × 3. [27 sts]
- Round 15: [8 sc, inc] × 3. [30 sts]
- Round 16 (Bauble Ridge): Work in BLO around all 30 stitches, leaving outer front loops free for Tier 2 baubles. [30 sts]
- Round 17 (Internal Anchor): Work in BLO: [1 sc, dec] × 10 [20 sts]. Place a marker in the 1st unworked front loop of this round for the Base Tier! Stuff middle tier lightly.
- Round 18: Work 10 decreases around [10 sts].
- Round 19: Work 5 decreases around [5 sts]. Fasten off, cinch opening closed, and weave in end.
Base Pine Tier (Rounds 20–28)
- Round 20: Reattach Colour A into the 30 exposed front loops of Round 17. Work 30 sc around. [30 sts]
- Round 21: [9 sc, inc] × 3. [33 sts]
- Round 22: [10 sc, inc] × 3. [36 sts]
- Round 23: [11 sc, inc] × 3. [39 sts]
- Round 24: [12 sc, inc] × 3 [42 sts]. Place a marker in the 1st front loop of Round 25!
- Round 25 (Bauble Ridge): Work in BLO: [1 sc, dec] × 14 [28 sts].
- Round 26: [2 sc, dec] × 7 [21 sts]. Stuff base tier firmly with fiberfill.
- Round 27: [1 sc, dec] × 7 [14 sts].
- Round 28: Work 7 decreases around [7 sts]. Fasten off, close opening neatly, and weave in tail. Your 3-tier tree cone is complete!
Part 2: Surface Bauble Bobble Trim (No-Sew Ornaments)
Hold the completed tree upright. Join Colour A (Spearmint Green) into the unworked outer front loops (FLOs) left behind on each tier’s rim. Work single crochets in Colour A, switching to Colour B (Mustard Yellow) only for each 4-dc Bobble Stitch so the ornaments pop crisply like baubles on pine needles!
- Tier 1 Baubles (Round 7 FLOs): Join Colour A into the 18 exposed front loops. Work: [2 sc in Colour A, 1 Bobble in Colour B] × 6 times around. Fasten off and weave in ends. [18 sts / 6 baubles]
- Tier 2 Baubles (Round 16 FLOs): Join Colour A into the 30 exposed front loops. Work: [4 sc in Colour A, 1 Bobble in Colour B] × 6 times around. Fasten off and weave in ends. [30 sts / 6 baubles]
- Tier 3 Baubles (Round 25 FLOs): Join Colour A into the 42 exposed front loops. Work: [6 sc in Colour A, 1 Bobble in Colour B] × 6 times around. Fasten off and weave in ends. [42 sts / 6 baubles]
Part 3: Smiling Planter Sack Pot, Soil & Scarlet Bow
Planter Sack Pot (Rounds 1–14)
- With Colour C (Vanilla Fudge): Round 1: 8 sc in MR [8 sts]. Round 2: 8 inc [16 sts]. Round 3: [1 sc, inc] × 8 [24 sts]. Round 4: [3 sc, inc] × 6 [30 sts]. Round 5: [4 sc, inc] × 6 [36 sts]. Round 6: [5 sc, inc] × 6 [42 sts].
- Rounds 7–8: Work 42 sc in each round. [42 sts per round]
- Round 9 (Eye Placement): [5 sc, dec] × 6 [36 sts]. Insert two 20 mm black safety eyes between Rounds 8 and 9, spaced 7 stitches apart. Snap backings on tightly.
- Round 10: [4 sc, dec] × 6 [30 sts]. Switch to Colour D (Scarlet Red).
- Round 11 (Red Collar Ridge): In FLO: [5 sc, dec, 6 sc, dec] × 2 [26 sts]. Mark this round! The unworked back loops (BLOs) of Round 11 are used for the chocolate soil insert!
- Round 12: Switch back to Colour C (Vanilla Fudge). Work in BLO: [(3 sc, inc) × 2, 2 sc, inc, 1 sc, inc] × 2 [34 sts].
- Round 13: [(4 sc, inc) × 2, 3 sc, inc, 2 sc, inc] × 2 [42 sts].
- Round 14: Work 42 slip stitches loosely around the outer rim to create a folded sack collar edge. Fasten off and weave in ends.
Chocolate Soil Insert & Scarlet Side Bow
- Soil Insert: Join Colour E (Chocolate Brown) into the 30 unworked back loops (BLOs) of Round 11 inside the pot neck:
- Round 1: 30 sc around [30 sts].
- Round 2: [3 sc, dec] × 6 [24 sts].
- Round 3: 12 decreases around [12 sts]. Stuff the planter sack firmly with fiberfill so it sits flat and stable.
- Round 4: 6 decreases around [6 sts]. Fasten off, cinch opening closed, and weave in end.
- Tied Scarlet Side Bow: Join Colour D (Scarlet Red) into the BLO of Round 11 positioned 4 stitches to the side of the eye. Chain 22 and fasten off. Rejoin Colour D into the adjacent stitch and chain 22 again. Tie the two chain cords into a festive side bow!
Part 4: Golden Star Topper & Tree Stump Anchor
- Crisp 5-Point Golden Star: In Colour F (Primrose Yellow), make an adjustable magic ring: Work all 5 points directly into the ring: [(1 sc, 1 dc, ch 1, 1 dc, 1 sc) × 5] into the magic ring (25 sts total). Pull magic ring tightly closed. Fasten off leaving a 25 cm sewing tail. Pinch each of the five ch-1 tips firmly between your thumb and forefinger to shape sharp, crisp star rays!
- Stuffed Tree Trunk Stump: In Colour E (Chocolate Brown): Round 1: 6 sc in MR [6 sts]. Round 2: 6 inc [12 sts]. Round 3: In BLO, 12 sc around [12 sts]. Round 4: 12 sc around [12 sts]. Fasten off, leaving a long 40 cm sewing tail. Stuff the stump firmly with fiberfill.
Part 5: Step-by-Step Assembly & Holiday Display

- Step 1 (Attaching the Star): Position the Primrose Yellow star upright over Round 2 at the tree apex. Using the star’s yarn tail, sew through two base stitches of the star into the tree tip so it stands rigid and proud.
- Step 2 (Attaching Stump to Tree Base): Center the stuffed Chocolate Brown stump against the underside of the bottom tier (Round 28). Sew the open top of the stump to the tree base securely. Do not cut the yarn tail!
- Step 3 (Planting Tree into Pot Soil): Using the remaining brown yarn tail from the stump, center the base of the trunk on the Chocolate Brown soil of the planter sack. Align the star topper and the safety eyes so both face directly forward. Stitch all the way around the trunk base into the soil.
- Step 4 (Embroidering the Smile): Using black embroidery floss or fine black yarn, embroider a sweet curved smile centered between the eyes on Round 8. Dab soft pink pastel blush onto the cheeks below the eyes for that signature kawaii radiance!
Display your completed plush tree proudly alongside our Festive Plush Mouse in Christmas Present Box and 3-in-1 Christmas Folding Shopping Bags for a heartwarming, cohesive handmade holiday sanctuary.
Pin This Plush Potted Christmas Tree Pattern for Later
Save this cozy holiday amigurumi tutorial directly to your Pinterest holiday boards so you have the round-by-round stitch counts, surface bobble charts, and assembly steps ready for your seasonal crafting!

