

Bring whimsical fairytale warmth to your winter holiday home with this heirloom Cozy Winter Snowman in Holly Hat with Lantern free crochet pattern. Standing approximately 17 cm (6.7 inches) tall in his dapper coffee-toned brimmed hat, this Nordic holiday amigurumi combines rustic alpine charm with sophisticated structural detailing. From his needle-sculpted eye sockets and dimensional orange carrot nose to his posable wire twig arms, vibrant 84-row candy-striped holiday scarf, and a removable miniature lantern with an internal yellow globe, he is the ultimate festive centerpiece for your mantel, tabletop, or Christmas tree display!
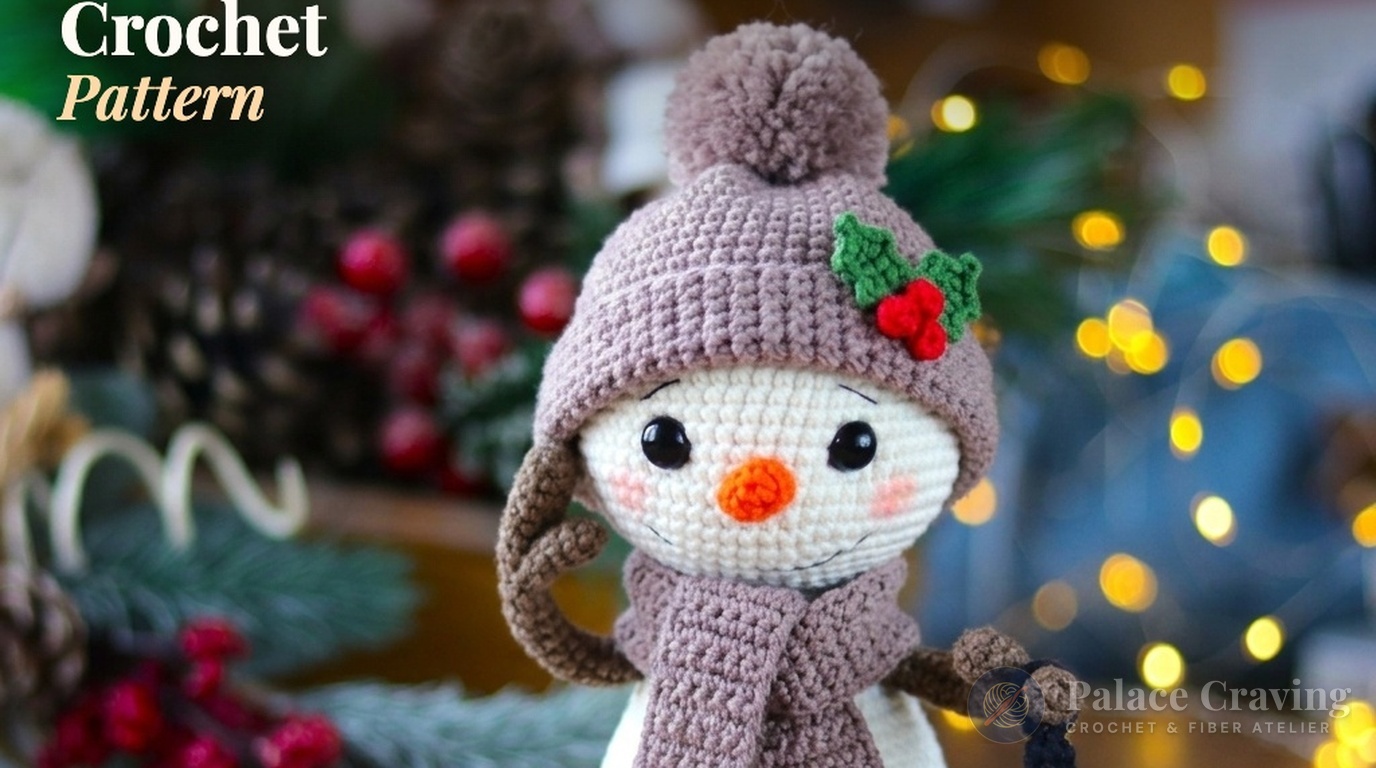
Unlike ordinary seasonal snowmen, this design features masterclass structural innovations that make it an enduring holiday heirloom. The twig arms are reinforced with insulated craft wire and joined directly into rounds 30–31 of the body without any sewing, allowing you to bend his hands naturally to carry pine sprigs, gifts, or his crocheted lantern. The coffee hat is worked with a sharp crown ridge and a dramatic three-round double crochet flared brim expanding to 99 stitches, decorated with rustic green and red patches adorned with embroidered white snowflakes. Paired with a double-thickness striped scarf and weighted bottom, he stands gracefully on any surface without wobbling.
Why You’ll Love Crocheting This Cozy Snowman
- Posable Twig Arm Architecture: Two continuous 20 cm looped wire inserts allow the twig arms to bend, pose, and securely hold his miniature lantern or holiday greenery.
- Ingenious No-Sew Arm Insertion: Arms are joined seamlessly into the torso at Rounds 30–31, with wire ends safely twisted and taped together inside the body cavity for permanent durability.
- Dapper Flared-Brim Coffee Hat: Crocheted with a defined back-loop crown ridge and a dramatic 99-stitch flared brim, embellished with hand-embroidered snowflake appliques.
- Removable 3D Holiday Lantern: Built with a black octagonal base, yellow interior glow globe, and a pointed roof with a hanging handle loop that slips neatly onto the snowman’s twig hand.
- 84-Row Classic Striped Scarf: Alternating emerald green and holiday red stripes finished with playful fringe ends to keep him cozy all winter long.
Key Materials & Palette Specifications

- YarnArt Jeans (55% Cotton, 45% Acrylic; 50g / 160m):
- Milk White (#03): ~60g for snowman head, plump body, and rounded support legs.
- Rustic Brown (#40): ~15g for two-finger twig arms.
- Ruby Red (#90): ~20g for striped scarf and hat patch applique.
- Jet Black (#53): ~15g for lantern base, roof, and globe cage lines.
- Golden Yellow (#35): ~10g for interior lantern glow globe.
- Alize Cotton Gold & Gazzal Jeans:
- Alize Cotton Gold Forest Green (#35): ~20g for striped scarf and green hat patch.
- Alize Cotton Gold Tangerine Orange (#37): ~10g for dimensional carrot nose.
- Gazzal Jeans Coffee (#1112): ~35g for the brimmed holiday hat.
- Crochet Hooks: 2.0 mm hook for tight amigurumi tension on head, body, arms, legs, and lantern; plus a 2.5 mm hook for the relaxed drape of the striped scarf and flared hat brim.
- Hardware & Notions: One pair of 10 mm black glossy safety eyes, 40 cm of 0.9–1.2 mm insulated craft wire, adhesive medical or electrical tape, black and white embroidery thread, dry pink pastel chalk with a soft blending brush, polyester fiberfill stuffing, stitch markers, and a tapestry needle.
Comprehensive Step-by-Step Crochet Instructions
Part 1: Head, Needle Sculpting & Carrot Nose
Worked in continuous spiral rounds using Milk White (#03) and a 2.0 mm hook. Stuff firmly as you progress.
- Rnds 1–6: R1: 6 sc in MR (6). R2: 6 inc (12). R3: (1 sc, inc) × 6 (18). R4: (2 sc, inc) × 6 (24). R5: (3 sc, inc) × 6 (30). R6: (4 sc, inc) × 6 (36).
- Rnds 7–12: R7: (5 sc, inc) × 6 (42). R8: (6 sc, inc) × 6 (48). R9: (7 sc, inc) × 6 (54). Rnds 10–12 (3 rounds): 54 sc around (54).
- Rnds 13–21 (Cheek Expansion & Eye Placement):
- R13: (8 sc, inc) × 6 (60).
- Rnds 14–21 (8 rounds): 60 sc around (60).
- Safety Eye Insertion: Insert 10 mm black safety eyes between Rnds 16 and 17, spaced 10 stitches apart. Snap locking washers firmly into place!
- Rnds 22–27 (Lower Chin Decreases):
- R22: (8 sc, dec) × 6 (54). R23: (7 sc, dec) × 6 (48). R24: (6 sc, dec) × 6 (42). Pack fiberfill firmly into the cheeks.
- R25: (5 sc, dec) × 6 (36). R26: (4 sc, dec) × 6 (30). R27: (3 sc, dec) × 6 (24). Sl st, fasten off leaving an uncinched 24-stitch neck opening.
- Eye Socket Needle Sculpting: Thread a long needle with Milk White yarn. Insert at the open neck base, exit at outer corner of left eye, re-enter at inner corner, and exit back at neck base. Pull gently to indent the eye socket; knot securely. Repeat for the right eye to create deep, expressive character sockets!
- Dimensional Carrot Nose: With Tangerine Orange (#37) and 2.0 mm hook: R1: 6 sc in MR (6). R2: 6 sc (6). R3: (1 sc, inc) × 3 (9). Rnds 4–6 (3 rounds): 9 sc around (9). Fasten off leaving a tail (do not stuff). Sew nose centered between Rnds 17–20. Embroider delicate black eyebrows and a smiling mouth; dust cheeks with dry pink pastel.
Part 2: Wire-Posable Twig Arms (Make 2)
Worked in Rustic Brown (#40) with a 2.0 mm hook. Each arm features a joined side twig finger.
- Side Twig Finger: R1: 6 sc in MR (6). Rnds 2–4 (3 rounds): 6 sc around (6). Fasten off and weave in starting tail.
- Main Twig Hand: R1: 6 sc in MR (6). Rnds 2–6 (5 rounds): 6 sc around (6). Do NOT cut yarn—join the finger in Rnd 7:
- Rnd 7 (Finger Join): Work 2 sc through both the main hand and side finger simultaneously, 4 sc along main hand, 4 sc around remaining free stitches of side finger (8 sts total).
- Rnds 8–19 (Twig Stem): Rnds 8–17 (10 rounds): 8 sc around (8). R18: (3 sc, inc) × 2 (10). R19: 10 sc around (10). Fasten off.
- Wire Reinforcement: Cut a 20 cm piece of craft wire, bend a smooth 1 cm loop at one tip, wrap with adhesive tape, and insert the loop down into the arm cavity. Leave the straight end protruding from the top.

Part 3: Plump Body with No-Sew Arm Insertion & Support Legs
- Body Foundation (Milk White #03 – Rnds 1–11):
- R1: 6 sc in MR (6). R2: 6 inc (12). R3: (1 sc, inc) × 6 (18). R4: (2 sc, inc) × 6 (24). R5: (3 sc, inc) × 6 (30).
- R6: (4 sc, inc) × 6 (36). R7: (5 sc, inc) × 6 (42). R8: (6 sc, inc) × 6 (48). R9: (7 sc, inc) × 6 (54). R10: 54 sc. R11: (8 sc, inc) × 6 (60).
- Rnds 12–29 (Lower Torso & Taper):
- Rnds 12–19 (8 rounds): 60 sc around (60).
- R20: (8 sc, dec) × 6 (54). Rnds 21–22: 54 sc. R23: (7 sc, dec) × 6 (48). Rnds 24–25: 48 sc. Stuff lower torso firmly.
- R26: (6 sc, dec) × 6 (42). Rnds 27–28: 42 sc. R29: (5 sc, dec) × 6 (36).
- Rnds 30–31 (No-Sew Arm Joining):
- R30: 7 sc on back, 5 sc through inner side of 1st arm and body simultaneously, 12 sc across chest, 5 sc through inner side of 2nd arm and body, 7 sc on back (36).
- R31: 7 sc on back, 5 sc along outer free stitches of 1st arm, 12 sc across chest, 5 sc along outer free stitches of 2nd arm, 7 sc on back (36).
- Twist both protruding internal wire ends tightly together inside the chest cavity and wrap securely with adhesive tape!
- Rnds 32–36 (Neck Yoke): R32: (4 sc, dec) × 6 (30). Rnds 33–34: 30 sc. R35: (3 sc, dec) × 6 (24). R36: 24 sc around. Fasten off leaving a long 40 cm tail. Pack extra stuffing into the neck and whipstitch head to body through all 24 stitches.
- Support Legs (Make 2): In Milk White: R1: 6 sc in MR (6). R2: 6 inc (12). R3: (3 sc, 3 inc) × 2 (18). R4: (2 sc, inc) × 6 (24). Rnds 5–7 (3 rounds): 24 sc. R8: (2 sc, dec) × 6 (18). Stuff lightly, flatten back edge, and sew symmetrically between Rnds 10–15 of lower body for a rock-solid tripod base!
Part 4: 84-Row Striped Holiday Scarf
Worked in turning rows with a 2.5 mm hook, alternating Forest Green (#35) and Ruby Red (#90) every 2 rows for a plush winter accessory.
- With Forest Green (#35): Ch 5; starting in 2nd ch from hook: work 4 sc across, ch 1, turn (4). Row 2: 4 sc across, ch 1, turn (4).
- Change to Ruby Red (#90): Rows 3–4: 4 sc across, ch 1, turn for 2 rows (4).
- Rows 5–84: Alternate Green and Red every 2 rows until you reach 84 rows total (~40 cm long). Fasten off and weave in all yarn ends neatly. Add 4 cm knotted fringe strands to both ends if desired!
Part 5: Coffee Brimmed Hat & Snowflake Patches
Worked with Gazzal Jeans Coffee (#1112) using a 2.5 mm hook for crisp shape and relaxed brim drape.
- Hat Crown (Rnds 1–10): R1: 6 sc in MR (6). R2: 6 inc (12). R3: (1 sc, inc) × 6 (18). R4: (2 sc, inc) × 6 (24). R5: (3 sc, inc) × 6 (30). R6: (4 sc, inc) × 6 (36). R7: (5 sc, inc) × 6 (42).
- R8 (Crown Ridge): In back loops only (BLO), 42 sc around (42). (This creates the crisp flat top edge of the hat crown).
- Rnds 9–16 (Hat Wall): Rnds 9–10: 42 sc. R11: (13 sc, inc) × 3 (45). Rnds 12–13: 45 sc. R14: (14 sc, inc) × 3 (48). Rnds 15–16: 48 sc.
- Rnds 17–21 (Base Flare): R17: (15 sc, inc) × 3 (51). R18: 51 sc. R19: (16 sc, inc) × 3 (54). R20: (8 sc, inc) × 6 (60). R21: (9 sc, inc) × 6, sl st (66).
- Rnds 22–24 (Flared Double Crochet Brim):
- R22: In front loops only (FLO), ch 2, (5 dc, dc-inc) × 11, sl st (77).
- R23: Ch 2, (6 dc, dc-inc) × 11, sl st (88).
- R24: Ch 2, (7 dc, dc-inc) × 11, sl st (99). Fasten off and weave in end.
- Rustic Hat Patches (Make 2 – 1 Red, 1 Green with 2.0 mm hook):
- Ch 5; in 2nd ch: 4 sc, ch 1, turn. Row 2: 4 sc, ch 1, turn (4).
- Perimeter Border: Work around edges:
(3 sc in corner, 2 sc, 3 sc in corner)on 1st side;(1 sc, 3 sc in corner)on 2nd side;(2 sc, 3 sc in corner)on 3rd side; 1 sc, sl st on 4th side. - Sew patches onto hat with black embroidery thread using rustic cross-stitches. Embroider 3 delicate white snowflakes across the patches and crown!
Part 6: Miniature Glowing Holiday Lantern
Worked with Jet Black (#53) and Golden Yellow (#35) using a 2.0 mm hook.
- Octagonal Lantern Base (Black #53): R1: 6 sc in MR (6). R2: 6 inc (12). R3: In BLO, (3 sc, inc) × 3 (15). Fasten off Black.
- Yellow Glow Globe: Attach Golden Yellow (#35) to the exposed front loops (FLO) of Rnd 3: R4: 12 sc around (12). Rnds 5–9 (5 rounds): 12 sc around (12). Fasten off.
- Pointed Upper Roof (Black #53): R1: 4 sc in MR (4). R2: (1 sc, inc) × 2 (6). R3: 6 sc (6). R4: (1 sc, inc) × 3 (9). R5: (2 sc, inc) × 3 (12). Rnds 6–7: 12 sc (2 rnds). R8: In FLO, (1 sc, inc) × 6 (18). Fasten off leaving a 25 cm sewing tail.
- Assembly & Handle Loop: Sew roof onto top of yellow globe, stuffing firmly as you close. With black embroidery thread, stitch vertical cage struts and diagonal cross-lines around the yellow globe. Crochet a ch 11 black loop and sew to the peak of the roof so it hangs gracefully over the snowman’s twig hand!
3 Atelier Secrets for Masterclass Amigurumi Results
- Deep Eye Socket Tightening: To give your snowman an expressive vintage character, do not rely on safety eyes alone. Passing double-strand white yarn from the neck base to each eye socket indents the eyes slightly into the head, making his smile look genuinely cheerful.
- Internal Wire Safety & Flexibility: Always loop the ends of your arm wire and wrap tightly with adhesive tape. This prevents the wire from poking through cotton stitches while ensuring you can reposition his twig fingers to hold the lantern firmly.
- Shaping the DC Flared Hat Brim: When working Rnds 22–24 of the hat, use relaxed double crochet tension. Lightly steam-block the brim over a small bowl or cup to set a gentle wave that frames his face handsomely.
Festive Styling & Winter Display Ideas

- Rustic Winter Fireplace Hearth: Place him alongside pinecone garlands, brass lanterns, and birch logs for an authentic Scandinavian holiday atmosphere.
- Holiday Table Centerpiece: Group him with miniature gingerbread houses and ceramic Christmas trees on a rustic wooden runner for a magical dinner presentation.
- Heirloom Handmade Gift: Gift this delightful snowman in a rustic kraft box tied with red baker’s twine and dried orange slices for an unforgettable holiday keepsake.
Curated Tools & Notions for Amigurumi Success
To help you achieve professional tension and seamless finishes, here are the exact atelier tools and notions featured in this masterclass project:
Ergonomic comfort-grip handles with smooth aluminum hooks that prevent hand fatigue during dense amigurumi and flared brim work.
Pliable, rust-proof craft wire that bends effortlessly while holding its shape, ideal for posable amigurumi arms, fingers, and necks.
FTC Disclosure: Palace Craving Atelier participates in affiliate programs. If you purchase through our links, we may earn a modest commission at zero additional cost to you.
Storage, Care & Heirloom Preservation
- Cleaning: Spot clean white yarn areas with a soft white cloth dipped in lukewarm water and mild wool soap. Avoid submerging to protect the internal wire frame from corrosion.
- Hat & Lantern Care: Store the lantern tucked loosely into his hands or beside him in tissue paper to protect the delicate cage embroidery.
- Off-Season Storage: Place the snowman in an airtight storage bin lined with acid-free tissue paper and natural cedar sachets away from moisture and direct heat.
Save & Pin This Festive Pattern
Keep this comprehensive heirloom pattern at your fingertips for your holiday crafting schedule! Save these tutorial pins directly to your favorite Pinterest crochet boards:


Frequently Asked Questions
Can I make the snowman without the internal wire?
Yes! If you are making this doll for an infant or young toddler, simply omit the wire inserts and stuff the twig arms lightly with polyester fiberfill. The arms will be soft and floppy rather than posable.
How do I ensure the snowman stands up by himself?
The secret lies in the two support legs sewn between Rounds 10–15 of the lower body, combined with firm stuffing in the lower base. You can also place a small pouch of clean plastic poly-pellets into the bottom of the body before stuffing.
What yarn can I substitute for YarnArt Jeans?
Any quality sport-weight cotton-acrylic blend (such as Alize Cotton Gold, Schachenmayr Catania, or Paintbox Yarns Cotton DK) works wonderfully. Maintain a 2.0 mm hook to keep your single crochet stitches tight and firm.
Pin This Pattern to Your Holiday Boards
Love this charming winter snowman? Save this pin to your Holiday & Christmas Crochet board today so you have every row count and assembly diagram ready whenever the winter snow falls!