

If you are searching for a crochet stitch that delivers dramatic architectural texture without excessive complexity, look no further than the alpine stitch. While the waffle stitch delivers deep square pockets and the moss stitch provides fluid linen drape, the alpine stitch creates a sophisticated raised diamond weave. Defined by interlocking diamond ridges that catch light and cast rich micro-shadows, this stitch creates a dense, thermal fabric ideal for heavy blankets, structured washcloths, and cozy winter sweaters. In this step-by-step tutorial, we break down the alpine stitch with exact foundation counts, post-stitch mechanics, and row-by-row instructions so your edges stay crisp and your stitch counts remain completely accurate.
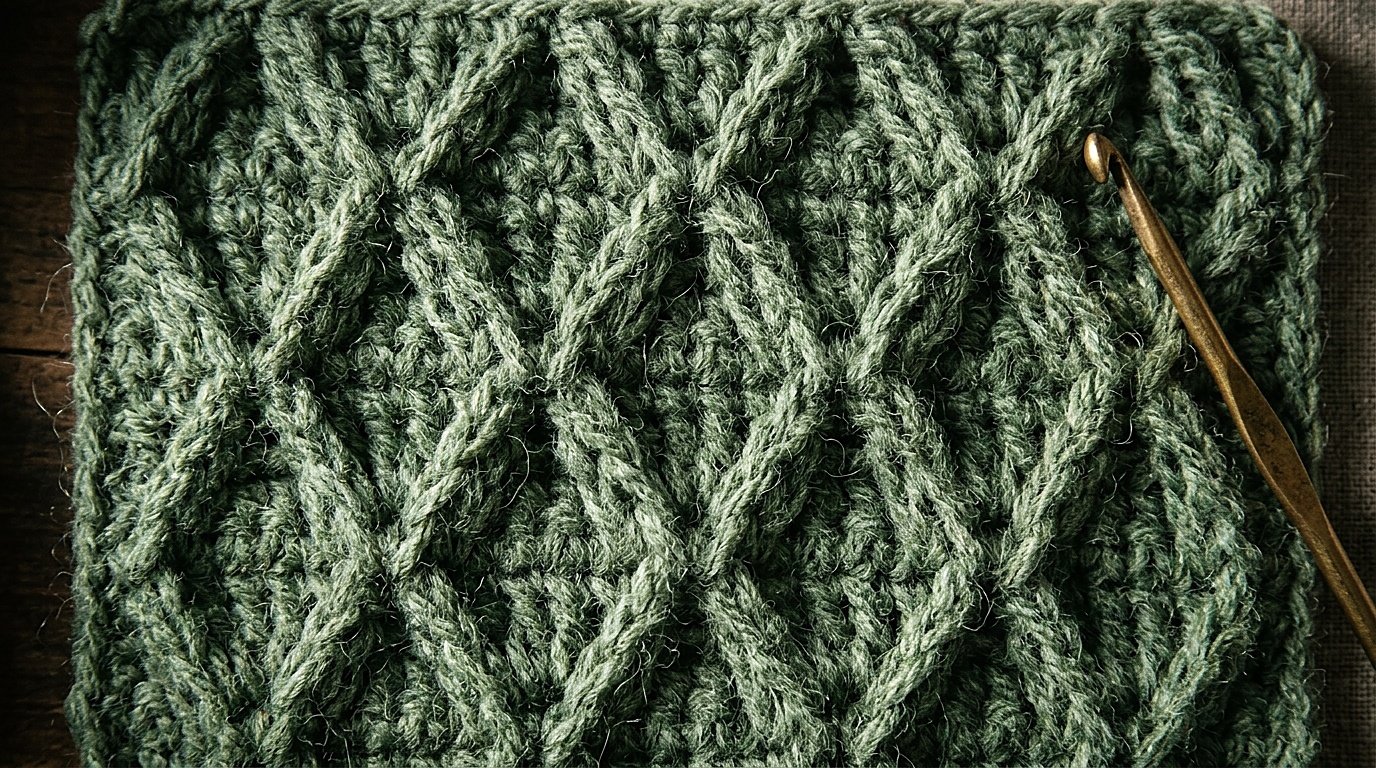
The visual signature of the alpine stitch (one of the favorites in our master crochet stitch directory) comes from alternating front-post double crochets with standard double crochets across a four-row repeat. Unlike beginner post-stitch patterns that work into the row immediately beneath, the alpine stitch reaches down two rows into the previous right-side row. This vertical reach creates raised diagonal diamond facets separated by smooth valleys, producing a plush, heat-trapping texture that outperforms standard flat crochet stitches.
Alpine Stitch Quick Reference & Technical Rules
| Skill Level | Confident Beginner / Intermediate |
| Stitch Terminology | US Crochet Terms |
| Active Stitch Count | Odd number of stitches (Multiple of 2 + 1) |
| Foundation Chain Formula | Active Stitches + 2 (e.g., 21 stitches = Chain 23) |
| Turning Chain Rule | Ch 2 does NOT count as a stitch (always work first dc into the very first stitch) |
| Pattern Repeat | 4-row repeat (Rows 3, 4, 5, and 6) |
| Key Fabric Property | Thick, one-sided thermal relief with smooth wrong-side backing |
The Anatomy of the 2-Row-Deep Front Post Double Crochet (FPDC)
The defining movement of the alpine stitch is the front-post double crochet worked around a double crochet two rows below. Mastering this single mechanical movement ensures your fabric lies completely flat without puckering or pulling inward:
- Hook Trajectory: Yarn over, insert your hook from right to left horizontally behind the vertical post of the target double crochet located two rows below (in the previous RS row). The body of your hook should sit directly behind the post, pushing it forward toward the right side.
- The Golden Loop Lift: Yarn over and pull up a loop. Crucial step: Gently lift your hook upward so the working loop reaches the full height of your current row before executing your final yarn-overs. If you keep this loop tight, the fabric will curl tightly forward.
- Skipping the Hidden Stitch: Once you complete the FPDC, tilt your work forward and locate the single crochet stitch on the current row that sits directly behind the post you just worked. Do not work into this stitch! It is already accounted for by the front post. Working into it will accidentally add extra stitches to your row.
Tools & Materials for Crisp Diamond Definition
Because the alpine stitch relies on defined vertical ridges, yarn selection dramatically affects the outcome. Heavily fuzzy yarns like boucle or brushed mohair will obscure the crisp diamond lattice. For high-contrast ridge definition, choose a smooth, multi-ply worsted weight yarn in a light or medium shade.

Step-by-Step 21-Stitch Practice Swatch
To master the alternating rhythm without second-guessing your counts, cast on this exact 21-stitch practice swatch. Keep track of your row ends to ensure every row maintains exactly 21 active stitches.
Foundation Chain: Loosely chain 23 with your 5.0mm hook.
Row 1 (Foundation Base – RS): Work 1 dc into the 3rd chain from your hook (the skipped 2 chains do not count as a stitch). Work 1 dc into each remaining chain across to the end. Turn. [21 active dc stitches]
Row 2 (Anchor Row – WS): Ch 1 (does not count as a stitch here and throughout), work 1 sc into the very first stitch and into each stitch across. Turn. [21 active sc stitches]

Row 3 (First Relief Row – RS): Ch 2 (does not count as a stitch), work 1 dc into the first stitch. *Work 1 FPDC around the next dc from Row 1 directly below, skip the sc behind it on Row 2, work 1 dc into the next sc stitch.* Repeat from * across until you reach the end of the row, placing your final dc into the last stitch. Turn. [21 active stitches: 11 dc, 10 FPDC]
Row 4 (Anchor Row – WS): Ch 1, work 1 sc into each stitch across. Turn. [21 active sc stitches]
Row 5 (Staggered Diamond Row – RS): Ch 2, work 1 dc into the first stitch, and 1 dc into the second stitch. *Work 1 FPDC around the next dc from Row 3 two rows below (which sits directly between two previous FPDC ridges), skip the sc behind it, work 1 dc into the next sc.* Repeat from * across until 1 stitch remains, work 1 dc into the final stitch. Turn. [21 active stitches: 12 dc, 9 FPDC]
Row 6 (Anchor Row – WS): Ch 1, work 1 sc into each stitch across. Turn. [21 active sc stitches]
Pattern Repeat: Repeat Rows 3 through 6 until your swatch reaches the desired height. Finish on a Row 4 or Row 6 anchor row for a neat, stable top edge.
How to Read the Fabric & Fix Common Stitch Errors
Post-stitch patterns are highly structural. If something feels off, use these visual diagnostics to identify and resolve the issue immediately:
- Your Stitch Count Is Growing: If you started with 21 stitches and suddenly have 23 or 24, you forgot to skip the sc behind the FPDC. Always check the back of your fabric—every FPDC must have an unworked sc resting directly behind it.
- The Swatch Curls Inward at the Bottom: Post stitches require slightly more vertical yarn length than regular double crochets. If your bottom edge curves upward into a smile, you are pulling the FPDC loops too tight. Relax your hook angle and pull the loop to row height.
- The Diamond Lattice Appears Crooked: On Row 5, make sure you anchor your first FPDC around the third double crochet of Row 3 (the plain dc that sits between the first two posts). If you work into another post stitch, the columns will stack into vertical ribs rather than staggering into diamonds.

How to Scale the Alpine Stitch for Real Projects
To adapt this stitch for any project dimension—from a kitchen dishcloth to a large sofa throw—use our verified formula: Foundation Chain = (Any Even Number of Stitches) + 2. This always produces an odd number of active stitches, ensuring symmetrical border double crochets on both edges:
- Textured Kitchen Washcloth (approx. 9″ x 9″): Chain 31. Yields 29 active stitches (1 border dc + 14 pattern pairs). Work 26 rows.
- Winter Ribbed Scarf (approx. 8″ x 65″): Chain 27. Yields 25 active stitches (1 border dc + 12 pattern pairs). Work in repeat until 65 inches long.
- Cozy Baby Blanket (approx. 32″ x 36″): Chain 111. Yields 109 active stitches. Work approximately 96 rows, then finish with a single crochet border.
- Full Afghan / Couch Throw (approx. 50″ x 60″): Chain 171. Yields 169 active stitches. Post stitches consume more yarn than flat double crochet, so keep an extra 1 to 2 skeins on hand for wide afghans.
Save This Alpine Stitch Guide on Pinterest
Pin this step-by-step stitch tutorial to your Pinterest crochet stitches board so you always have the row repeat handy when planning your next textured make!

