

There is nothing quite as comforting on a brisk winter evening as a steaming mug of hot cocoa topped with billows of sweet whipped cream. Our Christmas Hot Cocoa Mug and Gingerbread Man brings this quintessential holiday indulgence to life in rich amigurumi form! Standing approximately 12 to 14 cm (5 inches) tall, this festive tabletop piece features a pedestal-footed cherry red ceramic-style mug, organic melting chocolate rim drips, an undulating 3D spiral whipped cream ruffle, a cheerful dipping gingerbread man cookie with iced details, an upright wired candy cane stirrer, and a two-tone peppermint swirl candy disc.
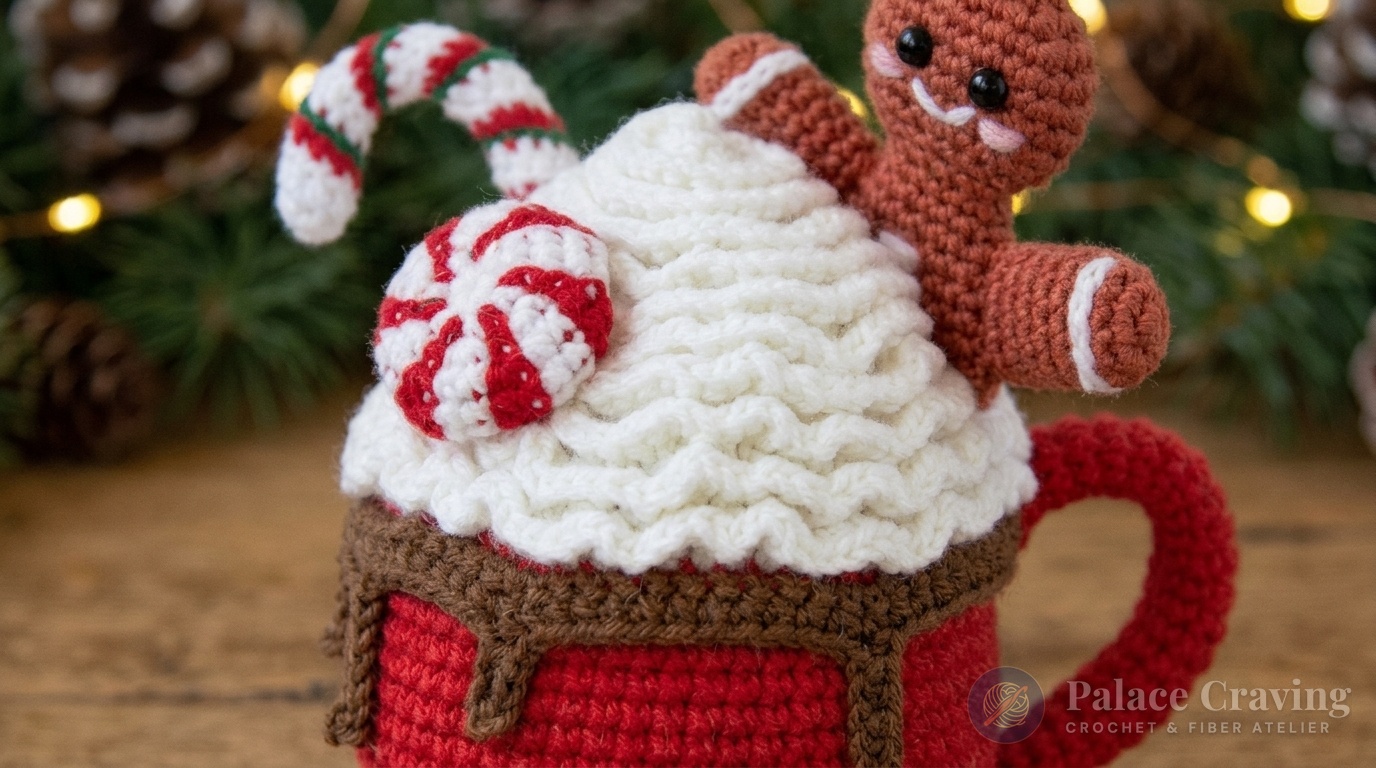
Unlike basic mug cozies or flat motifs, this project is engineered with a firm double-disc pedestal base and an internal structured wire handle that allows it to sit perfectly upright as a standalone holiday centerpiece. Pair this delightful festive creation with our Classic Standing Santa Claus Amigurumi Doll, our Festive Christmas Gingerbread Man, or our popular 3-in-1 Christmas Holiday Mugs to transform your mantel or kitchen coffee station into a whimsical holiday bakery.
Why You’ll Love Crafting This Holiday Hot Cocoa Mug
- Double-Disc Elevated Footed Base: Two crocheted discs whip-stitched together provide a firm, weighted foundation so the mug never wobbles or leans under the weight of the toppings.
- Continuous 3D Whipped Cream Ruffle Swirl: Worked in back loops only (BLO) to build the central cone, then reversed into the exposed front loops (FLO) with 2-sc increases in every loop from peak to base, creating lush, authentic ruffles without sewing seams!
- Realistic Melting Chocolate Drips: Worked directly into the mug rim loops with varying drop lengths (ch-3 to ch-6) that drape realistically over the glossy red ceramic surface.
- Dipping Miniature Gingerbread Cookie: A lightly stuffed, steam-pressed cookie boy nestled securely into a custom sculpted indent in the cream, accented with white icing smiles and pink pastel cheeks.
- Wired Candy Cane & Peppermint Swirl: A double-helix spiral candy cane reinforced with chenille craft wire and a classic two-color pinwheel candy complete the festive barista presentation.
Project Anatomy & Finished Component Guide
| Component | Crochet Technique | Primary Color | Finished Size |
|---|---|---|---|
| Footed Mug Body | Double disc base + 60-st spiral cylindrical walls | Holiday Cherry Red | ~8 cm (3.2 in) diam. × 7 cm tall |
| Whipped Cream Cone | BLO hdc decrease cone + FLO top-down ruffle spiral | Cream White | ~6 cm (2.4 in) dome peak |
| Melting Cocoa Drips | Surface crochet in Rnd 23 FLO with varied chain drops | Rich Chocolate Brown | Cascading rim accents |
| Dipping Gingerbread Boy | Continuous head/torso, flat arms, steam-pressed | Warm Cookie Tan / Brown | ~6.5 cm (2.6 in) tall |
| Wired Candy Cane | Double-helix BLO spiral (White hdc + Red sc) + wire | Crimson Red, White & Green | ~7 cm (2.8 in) tall |
| Peppermint Pinwheel | Two-color interlocking spiral disc (2-color jacquard) | Snow White & Crimson Red | ~3.5 cm (1.4 in) diameter |
Materials, Color Palette & Studio Notions

- Yarn Requirements: Sport/Fine 4-ply cotton or cotton-acrylic blend (approx. 160m / 175 yds per 50g skein):
- Holiday Cherry Red: ~45g (Footed base, cylindrical mug body, and wired handle)
- Whipped Cream White: ~35g (Whipped cream cone, continuous ruffle swirl, and icing accents)
- Rich Chocolate Brown: ~10g (Melting cocoa rim drips)
- Gingerbread Cookie Tan: ~15g (Miniature gingerbread cookie boy head, torso, and arms)
- Crimson Red & Snow White: ~10g each (Peppermint candy pinwheel disc and wired candy cane)
- Pine Needle Green: ~3g (Embroidered spiral candy cane stripe)
- Crochet Hooks: 2.25 mm hook (mug body, cream swirl, and handle) and 2.0 mm hook (gingerbread boy, candy cane, and peppermint disc).
- Notions & Armature: 3–4 chenille craft pipe cleaners (for handle and candy cane rigidity), two 6 mm black flatback beads or safety eyes, premium polyester fiberfill, tapestry needle, hot glue gun or fabric adhesive, and pink pastel chalk for blushing.
Barista Craft Secrets for Flawless Mug Sculpting
To achieve that crisp, clean coffee-shop look and ensure toppings nestle naturally, follow these studio-tested techniques:
- The Double-Disc Sole: Never use a single round disc for the foot. Working two identical discs and whip-stitching them together provides the rigidity of a cardboard insert without warping over time.
- The Sculpted Cream Indents: Before gluing or sewing your toppings, use a needle with strong white thread to stitch down two small hollows into the cream dome: one deep trench beside the handle for the cookie, and a round divot on the opposite side for the candy cane.
- Steam-Pressing the Gingerbread Man: Lightly stuff only the center of the cookie body, leaving the edges flat. Give the gingerbread man a gentle blast of steam from your iron before embroidering—this creates that authentic baked-cookie crispness!
Curated and verified in the Palace Craving fiber arts workshop.
Gauge & Cylinder Tension Swatch
Because the mug body must hold its cylindrical structure without bulging outward when stuffed, firm tension is critical. With a 2.25 mm hook in Holiday Red:
- Rnd 1: 6 sc in MR [6].
- Rnd 2: 6 inc [12].
- Rnd 3: *(1 sc, inc)* rep 6 times [18].
- Rnd 4: *(2 sc, inc)* rep 6 times [24].
- Rnds 5–6: 24 sc around (2 rounds) [24].
At the end of Round 4, your flat circular base swatch should measure 3.8 cm (1.5 inches) in diameter. If wider than 4.0 cm, size down to a 2.0 mm hook for the entire mug body.
Step-by-Step Master Pattern: Footed Base & Mug Body
1. Double-Disc Footed Pedestal (Make 2 Discs in Red)
Using a 2.25 mm hook and Holiday Red yarn:
- Rnd 1: 6 sc in MR [6].
- Rnd 2: 6 inc around [12].
- Rnd 3: *(1 sc, inc)* rep 6 times [18].
- Rnd 4: 1 sc, inc, *(2 sc, inc)* rep 5 times, 1 sc [24].
- Rnd 5: *(3 sc, inc)* rep 6 times [30].
- Rnd 6: 2 sc, inc, *(4 sc, inc)* rep 5 times, 2 sc [36 sts]. Finish with a sl st.
- Fasten off 1st disc. Leave a long tail on 2nd disc. Place discs wrong sides together and whip-stitch the outer edges together to form a firm, double-thick pedestal foot!
2. Red Cylindrical Mug Body
- Rnds 1–6: Work as for base disc up to 36 sts [36].
- Rnd 7: *(5 sc, inc)* rep 6 times [42].
- Rnd 8: *(6 sc, inc)* rep 6 times [48].
- Rnd 9: *(7 sc, inc)* rep 6 times [54].
- Rnd 10: *(8 sc, inc)* rep 6 times [60 sts].
- Glue or stitch the 36-st double-disc pedestal foot centered onto the bottom exterior of the mug.
- Rnds 11–23 (13 rnds): Work 13 rounds straight of 60 sc in every round [60 sts].
- Finish Rnd 23 with a slip stitch. Fasten off Holiday Red yarn.
Step-by-Step Master Pattern: Whipped Cream Cone & Spiral Ruffles
1. Whipped Cream Dome (Worked in BLO with Half Double Crochet)
Join Whipped Cream White yarn into the back loop only (BLO) of Round 23 (save the exposed front loops for chocolate drips!):
- Rnd 24:
BLO 60 hdcaround [60]. - Rnd 25:
BLO *(8 hdc, dec)*rep 6 times [54]. - Rnd 26:
BLO *(7 hdc, dec)*rep 6 times [48]. - Rnd 27:
BLO *(6 hdc, dec)*rep 6 times [42]. - Rnd 28:
BLO *(5 hdc, dec)*rep 6 times [36]. - Rnd 29:
BLO *(4 hdc, dec)*rep 6 times [30]. Stuff the red mug base firmly with fiberfill, keeping the cream cone slightly softer. - Rnd 30:
BLO *(3 hdc, dec)*rep 6 times [24]. - Rnd 31:
BLO *(2 hdc, dec)*rep 6 times [18]. - Rnd 32:
BLO *(1 hdc, dec)*rep 6 times [12]. - Rnd 33:
BLO 6 dec[6 sts]. Do not cut yarn!
2. Continuous Spiral Whipped Cream Ruffle
Without cutting your yarn at the peak of Round 33, rotate the mug and begin working in the opposite direction (from top peak down to the base) into the exposed front loops (FLO) left from Rnds 33 down to 24:
- Work 2 sc in every single exposed front loop continuously in a downward spiral all the way to Round 24!
- Because you double every stitch, the fabric naturally ripples into an organic, undulating 3D whipped cream spiral that crowns the entire cup! Fasten off and weave in the tail.
Wired Mug Handle & Melting Chocolate Rim Drips

1. Sturdy Wired Mug Handle
- With Holiday Red: R1: 8 sc in MR [8].
- Rnds 2–29 (28 rnds): 8 sc around (total 29 rounds) [8 sts]. Finish with a slip stitch; leave a 25 cm sewing tail.
- Fold 2 chenille pipe cleaners together, twist them firmly, and insert inside the crochet tube. Trim excess wire with pliers and whip-stitch the opening closed.
- Curve into an ear-handle shape; sew the top end over the Rnd 23/24 color-change seam and the lower end near the base of the mug.
2. Organic Melting Cocoa Rim Drips
- Join Rich Chocolate Brown yarn into the exposed front loop only (FLO) of Round 23 on the left side of the handle.
- Row 1: Work single crochet stitches around the rim, increasing 1 st every 10th stitch until reaching the right side of the handle.
- Row 2 (Turn & Work Custom Drips): Work a varied rhythm of drips:
- Short Drip: 3 sc, ch 3, 2 sc down chain from 2nd ch, sl st back into base rim.
- Medium Drip: 4 sc, ch 5, 4 sc down chain from 2nd ch, sl st back into base rim.
- Long Drip: 3 sc, ch 6, 5 sc down chain from 2nd ch, sl st back into base rim.
- Repeat this irregular rhythm around the entire perimeter. Smoothly glue the drips down against the red exterior mug wall using clear craft adhesive!
Toppers Master Pattern: Dipping Gingerbread, Peppermint Disc & Candy Cane
1. Miniature Dipping Gingerbread Cookie (2.0 mm Hook)
- Head & Torso:
- In Cookie Tan: R1: 6 sc in MR [6] • R2: 6 inc [12] • R3: *(1 sc, inc)*×6 [18] • R4: *(2 sc, inc)*×6 [24].
- Rnds 5–8 (4 rnds): 24 sc around [24].
- R9: *(2 sc, dec)*×6 [18] • R10: *(1 sc, dec)*×6 [12] • Rnds 11–12 (2 rnds): 12 sc [12]. Fasten off.
- Arms (Make 2): In Cookie Tan: R1: 6 sc in MR [6] • R2: 6 inc [12] • Rnds 3–8 (6 rnds): 12 sc [12]. Fasten off.
- Cookie Finishing: Stuff head and torso lightly to preserve a flat baked-cookie profile. Sew bottom seam flat. Attach arms to sides. Steam-press gently with iron. Attach two 6 mm black beads for eyes, embroider white icing smile, sleeve waves, chest buttons, and apply soft pink blush to cheeks!
2. Two-Tone Peppermint Swirl Candy Disc
Worked in a continuous two-color spiral, carrying yarn neatly on the interior:
- Rnd 1: With Snow White, 6 sc in MR [6].
- Rnd 2: Join Crimson Red; work *(1 White sc, 1 Red sc)* in every stitch around [6 White + 6 Red = 12 sts].
- Rnd 3: *(2 White sc in White st, 1 Red sc in Red st)* around [18].
- Rnd 4: *(1 White sc in White st, 2 Red sc in Red st)* around [24].
- Rnds 5–6 (2 rnds): Work straight, alternating *(2 White sc, 2 Red sc)* across 6 repeats [24].
- Rnd 7: 1 White sc in White st, 1 Red dec over Red sts [18].
- Rnd 8: 1 White dec over White sts, 1 Red sc in Red st [12]. Stuff lightly; fasten off Red yarn.
- Rnd 9: With Snow White only, 6 dec [6]. Cinch closed and pass needle through center to flatten disc into a candy button!
3. Double-Helix Wired Candy Cane Topper
- With Snow White: R1: 8 sc in MR [8]. All subsequent rounds worked in BLO:
- White Track: Work 1 sc, 7 hdc in BLO; pull up a tall loop and remove hook.
- Red Track: Join Crimson Red into the initial white sc; work 8 sc in BLO; pull up loop.
- Alternating Helix: Return to White loop: work 8 hdc in BLO; return to Red loop: work 8 sc in BLO. Alternate tracks until tube measures ~7 cm long.
- Insert a twisted 3-strand chenille pipe cleaner inside the tube (leaving 1.5 cm wire protruding from bottom!).
- With Pine Green yarn, embroider a dainty spiral backstitch line tracing between the red and white helical stripes. Bend the top into a classic candy cane hook!
Barista Assembly & Holiday Display Styling

To finalize your mug assembly:
- Sculpt Topper Hollows: Use a long tapestry needle and white thread to pull two deep tucks into the whipped cream cone.
- Mount Gingerbread Man: Nest the lower torso of the gingerbread boy into the right indent beside the handle at a charming 45-degree dipping angle; secure with fabric adhesive and invisible stitches.
- Anchor Candy Cane & Peppermint: Push the protruding candy cane wire into the left indent, stitch base securely, and glue the round peppermint swirl pinwheel to the front cream folds.
Frequently Asked Questions
Can I make the gingerbread man and candy cane removable?
Yes! If you skip gluing and simply slide the toppers into deep crocheted pockets within the whipped cream, children can take the gingerbread man out for interactive holiday playtime.
What yarn is best for crisp whipped cream ruffles?
A 50/50 cotton-acrylic blend (sport weight) is ideal. Pure acrylic can become too limp, while 100% mercerized cotton can be heavy. The cotton-acrylic blend holds sculptural ruffles effortlessly.
How do I clean this holiday display piece?
Because of the internal wire armature and delicate glued details, spot clean gently with a dry microfiber duster or cool damp sponge. Do not soak in water.
Save & Pin This Festive Hot Cocoa Mug
Craving sweet holiday crafting? Save these pins to your Holiday & Christmas Crochet boards so you have the complete free tutorial whenever you’re ready to crochet!

