

Nothing captures the warm, spiced enchantment of the holidays quite like a classic cookie brought to life, and this Festive Christmas Gingerbread Man is the ultimate pocket-sized holiday keepsake. Standing approximately 12.5 cm (4.9 inches) tall, this sweet amigurumi features seamless joined legs, no-sew shoulder arm joins, two-color fair-isle icing cuff stripes, a melting wavy frosting glaze cap sprinkled with colorful embroidered confetti, sweet facial sculpting with rosy blushed cheeks, and a buttoned forest green I-cord neck scarf!
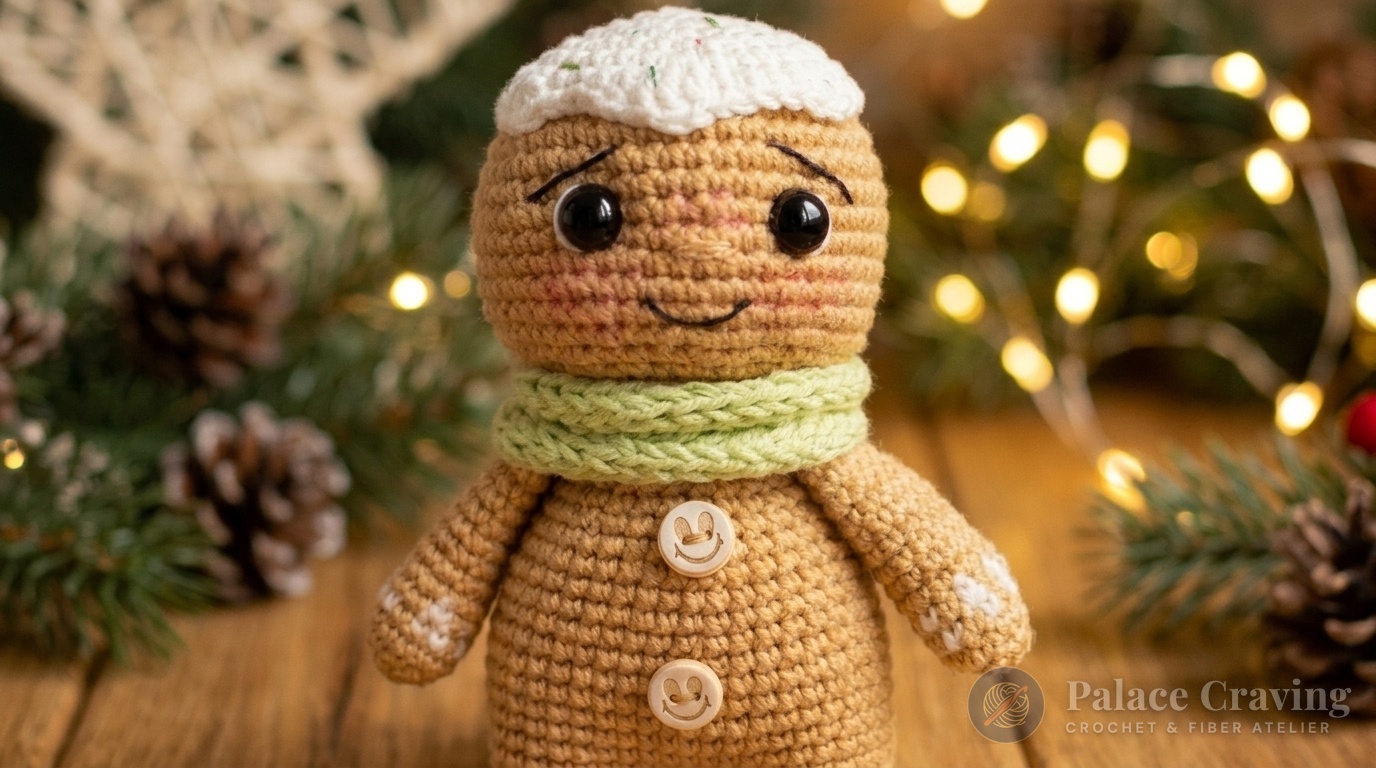
Unlike flat gingerbread cutouts, this amigurumi is engineered with three-dimensional cheek sculpting (using dedicated facial stitch markers) that creates an instantly endearing, lifelike expression. The arms are crocheted directly into the shoulder seam on Round 25, eliminating awkward limb attachment and ensuring seamless proportions. Showcase your gingerbread man alongside our delightful 3-in-1 Christmas Holiday Mugs, our magnificent Festive Gingerbread & Holly Door Wreath, our heirloom Crochet Gingerbread House Ornament, or our wise Grandpa Santa Claus Gnome for an irresistible holiday craft collection.
Why You’ll Love Making This Amigurumi Gingerbread Man
- Continuous Seamless Construction: The legs connect with a simple 3-chain bridge that flows straight up into the torso, while the arms are worked directly into the shoulder round—meaning zero seaming for the body and limbs!
- Two-Color Fair-Isle Icing Cuffs: Alternating single crochet colorwork at the wrists and ankles replicates traditional decorative royal icing piping.
- Wavy Dripping Frosting Cap: Worked with gradient single, half-double, and double crochet increases to mimic luscious melting glaze running over the crown of the head.
- Expressive Needle Facial Sculpting: Simple eye-cinching techniques pull the safety eyes inward to create round, chubby cheeks that hold their form forever.
- Perfect Holiday Stocking Stuffer: At under 5 inches tall, he makes a whimsical pocket companion, backpack charm, tier-tray ornament, or gift topper.
Anatomy & Stitch Count Breakdown
| Component | Yarn Color & Yardage | Finished Dimensions | Key Stitch Feature |
|---|---|---|---|
| Gingerbread Head | Cookie Beige (~15g) | 5.5 cm Ø round sphere | Rnd 16 cheek markers & eye cinch |
| Legs & Body (1 Piece) | Cookie Beige & Milk White (~20g) | 7.0 cm tall × 4.5 cm wide | 3-ch bridge join & no-sew shoulders |
| Arms with Icing (×2) | Cookie Beige & Milk White (~6g) | 4.5 cm long each | 2-color fair-isle cuff stripes |
| Wavy Glaze Cap | Milk Cream White (~8g) | 5.0 cm Ø contoured cap | Scalloped variable-height drip edge |
| Cozy Neck Scarf | Forest Green (~5g) | 28 cm long × 1.2 cm wide | 4-stitch I-cord with button closure |
Key Materials, Tools & Notion Swatches

- Yarn Requirements: Sport/Fine weight cotton-acrylic blend (55% cotton, 45% acrylic; approx. 160m / 174 yds per 50g skein):
- Cookie Beige (or Cocoa Brown): ~35g / 112m (Head, body, arms, and legs)
- Milk / Cream White: ~12g / 38m (Icing cuffs, wavy glaze cap, and eye whites)
- Forest Green: ~6g / 19m (Cozy neck scarf)
- Embroidery Floss: Strands of Christmas red, bubblegum pink, lime green, and jet black for sprinkles, facial embroidery, and freckles.
- Crochet Hook: 2.5 mm ergonomic crochet hook (ensures a dense fabric that keeps fiberfill securely enclosed).
- Safety Eyes: One pair of 8 mm black plastic safety eyes with secure backings.
- Buttons: 3 small wooden or decorative buttons (2 for the belly, 1 for the scarf closure).
- Stuffing: High-loft polyester fiberfill stuffing (~30g).
- Notions: Yarn needle, contrast stitch marker threads, pins, sharp craft scissors, and dry pink blush or pastel with an application brush.
Recommended Tools for Amigurumi Precision
To achieve crisp fair-isle colorwork and flawless facial embroidery on this holiday cookie, our studio relies on these notions:
- Ergonomic 2.5 mm Hook: Provides smooth tension control through tight single crochets without hand cramping.
- Curved Amigurumi Tapestry Needles: Glides effortlessly through dense fiberfill for precise cheek cinching and eye-white embroidery.
- Miniature Wooden Craft Buttons: Adds an authentic handcrafted bakery feel to the gingerbread belly and scarf closure.
Affiliate disclosure: We recommend only trusted tools tested in our fiber atelier.
Gauge & Colorwork Swatch Guidelines
Working in continuous spiral rounds without joining creates tight, clean amigurumi stitches. Test your tension with this quick 4-round swatch in Cookie Beige:
- Rnd 1: 6 sc in magic circle [6].
- Rnd 2: 6 inc [12].
- Rnd 3: *(1 sc, inc)* rep 6 times [18].
- Rnd 4: *(1 sc, inc, 1 sc)* rep 6 times [24].
At the end of Round 4, your flat circular swatch should measure 3.2 to 3.5 cm (1.3 inches) in diameter. If it measures larger, drop down to a 2.25 mm hook so the toy retains firm structure when stuffed.
Step-by-Step Master Pattern
Part 1: Arms with Fair-Isle Icing Cuffs (Make 2)
Begin with Cookie Beige yarn and a 2.5 mm hook:
- Rnd 1: 6 sc in magic circle [6].
- Rnd 2: 6 inc around [12].
- Rnd 3: *(5 sc, inc)* rep 2 times [14].
- Rnd 4 (Icing Cuff Stripe 1): Join Milk White yarn (carry Beige loosely inside):
*(1 sc beige, 1 sc milk)*rep 7 times around [14]. - Rnd 5 (Icing Cuff Stripe 2): Continue alternating:
*(1 sc milk, 1 sc beige)*rep 7 times around [14]. Cut Milk White yarn. - Rnd 6: In Cookie Beige only: 14 sc around [14].
- Rnd 7: 1 dec, 12 sc around [13].
- Rnds 8–10: 13 sc around (3 rounds even) [13].
- Rnd 11: 1 dec, 11 sc around [12].
- Rnds 12–15: 12 sc around (4 rounds even) [12].
- Closing: Stuff only the lower hand bulb lightly (leave the upper arm unstuffed). Fold top opening flat in half and crochet 6 sc through both layers together [6]. Fasten off.
Part 2: Head & Expressive Cheek Shaping
Work with Cookie Beige yarn in a continuous spiral:
- Rnd 1: 6 sc in magic circle [6].
- Rnd 2: 6 inc [12].
- Rnd 3: *(1 sc, inc)* rep 6 times [18].
- Rnd 4: 1 sc, 1 inc, *(2 sc, inc)* rep 5 times, 1 sc [24].
- Rnd 5: *(3 sc, inc)* rep 6 times [30].
- Rnd 6: 2 sc, 1 inc, *(4 sc, inc)* rep 5 times, 2 sc [36].
- Rnd 7: *(5 sc, inc)* rep 6 times [42].
- Rnd 8: 3 sc, 1 inc, *(6 sc, inc)* rep 5 times, 3 sc [48].
- Rnds 9–15: 48 sc around (7 rounds even) [48].
- Rnd 16 (Cheek Marker Round): 9 sc, *(inc, 1 sc)*×3, place a contrast marker thread, 19 sc, place a second contrast marker thread, *(1 sc, inc)*×3, 8 sc [54]. (The 19 stitches between markers center the front face perfectly!)
- Rnd 17: 54 sc around [54].
- Rnd 18: 2 sc, 1 dec, *(4 sc, dec)* rep 8 times, 2 sc [45].
- Rnd 19: *(3 sc, dec)* rep 9 times [36].
- Rnd 20: *(1 sc, dec)* rep 12 times [24]. Fasten off leaving a long tail for sewing head to body.
- Eye Placement & Stuffing: Insert 8 mm safety eyes between Rounds 12 and 13, spaced approximately 8 stitches apart and aligned squarely above the front 19-stitch section marked in Round 16. Stuff head firmly with fiberfill!
Crocheting the Legs, Body & No-Sew Shoulder Joins

1. Legs (Make 2)
- Rnd 1: With Cookie Beige: 6 sc in mc [6].
- Rnd 2: 6 inc [12].
- Rnd 3: *(1 sc, inc)* rep 6 times [18].
- Rnd 4 (Icing Cuff): Join Milk White:
*(1 sc beige, 1 sc milk)*rep 9 times [18]. - Rnd 5 (Icing Cuff):
*(1 sc milk, 1 sc beige)*rep 9 times [18]. Cut Milk White.- On the 1st leg: Sl st and fasten off Cookie Beige.
- On the 2nd leg: Do NOT cut Beige yarn! Chain 3, then insert hook into the last stitch of the 1st leg to join the body!
2. Continuous Torso
- Rnd 6 (Bridge Join): Work 18 sc around 1st leg, 3 sc across the chain bridge, 18 sc around 2nd leg, 3 sc along opposite side of chain bridge [42 sts].
- Rnd 7: 9 sc, 1 inc, 20 sc, 1 inc, 11 sc [44].
- Rnds 8–14: 44 sc around (7 rounds even) [44].
- Rnd 15: *(9 sc, dec)* rep 4 times [40].
- Rnds 16–17: 40 sc around (2 rounds even) [40].
- Rnd 18: *(8 sc, dec)* rep 4 times [36].
- Rnd 19: 36 sc around [36].
- Rnd 20: *(4 sc, dec)* rep 6 times [30].
- Rnds 21–22: 30 sc around (2 rounds even) [30]. Sew 2 small decorative buttons vertically on front belly at Rounds 13 and 20!
- Rnd 23: *(3 sc, dec)* rep 6 times [24].
- Rnd 24: 24 sc around [24].
- Rnd 25 (No-Sew Shoulder Arm Join): Hold arms flat against body sides: work 5 sc on body, 6 sc through both 1st arm and body layers simultaneously, 6 sc across chest, 6 sc through both 2nd arm and body layers, 1 sc on body, sl st [24]. Stuff body firmly with fiberfill!
- Neck Seam: Sew the head to the 24-stitch neck opening of the body, aligning the face markers squarely with the front chest.
Part 4: Wavy Icing Glaze Cap & Buttoned I-Cord Scarf
1. Wavy Frosting Cap
With Milk White yarn and a 2.5 mm hook:
- Rnds 1–2: R1: 6 sc in mc [6] • R2: 6 inc [12].
- Rnds 3–4: R3: *(1 sc, inc)*×6 [18] • R4: 1 sc, inc, *(2 sc, inc)*×5, 1 sc [24].
- Rnds 5–6: R5: *(3 sc, inc)*×6 [30] • R6: 2 sc, inc, *(4 sc, inc)*×5, 2 sc [36].
- Rnd 7 (Melting Icing Drip Edge):
1 sc, 1 hdc, 1 inc-dc, 1 hdc, 3 sc, 2 hdc, 2 dc, 1 hdc, 2 sc, 2 inc-dc, 3 sc, 1 hdc, 1 inc-dc, 1 hdc, 2 sc, 2 hdc, 2 dc, 2 hdc, 2 sc, 1 inc-hdc, 3 sc, sl st[42 sts]. Fasten off leaving a 40 cm tail. - Sprinkles Embroidery: Using embroidery floss in lime green, cherry red, and bright pink, stitch scattered 2-stitch straight sprinkles across the white glaze cap. Pin cap onto the crown of the head and sew neatly around the wavy edge.
2. Cozy Buttoned I-Cord Scarf
- With Forest Green yarn: work a 4-stitch I-cord (or chain 60 and work 1 row of hdc) until it measures 28 cm (11 inches) long.
- At one end, chain 5 and slip stitch to form a small buttonhole loop. Sew a matching small wooden button to the opposite end. Wrap snugly around the gingerbread man’s neck and button securely!
Part 5: Master Facial Sculpting & Finishing
To give your gingerbread man his irresistible bakery character, follow these finishing touches:
- Eye Cinch: Thread a needle with Cookie Beige yarn. Insert from the base of the head, pass through inner corner of left eye, across to inner corner of right eye, and back down to neck. Pull gently to indent the sockets, creating lifted chubby cheeks!
- Embroidered Nose: With Cookie Beige yarn, embroider a small horizontal satin-stitch nose between Rounds 14 and 15 spanning 3 stitches wide.
- Eye Highlights: With Milk White yarn, embroider a curved half-moon white accent along the outer edge of each black safety eye.
- Freckles & Smile: With fine black thread, embroider angled eyebrows between Rounds 10 and 12, and a sweet curved smile between Rounds 15 and 16. Add tiny pink straight-stitch freckles under each eye.
- Rosy Blush: Use a cotton swab or makeup brush to dust soft pink powder blush onto both cheeks!
Styling & Display Inspirations

Because of his compact 12.5 cm stature and flat joined feet, this plush is wonderfully versatile:
- Dessert Table Accent: Perch him on a tiered wooden serving board next to real holiday cookies, dried orange slices, and cinnamon sticks.
- Tree Ornament: Fasten a gold metallic thread loop behind his frosting cap to create a sweet, unbreakable tree trimming.
- Festive Package Tie-On: Tie him onto brown kraft-paper gift wrapping with baker’s twine for a present topper your loved ones will cherish forever.
Frequently Asked Questions
Is this gingerbread plush safe for babies and toddlers?
If crafting for children under 3 years old, omit plastic safety eyes and wooden buttons. Instead, embroider the eyes, belly buttons, and scarf closure with soft cotton yarn satin stitches!
Can I crochet this pattern in velvet or chenille yarn?
Yes! Using plush velvet yarn with a 4.0 mm hook will produce a super-soft jumbo gingerbread man measuring approximately 25 cm (10 inches) tall.
How do I prevent the fair-isle cuffs from pulling too tight?
When alternating yarn colors in Rounds 4 and 5, always keep the carried strand loose across the wrong side of the fabric to maintain arm and leg elasticity.
Save & Pin This Festive Gingerbread Pattern
Planning your holiday handmade list? Save these pins to your Holiday & Christmas Crochet boards so you have the complete free tutorial whenever you’re ready to crochet!

