

There is an irresistible, joyful whimsy in decorating your Christmas tree with handmade amigurumi characters, and none brings broader smiles than Santa Claus himself. Measuring just 4½ inches tall with a fluffy curly loop beard, cozy red stocking cap, round pompon, and miniature black belt buckle, this free crochet Santa ornament pattern is the ultimate fast, festive holiday craft. Built with an intuitive top-down amigurumi construction, this project transforms modest yarn scraps into a timeless holiday heirloom that will delight generations of family tree trimmers.
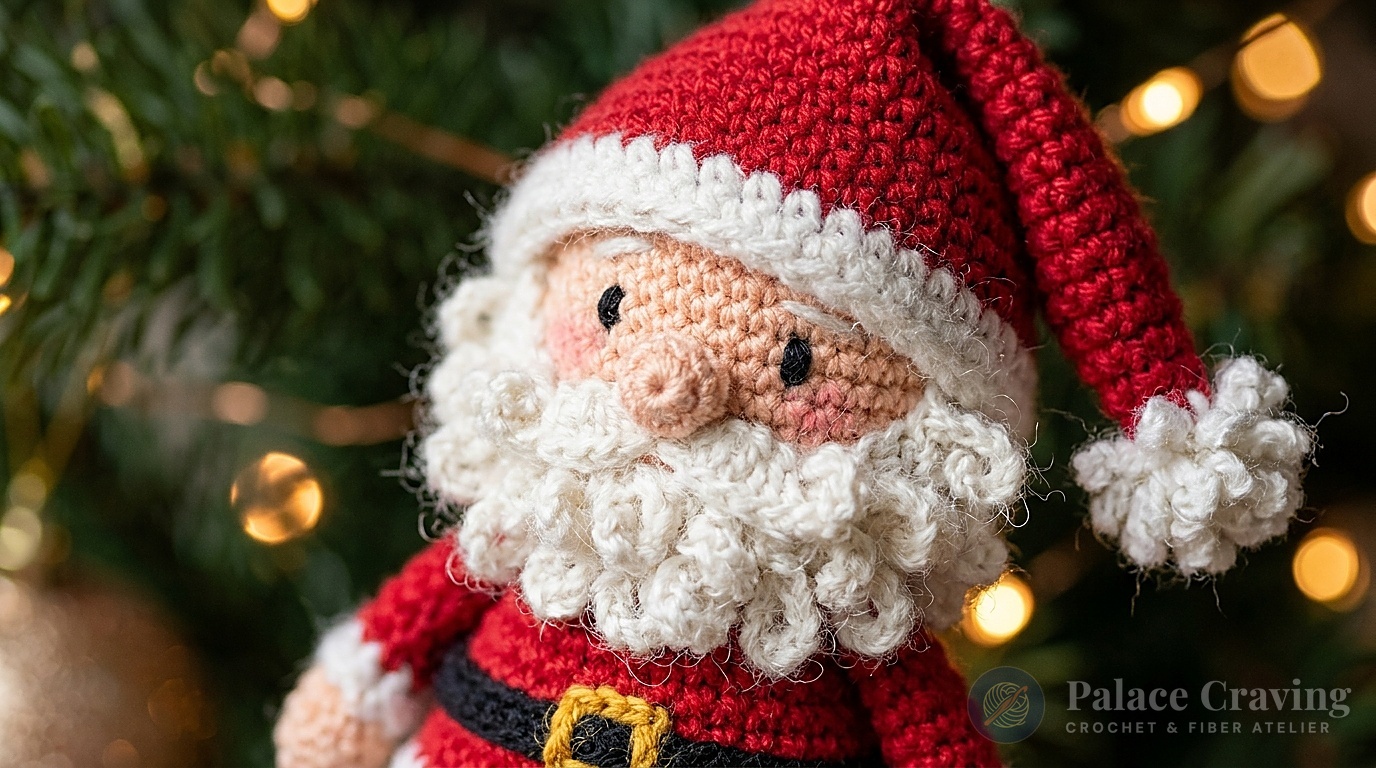
Unlike flat felt cutouts or generic plastic ornaments, this three-dimensional amigurumi Santa features rich tactile texture from top to toe. The ingenious textured loop beard is worked flat and framed by delicate chain-5 ringlets that naturally curl around Santa’s rosy cheeks without requiring stiffening sprays or complicated brushwork. Style your mini Santas alongside our heavyweight Heirloom Crochet Cable Stocking, our serene Crochet Angel Ornaments, or our ringing Vintage Crochet Bells for a truly magical handmade Christmas vignette.
Why You’ll Love Making This Mini Amigurumi Santa
- Quick 45-Minute Make: Each mini Santa requires just 23 short rounds of basic single crochet stitches, making it a delightfully fast project for marathon gift crafting.
- Ingenious Curly Loop Beard: The signature fluffy beard uses simple chain-5 loops along the edge that automatically curl outward, giving Santa his iconic jolly fullness.
- Virtually Zero Sewing Hassle: The head and torso are crocheted as one continuous piece with built-in color changes for the collar and black waist belt.
- Ultimate Scrap-Buster: Uses tiny 5-to-25-yard remnants of standard worsted yarn in Cherry Red, White, Peach, and Black.
- Unbreakable Holiday Keepsake: Soft and durable, this amigurumi ornament withstands curious kittens, toddler hands, and years of attic storage without chipping or breaking.
Anatomy & Stitch Count Breakdown
Standing approximately 4½ inches (11.5 cm) tall from the tip of the stocking cap to the coat base, here is how each component is proportioned:
Curated Materials & Studio Swaps

- Medium Worsted (#4) Yarn:
- Color A (Buff / Soft Peach): Approx. 10 yards for the head/face.
- Color B (Cherry Red): Approx. 25 yards for the coat body and stocking cap.
- Color C (White / Cream Aran): Approx. 20 yards for the beard, mustache, hat trim, and pompon.
- Color D (Midnight Black / Royal Blue): Approx. 5 yards for the waist belt and boots.
- Size U.S. F-5 (3.75 mm) Crochet Hook: Keeps single crochet stitches firm and compact, ensuring polyfill never peeks through Santa’s coat or cheeks. (Review our tutorial on Hook Grips & Tension Control).
- Polyester Fiberfill Stuffing: Small handful to firmly pack the head and torso.
- Locking Stitch Marker: Essential for continuous spiral rounds without step seams.
- Blunt Tapestry Yarn Needle & Embroidery Floss: For attaching the beard, embroidering French knot eyes, and adding a gold belt buckle accent.
- Optional Cheerful Accents: A soft pink crayon or makeup blush with a cotton swab for Santa’s rosy cheeks, and a tiny jingle bell or candy cane charm for his clasped hands!
Gauge & Work Notes
Gauge: 4 single crochet (sc) = 1 inch (2.5 cm); 4 rounds = 1 inch (2.5 cm).
Continuous Spiral Technique: Do not join with slip stitches at the end of each round unless explicitly instructed. Move your locking stitch marker to the last stitch of each round as you progress.
Step-by-Step Crochet Instructions
Part 1: The Head & Continuous Body
With Color A (Buff Peach), make an adjustable magic loop.
Rnd 1 (RS): Ch 1. Work 6 sc in loop. Place marker (PM) in last st. Pull tail tight. (6 sc)
Rnd 2: Work 2 sc in each sc around. (12 sc)
Rnd 3: *(2 sc in next sc, 1 sc in next sc)* 6 times around. (18 sc)
Rnd 4: *(2 sc in next sc, 1 sc in each of next 2 sc)* 6 times around. (24 sc)
Rnds 5 to 8: Work 1 sc in each sc around. (24 sc per round)
Rnd 9 (Head Taper): *(Sc2tog, 1 sc in each of next 2 sc)* 6 times around. (18 sts)
Rnd 10 (Neck Cinch): *(Sc2tog, 1 sc in next sc)* 6 times around. (12 sts)
Stuffing Pause: Firmly pack polyester fiberfill into the head sphere until plump and smooth.
Rnd 11 (Coat Collar): Change to Color B (Cherry Red). Work 1 sc in each sc around. (12 sc)
Rnd 12 (Torso Expansion): *(2 sc in next sc, 1 sc in next sc)* 6 times around. (18 sc)
Rnd 13: Work 1 sc in each sc around. (18 sc)
Rnd 14: *(2 sc in next sc, 1 sc in each of next 2 sc)* 6 times around. (24 sc)
Rnds 15 & 16: Work 1 sc in each sc around. (24 sc per round)
Rnd 17 (Waist Belt): Change to Color D (Black). Work 1 sc in each sc around. (24 sc)
Rnds 18 to 20: Change back to Color B (Red). Work 1 sc in each sc around. (24 sc per round)
Rnd 21 (Lower Coat Taper): *(Sc2tog, 1 sc in each of next 2 sc)* 6 times around. (18 sts)
Stuffing Pause: Pack polyfill firmly into the torso cavity.
Rnd 22: *(Sc2tog, 1 sc in next sc)* 6 times around. (12 sts)
Rnd 23: *(Sc2tog)* 6 times around. (6 sts)
Fasten off, leaving a 10-inch yarn tail. Weave through the remaining 6 stitches, pull tightly to cinch the base closed, and weave in all ends inside the body.

Part 2: The Pointed Stocking Cap
With Color B (Red), make a magic loop.
Rnd 1: Work 4 sc in loop. (4 sc)
Rnd 2: Work 2 sc in next sc, 1 sc in next 3 sc. (5 sc)
Rnd 3: Work 2 sc in next sc, 1 sc in next 4 sc. (6 sc)
Rnd 4: *(2 sc in next sc, 1 sc in next sc)* 3 times. (9 sc)
Rnd 5: Work 1 sc in each sc around. (9 sc)
Rnd 6: *(2 sc in next sc, 1 sc in next 2 sc)* 3 times. (12 sc)
Rnd 7: Work 1 sc in each sc around. (12 sc)
Rnd 8: *(2 sc in next sc, 1 sc in next sc)* 6 times. (18 sc)
Rnd 9: Work 1 sc in each sc around. (18 sc)
Rnd 10: *(2 sc in next sc, 1 sc in next 2 sc)* 6 times. (24 sc)
Rnds 11 & 12: Work 1 sc in each sc around. (24 sc per round)
Rnd 13 (Fluffy Hat Brim): Change to Color C (White). Work *(sl st in next st, ch 2, sl st in next st)* around to form a fluffy ruffled brim. Join and fasten off, leaving a sewing tail.
Top Pompon: With Color C, wind yarn 15 times around two fingers, tie tightly in the middle, snip loops, and trim into a neat ½-inch pompon. Sew firmly to the tip of the red cap!
Part 3: The Curly Loop Beard & Mustache
With Color C (White), ch 2.
Row 1: Work 2 sc in 2nd ch from hook. Turn. (2 sc)
Row 2 (RS): Ch 1. 2 sc in each sc across. Turn. (4 sc)
Rows 3 & 4: Ch 1. 2 sc in first sc, sc across to last sc, 2 sc in last sc. Turn. (8 sc at Row 4)
Row 5: Ch 1. Sc in each sc across. Turn. (8 sc)
Row 6 (Curly Loop Border): Ch 1, sc2tog, sc in next 4 sc, sc2tog. Do not turn! Work along the curved outer edge of the beard: *[ch 5, sl st in next edge st]* repeat around the entire curved cheek-to-chin border to form natural ringlet whiskers. Fasten off, leaving a long sewing tail.
Mustache (Make 2 wings): With Color C, ch 4. Sl st in 2nd ch from hook, sc in next ch, hdc in last ch. Fasten off. Sew the two wings side-by-side just above the beard center!
Part 4: Arms & Assembly
- Crochet Arms (Make 2): With Color B (Red), ch 2. Work 4 sc in 2nd ch from hook. Work 5 rounds of 4 sc (24 total stitches). Fasten off without stuffing. Sew to either side of the coat at Round 12 so hands fold in front over the black belt.
- Attach Hat & Beard: Place the stocking cap snugly over the top of the head, tilting the pointed cone playfully to one side. Stitch around the inside of the white brim to secure. Position the beard directly below the hat brim and tack down with cream yarn.
- Embroider Face: Using 2 plies of black embroidery floss, make two small French knot eyes just above the mustache. Dab rosy blush onto cheeks using a cotton swab.
- Gold Belt Buckle: With gold yarn or yellow embroidery floss, work 4 small straight stitches over the black belt at center front to create a gleaming square buckle.
- Hanging Loop: Thread a 6-inch loop of red or gold yarn through the top fold of Santa’s cap and knot securely to hang from the tree.
3 Pro Secrets for Picture-Perfect Amigurumi Santas
1. Tilt the Stocking Cap: Instead of pulling Santa’s hat straight down, fold the long tapered cone over to one ear and catch it with a single hidden tack stitch. This gives Santa an endearing, whimsical storybook slouch!
2. Fluffing the Curly Loops: After stitching the chain-5 beard loops, twist them gently between your fingertips to set the curl. The acrylic fiber memory will keep the ringlets springy and defined indefinitely.
3. Rosy Cheeks Technique: Never apply blush directly with a brush! Rub the cotton swab first on a scrap piece of paper to remove excess powder before gently buffing Santa’s cheeks. This creates a soft, natural winter-glow gradient.
Festive Tree & Home Styling Ideas

Here are delightful ways to showcase your completed mini Santas:
- Evergreen Christmas Tree Family: Craft a trio of mini Santas nestled among bright red berry picks and cedar pine garlands on the family Christmas tree.
- Advent Calendar Surprises: Because each Santa measures just 4½ inches, they tuck neatly into pocket advent calendars or mini gift bags for a charming holiday countdown.
- Festive Package Toppers: Tie a Santa ornament onto brown kraft-paper wrapped holiday packages with natural baker’s twine for a personal gift keepsake.
- Holiday Desk Mascot: Perch a freestanding Santa on a miniature wooden spool on your office desk or kitchen windowsill to spread daily holiday cheer.
Frequently Asked Questions
Can I make an Elf with the same pattern?
Yes! Simply replace the Cherry Red with Festive Lime Green, eliminate the beard, and add a small collar of pointed green scallops around Round 11 to create Santa’s matching holiday elf companion!
What safety eyes can I use instead of French knots?
If making ornaments for adults or older children, 6mm black plastic safety eyes inserted between Rounds 6 and 7 before stuffing create a cute, glossy amigurumi gaze.
How do I wash or refresh these ornaments?
Spot clean with a damp cloth and mild wool wash. Fluff the beard loops gently with your fingers and allow to air dry completely before boxing for seasonal storage.
Pin This Free Holiday Pattern
Love this jolly holiday amigurumi project? Save this free mini crochet Santa ornament guide to your Christmas Crochet, Amigurumi Toys, and DIY Holiday Decor boards on Pinterest!

