

A beautifully crafted handmade crossbody bag is the quintessential bridge between functional utility and bespoke fashion. Unlike breezy open-mesh totes (like our French market bag) or bohemian designs (such as our granny square tote bag pattern), an everyday shoulder purse demands architectural structural integrity: dense stitches that prevent coins, keys, and lip balms from poking through, reinforced corners that maintain a tailored geometric silhouette, and an engineered, non-stretching strap that won’t sag down to your knees when carrying your smartphone and wallet. This free modern crochet crossbody bag pattern achieves that exact designer standard using sturdy cotton-linen cord, dense thermal texture, and seamless one-piece construction.
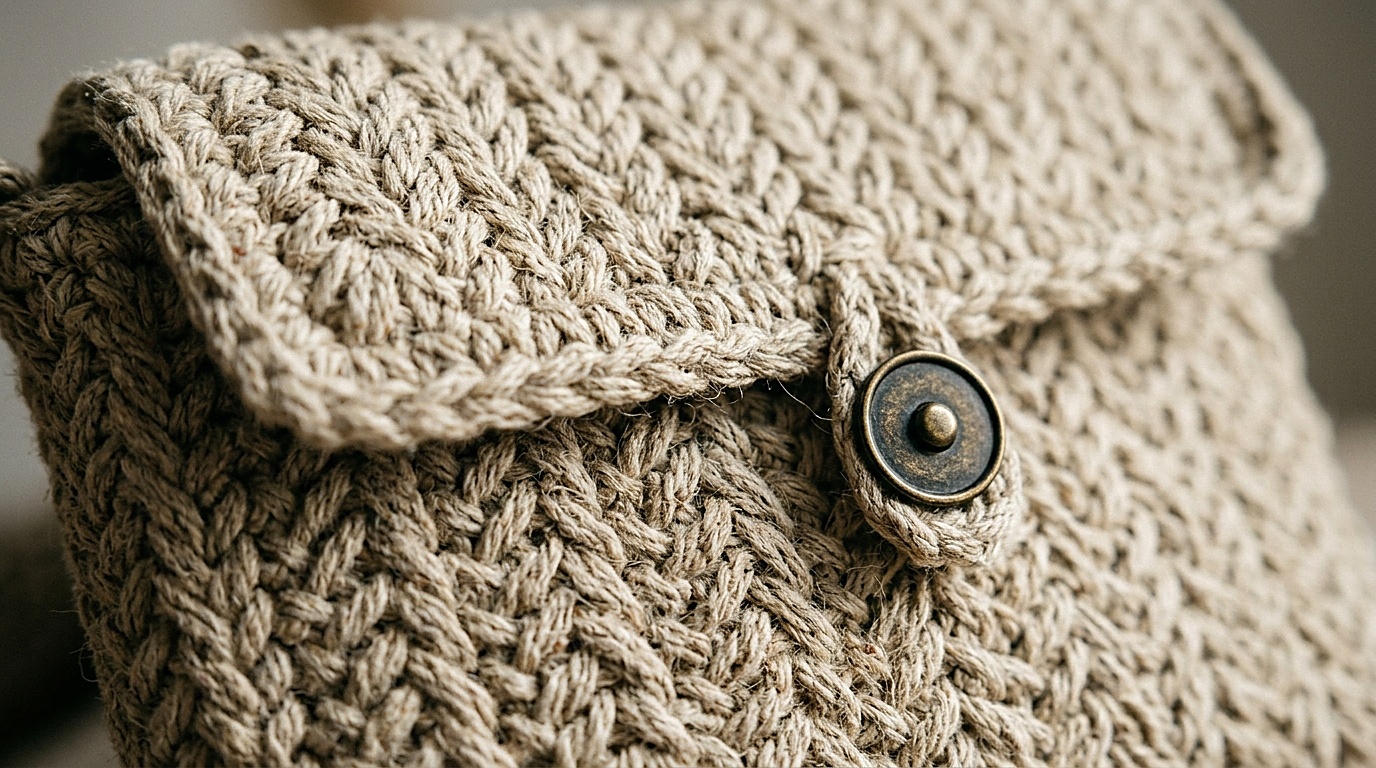
Most crochet bag tutorials disappoint makers for one predictable reason: they use soft acrylic yarns with tall, loose double crochets, resulting in a bag that stretches out of shape after just two days of daily use. In this comprehensive pattern, we solve every structural vulnerability from first principles. By combining a dense Back-Loop Herringbone Single Crochet with a reinforced oval base and a sturdy slip-stitch thermal strap, you create a boutique-worthy purse that holds its shape permanently—with or without a sewn fabric lining.
Structural Engineering: Why Fiber & Stitch Choice Matter
Crochet fabric naturally has more stretch and weight than woven cloth, which requires disciplined tension (learn optimal methods in our hook grip and tension guide). When designing a durable handbag, three engineering principles must be enforced:
- Inelastic Fiber Selection: Cotton, linen, or recycled cotton macramé cord (1.5 mm to 2 mm) have virtually zero elastic bounce. Unlike wool or acrylic—which expand under load and never bounce back—cotton fibers lock into place, ensuring your bag maintains its precise proportions.
- Compact Stitch Architecture: We avoid standard double crochet stitches because the open gaps allow small items to slip through. Instead, we utilize Herringbone Single Crochet (HSC) worked in continuous spirals. This stitch slants slightly, creating a thick, double-layered woven fabric with remarkable vertical rigidity.
- The Non-Stretch Thermal Strap: A standard chain-and-sc strap can stretch by up to 35% under the weight of a phone and keys. Our pattern features an integrated Thermal Slip-Stitch Cord worked across 4 stitches, resulting in a dense, supple belt that stretches less than 2% over years of wear.
Bag Dimensions, Gauge & Materials Specifications

- Yarn: Approximately 260 yards (238 meters) of Category 4 Worsted Weight cotton-linen cord (check our crochet yarn weight and hook size chart for metric equivalents) (such as Lion Brand 24/7 Cotton, Rico Design Creative Cotton Cord, or Hobbii Rainbow Cotton 8/8). Our model uses Natural Raw Flax Oatmeal.
- Crochet Hook: US Size 7 (4.5 mm) or US Size G-6 (4.0 mm). Sizing down half a millimeter from the yarn label’s recommendation ensures tight, dense, opaque stitches that prevent sagging.
- Hardware: 2 Antique Brass D-Rings (1 inch / 25 mm diameter), 2 matching Antique Brass Swivel Snap Hooks, and 1 natural beechwood toggle button (or a magnetic sew-on clasp).
- Notions: 2 locking stitch markers, steel tapestry needle with large blunt eye, and measuring tape.
- Finished Bag Dimensions: 8.5 inches (21.5 cm) wide × 6.5 inches (16.5 cm) tall × 2.0 inches (5.0 cm) deep base.
- Finished Strap Length: 44 inches (112 cm) from clasp to clasp (customizable to your height).
- Gauge: 16 stitches and 14 rounds in Herringbone Single Crochet = 4 inches (10 cm) using the 4.5 mm hook.
Abbreviations & Special Technique Guide
This pattern is written in standard US Crochet Terminology.
- ch: Chain
- sc: Single crochet
- sl st: Slip stitch
- blo: Back loop only
- inc: Increase (work 2 stitches into the same space)
- HSC (Herringbone Single Crochet): Insert hook into the left vertical bar of the previous stitch worked, insert hook into the next stitch, yarn over, pull up a loop (3 loops on hook), yarn over and pull through all 3 loops on hook.
- Continuous Spiral Rule: The body of the bag is worked in seamless continuous rounds without joining with a slip stitch. Always place a locking stitch marker in the first stitch of each round to track your progression.
Step 1: Crocheting the Structured Seamless Oval Base
The base is worked in the round around both sides of a foundation chain to create a flat, rigid oval bottom with rounded corners.
Foundation Chain: Ch 21 loosely with 4.5 mm hook.
Round 1: Work 1 sc in 2nd ch from hook and in each of the next 18 chains. In the final chain, work 3 sc (this rounds the corner). Do not turn your work—rotate your chain 180 degrees to work along the opposite unworked loops of the foundation chain. Work 1 sc in each of the next 18 chain loops. In the very last space (the base of the starting chain), work 2 sc. Place marker in the first stitch. [42 sc total around the oval]
Round 2: Work 2 sc in the first st (corner increase). 1 sc in each of next 18 sts. Work 2 sc in each of the next 3 corner sts. 1 sc in each of next 18 sts. Work 2 sc in each of the final 2 corner sts. [48 sc]
Round 3: 1 sc in first st, 2 sc in next st. 1 sc in next 18 sts. *(1 sc, 2 sc in next st)* 3 times around the curved end. 1 sc in next 18 sts. *(1 sc, 2 sc in next st)* 2 times to complete the round. [54 sc]
Round 4 (The Base Ridge Transition): Work 1 sl st in the Back Loop Only (BLO) of every stitch around. Do not increase. [54 sl st]. (This creates a crisp, architectural 90-degree right angle that transitions the flat bottom into the vertical walls of the purse, allowing it to stand upright on a flat surface).
Step 2: Crocheting the Textured Body Walls

Now that the rigid base is anchored, we transition into the textured spiral that builds the upright height of the bag without seams.
Round 5: Work 1 standard sc in the back loop only of the first stitch. For every subsequent stitch around: work 1 Herringbone Single Crochet (HSC) into each stitch. Place your marker in the first stitch. [54 HSC]
Rounds 6 to 24: Continue working 1 HSC in each stitch in continuous spirals, moving your marker up at the end of each round. Maintain even, firm tension.
Attaching D-Ring Anchors (Round 25):
Flatten the bag body so the base sits centered. Identify the exact center 3 stitches on both the left and right fold edges. When crocheting across Round 25:
1. When you reach the first 3 side edge stitches, hold your 1-inch brass D-ring flush against the inside edge of the bag.
2. Insert your hook through the stitch AND through the lower curve of the D-ring simultaneously, working your HSC around the metal bar. Repeat across all 3 side stitches. The D-ring is now permanently anchored into the fiber with zero risk of pulling loose.
3. Continue in HSC across the front, repeat the 3-stitch D-ring anchor on the opposite side edge, and complete the round. [54 HSC]
Round 26: Work 1 HSC in each stitch across to the back panel center. Do not fasten off.
Step 3: Seamless Foldover Flap Construction
Rather than crocheting a separate flap and sewing it on with a bulky seam, the foldover flap is worked directly from the top edge of the back panel in turning rows.
Row 1 (Flap Foundation): Flatten the bag. Count 24 stitches across the back panel centered between the two D-rings. Work 1 sc in each of these 24 stitches. Leave the remaining 30 front and side stitches unworked. Turn. [24 sc]
Rows 2 to 14: Ch 1 (does not count as st), work 1 sc in the back loop only of each stitch across. Turn. [24 sc]. (Working in the back loop gives the flap an elegant ribbed accordion drape that folds over the front smoothly without puckering).
Row 15 (Button Loop Shaping): Ch 1, 1 sc in each of the first 10 sts. Chain 5 (or enough chains to fit comfortably around your toggle button), skip 4 center stitches, 1 sc in each of the remaining 10 sts. Turn. [20 sc + 5-ch loop]
Row 16 (Finishing Trim): Ch 1, 1 sc in each st across, working 5 sc directly into the chain-5 button loop space. When reaching the edge, do not turn—continue working a round of clean slip stitches down the left edge of the flap, across the front rim of the bag opening, and up the right edge of the flap. Fasten off and weave in all tails invisibly.
Step 4: The Non-Stretch Thermal Strap (Romanian Cord Alternative)
This dense, tubular flat strap is the secret to a professional purse that never stretches out of shape.
- Row 1: Leaving an 8-inch tail, attach yarn with a slip knot directly around the swivel eye of the first brass snap hook. Work 4 sc into the metal loop. Turn. [4 sc]
- Row 2: Ch 1. Insert hook into the back loop of the first stitch AND the unworked front loop from the row below (Thermal single crochet technique). Yarn over, pull through, yarn over and pull through 2 loops. Repeat across all 4 stitches. Turn.
- Rows 3 to Target Length (approx. Row 180): Repeat Row 2 until the strap measures 42 inches (106 cm) flat without pulling.
- Attaching the Second Clasp: Hold the swivel eye of the second snap hook against your working edge. Work 1 sl st through each of the 4 stitches AND the clasp eye simultaneously. Fasten off with a 10-inch tail, wrap the tail firmly around the base 3 times for a boutique leather-worker finish, and weave in securely.
Finishing, Button Placement & Daily Care

- Sewing the Beechwood Button: Fold the flap over the front of the bag. Use a stitch marker to pinpoint the exact location where the button loop rests naturally without pulling. Sew your beechwood button or magnetic snap securely to the front panel using matching cotton cord.
- Optional Fabric Lining: Because our Herringbone Single Crochet is completely opaque, a fabric lining is not required. However, if you carry pointed keys or pens, you can easily sew a simple cotton canvas pouch (8″ × 6″) and hand-stitch it into the interior rim just below the D-ring anchors.
- Cleaning & Maintenance: Spot clean cotton-linen cord using a soft cloth, lukewarm water, and mild detergent. Unclip the strap and remove the button prior to hand-washing the bag body. Stuff lightly with a clean dry towel and air dry flat in the shade to maintain its crisp, upright structure.
Save This Free Pattern to Pinterest
Save these reference pins to your Crochet Bags & Totes or Free Crochet Patterns board on Pinterest so you always have this structured crossbody bag sizing guide, thermal strap formula, and base shaping instructions ready for your next handmade accessory project!


Frequently Asked Questions
Can I use standard acrylic yarn instead of cotton cord?
We strongly recommend against 100% acrylic yarn for this pattern. Acrylic is naturally stretchy and lacks the vertical tensile strength required to keep a purse from deforming under the weight of everyday essentials. If cotton cord is unavailable, a 50/50 cotton-acrylic blend or sturdy mercerized cotton is the best substitute.
How do I adjust the purse dimensions to fit an iPad or tablet?
To make a larger tote version, add chains to the foundation in multiples of 2. For an iPad (approx. 10 inches wide), start with Chain 31 instead of 21, and work 32 rounds of HSC for height instead of 24. Follow the base increase rules identically around the ends.
Why are the edges of my oval base curling upward like a bowl?
Curling in an oval base occurs when your corner increase stitches are worked with overly tight tension or when an increase is accidentally skipped. Ensure you place 3 sc in the corner turns of Round 1, and size up to a 5.0 mm hook for the base before switching back to 4.5 mm for the body walls.
Can I attach a zipper instead of a foldover flap?
Yes! If you prefer a top-zippered closure, omit the flap entirely after Round 26. Work one final round of reverse single crochet (crab stitch) around the opening, and hand-sew a 9-inch metal zipper directly inside the top rim using matching sewing thread.
Have you finished your modern textured crossbody bag? Document your project on Ravelry or save this tutorial to your Pinterest crochet boards!