

There is a reason the crochet twisted headband—often called a turban ear warmer—remains one of the most rewarding quick-makes in modern fiber arts (pair it with our matching modern crochet ribbed beanie for a coordinated cold-weather set). It requires only a single skein of worsted yarn, works up in less than two hours (ranking it among our best easy crochet projects for beginners), and transforms a straightforward flat ribbed rectangle into a sophisticated, boutique-worthy accessory through an ingenious four-layer interlocking seam. Whether you need a warm cold-weather ear warmer that won’t crush your topknot or a fast handmade gift that looks deceptively complex, this free pattern guides you through custom head sizing, negative ease math, and an exact step-by-step twist assembly walkthrough.
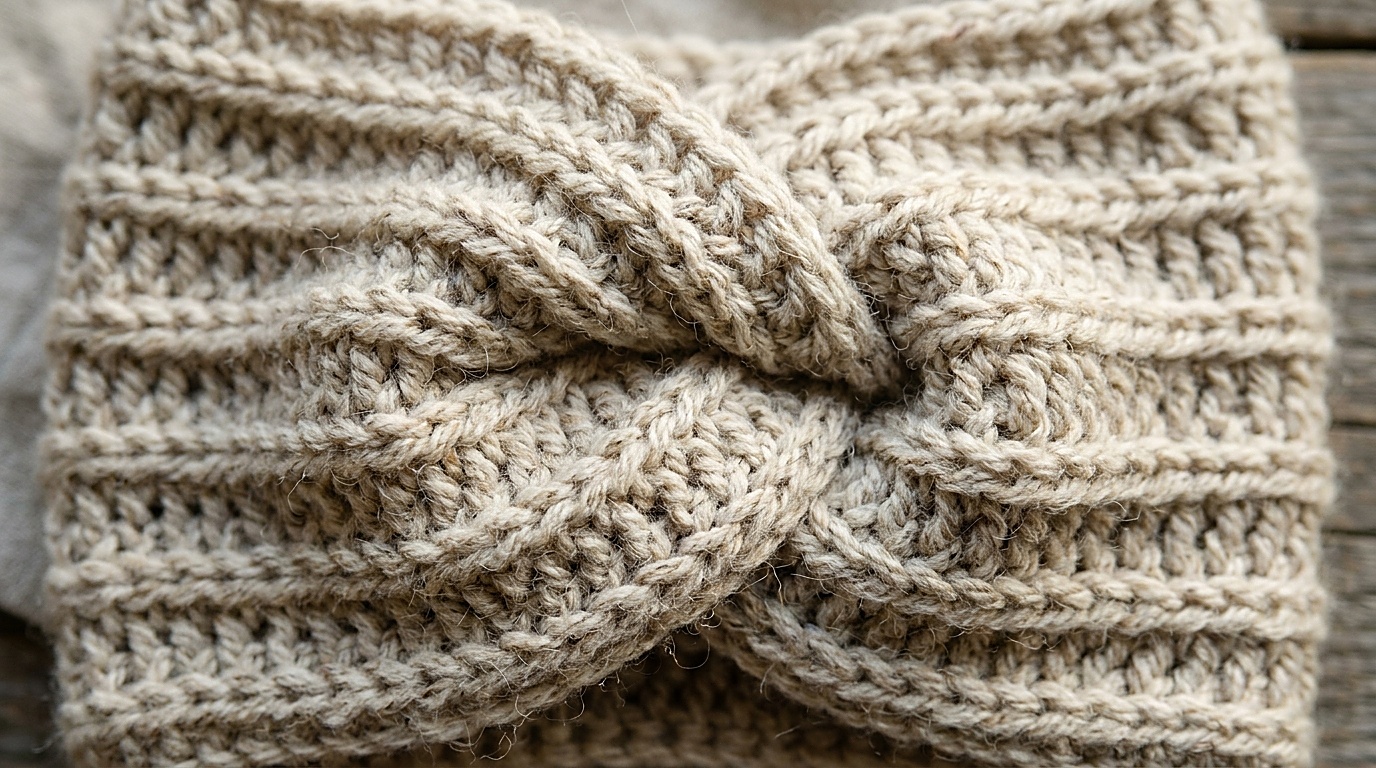
Unlike standard flat beanies, this twisted ear warmer is worked flat in rows using Half Double Crochet in the Back Loop Only (HDC BLO, a technique also featured in our chunky ribbed throw pattern). By working strictly into the back loop of each stitch, the natural “third loop” of the half double crochet is pushed forward to form horizontal raised ridges. This creates a deeply textured fabric with superior crosswise elasticity—giving your headband the comfortable stretch and spring recovery of a knit brioche stitch while maintaining the sturdy warmth of crochet.
Understanding Headband Sizing & Negative Ease
The single most common mistake makers encounter with crochet ear warmers is making the band equal to their exact head circumference. A headband crocheted with zero ease will slide down over your eyes or loosen after thirty minutes of wear. For a headband to stay securely seated over your ears in blustery weather, it requires approximately 2 to 2.5 inches (5 to 6 cm) of negative ease.
| Size Category | Head Circumference | Finished Unstretched Length | Band Width | Approx. Total Rows |
|---|---|---|---|---|
| Toddler (1–3 yrs) | 18″ – 19″ (46–48 cm) | 16.0″ (40.5 cm) | 3.5″ (9 cm) | 46 rows |
| Child (4–10 yrs) | 19″ – 20″ (48–51 cm) | 17.0″ (43 cm) | 4.0″ (10 cm) | 50 rows |
| Teen / Small Adult | 20″ – 21″ (51–53 cm) | 18.0″ (46 cm) | 4.5″ (11.5 cm) | 54 rows |
| Adult Medium (Standard) | 21″ – 22″ (53–56 cm) | 19.5″ (49.5 cm) | 5.0″ (12.5 cm) | 58 rows |
| Adult Large | 22″ – 23.5″ (56–60 cm) | 20.5″ (52 cm) | 5.0″ (12.5 cm) | 62 rows |
Measurement Tip: Always measure your band length laying completely flat on a hard table without pulling or stretching the fabric. The stretch should occur when worn on the head, not when calculating raw row length.
Materials & Fiber Selection

- Yarn: 120–150 yards (110–137 m) of Category 4 Worsted or Aran weight yarn (refer to our crochet yarn weight guide). We recommend an acrylic-wool blend (such as Lion Brand Wool-Ease or Patons Classic Wool Worsted) or a premium soft acrylic. Note: Avoid 100% cotton or plant fibers for this project; plant cellulose lacks natural elastic memory and will stretch out permanently after a few wears.
- Crochet Hook: US Size H/8 (5.0 mm) or I/9 (5.5 mm). Use a hook that produces flexible, supple fabric with good drape rather than dense, stiff fabric.
- Notions: Blunt tapestry needle with a large eye (essential for seaming through 4 thick layers), tape measure, and sharp yarn scissors.
- Gauge: 14 half double crochet stitches and 10 rows in HDC BLO = 4 inches (10 cm). Meeting row gauge is flexible because you simply add or subtract rows until your desired length is reached.
Pattern Specifications & Abbreviations
This pattern is written in standard US Crochet Terminology.
- ch: Chain
- hdc: Half double crochet
- blo: Back loop only
- st(s): Stitch(es)
- st multiple: Any number of stitches for width + 1 turning chain
- turning chain rule: Ch 1 does NOT count as a stitch. Always place your first stitch of the row into the very first stitch at the base of the turning chain.
Step-by-Step Headband Pattern Walkthrough
Foundation Chain: Ch 19 loosely. (If your foundation chains tend to be tight, consider using a 5.5 mm hook just for the chain, then switch to a 5.0 mm hook for the working rows).
Row 1 (Foundation Row): Starting in the 2nd ch from your hook, work 1 hdc into each chain across. Turn. [18 active stitches]
Row 2 (Ribbing Row): Ch 1 (does not count as a stitch here and throughout). Looking down at the top “V” of your stitches, insert your hook under the back loop only (the loop furthest away from you) of the very first stitch. Work 1 hdc in BLO in each stitch across to the end of the row. Turn. [18 active stitches]
Rows 3 to 58 (Repeat for Adult Medium): Repeat Row 2 until your rectangle measures 19.5 inches (49.5 cm) long when laid completely flat and unstretched. Adjust the number of rows according to the Sizing Table above if making toddler, child, or adult large sizes.
Fastening Off: Cut your yarn, leaving a long 14-inch (35 cm) working tail. Pull the tail through your final active loop to secure. Do not weave in this tail yet—it will be used to sew the front twist seam.
The 4-Layer Interlocking “Sandwich” Twist Seam
This is where the magic happens. The twist knot is formed by folding both raw ends into interlocking “C” shapes and sandwiching them together before seaming.

Step 1: Position Flat: Lay your crocheted strip completely flat on a table with the right side facing upward toward you.
Step 2: Bring Ends Together: Bring the two short raw ends toward each other into the center of the band.
Step 3: Fold into “U” Shapes: Pinch each short end in half lengthwise so that each end forms a horizontal “U” or “C” shape.
Step 4: Interlock the Layers (The Sandwich): Slide the two folded ends together so their folds interlock like fingers folding together. You should have exactly 4 stacked layers in this order:
• Layer 1: Front half of End A
• Layer 2: Front half of End B
• Layer 3: Back half of End A
• Layer 4: Back half of End B
Align all four edges flush so no single layer is tucked too deep inside.
Step 5: Stitching Across: Thread your 14-inch yarn tail onto your blunt tapestry needle. Insert your needle through all 4 layers at the outer edge. Sew across the raw edge using a firm whipstitch or mattress stitch. Every single pass of your needle must catch all four layers (8 yarn loops total). When you reach the opposite side, sew back across a second time for extra reinforcement.
Step 6: The Big Reveal: Knot your working yarn securely at the edge and weave the tail into the seam ridges. Now reach through the tube and turn the headband completely inside out. The four-layer seam is now hidden on the inside, and a beautifully sculpted twist knot appears on the outside!
Finishing, Blocking & Care

- Steam Blocking for Perfect Drape: Because this project relies on 3D ribbing, never press it with a heavy dry iron, which will crush the ridges permanently. Instead, hover a garment steamer or steam iron 1 to 2 inches above the fabric and gently pat it with your palms.
- Washing Instructions: Hand wash in cool water with a gentle wool or fiber wash. Squeeze out excess moisture by rolling the headband inside a clean, dry bath towel. Lay flat on a mesh sweater dryer away from direct sunlight.
- How to Wear: Position the twist directly in the center of your forehead for a classic turban look, or shift it slightly to the temple for an asymmetrical modern look.
Save This Free Pattern to Pinterest
Pin your favorite reference cards below to your Crochet Accessories or Free Crochet Patterns board on Pinterest so you always have this head sizing chart and twist assembly diagram ready for your next winter project!


Frequently Asked Questions
Can I adjust the width of this crochet headband?
Yes! The width is determined by your foundation chain count. To make a narrower 3.5-inch headband, chain 13 (12 active stitches). To make an extra-wide 6-inch cold weather ear warmer, chain 23 (22 active stitches). The row-by-row repeat remains identical.
Why is my headband twisting unevenly at the center?
Uneven twists usually occur when one of the four folded layers slips backward during seaming. Make sure all four raw edges are lined up completely flush with each other before inserting your tapestry needle, and use locking stitch markers to clip the layers together while stitching.
Can I use bulky Category 5 yarn instead of worsted weight?
Yes, but you will need to adjust your stitch count. With bulky weight yarn and a 6.5 mm (K) hook, chain 13 for 12 active stitches to achieve a 5-inch width, and crochet approximately 42 to 44 rows to reach the 19.5-inch length.
Why are the edges of my ribbed strip wavy?
Wavy edges happen when the turning chain is made too loosely or when accidental increases occur at row ends. Ensure your turning chain 1 is pulled snug, and verify periodically that your active stitch count remains at exactly 18 stitches.
Have you made this cozy twisted ear warmer? Share your finished project on Ravelry or save this tutorial to your Pinterest crochet boards!