

There is nothing quite as precious as gifting an expectant mother a pair of tiny, handmade crochet baby booties. Yet every seasoned parent knows the universal infant dilemma: traditional baby shoes kick off within five seconds of squirming. This free crochet baby booties pattern is engineered specifically to stay securely in place—featuring a cozy folded ankle cuff, an adjustable woven drawstring tie, and an ingenious flat-rectangle geometry that eliminates confusing sole ovals entirely.
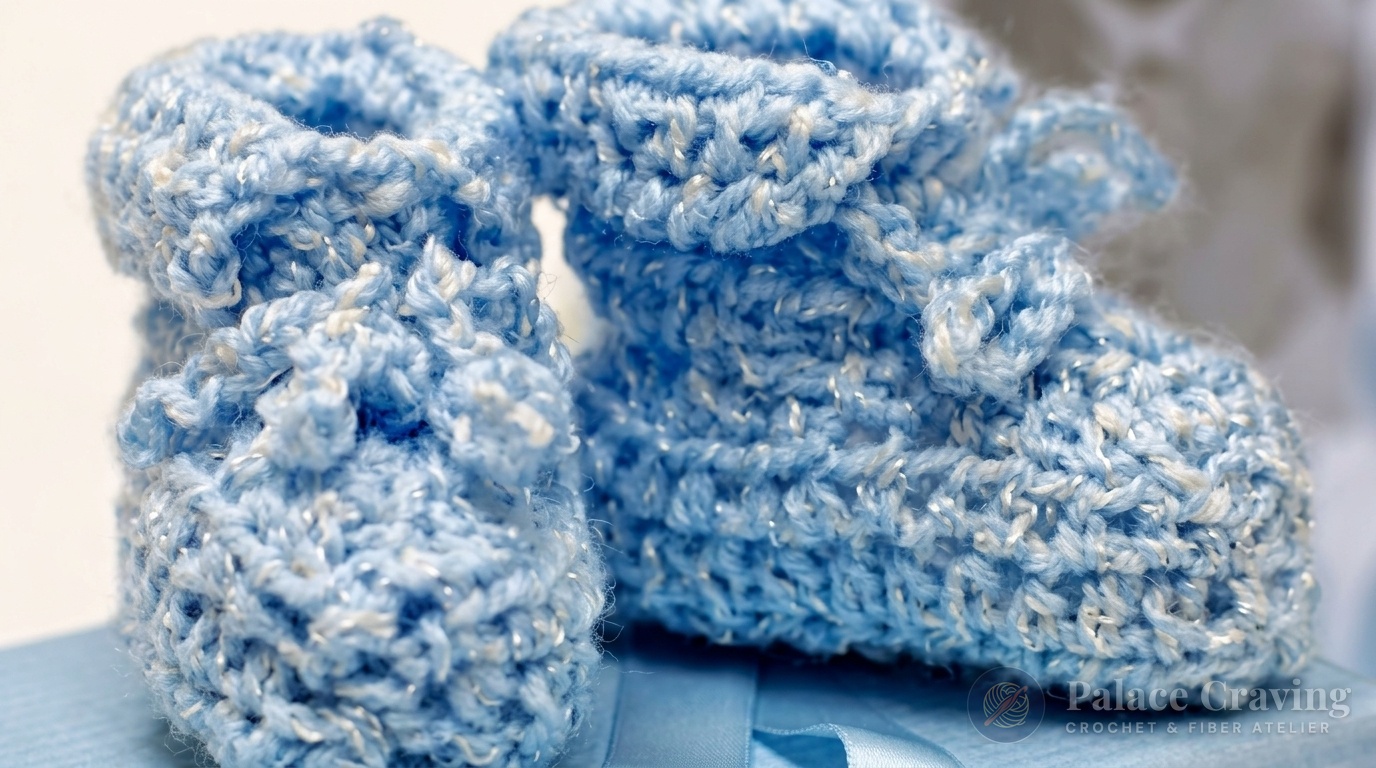
Most traditional baby bootie patterns demand fiddly rounds worked around tiny tight curves, complicated heel flap math, or separate sole pieces that must be sewn together with bulky inner seams that irritate tender infant skin. In our studio, we streamlined the construction into a stepped T-shaped flat layout worked in continuous half double crochet rows. You simply stitch one flat textured piece, fold it with right sides together, and join the back and sole with a soft, clean whipstitch seam. Paired with our beloved Velvet Baby Blanket with Shell Border, this set makes the ultimate treasured baby shower heirloom.
Why You’ll Love Crocheting These Baby Booties
- One-Hour Turnaround: With simple rows and zero circular decreases, you can finish an entire matching pair during a single baby nap (approx. 45 to 60 minutes total).
- Worked 100% Flat: Say goodbye to tight magic rings and confusing oval increases. The entire shoe body is crocheted back and forth in straightforward turned rows.
- Guaranteed Stay-On Ankle Tie: The woven crochet chain tie gently cinches above the ankle bone, preventing little kicking feet from tossing their booties off in strollers or car seats.
- Decorative Crab Stitch Collar: Finished with a sophisticated reverse single crochet (crab stitch) border that adds an artisan corded rim to the turn-down cuff.
- Hypoallergenic & Washable: Designed for lightweight baby DK or bamboo-cotton yarns that can be popped into the washing machine without losing softness.
Age Sizing & Foot Measurement Reference Chart
Babies grow rapidly during their first year. Use this verified sizing chart to select the ideal foot length for your little recipient:
Key Materials & Studio Swaps

- Baby DK / Light Worsted (#3) Yarn: 1 ball (approx. 50g / 140 yds) in Soft Powder Blue, Mint, Buttercream, or Heather Cream. Look for certified OEKO-TEX Standard 100 acrylic or bamboo-cotton blends that won’t pill or shed loose fibers into baby’s mouth. (Check our Crochet Yarn Weight Guide for ply advice).
- Size U.S. G/6 (4.0 mm) Crochet Hook: Ensures dense, soft stitches that keep tiny toes warm without stiff fabric tension.
- Blunt Steel Yarn Tapestry Needle: Essential for soft, flat seaming along the sole and weaving in ends seamlessly.
- Measuring Tape & Locking Markers: Two locking stitch markers to pinpoint the ankle fold row precisely.
Tested Notions for Delicate Baby Projects
Infant garments require extra-smooth hooks and snag-free needles to prevent snagging delicate plies. We recommend these workshop favorites:
Clover Amour 4.0mm (US G/6) Hook
Ergonomic elastomer handle reduces hand fatigue while the matte aluminum head glides through baby yarn.
Clover Bent Tip Steel Tapestry Needles
The curved tip effortlessly picks up sole stitches for flat, bump-free seams inside baby shoes.
Disclosure: Palace Craving atelier participates in select affiliate programs. When purchasing through our links, we may earn an editorial commission at zero additional cost to you.
Step-by-Step Stitch Walkthrough (3-6 Months)
Pattern Gauge & Notes:
• Gauge: 16 half double crochet (hdc) and 11 rows = 4 inches (10 cm).
• Turning Chains: The beginning Ch-2 does not count as a stitch throughout.
• Note on Sizes: Instructions below are written for size 3–6 months. For newborn (0-3m), start with ch 25 (23 hdc). For 6-12m, start with ch 33 (31 hdc).
Phase 1: The Foot Base & Sole Foundation
Foundation: Using your 4.0mm hook and baby yarn, Chain 29.
Row 1 (Right Side): Work 1 hdc into the 3rd chain from your hook. Work 1 hdc in each chain stitch across to the end. (27 hdc total). Turn your work.
Rows 2 through 5: Ch 2 (does not count as st). Work 1 hdc in each hdc across to the end of the row. (27 hdc). Turn your work.
At the end of Row 5, you have created the full depth of the lower foot and sole.
Phase 2: The Stepped Ankle Cuff
Now we indent both sides to build the vertical ankle shaft and fold-down cuff:
Row 6 (Indent Row): Slip stitch loosely across each of the first 6 hdc. Ch 2. Work 1 hdc in the exact same stitch as your last slip stitch. Work 1 hdc in each of the next 16 hdc. Turn. Leave the remaining 5 stitches completely unworked. (17 hdc active on your hook).
Rows 7 through 11: Ch 2. 1 hdc in each hdc across. (17 hdc). Turn your work.
Marker Placement: Place a locking stitch marker at each outer end of Row 9. (This marks the exact fold line where the ankle cuff turns down).
Important: Do not turn your work at the end of Row 11.

Phase 3: The Artisan Crab Stitch Edging
Row 12 (Reverse Single Crochet / Crab Stitch): Ch 1. Working in reverse from left to right (instead of right to left as usual), insert your hook into the stitch to the right, yarn over, pull up a loop, yarn over and draw through both loops on your hook. Work 1 reverse sc in each hdc across the cuff top. This creates an exquisite, raised corded rim that prevents the cuff edge from rolling unevenly. Fasten off, leaving an 18-inch seaming tail.
Phase 4: Seamless Assembly & Ankle Tie
Folding & Seaming: Fold the bootie in half with Right Sides facing each other (matching the front toe edges and sole edges). Thread your tapestry needle with the yarn tail. Beginning at your marked Row 9, seam down the remaining edge of the cuff, round the curved front toe, and travel continuously across the entire bottom sole to the heel. Turn bootie right side out.
Fold the Cuff: Fold the top cuff downward along the Row 9 fold line, displaying the beautiful crab stitch edge.
The Stay-On Ankle Tie: Ch 50 to 55 to make a chain approx. 12 inches (30.5 cm) long. Fasten off and tie small decorative knots at each tip. Thread the chain through a yarn needle and weave in-and-out around the ankle through Row 7. Tie in a sweet front bow.

3 Atelier Secrets for Tender Infant Wearables
1. Invisible Flat Seaming: Never join baby soles with bulky single crochet ridges on the interior! A prominent interior ridge presses against delicate infant heels. Use a flat whipstitch catching only the inner loops of both edges, creating a feather-soft seam that is undetectable to touch.
2. Elastic Drawstring Security: If you prefer ribbons over crocheted chains, use 3/8-inch satin ribbon or cotton twill tape. Always ensure ribbon ends are heat-sealed with a quick flame pass to prevent fraying strands.
3. Washing & Preservation: Hand wash or machine wash in a mesh lingerie bag on gentle cycle with fragrance-free baby detergent. Reshape the rounded toes with your thumbs and dry flat. For complete blocking and laundering guidelines, explore our guide on How to Block Crochet & Finish Edges.
Explore More Free Nursery & Wearable Patterns
Crafting for little ones? You will adore these heirloom baby and family guides from Palace Craving:
- Velvet Baby Blanket with Shell Border – Ultra-plush nursery blanket with timeless scalloped edging.
- Easy Crochet Baby Blanket Pattern – A soft, textured beginner nursery throw with relaxing rhythm.
- Easy Chunky Crochet Slippers Pattern – Match with mama! Cozy adult loafer slippers worked in plush bulky yarn.
Save This Baby Pattern to Pinterest
Pin this step-by-step tutorial to your Baby Crochet, Nursery Crafts, and DIY Baby Shower Gifts boards so you always have this quick 1-hour pattern ready!

