

Few holiday figures embody the magic and warmth of Christmas quite like Father Christmas himself. Our Classic Standing Santa Claus Amigurumi Doll is an authentic, heirloom-quality masterpiece designed to stand proudly at 28 cm (11 inches) tall. From his tailored cherry red overcoat with folded snow-white borders to his dimensional 3-part sculpted beard, handlebar mustache, poseable wired limbs, and signature yellow-buckled waistbelt, every detail of this amigurumi captures vintage holiday nostalgia while remaining sturdy enough for tabletop displays and fireside mantels.
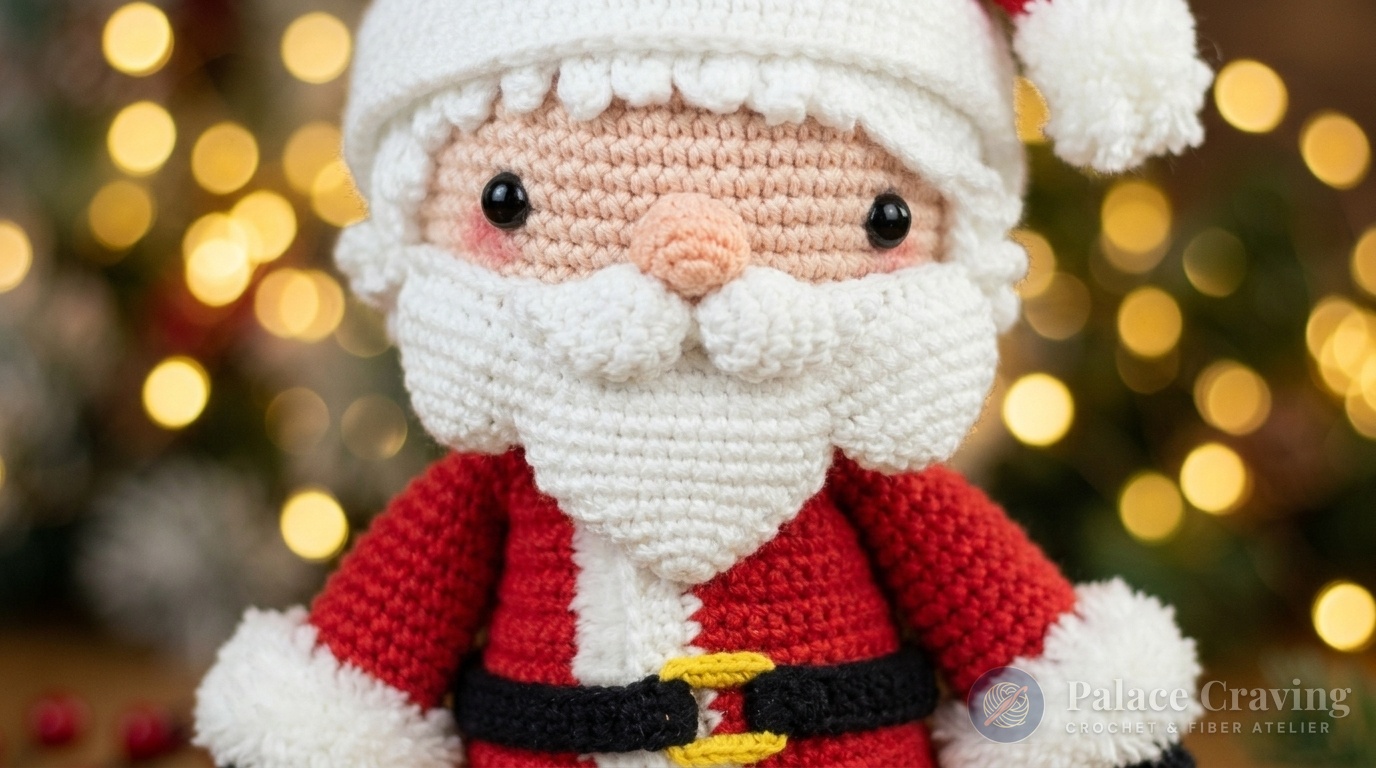
Unlike basic stuffed toys that tilt or slump over, this Santa doll features continuous bottom-up joined legs, reinforced flat boot soles, and an internal plump belly pillow that gives him that iconic jolly Father Christmas silhouette. Whether displayed beside our Christmas Holly Berry Elf Gnomes Duo, our adorable Festive Christmas Gingerbread Man, or our cozy Grandpa Santa Claus Gnome, this standing Santa serves as the proud centerpiece of any holiday crochet collection.
Why You’ll Love Crocheting This Standing Santa
- True Standing Stability: Structured boots with continuous leg joining and weighted bases allow Father Christmas to stand firmly without an external doll stand.
- Dimensional 3-Part Sculpted Beard: A central chin cup joined seamlessly to two contoured cheek wings creates an architectural, voluminous beard that never lays flat or lifeless.
- Full Removable Tailored Coat: Crocheted flat in turned rows with crisp single-crochet vertical front edgings, folded white cuffs, and a separate yellow-buckled black belt.
- Poseable Arms & Thumb-Sculpted Mittens: Optional craft wire armature inside the arms and legs allows you to pose Santa waving, holding a tiny bell, or carrying a gift sack.
- Curly Hair Wig Cap: A full under-cap with 36 individual crocheted spiral curls frames his temples and nape beneath his slouchy pointed hat.
Santa Doll Anatomy & Finished Measurements
| Component | Crochet Technique | Yarn Color | Finished Measurement |
|---|---|---|---|
| Assembled Doll | Continuous joined legs to neck, sculpted head | White, Skin Tone, Red | ~28 cm (11.0 in) tall |
| Tailored Overcoat | Worked flat (Back + 2 Fronts) + round sleeves | Holiday Cherry Red & White | Removable fitted jacket |
| 3-Part Beard | Center bowl + 2 side wings joined in continuous rnds | Crisp Snow White | Voluminous contoured face frame |
| Hair Wig Cap | Circular crown cap + 36 spiral chain locks | Crisp Snow White | Full head coverage & back curls |
| Boots & Trousers | Reinforced oval soles, BLO cuff, joined pants | Black, Red & White socks | Sturdy flat-bottomed base |
Materials, Color Breakdown & Studio Notions

- Yarn Requirements: Sport/Fine 4-ply cotton or cotton-acrylic blend (approx. 160m / 175 yds per 50g skein):
- Holiday Cherry Red: ~75g (Overcoat, pointed Santa hat, and trousers)
- Crisp Snow White: ~55g (Wig cap with 36 curls, 3-part beard, mustache, hat brim, coat trims, and leg undergarments)
- Soft Peach / Skin Tone: ~25g (Sculpted head, neck, ears, and hands)
- Jet Black: ~30g (Sturdy boots, mittens, and waistbelt)
- Bright Golden Yellow: ~5g (Square waistbelt buckle)
- Crochet Hook: 2.25 mm ergonomic crochet hook (used throughout for a dense, stitch-tight fabric).
- Safety Eyes: One pair of 6 mm black safety eyes with washer backings.
- Notions: Polyester fiberfill stuffing, craft wire skeleton (optional 1.5mm aluminum craft wire for poseability), tapestry needle, stitch markers, and soft pink dry pastel blush.
Studio Pro-Tips for Heirloom Amigurumi
To achieve crisp stitch definition and ensure Santa stands perfectly balanced on his boots, keep these artisan recommendations in mind:
- Sole Plastic Reinforcements: Trace the oval shape of the boot soles onto flexible plastic lid material and slip them into the boots before stuffing. This ensures the bottom stays totally flat.
- Wire Armature Safety: If adding wire to make Santa poseable, bend both wire ends into tight loops and wrap them with electrical tape before inserting into the limbs to prevent wire tips from poking through the crochet stitches.
- The Plump Belly Secret: Do not skip the separate crochet belly pillow! Inserting this rounded insert under Santa’s shirt creates his cheerful, rounded jolly silhouette without distorting the outer coat.
Editorial transparency: Curated and verified by the Palace Craving fiber arts team.
Gauge & Tension Swatch
Because the boots and legs must support the upper torso, coat, and head, tight tension is required. Using a 2.25 mm hook in White yarn:
- Rnd 1: 6 sc in MR [6].
- Rnd 2: 6 inc [12].
- Rnd 3: *(1 sc, inc)* rep 6 times [18].
- Rnd 4: *(2 sc, inc)* rep 6 times [24].
- Rnds 5–6: 24 sc around (2 rounds) [24].
Your finished cup swatch should measure exactly 3.2 cm (1.25 inches) in diameter. If your measurement is larger than 3.5 cm, size down to a 2.0 mm hook so the doll remains firm and upright.
Step-by-Step Master Pattern: Legs, Belly & Body
1. First Leg & Second Leg (Make 2 in White)
Both legs are worked in continuous spirals using a 2.25 mm hook:
- Rnd 1: With White yarn, 6 sc in MR [6].
- Rnd 2: 6 inc around [12].
- Rnd 3: *(1 inc, 3 sc)* rep 2 times, 4 sc [14].
- Rnds 4–34 (31 rnds): 14 sc around (31 rounds even) [14].
- Fasten off First Leg. Stuff leg firmly. Do not fasten off Second Leg!
2. Joining Legs & Lower Torso
- Rnd 35 (Join Legs): On Second Leg, ch 5; join to First Leg with 1 sl st; work 14 sc around First Leg, 4 sc along ch-5 bridge, 14 sc around Second Leg, 4 sc along opposite side of ch-5 bridge [36 sts].
- Rnd 36: 1 inc, 2 sc, 1 inc, 13 sc, 1 inc, 4 sc, 1 inc, 13 sc [40].
- Rnd 37: *(1 inc, 7 sc)* rep 5 times [45].
- Rnds 38–43 (6 rnds): 45 sc around (6 rounds even) [45].
- Rnd 44: 8 sc, 1 dec, 21 sc, 1 dec, 12 sc [43].
- Rnd 45: 43 sc around [43].
- Rnd 46: 7 sc, 1 dec, 20 sc, 1 dec, 12 sc [41].
- Rnd 47: 41 sc around [41].
- Rnd 48: 9 sc, 1 dec, 14 sc, 1 dec, 14 sc [39].
- Rnd 49: 39 sc around [39].
- Rnd 50: 8 sc, 1 dec, 12 sc, 1 dec, 15 sc [37].
- Rnd 51: 37 sc around [37].
- Rnd 52: 8 sc, 1 dec, 11 sc, 1 dec, 14 sc [35].
- Rnds 53–54 (2 rnds): 35 sc around [35].
- Rnd 55: 4 sc, 1 dec, 16 sc, 1 dec, 11 sc [33].
- Rnd 56: 33 sc around [33].
- Rnd 57: 5 sc, 1 dec, 5 sc, 1 dec, 7 sc, 1 dec, 5 sc, 1 dec, 3 sc [29].
- Rnd 58: 3 sc, 1 dec, 6 sc, 1 dec, 5 sc, 1 dec, 5 sc, 1 dec, 2 sc [25].
- Rnd 59: *(1 dec, 3 sc)* rep 5 times [20].
- Rnd 60: *(1 dec, 2 sc)* rep 5 times [15].
- Rnd 61: 5 sc, 2 dec, 6 sc [13].
- Rnds 62–67 (Neck – 6 rnds): Switch to Soft Peach: 13 sc around (6 rounds) [13]. Fasten off, leaving a long tail. Stuff body and neck very firmly.
3. Jolly Fake Belly Pillow
Worked in White yarn to create Santa’s plump tummy:
- Rnd 1: 6 sc in MR [6] • Rnd 2: 6 inc [12] • Rnd 3: *(1 sc, inc)*×6 [18].
- Rnd 4: *(2 sc, inc)*×6 [24] • Rnd 5: *(3 sc, inc)*×6 [30] • Rnd 6: *(4 sc, inc)*×6 [36].
- Rnds 7–9 (3 rnds): 36 sc around [36].
- Rnd 10: *(4 sc, dec)*×6 [30] • Rnd 11: *(3 sc, dec)*×6 [24] • Rnd 12: *(2 sc, dec)*×6 [18].
- Rnd 13: *(1 sc, dec)*×6 [12] • Rnd 14: 6 dec [6]. Stuff firmly, cinch closed, and stitch securely to Santa’s lower belly area.
Step-by-Step Master Pattern: Head, Ears, Mittens & Boots
1. Sculpted Head (Soft Peach)
- Rnds 1–9: Start with 6 sc in MR, increase by 6 sts every round up to 54 sc [54].
- Rnd 10: 54 sc • Rnd 11: *(8 sc, inc)*×6 [60] • Rnd 12: 60 sc [60].
- Rnd 13: *(9 sc, inc)*×6 [66] • Rnd 14: 66 sc • Rnd 15: *(10 sc, inc)*×6 [72].
- Rnds 16–25 (10 rnds): 72 sc around [72].
- Rnds 26–33: Decrease by 6 sts every round down to 30 sc [30].
- Rnd 34: 2 sc, *(1 dec, 2 sc)* rep 7 times [23 sts]. Insert 6 mm safety eyes between Rnds 21 and 22, spaced 14 stitches apart. Stuff head firmly.
- Rnd 35: 2 sc, *(1 dec, 1 sc)* rep 7 times [16 sts]. Fasten off, leaving tail to sew onto neck.
2. Sculpted Ears (Make 2 in Soft Peach)
Row 1: 6 sc in MR, ch 1, turn [6] • Row 2: 2 inc, 3 sc, 1 sl st, ch 1, turn [8] • Row 3: 1 sl st, 5 sc, 1 inc, 1 sl st [9]. Fasten off, leaving tail. Sew to sides of head level with eyes.
3. Black Boots (Make 2)
- Rnd 1: With Jet Black, ch 6; work 5 sc on both sides of foundation chain [10].
- Rnd 2: *(2 inc, 3 sc)* rep 2 times [14].
- Rnd 3: *(2 inc, 5 sc)* rep 2 times [18].
- Rnd 4: *(2 inc, 7 sc)* rep 2 times [22].
- Rnd 5:
BLO 22 scaround [22]. - Rnds 6–7: 22 sc around (2 rounds) [22].
- Rnd 8: 3 dec, 14 sc, 1 dec [18] • Rnd 9: 2 dec, 14 sc [16].
- Rnd 10: *(1 inc, 3 sc)* rep 4 times [20] • Rnds 11–15 (5 rnds): 20 sc around [20].
- Rnd 16:
BLO 20 sc, ch 1, turn • Rnd 17: 20 sc, fasten off. Fold top cuff over along R16 BLO!
Tailored Red Overcoat, Trousers & Buckle Belt

1. Coat Back Piece (Worked Flat in Turned Rows)
- With White, ch 25. Rows 1–4: 24 sc, ch 1, turn (4 rows) [24].
- Switch to Red: Row 5:
BLO 24 sc, ch 1, turn [24]. - Rows 6–21 (16 rows): 24 sc, ch 1, turn [24].
- Row 22: 1 dec, 20 sc, 1 dec [22] • Row 23: 1 dec, 18 sc, 1 dec [20] • Rows 24–25: 20 sc [20].
- Row 26: 1 dec, 16 sc, 1 dec [18] • Row 27: 1 dec, 14 sc, 1 dec [16] • Rows 28–31 (4 rows): 16 sc [16].
- Row 32: 6 sc, 4 sl st, 6 sc [16] • Row 33: 6 sc, 4 sl st in previous sl sts, 6 sc, fasten off [16].
2. Coat Front Pieces (Make 2)
- With White, ch 14. Rows 1–4: 13 sc, ch 1, turn [13].
- Switch to Red: Row 5:
BLO 13 sc, ch 1, turn [13]. Rows 6–21: 13 sc (16 rows) [13]. - Rows 22–29: Decrease 1 st at neckline edge until reaching 7 sts [7]. Rows 30–33 (4 rows): 7 sc, fasten off.
- Sew shoulder and side seams to Back piece, leaving 22-st armholes.
- White Front Borders: Join White yarn along the front vertical edge; work 31 sc across 4 rows [31]. Fasten off and repeat on opposite front.
3. Coat Sleeves (Make 2)
Join Red in armhole: R1: 22 sc around [22] • R2: *(1 dec, 2 sc)* around to 18 sts [18] • Rnds 3–17 (15 rnds): 18 sc [18]. Switch to White: R18: 18 sc • R19: BLO 18 sc • Rnds 20–21: 18 sc, fasten off. Fold cuff upward!
4. Waistbelt & Buckle
- Black Belt: Ch 65; work 64 sc across, fasten off.
- Yellow Buckle: Ch 15; work 14 sl st, join into a ring, and steam-block into a crisp square frame. Slip belt through buckle and snap onto Santa’s coat!
Hair Wig Cap with 36 Spiral Curls & 3-Part Sculpted Beard
1. Hair Wig Cap with 36 Cascading Locks
- Crown Cap (White): Rnds 1–12: 6 sc in MR, increase by 6 sts each round to 72 sc [72]. Rnds 13–22 (10 rnds): 72 sc around [72].
- Rnd 23 (Spiral Hair Locks):
- Front Bangs: Repeat
[ch 4, 3 sc on ch, 1 sc in base st, 2 sc on cap]× 8 times. - Side Transitions: Work
ch 6, 5 sc on ch, 1 sc in base, 2 sc on capon both sides. - Back Ringlets: Repeat
[ch 13, 12 sc on ch, 1 sc in base, 2 sc on cap]× 26 times around the back and nape [36 curls total]. Fasten off and sew cap to head.
- Front Bangs: Repeat
2. Architectural 3-Part Sculpted Beard
This unique 3-part construction produces the rich, 3D volume characteristic of Father Christmas:
- Center Piece (×1): R1: 6 sc in MR [6] • R2: 6 inc [12] • R3: *(1 sc, inc)*×6 [18] • R4: *(2 sc, inc)*×6 [24] • Rnds 5–7: 24 sc (3 rnds) [24]. Fasten off.
- Side Pieces (×2): R1: 6 sc in MR [6] • R2: 6 inc [12] • R3: *(1 sc, inc)*×6 [18] • R4: 18 sc [18]. Fasten off first side; do not cut yarn on second side!
- Joining the 3 Pieces (Continuous Round):
- From 2nd Side piece: 1 sc on Center piece, 11 sc across Center, join 1st Side piece with 1 sc, 17 sc around 1st Side piece, 12 sc across Center piece, 18 sc around 2nd Side piece [64 sts total].
- Rnd 2: 13 sc, 1 inc, 17 sc, 1 inc, 13 sc, 1 inc, 17 sc, 1 inc [68].
- Rnd 3: 13 sc, 2 inc, 17 sc, 2 inc, 13 sc, 2 inc, 17 sc, 2 inc [76].
- Rnd 4: *(1 dec, 4 sc)* rep 12 times, 4 sc [64].
- Rnd 5: *(1 dec, 3 sc)* rep 12 times, 4 sc [52]. Stuff lightly with fiberfill and stitch firmly around Santa’s lower jawline!
3. Curled Handlebar Mustache (Make 2)
With White: R1: 5 sc in MR [5] • R2: 5 inc [10] • R3: *(1 inc, 4 sc)*×2 [12] • R4: 2 dec, 8 sc [10] • R5: 3 dec, 4 sc [7] • R6: 3 dec, 1 sc [4]. Fasten off. Sew both halves together at center and stitch directly above the beard!
Pointed Slouchy Santa Hat
- With Holiday Red: R1: 6 sc in MR [6] • R2: *(1 sc, inc)*×3 [9] • R3: 9 sc [9] • R4: *(2 sc, inc)*×3 [12].
- Increase gradually by 3 sts every 2nd or 3rd round until reaching 69 sts at Round 33 [69].
- Rnds 34–41 (8 rnds): 69 sc around [69]. Fasten off Red.
- White Folded Brim: Switch to White: Rnds 42–47 (6 rnds): 69 sc [69] • Ch 1, turn to other side • R48:
BLO 69 sc[69] • Rnds 49–54 (6 rnds): 69 sc [69]. Fasten off. Fold brim upward along R48 BLO. - Attach a fluffy 3 cm white pom-pom to the hat tip and position onto Santa’s curly head.
Holiday Staging & Mantels Display

Because Father Christmas is built with a sturdy flat boot foundation and balanced proportions, you can showcase him in multiple festive arrangements:
- Hearthside Guardian: Place Santa on your brick fireplace mantel flanked by cedar garlands, dried orange slices, and pillar candles.
- Entryway Welcome Vignette: Stand him on an entryway console table paired with our 3-in-1 Christmas Holiday Mugs filled with candy canes.
- Cherished Generational Keepsake: Boxed with festive tissue and a handwritten tag, this handmade doll makes an unforgettable holiday gift passed down through generations.
Frequently Asked Questions
How does this Santa doll stand up on its own without a stand?
The secret lies in the flat oval boot soles reinforced with plastic inserts, coupled with dense stuffing in the legs and lower torso. The wide boot footprint provides exceptional balance.
Can I make his arms poseable?
Yes! Simply insert a length of 1.5mm aluminum craft wire through the torso into both arms, bending the tips into smooth loops so they never pierce the stitches. Santa can then hold miniature holiday props.
How do I clean this amigurumi doll?
Spot clean using a microfiber cloth dampened with cool water and gentle wool wash. Avoid submerging the doll to preserve the facial blush and wire armature.
Save & Pin This Classic Standing Santa
Ready to craft Father Christmas? Save these pins to your Holiday & Christmas Crochet boards so you have the complete free tutorial whenever you’re ready to crochet!

