

Few holiday figures embody the cozy nostalgia of Christmas quite like a grandfatherly Nordic gnome, and this Grandpa Santa Claus Gnome with Curled Beard is designed to be an absolute showstopper. Standing an impressive 23 cm (9 inches) tall, this charming amigurumi blends Scandinavian folklore with traditional Santa iconography. It features an ingenious 5-part sculpted curled beard worked in coiled tubular segments, a round beige nose, delicate round wire eyeglasses, a flared red Santa coat with an embroidered buckled belt, and a tall, gracefully drooping pointed hat finished with a fluffy snowball pom-pom.
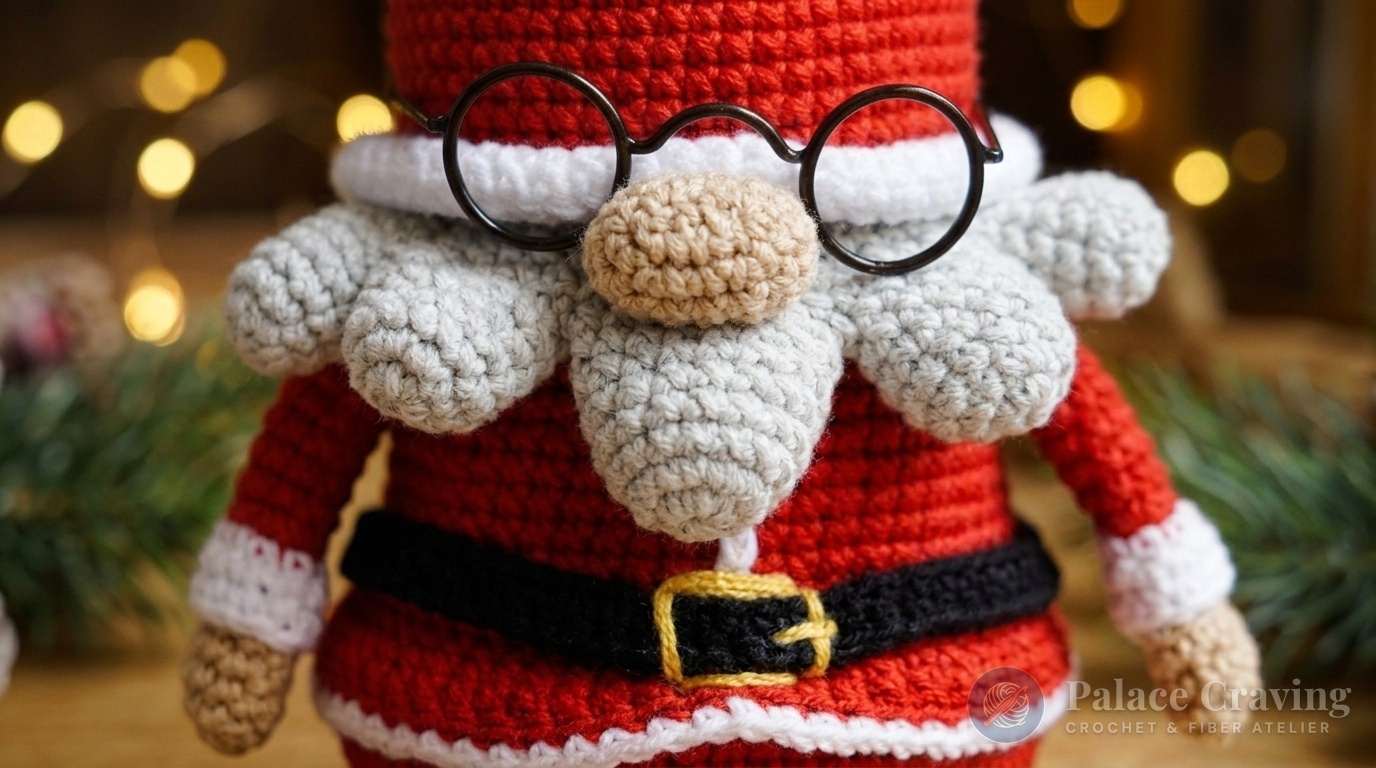
Unlike standard flat-stitched gnomes whose beards hang as limp fringe, Grandpa Santa’s beard is engineered with five individual three-dimensional tubes that curve upward organically, giving him a rich, tactile, grandfatherly dignity. He is worked seamlessly from the top of the head down through the coat body, ensuring a sturdy self-standing silhouette that looks stunning on a holiday sideboard or fireplace mantel. Pair him with our whimsical Cozy Nordic Holiday Gnomes with Dangling Legs, our tabletop 3D Crochet Christmas Tree Duo, our tree-ready Mini Crochet Santa Amigurumi Ornament, or our playful Christmas Snowman in Reindeer Earmuffs to build an unforgettable handmade holiday village.
Why You’ll Love Making This Sculpted Grandpa Santa Gnome
- Architectural 5-Part Sculpted Beard: Forget flimsy brush-out roving; this beard is built from 5 distinct coiled tubes joined in a single continuous row for lasting sculptural form year after year.
- Top-Down Continuous Construction: The head and coat body flow seamlessly from crown to base, eliminating weak neck joins and ensuring your gnome stands proud and tall.
- Dimensional Flared Hem & Belt: Worked directly into front loops with a contrasting white chain-slip edging, black waistbelt, and gold-embroidered buckle for authentic tailoring.
- Characterful Wire Eyeglasses: An easy DIY craft-wire trick adds miniature round spectacles that give Grandpa Santa an instant burst of personality and vintage charm.
- Versatile Weighted Base: Easily weighted with washed pebbles or poly-pellets in the lower cavity, allowing him to double as a festive decorative doorstop or centerpiece anchor.
Anatomy & Stitch Count Breakdown
| Component | Yarn Color & Yardage | Finished Dimensions | Key Stitch Feature |
|---|---|---|---|
| Head & Body (1 Piece) | Warm Beige (~15g) & Cherry Red (~20g) | 15 cm tall × 10 cm wide | Continuous spiral, BLO transitional rounds |
| 5-Part Curled Beard | Heather Fog Grey (~10g) | 10 cm wide × 7 cm long | 5 gradient tubes joined continuously |
| Pointed Santa Hat | Cherry Red (~20g) & Pure White (~5g) | 18 cm tall (slouchy point) | Gradual 41-round cone with fold-up brim |
| Oval Nose & Hair | Warm Beige (~3g) & Fog Grey (~2g) | 2.5 cm × 1.8 cm oval | Double-sided chain foundation |
| Arms & Boots | Red, White, & Jet Black (~7g) | Arms: 7 cm; Boots: 4 cm | Folded white cuffs & flat-bottom boots |
Key Materials, Tools & Notion Swatches

- Yarn Requirements: Sport/Fine weight (55% cotton / 45% acrylic, approx. 160m / 174 yds per 50g skein). You will need:
- Cherry Red (#90): ~20g / 70m (Hat, Coat, Arms)
- Warm Beige (#07): ~15g / 50m (Head, Hands, Oval Nose)
- Heather Fog Grey (#49): ~10g / 35m (5-part Curled Beard & Hair tufts)
- Jet Black (#53): ~7g / 25m (Belt & Sturdy Boots)
- Pure White (#62): ~5g / 15m (Hat Brim, Pom-pom ball, Coat Edging & Sleeve Cuffs)
- Golden Yellow (#58): ~1m / scrap (Buckle embroidery)
- Crochet Hook: 2.5 mm ergonomic crochet hook (tight gauge is crucial to prevent stuffing show-through).
- Stuffing: ~60g high-loft polyester fiberfill stuffing.
- Wire for Eyeglasses: Approx. 20 cm of 18–20 gauge black craft wire (or pre-made 1.5-inch mini doll glasses).
- Notions: Yarn needle, contrast stitch marker thread, sharp fabric scissors, and an optional 10×15 cm weighted pellet pouch.
Recommended Tools for Amigurumi Precision
To achieve tight, crisp stitches and effortless wire shaping on this holiday heirloom, our studio relies on these curated notions:
- Ergonomic 2.5 mm Hook: Provides smooth glide across dense cotton-acrylic fibers without hand strain during repetitive rounds.
- Craft Jewelry Pliers & Wire: Perfect for twisting symmetrical round eyeglass frames that hold their shape.
- Poly-Pellet Weighting Beads: Anchors the lower base so Grandpa Santa remains rock-solid on display.
Affiliate disclosure: We recommend only trusted tools tested in our fiber atelier.
Gauge & Vital Swatch Notes
Working in continuous spiral rounds without joining creates the tightest amigurumi fabric. Test your tension with this quick 6-round gauge swatch in Beige or Red:
- Rnd 1: 6 sc in magic ring [6]
- Rnd 2: 6 inc [12]
- Rnd 3: *(1 sc, inc) rep ×6 [18]
- Rnd 4: *(1 sc, inc, 1 sc) rep ×6 [24]
- Rnd 5: *(3 sc, inc) rep ×6 [30]
- Rnd 6: *(2 sc, inc, 2 sc) rep ×6 [36]
At the end of Round 6, your flat circular swatch should measure exactly 4.5 to 5.0 cm (1.8 to 2.0 inches) in diameter. If your circle measures larger, drop down to a 2.25 mm hook to prevent fiberfill from peeking through.
Step-by-Step Grandpa Santa Gnome Master Pattern
Part 1: Head & Body (Worked Top-Down in One Piece)
Begin with Warm Beige yarn and a 2.5 mm hook. Work in a continuous spiral without turning or joining rounds.
- Rnd 1: 6 sc in magic ring [6].
- Rnd 2: 6 inc [12].
- Rnd 3: *(1 sc, inc)* rep 6 times [18].
- Rnd 4: *(1 sc, inc, 1 sc)* rep 6 times [24].
- Rnd 5: *(3 sc, inc)* rep 6 times [30].
- Rnd 6: 30 sc around [30].
- Rnd 7: *(2 sc, inc, 2 sc)* rep 6 times [36].
- Rnd 8: *(5 sc, inc)* rep 6 times [42].
- Rnd 9: 42 sc around [42].
- Rnd 10: *(3 sc, inc, 3 sc)* rep 6 times [48].
- Rnds 11–20: 48 sc around (10 rounds even). Cut Beige yarn [48].
- Rnds 21–22: Join Cherry Red yarn. Work
BLO 48 scfor 2 rounds [48]. - Rnds 23–27: 48 sc around (5 rounds even) [48].
- Rnd 28: *(7 sc, inc)* rep 6 times [54].
- Rnds 29–31: 54 sc around (3 rounds even) [54].
- Rnd 32: *(4 sc, inc, 4 sc)* rep 6 times [60].
- Rnds 33–34: 60 sc around (2 rounds even). Mark the last stitch of Round 34 with a contrasting safety pin—this marks your coat hemline! [60].
- Rnd 35:
BLO 60 sc[60]. - Rnd 36: *(14 sc, inc)* rep 4 times [64].
- Rnds 37–38: 64 sc around (2 rounds even) [64].
- Rnd 39: *(3 sc, sc2tog, 3 sc)* rep 8 times [56].
- Rnds 40–41: 56 sc around (2 rounds even) [56].
- Rnd 42: *(5 sc, sc2tog)* rep 8 times [48].
- Rnds 43–44: 48 sc around (2 rounds even) [48].
- Rnd 45:
BLO 48 sc[48]. - Rnd 46: *(2 sc, sc2tog, 2 sc)* rep 8 times [40]. Begin stuffing the head and body firmly with fiberfill (or insert weighted pellet pouch in bottom base).
- Rnd 47: *(3 sc, sc2tog)* rep 8 times [32].
- Rnd 48: *(1 sc, sc2tog, 1 sc)* rep 8 times [24].
- Rnd 49: *(1 sc, sc2tog)* rep 8 times [16]. Complete final stuffing.
- Rnd 50: 8 sc2tog [8]. Fasten off, weave tail through remaining 8 stitches, pull tightly to seal, and secure internally.
Part 2: Coat Hem, Placket & Black Buckled Belt
Return to the marked front loops of Round 34 on the body:
- Coat Hem R1: Join Cherry Red yarn to the marked stitch of Rnd 34 FLO: ch 2, work 27 dc in FLO, 1 hdc in FLO, 1 sc in FLO, 1 sl st in FLO (mark this center-front slip stitch!), 1 sc in FLO, 1 hdc in FLO, 27 dc in FLO, join with sl st to top of ch 2 [60]. Fasten off.
- Coat Hem R2 (Decorative White Trim): Join Pure White yarn: work
*(sl st, ch 1)*in each stitch around [120]. Fasten off with invisible join. - Center-Front Placket: Join Pure White yarn into the marked center-front slip stitch of Hem R1: chain 12. Fasten off leaving a 15 cm tail. Sew this neat vertical chain straight up the center front of the red coat up to Round 21.
- Waist Belt: With Jet Black yarn: chain 62. Work 1 dc in 4th chain from hook and in each remaining chain to end [60 dc]. Fasten off. Wrap belt around waist directly above the coat hem and tack securely.
- Embroidered Gold Buckle: With Golden Yellow yarn and a tapestry needle, embroider a crisp 4×4 stitch rectangular buckle frame directly over the white placket and black belt at center front.
Crocheting the 5-Part Sculpted Curled Beard

Grandpa Santa’s signature feature is his 5-part curled beard in Heather Fog Grey yarn. You will crochet five individual tubular curls and join them together in a single continuous row across the top:
- Curl #1 (Outer Right): R1: 6 sc in MR [6]. R2: 6 inc [12]. R3–5: 12 sc (3 rounds) [12]. Fasten off [12 sts].
- Curls #2 & #4 (Inner Left & Right): Make 2 identical pieces. R1: 6 sc in MR [6]. R2: 6 inc [12]. R3: *(5 sc, inc)* rep 2 times [14]. R4–6: 14 sc (3 rounds) [14]. Fasten off [14 sts each].
- Curl #3 (Center Longest Curl): R1: 6 sc in MR [6]. R2: 6 inc [12]. R3: *(3 sc, inc)* rep 4 times [16]. R4–7: 16 sc (4 rounds) [16]. Fasten off [16 sts].
- Curl #5 (Outer Left): R1: 6 sc in MR [6]. R2: 6 inc [12]. R3–5: 12 sc (3 rounds) [12]. Do not cut yarn on Curl #5!
Joining the 5 Curls in One Continuous Piece
Line up your 5 curls side-by-side in order: #1, #2, #3, #4, #5.
- Beard Join Rnd 1: Continuing with the live yarn from Curl #5, work across the front halves of all curls: 6 sc on Curl #1, 7 sc on Curl #2, 8 sc on Curl #3, 7 sc on Curl #4, 12 sc all around Curl #5; then turn slightly and work across the remaining back halves: 7 sc on Curl #4, 8 sc on Curl #3, 7 sc on Curl #2, 6 sc on Curl #1 [68 sts total].
- Beard Join Rnd 2: Work
*(sc2tog, 4 sc, sc2tog, 5 sc, sc2tog, 6 sc, sc2tog, 5 sc, sc2tog, 4 sc)*rep 2 times [58 sts]. Stuff each curl lightly so they remain springy and tubular. - Closing the Top Edge (Row 3): Pinch the top opening flat and crochet through both layers to seal:
*(4 sc through both layers, then sc2tog on front layer while skipping 2 sts on back layer)*rep 2 times; 5 sc, (sc2tog front & skip 2 back); 4 sc, (sc2tog front & skip 2 back), 4 sc. Fasten off leaving a long 30 cm tail.
Part 4: Oval Nose & Eyeglasses Assembly
- Oval Nose (Warm Beige): Chain 4.
- Rnd 1: Work 3 sc in 2nd ch from hook, 1 sc in next ch, 3 sc in last ch; rotate to work on underside of foundation chain: 1 sc [8 sts].
- Rnd 2: 3 inc, 1 sc, 3 inc, 1 sc [14 sts].
- Rnds 3–4: 14 sc around (2 rounds even) [14 sts]. Fasten off leaving a sewing tail. Stuff lightly and sew centered directly on top of Beard Curl #3.
- Crafting the Wire Glasses: Take 20 cm of black craft wire. Wrap one loop around a lipstick tube or fat marker (approx. 1.8 cm diameter), twist wire in the center to form a 1 cm bridge, and wrap the second loop. Bend the two side temples backward. Place the bridge gently over the top of the beige nose!
Part 5: Arms, Sleeve Cuffs & Sturdy Boots
- Arms (Make 2): Start with Warm Beige:
- R1: 5 sc in MR [5]. R2: 5 inc [10]. R3–5: 10 sc (3 rounds) [10]. Fasten off Beige.
- Join Cherry Red: R6–7: 10 sc [10]. R8:
BLO 10 sc[10]. R9–17: 10 sc (9 rounds even) [10]. Stuff lower hand only. Sew arms to sides of body just under the outer beard curls. - White Sleeve Cuffs: Join Pure White into Rnd 7 FLO of arm: R1:
FLO 10 sc[10]. R2–3:BLO 10 sc(2 rounds) [10]. Fasten off and fold cuff upward over the red sleeve!
- Sturdy Boots (Make 2): With Jet Black:
- R1: 6 sc in MR [6]. R2: 6 inc [12]. R3: *(1 sc, inc)* rep 6 times [18]. R4–6: 18 sc (3 rounds) [18]. R7: *(1 sc, sc2tog)* rep 6 times [12].
- Stuff lightly, flatten top edge, and work 6 sc across both layers to close. Sew boots firmly to the front loops of Body Round 44 so they poke out under the coat hem!
Part 6: Pointed Santa Hat & Snowball Pom-Pom
Start at the tip of the hat with Cherry Red yarn:
- Rnds 1–5: R1: 6 sc in MR [6]. R2: *(1 sc, inc)*×3 [9]. R3: 9 sc [9]. R4: *(1 sc, inc, 1 sc)*×3 [12]. R5: 12 sc [12].
- Rnds 6–9: R6: *(1 sc, inc, 1 sc)*×4 [16]. R7: 16 sc [16]. R8: *(3 sc, inc)*×4 [20]. R9: 20 sc [20].
- Rnds 10–13: R10: *(2 sc, inc, 2 sc)*×4 [24]. R11: 24 sc [24]. R12: *(5 sc, inc)*×4 [28]. R13: 28 sc [28].
- Rnds 14–17: R14: *(3 sc, inc, 3 sc)*×4 [32]. R15: 32 sc [32]. R16: *(7 sc, inc)*×4 [36]. R17: 36 sc [36].
- Rnds 18–21: R18: *(4 sc, inc, 4 sc)*×4 [40]. R19: 40 sc [40]. R20: *(9 sc, inc)*×4 [44]. R21: 44 sc [44].
- Rnds 22–27: R22: *(5 sc, inc, 5 sc)*×4 [48]. R23–24: 48 sc (2 rnds). R25: *(11 sc, inc)*×4 [52]. R26–27: 52 sc (2 rnds) [52].
- Rnds 28–36: R28: *(6 sc, inc, 6 sc)*×4 [56]. R29–30: 56 sc (2 rnds). R31: *(13 sc, inc)*×4 [60]. R32–36: 60 sc around (5 rounds even) [60]. Fasten off Red.
- Fold-Up White Brim (Rnds 37–41): Join Pure White yarn: work 60 sc around for 5 rounds even [60]. Fasten off and fold brim upward.
- Snowball Pom-Pom: With Pure White: R1: 5 sc in MR [5]. R2: 5 inc [10]. R3: *(1 sc, inc)*×5 [15]. R4–5: 15 sc (2 rnds) [15]. R6: *(1 sc, sc2tog)*×5 [10]. Stuff firmly, cinch closed, and sew securely to the pointed tip of the hat.
Assembly, Styling & Display Inspirations

To finalize Grandpa Santa’s styling, embroider a few strands of grey hair peeking out on either side of his head just below the white hat brim. Pull the hat low over his forehead so it rests directly above his wire glasses and snug against the top of his beige nose.
Because of his substantial 23 cm height and flared coat base, he makes a breathtaking focal point in several holiday settings:
- Mantelpiece Guardian: Flank him with pine garlands, dried orange slices, and pillar candles for an authentic Nordic hearth.
- Festive Entryway Greeter: Weight the base with sand or pellets to anchor him as a charming holiday doorstop or console table centerpiece.
- Cherished Gift Box Accent: Nestled inside a wooden crate with artisan chocolates and holiday tea bags, he serves as an unforgettable heirloom gift.
Frequently Asked Questions
How do I keep the curled beard loops from uncoiling over time?
Because each beard tube is crocheted in dense single crochet spirals rather than chained ribbons, the structural tension keeps them coiled naturally. Lightly stuffing each tube with a tiny pinch of fiberfill preserves their rounded cylindrical shape permanently.
Can I use safety eyes if I don’t want the glasses?
Yes! If you prefer a traditional gnome look without glasses, insert a pair of 8mm or 10mm black safety eyes between Rounds 14 and 15 of the head before attaching the nose and beard.
How can I make the hat tip droop gracefully to the side?
The gradual 41-round cone has natural drape. You can fold the upper third over and make a tiny hidden catch-stitch through the fold to keep the pom-pom resting charmingly over one shoulder.
Save & Pin This Grandpa Santa Gnome Pattern
Planning your holiday handmade gift list? Save these pins to your Holiday & Christmas Crochet boards so you have the complete free tutorial whenever you’re ready to crochet!

