

Step into a winter fairy tale of spun sugar, warm cinnamon, and architectural wonder with our 3D Christmas Gingerbread House and Candy Decor. Measuring an impressive 22 cm wide × 29 cm long × 27 cm high (8.7 × 11.4 × 10.6 inches), this grand heirloom cottage is engineered with a rigid interior frame, five illuminated picture windows with braided mullions, a working hinged red front door crowned with a miniature holiday wreath, scalloped terracotta shell-stitch roof tiles with snow-white icing crests, a brick chimney billowing with fluffy smoke, and an entire sweet-shop menagerie of crochet candy canes, swirl lollipops, peppermint pinwheels, and gumdrops!
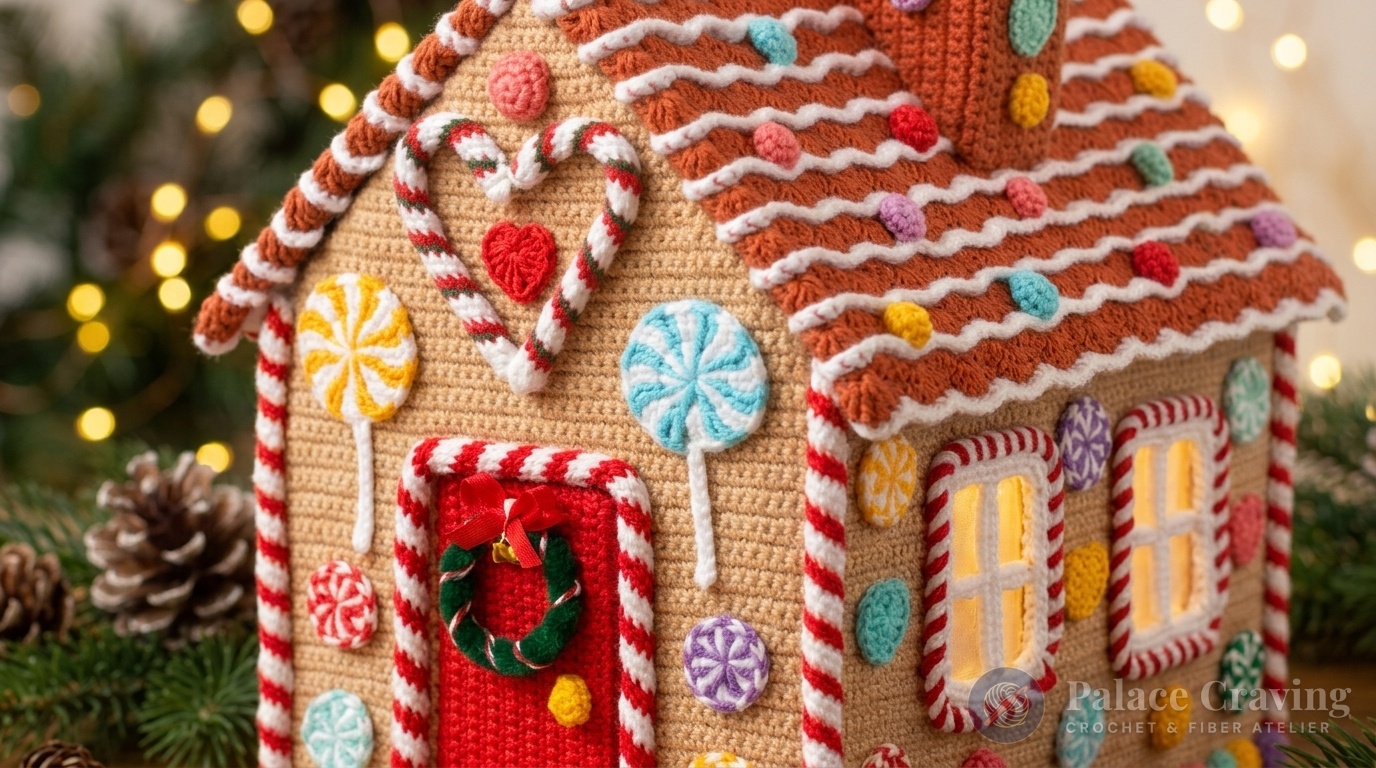
Unlike fragile edible gingerbread that softens or collapses, this handcrafted fiber art cottage is built to be treasured for generations. Designed with an ingenious hinged opening roof slope, it serves not only as an illuminated holiday mantel centerpiece, but also as an interactive holiday playhouse or sweet holiday keepsake box. Pair this stunning architectural showcase with our Christmas Hot Cocoa Mug and Gingerbread Man, our Classic Standing Santa Claus Amigurumi Doll, and our Festive Christmas Gingerbread Man to curate the ultimate handmade North Pole village display.
Why You’ll Love Building This 3D Gingerbread Cottage
- Engineered Structural Rigidity: Reinforced with standard plastic canvas mesh and concealed wooden corner dowels, ensuring straight, plumb walls that never sag or buckle over time.
- Illuminated Architectural Windows: Five cut-out picture windows backed with clear film, braided white mullion crossbars, and two-color twisted candy cane trim allow warm interior LED fairy lights to glow through into your darkened holiday room.
- Interactive Opening Roof Slope: One side of the roof is permanently sewn to the cottage walls while the opposite slope lifts freely on a crocheted hinge—perfect for children’s playtime, holiday treats, or easy battery access.
- Scalloped Shell-Stitch Roof Tiles: Alternating rows of terracotta double-crochet fan shells edged with front-loop white icing rows recreate traditional European baked gingerbread shingles dusted with fresh powder snow.
- Complete Sweet-Shop Candy Collection: Includes patterns for 6 distinct holiday confectionery elements: wired spiral candy canes, a U-shaped candy cane door arch, two-color swirl mints, swirl lollipops on sticks, sweetheart candies, and chimney smoke pom-poms.
Architectural Specifications & Blueprint Dimensions
| Architectural Component | Crochet Technique | Underlying Support | Finished Dimensions |
|---|---|---|---|
| Assembled Cottage | 4 walls + floor + 2 roof slopes | Plastic canvas & wooden dowels | 22 W × 29 L × 27 H cm (8.7 × 11.4 × 10.6 in) |
| Side Walls (×2) | Beige sc panels with window cutouts | Felt-lined plastic canvas | 26 cm long × 16.5 cm high |
| Gable Walls (Front/Back) | Beige sc with beveled roof decreases | Felt-lined plastic canvas | 22 cm wide × 24.7 cm peak height |
| Hinged Red Front Door | Double-sided red sc rectangle + thread hinge | Trimmed plastic canvas core | 6.0 cm wide × 11.5 cm high |
| Shell-Stitch Roof | Terracotta dc shells + FLO white icing ridges | Hinged felt-lined canvas sheets | Two 16 cm × 32 cm roof slopes |
| 3D Chimney Pipe | Beveled terracotta rectangle + white rim | Folded 4-panel canvas box | 4 × 4 cm square base × 9 cm peak |
Materials, Structural Hardware & Color Palette

- Yarn Requirements: Sport/Fine 4-ply cotton or cotton-acrylic blend (approx. 160m / 175 yds per 50g skein):
- Gingerbread Warm Beige/Tan: ~200g / 4 skeins (4 wall panels, floor, and interior window jambs)
- Terracotta Roof Shingle Orange-Red: ~50g / 1 skein (Scalloped shell-stitch roof tiles and chimney pipe)
- Icing Snow White: ~50g / 1 skein (Window mullions, twisted frames, roof snow ridges, candy cane stripes, and chimney icing rim)
- Festive Cherry Red: ~40g (Hinged door, candy canes, swirl mints, and lollipops)
- Pine Needle Green: ~25g (Candy cane stripes, door wreath, and gumdrops)
- Bright Confectionery Pastels: ~15g total (Yellow, soft purple, and candy pink for sweets)
- Crochet Hooks: 2.25 mm hook (main cottage walls, floor, and roof) and 2.0 mm hook (fine candy canes, lollipops, and sweets).
- Structural Hardware: 4 sheets of stiff Plastic Canvas (26 × 33 cm), 9 sheets of thin beige A4 craft felt (for interior lining), 4 wooden BBQ skewers (30 cm) for corner bracing, clear transparent plastic sheet/binder sleeve (for window panes), and hot glue sticks.
- Illumination & Notions: 1 battery-operated warm-white mini LED wire fairy light garland (10–20 micro LEDs), 2 green chenille pipe cleaners (for door wreath), colored pipe cleaners (for candy canes), two 8mm mini brass jingle bells, narrow red ribbon, and 3 white craft pom-poms (2 cm & 1 cm) for chimney smoke.
Architectural Masterclass: Builder Tips for Sturdy Construction
Building a large 3D crochet structure requires careful engineering. Keep these studio guidelines in mind for professional results:
- Budget-Friendly Cardboard Substitute: If plastic canvas is unavailable, substitute sturdy corrugated cardboard cut from clean shipping boxes. If using cardboard, you can omit the felt lining and simply paint or glue brown paper inside.
- The Felt Glue Margin: When gluing beige felt to the plastic canvas panels, leave a 5 mm margin unglued along all outer edges. This allows your tapestry needle to pierce through the canvas mesh cleanly without gumming up from dried adhesive.
- Internal Skewer Dowels: Glue trimmed wooden skewers directly into the 4 interior vertical wall corners and wrap them with 2 cm felt strips. This provides rigid load-bearing strength so the heavy shell roof never causes the side walls to bow inward.
Curated and verified in the Palace Craving fiber architecture studio.
Gauge & Canvas Sizing Guide
Because every crocheted panel must fit precisely over its corresponding plastic canvas frame, match your gauge to the canvas before beginning the walls:
- With a 2.25 mm hook in Gingerbread Beige, chain 21 sts.
- Work 20 rows of sc in turned rows [20 sts × 20 rows].
- Lightly steam-block your swatch. It should measure exactly 7.5 cm wide × 7.0 cm high. Hold the swatch against your plastic canvas grid; stitches should align naturally with the mesh holes without stretching or bunching.
Step-by-Step Master Pattern: Wall Panels & Window Cutouts
1. Plastic Canvas Skeleton Blueprint
Cut the 4 sheets of 26 × 33 cm plastic canvas into 8 half-sheets measuring 26 × 16.5 cm:
- 2 Side Wall Sheets: Cut two 5 × 6 cm window apertures in each sheet (spaced 5 cm from side edges and 6 cm apart, sitting 12 cm high).
- 1 Floor Sheet: Keep intact as a 26 × 16.5 cm base.
- 2 Gable End Sheets (Front & Back): Cut 8.2 cm sloped roof angles from the side top edge to create the peaked triangular gable (leaving 16.5 cm side wall height and a 24.7 cm central peak). Save the cut-off triangle pieces for the chimney!
- Door Aperture (Front Gable): Cut out a 6.5 cm wide × 12 cm high doorway. Trim 0.5 cm off the perimeter of the detached canvas door rectangle so it swings freely once crocheted!
- Back Window Aperture: Cut out a centered 6 × 6 cm square window aperture.
- Glue beige craft felt to the interior side of all canvas pieces, trimming flush to edges.
2. Crocheting the Beige Wall Panels
Using a 2.25 mm hook and Gingerbread Beige yarn, work in back-and-forth turned rows of sc:
- Side Walls (Make 2): Chain to match the 26 cm canvas bottom width. Work sc rows straight up to the window sills. Divide work into 3 separate sections to work the pillars between windows. At top of windows, chain across the window gaps to bridge the pillars, then work full-width sc rows up to the top 16.5 cm wall edge.
- Front Gable Wall: Work foundation chain matching bottom width; work up to doorway sill. Divide work into left and right door pillars. Bridge doorway with chains at row 12 cm, work across full width up to 16.5 cm, then decrease 1 st at both ends of every row to form the gable roof angle!
- Back Gable Wall: Work identically, bridging the single 6 × 6 cm center window.
- Steam-iron all panels flat. Glue clear plastic film inside all window openings. Glue and whip-stitch the crocheted panels onto the exterior of all canvas walls.
Hinged Front Door, Braided Windows & 4-Wall Assembly

1. Working Hinged Red Door
- Hinge the trimmed door canvas piece to the doorway opening at 4 points using strong sewing thread, allowing the door to swing open smoothly.
- With Festive Cherry Red yarn, crochet 2 identical rectangles matching the door dimensions (working rows vertically along the door length). Sandwich the canvas door between both red panels and whipstitch outer edges together.
- Attach a tiny crocheted yellow gumdrop bead as the door handle!
2. Braided Window Crossbars & Twisted Candy Cane Frames (×5 Windows)
- Braided Mullions: Anchor 4 vertical strands of White yarn across the inside of each window opening. Figure-8 braid horizontally across the strands with a tapestry needle, tacking at the center intersection to create authentic paned window grids.
- Twisted 2-Color Window Frames:
- In White, chain a foundation loop matching the window perimeter; work 1 round of sc with 3 sc in each corner.
- Work a 2-color twisted border: ch 3 in White, drop loop; join Red in next st, ch 3. Fold White behind Red, work sl st in next st, ch 3; fold Red behind White, work sl st in next st, ch 3. Alternate around the entire frame!
- Sew the inner edge to the beige window rim and glue outer twisted edges flat.
3. 4-Wall Box & Corner Skewer Reinforcement
- Wrap the Floor canvas with felt inside and a crocheted Beige rectangle underneath.
- Erect all 4 completed walls onto the floor. Whip-stitch bottom wall edges to the floor from the outside, then sew all 4 vertical corner seams tightly together.
- Hot-glue a cut 30 cm wooden BBQ skewer vertically inside each of the 4 inner wall corners and cover each skewer with a 2 cm strip of beige felt for a clean interior finish!
Shell-Stitch Terracotta Roof, Chimney & LED Lighting
1. Scalloped Shell-Stitch Roof Tiles & Snow Icing Ridges
Worked in Terracotta yarn with a 2.25 mm hook:
- Chain length 1 cm longer than the roof panel foundation.
- Row 1: sc across foundation chain, ch 1, turn.
- Row 2 (Shells): *(skip 2 sts, 5 dc in next st, skip 2 sts, 1 sc in next st)* across row.
- Snow Icing Row (Every 2 Shell Rows): Join Icing White on the right side without turning: work
1 sc in Front Loop Only (FLO)across, working2 sc in center dc of every shell. Fasten off White. - Turn work and resume Terracotta shell rows into the remaining loops of the previous shell row, adding a White FLO icing ridge every 2 shell rows until the roof slope is complete.
- Rejoin Terracotta to the starting foundation chain edge, work 2 rows of sc (to form the ridge hinge), then repeat shells + white icing rows for the opposite roof slope!
2. Hinged Opening Roof Assembly
- Glue two felt-lined canvas roof panels inside the crocheted roof piece, leaving a 1 cm flexible gap along the central ridge hinge so the roof folds freely.
- Sew ONLY the back roof slope to the front, back, and left walls! Leave the front roof slope unattached so it lifts open freely for playtime and treats!
- Glue wooden skewers along the top rim of the open side wall for extra edge rigidity.
3. 3D Chimney Pipe & Billowing Pom-Pom Smoke
- Assemble 4 beveled canvas pieces into a 3D chimney box (sloped to match the roof angle).
- Crochet a fitted Terracotta sheath with a 3-row White sc snow rim around the top lip; slip over the canvas chimney and sew securely onto the fixed roof slope.
- Hot-glue a stack of 2 cm and 1 cm white craft pom-poms inside the chimney opening to create billowing clouds of hearth smoke!
- Interior LED Fairy Lights: Glue a small felt battery box pocket inside the cottage roof beneath the chimney. String the warm LED micro lights around the interior perimeter, securing with felt tabs so golden light spills out through all five windows!
Confectionery Master Pattern: Complete Holiday Candy Collection
1. Double-Helix Spiral Candy Canes (2.0 mm Hook)
- With White: 7 sc in MR [7]. All following rounds worked in BLO:
- White Track: 1 sl st, 1 sc, 5 hdc in BLO; pull up tall loop and remove hook.
- Red Track: Join Red into free back loops; 1 sl st, sc in BLO around to White round end; drop loop.
- Continuous Spiral: Alternate White hdc in BLO and Red sc in BLO until tube reaches 10–12 cm long!
- Insert a chenille pipe cleaner inside the core, stitch end closed, and bend into a classic curved candy cane. Make several in Red/White and Green/White!
- Doorway Arch: Crochet an extra-long candy cane tube, bend into a rectangular U-frame, steam flat, and glue framing the front door!
2. Two-Color Swirl Mint Pinwheels & Lollipops
- Swirl Mints: With White, ch 5. Join Red into 1st ch; work into that same 1st ch, alternating *(1 White dc, 1 Red dc)* around until you have 8 White and 8 Red sts [16 dc]. Sl st, fasten off.
- Swirl Lollipops: Work Round 1 as for Swirl Mint. Rnd 2: Work *(2 White dc in White st, 2 Colored dc in Colored st)* around [32 dc]. Fasten off color; with White, chain 12 and work 11 sc down chain to form the lollipop stick!
- Sweetheart Candies: Into MR: 1 sc, 1 hdc, 6 dc, ch 2, 6 dc, 1 hdc, 1 sc. Cinch ring tightly closed!
- Door Wreath: Twist 2 green pipe cleaners into a ring, wrap with red ribbon, tie a bow with 2 brass jingle bells, and mount onto the red front door.
Holiday Staging & Heirloom Showcase

Because this cottage is constructed with rigid plastic canvas and corner dowels, it can be styled as a showstopping holiday centerpiece in diverse settings:
- Fireside Mantelpiece: Place the illuminated cottage at the center of your fireplace mantel, framed by evergreen boughs, frosted pinecones, and pillar candles.
- Holiday Table Runner Centerpiece: Flank the house with our Christmas Hot Cocoa Mug and scattered crochet peppermint candies for an edible-free gingerbread landscape.
- Interactive Keepsake Box: Use the lifting roof to hide small holiday gifts, chocolate coins, or handwritten Christmas notes for family members to discover on Christmas morning!
Frequently Asked Questions
Can I substitute cardboard for the plastic canvas?
Yes! Heavy brown cardboard from shipping boxes works exceptionally well. Simply cut the cardboard using our blueprint measurements. You can omit the felt lining if using clean kraft cardboard.
Are the LED fairy lights safe inside the crochet house?
Yes, provided you use battery-operated cool-touch LED micro lights (copper wire fairy lights). Never use traditional incandescent holiday bulbs that generate heat.
How do I store the gingerbread house after the holidays?
Because of its sturdy box construction, you can store the house inside a standard medium cardboard tote bin. Pack crumpled acid-free tissue paper inside and around the walls to protect the roof shell tiles and chimney smoke.
Save & Pin This 3D Gingerbread Cottage
Dreaming of a handmade holiday village? Save these pins to your Holiday & Christmas Crochet boards so you have the complete architectural pattern ready whenever you begin building!

