

Straight from the busy heart of Santa’s toy workshop arrives the most whimsical holiday pair of the season: the Christmas Elf Boy and Mini Reindeer Duo. Standing an impressive 25 cm (10 inches) tall, this lovable amigurumi elf boy is dressed in classic North Pole style—featuring candy cane striped red-and-white stockings, sturdy brown boots with red buttoned side straps, a flared pine-green tunic trimmed with a scalloped red collar and chest buttons, a buckled waistbelt, pointed ears, layered bangs, and a tall pointed hat with three sculpted creased folds. Tucked under his arm or standing by his side is his sweet 10 cm (4 inch) pet reindeer companion, complete with branched antlers, a snug red winter scarf, and knotted cord hooves!
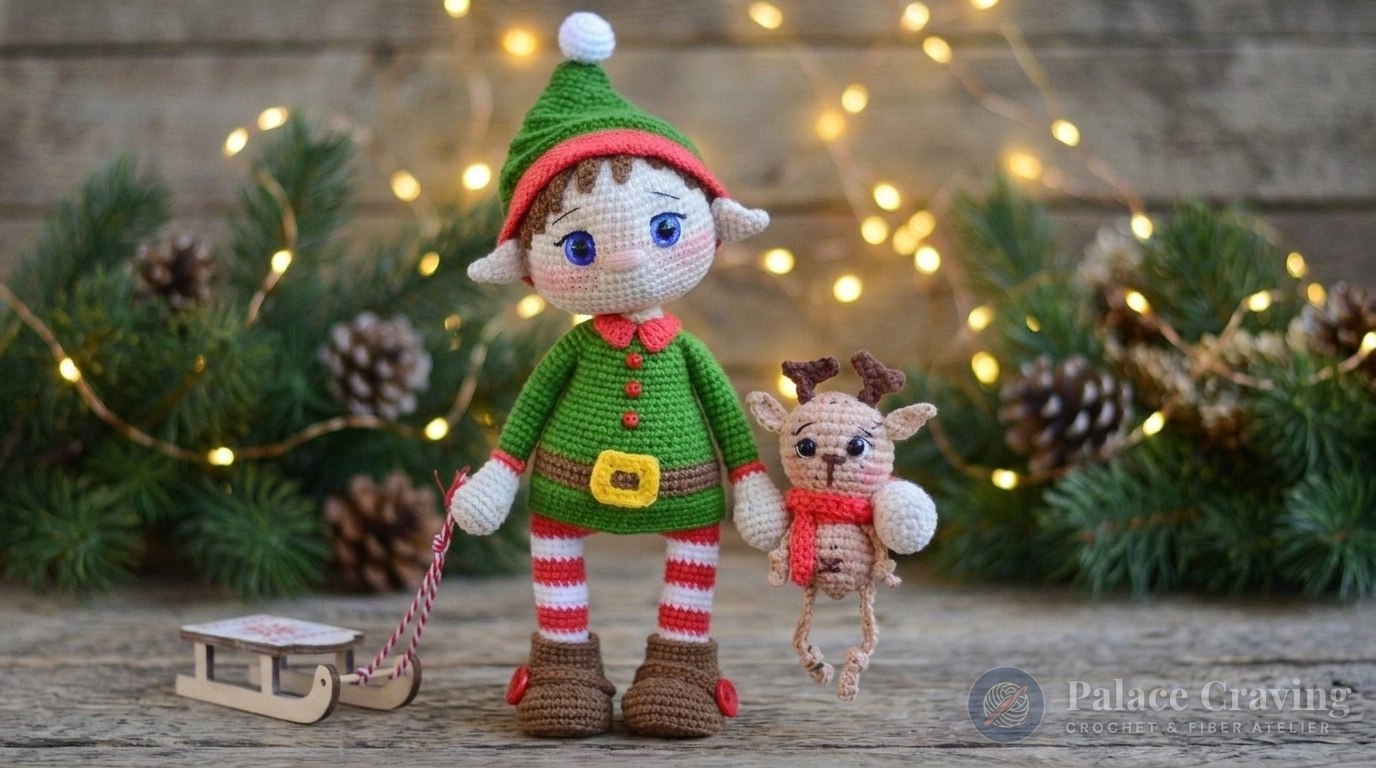
Unlike limp amigurumi toys that require props or stands, this elf doll is built on a solid foundation of flat-bottomed reinforced boot soles and dense bottom-up leg construction. Pair this enchanting character duo with our grand 3D Christmas Gingerbread House, our festive Christmas Hot Cocoa Mug and Gingerbread Man, or our venerable Classic Standing Santa Claus Amigurumi Doll to complete your handmade holiday storytelling vignette.
Why You’ll Love Crocheting This Elf & Reindeer Set
- Complete 2-in-1 Character Duo: You get complete instructions for both the full-sized standing Elf Boy doll and his miniature pocket-sized reindeer companion.
- Architectural Sculpted Hat Creases: The tall pointed elf hat uses an ingenious technique of grabbing unused front/back loops across rows to lock in three realistic, permanent horizontal folds without wire!
- Sturdy Free-Standing Boots: Wide oval soles reinforced with internal plastic inserts and detailed with working side straps and red buttons allow the elf to stand firmly on shelves and mantels.
- Flared Peplum Tunic & Scalloped Collar: Worked directly into the front loops of the waist, creating a crisp flared hemline complemented by a dramatic treble-crochet scalloped collar and gold buckle.
- Pocket-Sized Reindeer Toy: A charming one-piece head-and-body construction accented with branched brown antlers, knotted cord limbs, and an embroidered “X” belly button.
Character Anatomy & Finished Measurements Guide
| Character / Item | Crochet Technique | Key Attire & Notions | Finished Height |
|---|---|---|---|
| Christmas Elf Boy | Bottom-up joined legs, sc body & sculpted head | Green tunic, striped socks, boots, button straps | ~25 cm (10.0 in) tall |
| Mini Reindeer Friend | Top-down continuous head/body, cord limbs | Sand tan fur, branched antlers, red winter scarf | ~10 cm (4.0 in) tall |
| Sculpted Creased Hat | Round increases with 3 loop-pickup folds | Red rim, green body, white pom-pom | ~15 cm (6.0 in) slouch |
| Sturdy Brown Boots | Oval ch-10 base, plastic insole, strap & button | Chestnut brown, 15 mm red button, turn-up cuff | ~4.5 cm wide flat sole |
Materials, Color Palette & Studio Notions

- Yarn Requirements: Sport/Fine 4-ply cotton or cotton-acrylic blend (approx. 160m / 175 yds per 50g skein):
- Pine Needle Green: ~40g (Elf tunic, hat body, and sleeve cuffs)
- Holiday Cherry Red: ~40g (Striped stockings, hat brim, collar, and reindeer scarf)
- Crisp Snow White: ~30g (Striped stockings and fluffy hat pom-pom)
- Soft Skin Beige: ~35g (Elf head, pointed ears, hands, and neck)
- Chestnut Brown: ~30g (Boots, layered bangs fringe, waistbelt, and antlers)
- Sand Tan: ~25g (Mini reindeer head, body, ears, and limbs)
- Golden Yellow: ~5g (Square waistbelt buckle)
- Crochet Hooks: 2.25 mm hook (main elf doll, boots, and hat) and 2.0 mm hook (mini reindeer and fine notions).
- Eyes & Buttons: One pair of 12 mm black safety eyes (Elf Boy), one pair of 6 mm safety eyes (Mini Reindeer), 2× 15 mm red buttons (boot straps), and 3× 6 mm red buttons (chest tunic).
- Notions & Tools: Stiff plastic sheet (cut from plastic food containers for boot soles), chenille craft pipe cleaner (optional arm wire), thin black embroidery floss, tapestry needle, stitch markers, and soft pink dry pastel chalk for rosy cheeks and freckles.
Studio Pro-Tips for Heirloom Doll Crafting
To achieve a professional boutique finish and ensure your elf boy stands proudly without tipping, follow these artisan techniques:
- Rigid Plastic Boot Insoles: Trace the oval shape of Round 4 of the boot sole onto flexible plastic lids and slip them inside before stuffing. Pack fiberfill firmly above the plastic to create a weighted, non-tipping base.
- The Secret to Hat Creases: The three dramatic slouchy folds in the elf hat are crocheted directly into the rounds! When working Rounds 12, 18, and 23, picking up the unworked loops from 5 rounds below locks in a permanent accordion fold that will never droop or lose its shape.
- Facial Sculpting Depth: After stuffing the head firmly, use strong thread to cinch between the safety eye sockets and the base of the neck. This creates gentle indentations that give the elf an expressive, animated storybook expression.
Curated and verified in the Palace Craving amigurumi atelier.
Gauge & Head Tension Swatch
Because these holiday dolls feature tailored clothing that must fit snugly over the body, tension control is essential. Using a 2.25 mm hook in Soft Skin Beige:
- Rnd 1: 6 sc in MR [6].
- Rnd 2: 6 inc [12].
- Rnd 3: *(1 sc, inc)* rep 6 times [18].
- Rnd 4: *(2 sc, inc)* rep 6 times [24].
- Rnds 5–6: 24 sc around (2 rounds) [24].
Your finished circular cup swatch should measure 3.2 cm (1.25 inches) in diameter. If larger than 3.5 cm, size down to a 2.0 mm hook to maintain tight stitches that prevent white fiberfill from showing through.
Step-by-Step Master Pattern: Elf Head, Bangs & Pointed Ears
1. Sculpted Head (Soft Skin Beige)
Worked top-down in continuous spirals with a 2.25 mm hook:
- Rnds 1–7: Start with 6 sc in MR, increasing by 6 sts every round up to 42 sc [42].
- Rnds 8–13: Continue increases on alternate rounds up to 60 sc [60]. (If using push-in safety eyes, insert 12 mm eyes between Rnds 14 and 15, spaced 10 stitches apart).
- Rnds 14–18: Increase to 66 sc, then work 4 rounds even [66].
- Rnds 19–24: Decrease by 6 sts each round down to 36 sc. Stuff head firmly, sculpting the plump lower cheeks with extra fiberfill.
- Rnds 25–29: Decrease down to 6 sc, cinch opening closed, and fasten off.
2. Layered Fringe Bangs (Chestnut Brown)
Worked continuously in chained strands from forehead center:
- Work 8 hair locks along foundation:
(ch 9, 8 sc),(ch 7, 6 sc),(ch 4, 3 sc),(ch 6, 5 sc),(ch 7, 6 sc),(ch 8, 7 sc),(ch 9, 8 sc),(ch 9, 8 sc). - Steam lightly and sew across the forehead on Rounds 2–3 of the head, sweeping the locks softly across the brow.
3. Pointed Elf Ears (Make 2 in Skin Beige)
- R1: 6 sc in MR [6] • R2: 6 sc [6] • R3: *(1 sc, inc)*×3 [9] • R4: 9 sc [9].
- R5: 1 inc, 8 sc [10] • R6: 1 inc, 9 sc [11] • R7: 2 dec, 7 sc [9]. Fasten off, leaving a tail.
- Pinch base and stitch to Rounds 14–16 on both sides of the head.
- Facial Details: Embroider white lower eye arcs, thin black upper lash lines, neat eyebrows 2 sts above eyes, and a 5-pass beige nose. Dust cheeks with soft pink blush and add delicate freckles with a fine brown pen!
Step-by-Step Master Pattern: Sculpted-Fold Elf Hat & Arms
1. Pointed Elf Hat with 3 Built-In Creases
- Rnds 1–5: With Holiday Red: ch 60, join in a ring; work 4 rounds of 60 sc [60].
- Rnds 6–11: Switch to Pine Green:
BLO 60 sc; work 3 rnds even; R10: 20 sc,20 sc in FLO, 20 sc [60]; R11: 60 sc [60]. - Rnd 12 (Crease Fold 1): 20 sc, then work 20 sc grabbing the unused back loops of Round 7 simultaneously (creates the 1st permanent horizontal accordion crease!), 20 sc [60].
- Rnds 13–17: Decrease to 48 sc; R16: 16 sc,
16 sc in FLO, 16 sc [48]; R17: 48 sc. - Rnd 18 (Crease Fold 2): 16 sc, 16 sc grabbing unused back loops of Rnd 13 simultaneously, 16 sc [48].
- Rnds 19–22: Decrease to 36 sc; R21: 12 sc,
12 sc in FLO, 12 sc [36]; R22: 36 sc. - Rnd 23 (Crease Fold 3): 12 sc, 12 sc grabbing unused back loops of Rnd 18 simultaneously, 12 sc [36].
- Rnds 24–35: Taper tip by decreasing down to 6 sc, cinch closed, and attach a 2.5 cm crochet white pom-pom. Tack hat tilted stylishly onto head!
2. Arms & Cuffed Mittens with Bobble Thumbs (Make 2)
- With Skin Beige: R1: 6 sc in MR [6] • R2: 6 inc [12] • R3: *(1 sc, inc)*×6 [18] • Rnds 4–5: 18 sc [18].
- R6: *(4 sc, dec)*×3 [15] • R7: 1 Bobble (3-hdc cluster thumb), 14 sc [15] • R8: 15 sc [15].
- R9: *(3 sc, dec)*×3 [12] • R10: 12 sc [12]. Switch to Holiday Red: R11: 12 sc. Switch to Pine Green: R12:
BLO 12 sc. - Rnds 13–27 (15 rnds): 12 sc around in Pine Green [12]. Stuff lower hand only or insert chenille wire.
- Cuff Trim: Join Red into Rnd 12 FLO and work 12 sl st around the cuff seam!
Sturdy Buttoned Boots & Striped Stocking Legs

1. Sturdy Brown Boots (Make 2)
- With Chestnut Brown: R1: ch 10; from 2nd ch: inc, 7 sc, 3 sc in last ch; opposite side: 7 sc, inc [21].
- R2: inc, 8 sc, 3 inc, 7 sc, 2 inc [27] • R3: 1 sc, inc, 8 sc, *(1 sc, inc)*×3, 7 sc, *(1 sc, inc)*×2 [33].
- R4: 2 sc, inc, 8 sc, *(2 sc, inc)*×3, 7 sc, *(2 sc, inc)*×2 [39] • R5: 13 sc, *(2 hdc, inc)*×3, 17 sc [42].
- Rnds 6–9 (4 rnds): 42 sc around [42].
- R10: 11 sc, *(dec, 2 sc)*×5, 11 sc [37] • R11: 11 sc, *(dec, 1 sc)*×5, 11 sc [32]. (Insert stiff plastic insole & stuff boot toe firmly).
- R12: 10 sc, 6 dec, 10 sc [26] • R13: dec,
24 sc in BLO[25].
2. Striped Candy Cane Legs
- Switch to Holiday Red: R14: *(3 sc, dec)*×5 [20] • R15: *(2 sc, dec)*×5 [15] • R16: 15 sc [15].
- Attach Snow White: Rnds 17–19: 15 sc (3 rnds in White).
- Alternate 3 rounds Red / 3 rounds White for Rnds 20–31 (total 12 rounds) [15 sts].
- Fasten off 1st leg. Do not cut yarn on 2nd leg!
- Boot Cuffs & Side Straps: Join Chestnut Brown to Rnd 13 FLO; work 5 rounds of 26 sc to form turn-up boot cuff. For strap: ch 23, work 15 sc leaving buttonhole loop; sew to outer boot with a 15 mm red button!
Torso, Flared Tunic, Scalloped Collar & Belt
- Joining Legs (Bottom-Up): On Leg 2, chain 9 and join to Leg 1 with slip stitch. In Red: work 15 sc on Leg 1, 9 sc across chain, 15 sc on Leg 2, 9 sc on opposite side of chain [48 sts].
- R2: 9 sc, *(inc, 3 sc)*×6 (front belly shape), 15 sc [54] • R3: 54 sc [54].
- Work striped under-tunic: Rnds 4–6 in White [54], R7 in Red [54], R8 in Green [54].
- Belt Base: Switch to Brown: R9:
BLO 54 sc[54] • Rnds 10–11: 54 sc. Switch to Green: R12: 54 sc. - Rnds 13–23: Shape chest with gradual decreases to 36 sc [36].
- Join Arms (Rnds 24–25): Crochet 6 sc through inner side of Arm 1 & body together, 14 sc across chest, 6 sc through inner side of Arm 2 & body together [36 sts]. Next round: work around outer arm stitches [40 sts].
- Rnds 26–30: Decrease to 20 sc. Switch to Beige: R31:
BLO 20 sc• Rnds 32–33: 20 sc. Stuff neck firmly and sew head onto body! - Flared Peplum Tunic: Attach Green to Rnd 9 FLO: work 4 rounds of 54 sc, then R5: *(8 sc, inc)*×6 [60]. Fasten off!
- Scalloped Red Collar: Attach Red to Rnd 31 FLO:
(ch 3, 2 tr) in 1st st, tr, 2 dc, 2 hdc, 8 sc, 2 hdc, 2 dc, tr, (2 tr, ch 3, sl st). Tack down and sew three 6 mm red buttons down center chest. - Gold Buckle: In Yellow, chain 16, work 3 sc in corners to form square; sew over brown belt at center front.
Pocket-Sized Mini Reindeer Companion Master Pattern
1. Reindeer Head & Body (Sand Tan)
Worked continuously from head down to base using a 2.0 mm hook:
- R1: 6 sc in MR [6] • R2: 6 inc [12] • R3: *(1 sc, inc)*×6 [18] • R4: *(2 sc, inc)*×6 [24] • R5: *(3 sc, inc)*×6 [30].
- Rnds 6–8 (3 rnds): 30 sc around [30].
- R9: *(3 sc, dec)*×6 [24] • R10: 24 sc • R11: *(2 sc, dec)*×6 [18] • R12: 18 sc • R13: *(1 sc, dec)*×6 [12] • R14: 12 sc. Stuff head firmly.
- Body Continuation: R15: *(1 sc, inc)*×6 [18] • R16: *(8 sc, inc)*×2 [20] • Rnds 17–20 (4 rnds): 20 sc [20].
- R21: *(2 sc, dec)*×5 [15] • R22: *(1 sc, dec)*×5 [10]. Stuff tummy firmly. R23: 5 dec to close [5].
2. Branched Antlers, Cord Limbs & Red Scarf
- Branched Antlers (Make 2 in Chestnut Brown): Attach yarn to Rounds 3–4 of head: ch 6, 3 sc down chain, ch 3, 2 sc down branch, then 2 sc down remaining main chain, sl st to head and fasten off!
- Ears (Make 2 in Sand Tan): Attach to Round 6: ch 6; work sl st, sc, hdc, 2 dc, sl st. Fasten off.
- Knotted Cord Limbs:
- Arms (×2): Chain 13, work 12 sc down chain, tie a tight knot near the paw tip, and sew to neck sides.
- Legs (×2): Chain 17, work 16 sc down chain, tie a knot near hoof tip, and sew to base.
- Face & Scarf: Install 6 mm eyes on Rounds 7–8. Embroider brown nose, white eye shines, and a tiny brown “X” belly button on Round 19. Crochet a simple red scarf (ch 55, 54 sc) and wrap around neck!
Holiday Staging & Mantel Displays

Because the Elf Boy features rigid plastic boot soles, he stands upright effortlessly on diverse surfaces:
- Storybook Mantel Display: Place the duo beside a lantern or pillar candles framed by cedar boughs and cinnamon sticks.
- Tree Skirt Vignette: Stand them at the foot of your Christmas tree as Santa’s official toy testers on Christmas morning.
- Beloved Generational Gift: Packaged together in a keepsake box with red tissue paper, this boy elf and his pet reindeer make a treasured handmade heirloom for children and amigurumi collectors alike.
Frequently Asked Questions
How does the elf doll stay standing upright?
The secret is the combination of the wide ch-10 boot foundation, stiff plastic sole cutouts inserted inside the boots, and dense fiberfill packing in the feet and lower legs.
Are the safety eyes safe for small children?
For toys intended for toddlers under 3 years old, we recommend embroidering French knot eyes with black cotton floss rather than using plastic safety washers.
Can I pose the elf’s arms?
Yes! Simply insert a 15 cm piece of chenille craft pipe cleaner into each arm before sewing to the shoulders, folding the wire tips into smooth loops.
Save & Pin This Festive Elf & Reindeer Duo
Planning your holiday handmade gift list? Save these pins to your Holiday & Christmas Crochet boards so you have the complete free tutorial whenever you’re ready to crochet!

