

When crafting handmade Christmas decor that commands attention on a holiday mantelpiece, sideboard, or dining centerpiece, nothing rivals the architectural presence of freestanding 3D fir trees. This free crochet Christmas tree duo pattern creates a pair of charming 8½-inch tabletop trees featuring rich forest and mistletoe green textures, draped crochet chain garlands, festive red sewing button ornaments, and rustic wooden spool trunk stands. With their crisp three-sided pyramid geometry and stable base, they bring instant Scandinavian farmhouse holiday warmth to any room.
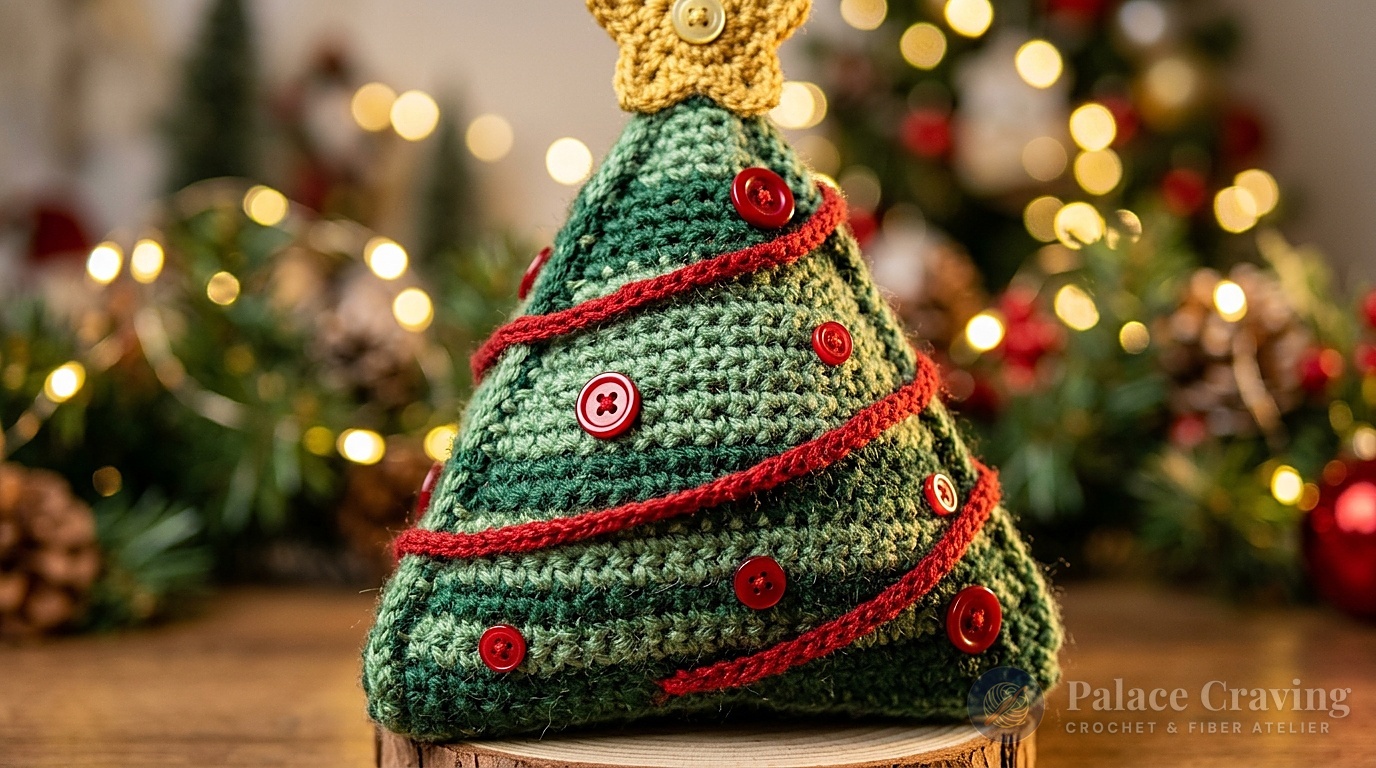
Unlike flat or floppy tree appliques that require cardboard backing or hanging support, these freestanding tabletop trees achieve remarkable rigidity through clever structural engineering. By seaming three triangular wedge panels onto a flat triangular base plate and inserting an internal wooden dowel anchored into a vintage thread spool, each tree stands upright with architectural stability. Create a cohesive holiday vignette by styling your tree duo alongside our sweet Crochet Gingerbread House Ornaments, our viral Velvet Crochet Christmas Bows, or our twirling Crochet Spiral Wreaths.
Why You’ll Love Making This Tabletop Tree Duo
- True Freestanding 3D Architecture: The 3-sided pyramid construction and weighted wooden spool base ensure your trees remain perfectly upright throughout the entire holiday season.
- Two Distinct Holiday Styles: Pattern includes full instructions for Tree 1 (curved festive garlands, scattered button ornaments, and a 5-point star topper) and Tree 2 (geometric branching lines and a sunburst circle topper).
- Zero Complex Specialty Stitches: Built using basic single crochet stitches, chain stitches, and simple edge increases that even confident beginners can master with ease.
- Stash-Friendly Palette: Uses standard worsted weight yarn in rich holiday tones—Forest Green, Mistletoe Light Green, and Cherry Red.
- Endless Heirloom Charm: Replace plastic factory decor with enduring, tactile handmade holiday heirlooms that family members will treasure for decades.
Structural Dimensions & Anatomy Breakdown
Each completed Christmas tree stands approximately 8½ inches (21.5 cm) tall with a base diameter of 5½ inches (14 cm). Here is how the structural components are organized:
Key Materials & Studio Swaps

- Medium Worsted (#4) Acrylic Yarn: 1 skein each of Forest Green Tones (Color A), Mistletoe Light Green (Color B), and Cherry Red (Color C). (For yarn weight rules, consult our Crochet Yarn Weight & Hook Size Guide).
- Size U.S. H-8 (5.0 mm) Crochet Hook: A smooth ergonomic 5.0mm hook ensures firm stitch tension while keeping hand fatigue minimal during repetitive single crochet rows. (Review our masterclass on Hook Grips & Tension Control).
- Wooden Thread Spools & Dowels: Two standard wooden thread spools and two ⅛-inch x 7½-inch wooden dowels (or clean wooden chopsticks) to form the internal trunks and weighted stands.
- Assorted Red Buttons: 21 to 24 small red buttons (7/16-inch) and two ¾-inch buttons for Tree 1; 18 medium buttons (9/16-inch) and two ¾-inch buttons for Tree 2.
- Yarn Needle, Sewing Needle & Red Thread: For sewing embellishments and seaming panels.
- Craft Glue & Polyester Fiberfill: Quick-drying tacky glue to secure the spool trunk, and a handful of fiberfill to lightly stuff the pyramid.
Gauge & Structural Tension
Gauge: 16 single crochet (sc) = 4 inches (10 cm); 16 rows of sc = 4 inches (10 cm).
Because these trees need to hold crisp planar surfaces without sagging under the weight of button ornaments, maintaining a firm, uniform gauge is critical. If your fabric feels loose or stretchy, drop down a hook size to a 4.5mm (US 7) hook. Dense stitches produce sharp pyramid ridges that look tailored and professional.
Step-by-Step Crochet Instructions
Phase 1: Stitching Tree Sides (Make 3 per Tree)
Each tree requires three identical triangular panels. With Forest Green (Color A), chain 2.
Row 1: Work 3 sc in the 2nd chain from hook. Turn. (3 sc)
Row 2: Ch 1. Work 1 sc in each st across. Turn. (3 sc)
Row 3: Ch 1. Work 2 sc in first st, 1 sc in next st, and 2 sc in last st. Turn. (5 sc)
Rows 4 to 6: Ch 1. Work 1 sc in each st across. Turn. (5 sc per row)
Row 7 (Increase Row): Ch 1. Work 2 sc in first st, 1 sc in each st across to last st, 2 sc in last st. Turn. (7 sc)
Rows 8 to 27: Repeat Rows 4 to 7 five more times (expanding by 2 stitches every 4th row). (17 sc at Row 27)
Rows 28 to 32: Ch 1. Work 1 sc in each st across. Turn. Fasten off at end of Row 32, leaving a long sewing tail. (17 sc)
Phase 2: Crocheting the Triangular Bottom Base (Make 1)
The base is worked identically to the sides using Color A, following Rows 1 through 32 exactly. Fasten off and leave a sewing tail.

Phase 3: Crafting Embellishments & Tree Toppers
For Tree 1 (Festive Garlands & Star Topper):
- 5-Point Star Topper (Make 2): With Cherry Red (Color C), ch 2. Round 1: Work 5 sc in 2nd ch from hook; join with sl st to first sc (5 sc). Round 2: Ch 1, sc in first sc, *[ch 5, sc in 2nd ch from hook, hdc in next ch, dc in next 2 ch, skip next sc in Round 1]*, sc in next sc; repeat from * around to form 5 points. Fasten off. Sew the two star pieces back-to-back, sew a ¾-inch red button to each side, and attach to the tree peak!
- Garland Swags: With Mistletoe Light Green (Color B), crochet 4 foundation chains in graduated lengths to wrap horizontally around the tree. Sew garlands across the sides 1½ inches apart, and sew 7/16-inch red buttons between the swags.
For Tree 2 (Geometric Branching & Sunburst Topper):
- Sunburst Circle Topper (Make 2): With Color B, ch 2. Round 1: 6 sc in 2nd ch from hook; join. Round 2: Ch 3 (counts as dc), dc in first sc, 2 dc in each sc around; join (12 dc). Sew the two circles together with a ¾-inch button on each side, and sew to the tree peak.
- Trunk Stem & Branches: With Cherry Red (Color C), crochet three 33-chain center stems and nine branch chains (three each of ch 15, ch 19, and ch 23). Sew one stem down the center of each tree side, attach the branches horizontally in a triangular chevron layout, and sew a 9/16-inch red button at each branch tip!
Phase 4: 3D Pyramid Assembly & Wooden Trunk Stand
- Seam the Sides: Using your tapestry needle and Color A yarn, seam the three triangular side panels together along their vertical edges from base to peak. This forms a hollow 3-sided pyramid cone.
- Attach the Base: Sew two edges of the triangular bottom base to the corresponding bottom edges of the pyramid. Leave the third edge open for stuffing and trunk insertion.
- Assemble Wooden Trunk: Apply a dab of tacky craft glue to one end of a 7½-inch wooden dowel and insert it into the center hole of your wooden thread spool. Apply glue to the top lip of the spool.
- Insert Trunk & Stuff: Lightly pack polyester fiberfill into the peak and interior of the tree. Insert the wooden dowel through the open bottom edge, pushing it up into the tree’s center axis until the wooden spool rests flush against the bottom base.
- Seal the Base: Neatly whip-stitch the remaining third edge of the base closed around the trunk dowel, knot securely, and weave in all yarn ends. Your tree is now completely freestanding!
3 Chef Secrets for Flawless Tabletop Trees
1. Block Panels Before Seaming: Pin your flat triangular wedges to a blocking mat and mist lightly with warm water. Allowing them to dry completely ensures every side panel has identical dimensions, resulting in laser-straight pyramid edges.
2. Weighting the Spool Stand: If you live in a bustling household with pets or drafty windows, glue a small metal washer or small lead craft weight to the bottom of the wooden thread spool. The low center of gravity makes the tree virtually tip-proof!
3. Securing Button Shorter Stems: When sewing buttons onto crochet fabric, place a drop of fabric glue or clear nail polish on the back knot. This locks the thread loops permanently so buttons never droop or pull loose over time.
Holiday Mantelpiece & Tabletop Styling Ideas

Here are inspiring ways to display your completed crochet tree duo:
- The Nordic Fireplace Mantel: Stagger the two trees at slightly different heights on your mantel, surrounded by mini white ceramic houses, fresh cedar boughs, and warm copper fairy lights.
- Christmas Dining Centerpiece: Arrange the tree duo down the center of an oatmeal linen table runner, interspersed with small glass votive candles and our Spiral Wreath Ornaments as festive napkin rings.
- Holiday Desk or Bookshelf Vignette: Because these trees have a modest 5½-inch footprint, they make delightful holiday cheer additions to home office desks, coffee bars, and kitchen floating shelves.
Frequently Asked Questions
Can I make these trees without wooden dowels or spools?
Yes! You can simply stuff the pyramid firmly with polyester fiberfill and add a small bag of dried beans or craft plastic pellets in the bottom base to give the tree freestanding weight.
How can I adjust the height of the trees?
To make a taller tree, continue the 4-row repeat sequence (Rows 4 to 7) for an additional 4 to 8 rows before working the final straight rows. Be sure to expand your triangular base panel to match the wider base width!
Can I use twinkle fairy lights inside the tree?
Yes! Insert a small battery-operated micro-LED wire light strand into the hollow pyramid before sealing the base. Leave the tiny battery pack accessible at the bottom edge for an enchanting illuminated Christmas glow!
Pin This Free Holiday Pattern
Love this Scandinavian holiday decor project? Save this free 3D crochet Christmas tree duo tutorial to your Christmas Crochet, DIY Holiday Decor, and Farmhouse Christmas boards on Pinterest!

