

There is an unmistakable, nostalgic warmth that fills a winter home when the sweet scents of cinnamon, ginger, and cloves drift from the holiday kitchen. This free crochet gingerbread house ornament captures that timeless sweet-shop magic in plush, everlasting yarn stitches. Featuring warm cookie-brown walls, scalloped snowy white royal icing along the roof eaves, delicately embroidered windowpanes, and a cheerful cherry-red heart above the arched door, this 5-inch cottage brings heartwarming holiday nostalgia straight to your Christmas tree branches.
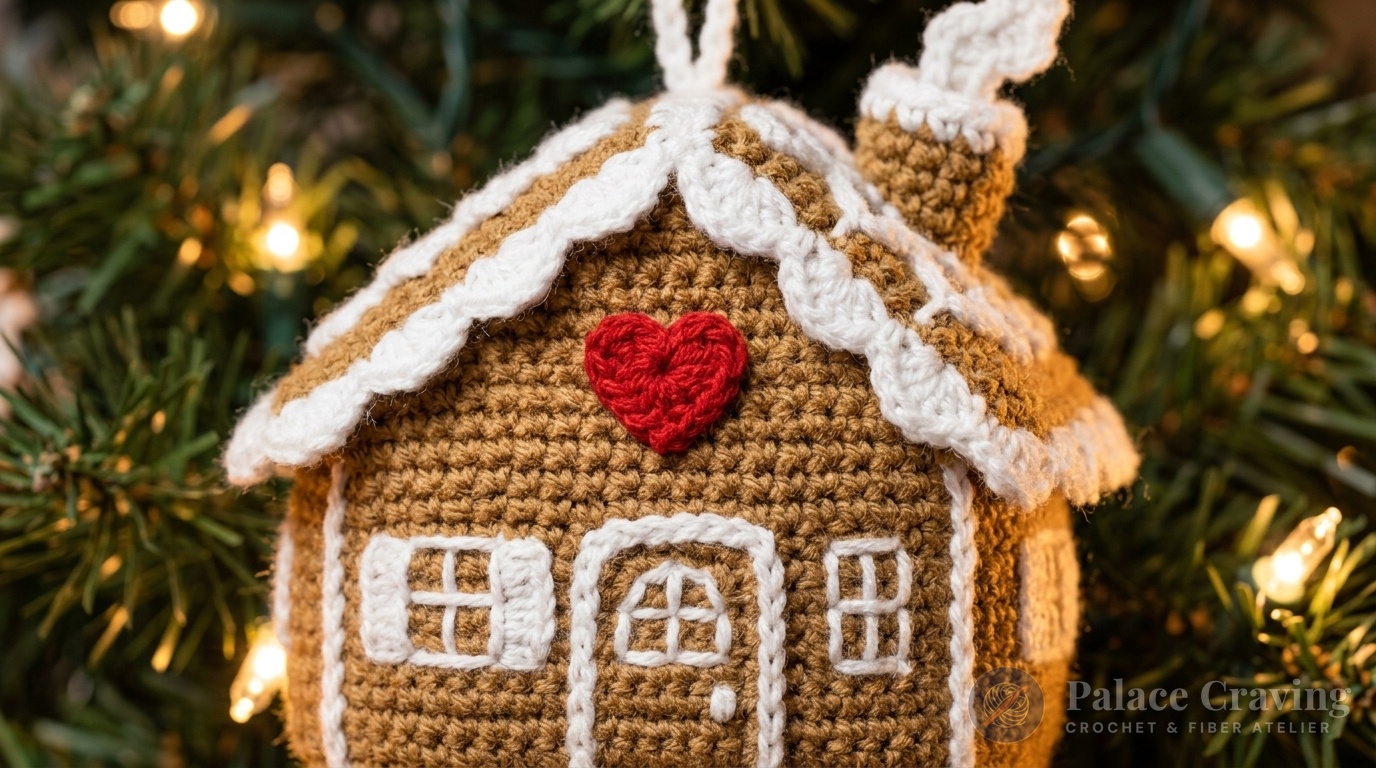
Unlike fragile clay or baked cookie ornaments that chip and deteriorate over time, crocheted gingerbread keepsakes are practically indestructible, making them cherished family heirlooms that look fresh year after year. Designed with an easy two-panel construction, you stitch the front and back cottage walls flat in single crochet, shape the peaked gable roof with gentle decreases, embroider your confectionary details, and lightly stuff the interior with fiberfill before joining the panels. Pair this darling cottage with our viral Velvet Crochet Christmas Bows or our twirling Crochet Spiral Wreath Ornaments for a cohesive, storybook handmade Christmas tree display.
Why You’ll Love Crocheting This Gingerbread Cottage
- Authentic Sweet-Shop Nostalgia: Combines warm golden-brown cookie yarn with snowy white piped icing details that look good enough to eat.
- Quick Weekend Make: Each gingerbread house panel works up in under 30 minutes, allowing you to finish a complete stuffed house in just over an hour.
- Lightly Stuffed 3D Silhouette: The double-layer construction with a gentle pinch of polyfill provides pillowy dimension without becoming heavy or sagging tree branches.
- Zero Complex Shaping: Built using basic single crochet, foundation chains, and simple two-together decreases (sc2tog).
- Endless Customization: Add mini crochet peppermint candies, button gumdrops, or French knot sugar pearls across the roofline to make each house unique!
Finished Dimensions & Architecture Overview
Measuring approximately 5 inches (12.5 cm) tall by 3½ inches (9 cm) wide, this ornament is the ideal scale for standard Christmas trees, holiday garlands, or festive package tie-ons. Here is the architectural breakdown of the cottage components:
Key Materials & Studio Swaps

- Medium Worsted (#4) Acrylic or Cotton Yarn: 1 skein each of Warm Cinnamon Brown (Color A), Soft White (Color B), and Cherry Red (Color C). You will need roughly 35 yards of brown, 15 yards of white, and small scraps of red. (Check our Crochet Yarn Weight & Hook Size Guide for yarn substitution rules).
- Size U.S. G-6 (4.0 mm) Crochet Hook: A smooth 4.0mm hook ensures tight, dense single crochet stitches that prevent the polyester fiberfill stuffing from peeking through. (Review our guide on Hook Grips & Tension Control).
- Polyester Fiberfill Stuffing: Just a small walnut-sized pinch is needed to give the cottage a soft, puffy pillow feel without over-stretching the stitches.
- Bent-Tip Tapestry Needle: For cleanly embroidering the windowpanes and joining the front and back panels together.
- Red Baker’s Twine or Metallic Cord: A 6-inch loop for hanging the completed ornament securely.
Gauge & Texture Tips
Gauge: 4 single crochet (sc) = 1 inch (2.5 cm); 4 rows of sc = 1 inch (2.5 cm).
Because this project is lightly stuffed with fiberfill, working with firm tension is vital. If your stitches appear loose or you notice small gaps when holding the fabric up to the light, drop down a half-hook size to a 3.75mm (US F-5) hook. A dense fabric creates clean, crisp architectural walls that stand up straight on your tree.
Step-by-Step Crochet Walkthrough
Phase 1: Crocheting the House Panels (Make 2)
Both the front and back panels are worked identically. With Warm Cinnamon Brown (Color A), chain 13.
Row 1: Work 1 sc in the 2nd chain from hook and in each chain across. Turn. (12 sc)
Rows 2 to 10: Ch 1. Work 1 sc in each sc across to end of row. Turn. (12 sc per row — this forms the rectangular lower cottage body)
Row 11 (Roof Gable Base): Ch 1. Work 1 sc in each sc across. Turn. (12 sc)
Row 12: Ch 1. Sc2tog across the first 2 sts, 1 sc in each of the next 8 sc, sc2tog across the last 2 sts. Turn. (10 sts)
Row 13: Ch 1. Work 1 sc in each st across. Turn. (10 sts)
Row 14: Ch 1. Sc2tog across first 2 sts, 1 sc in each of next 6 sts, sc2tog across last 2 sts. Turn. (8 sts)
Row 15: Ch 1. Sc2tog across first 2 sts, 1 sc in each of next 4 sts, sc2tog across last 2 sts. Turn. (6 sts)
Row 16: Ch 1. Sc2tog across first 2 sts, 1 sc in each of next 2 sts, sc2tog across last 2 sts. Turn. (4 sts)
Row 17 (Peak): Ch 1. [Sc2tog] twice. Turn. (2 sts)
Row 18: Ch 1. Sc2tog across remaining 2 sts. Fasten off. (1 st at the roof peak)
Panel Border: Join Color A with a slip stitch in any bottom corner. Ch 1, work single crochets evenly around the entire outer perimeter of the house, placing 3 sc in the roof peak and corner points for clean turns. Join with slip stitch to first sc and fasten off.
Phase 2: Embroidering Front Panel Details
Before joining the panels, embroider your festive details onto the front panel:
- Arched Front Door: Thread your tapestry needle with Soft White (Color B). Using straight backstitches, outline an arched doorway (roughly 5 stitches wide by 6 rows tall) centered at the bottom of the front panel. Add horizontal door lines or a tiny french-knot doorknob.
- Windowpanes: Embroider two 4-pane cross-hatch windows on either side of the door, using simple satin or back stitches.
- Festive Heart Accent: With Cherry Red (Color C) and your 4.0mm hook, make a magic ring: Ch 2, 2 dc, 2 hdc, ch 1, 1 dc (heart point), ch 1, 2 hdc, 2 dc, ch 2, sl st in ring. Pull ring tight. Sew this tiny red heart directly above the arched door!

Phase 3: Assembly & Scalloped Icing Trim
Hold the front and back panels together with right sides facing outward.
Joining: Join Warm Brown (Color A) through both thicknesses at a bottom corner. Work single crochets evenly around the sides and roof to seam the panels together. Stop when you reach the bottom edge!
Stuffing: Insert a gentle, flat pinch of polyester fiberfill into the cottage. Do not overstuff—you want the gingerbread house to look like a soft, puffed cookie, not a round ball. Continue working single crochets across the bottom edge to seal the opening, join with a slip stitch, and fasten off.
Scalloped Royal Icing Eaves: Join Soft White (Color B) at the lower-left roof eave. Work along the angled roofline: *[Slip stitch in next st, skip 1 st, 5 double crochet in next st, skip 1 st]* across the roof eaves to create fluffy, scalloped snow drifts dripping from the roof! Fasten off and weave in all yarn ends.
3 Chef Secrets for Bakery-Quality Gingerbread Makes
1. Steam-Iron the Panels Before Assembly: Because single crochet worked in back-and-forth rows can curl slightly at the corners, give both flat panels a quick shot of steam with a pressing cloth before embroidering. The walls will become flat, crisp, and effortless to seam.
2. Fluffy Polyfill Distribution: Before sealing the final corner, tease your fiberfill between your fingers so there are no dense clumps. Distribute it gently into the peaked roof peak using the eraser end of a pencil.
3. Cinnamon-Infused Yarn Hack: For a sensory Christmas experience that fills the room with festive fragrance, store your finished gingerbread ornaments in a sealed mason jar with two whole cinnamon sticks and a clove pod for 24 hours before hanging them on your tree!
Holiday Styling & Sweet Shop Inspiration

Here are delightful ways to incorporate these gingerbread cottages into your holiday home:
- The Gingerbread Bakery Tree: Pair multiple gingerbread houses with matching gingerbread men, candy cane spirals, and our Mini Crochet Snowmen to build an enchanting culinary theme tree.
- Mantelpiece Bunting: String 5 to 7 gingerbread cottages along a strand of jute twine interspersed with wooden cranberries and dried orange slices for a charming farmhouse fireplace garland.
- Heirloom Holiday Gift Tags: Tie a gingerbread cottage around a jar of homemade cookie mix or hot chocolate mix. The recipient enjoys a sweet gift and keeps the handmade ornament forever!
Frequently Asked Questions
Can I use 100% cotton yarn instead of acrylic?
Yes! Cotton yarn like classic dishcloth cotton gives the gingerbread house a rustic, sturdy matte finish that holds its shape remarkably well without any sagging. Acrylic gives a slightly softer, fluffier cookie look. Both work wonderfully with a 4.0mm hook.
How do I keep the roof peak sharp and defined?
When seaming around the peak, be sure to work 3 single crochet stitches into the exact top decrease stitch. This extra stitch eases the turn and prevents the gable peak from rounding out.
Can I make a whole gingerbread family to match?
Absolutely! You can use this same warm cinnamon yarn and white icing embroidery to create matching gingerbread men, gingerbread ladies with little crochet skirts, and mini gingerbread babies for a complete holiday family keepsake.
Pin This Free Holiday Pattern
Love this cozy sweet-shop holiday project? Save this free crochet gingerbread house ornament tutorial to your Christmas Crochet, DIY Tree Decor, and Holiday Crafting boards on Pinterest!

