

Few holiday crafts spark as much pure, heartwarming delight as a tiny amigurumi character peeking out from the boughs of a Christmas tree. With his round snowball cheeks, miniature turquoise winter beanie, and cheerful embroidered smile, this mini crochet snowman amigurumi captures the quintessential whimsy of cozy winter days. Designed as a quick weekend project, this free pattern works up rapidly in continuous single crochet spirals—yielding an irresistible 5-inch stuffed companion that doubles as a Christmas tree ornament, festive tabletop accent, or thoughtful stocking stuffer.
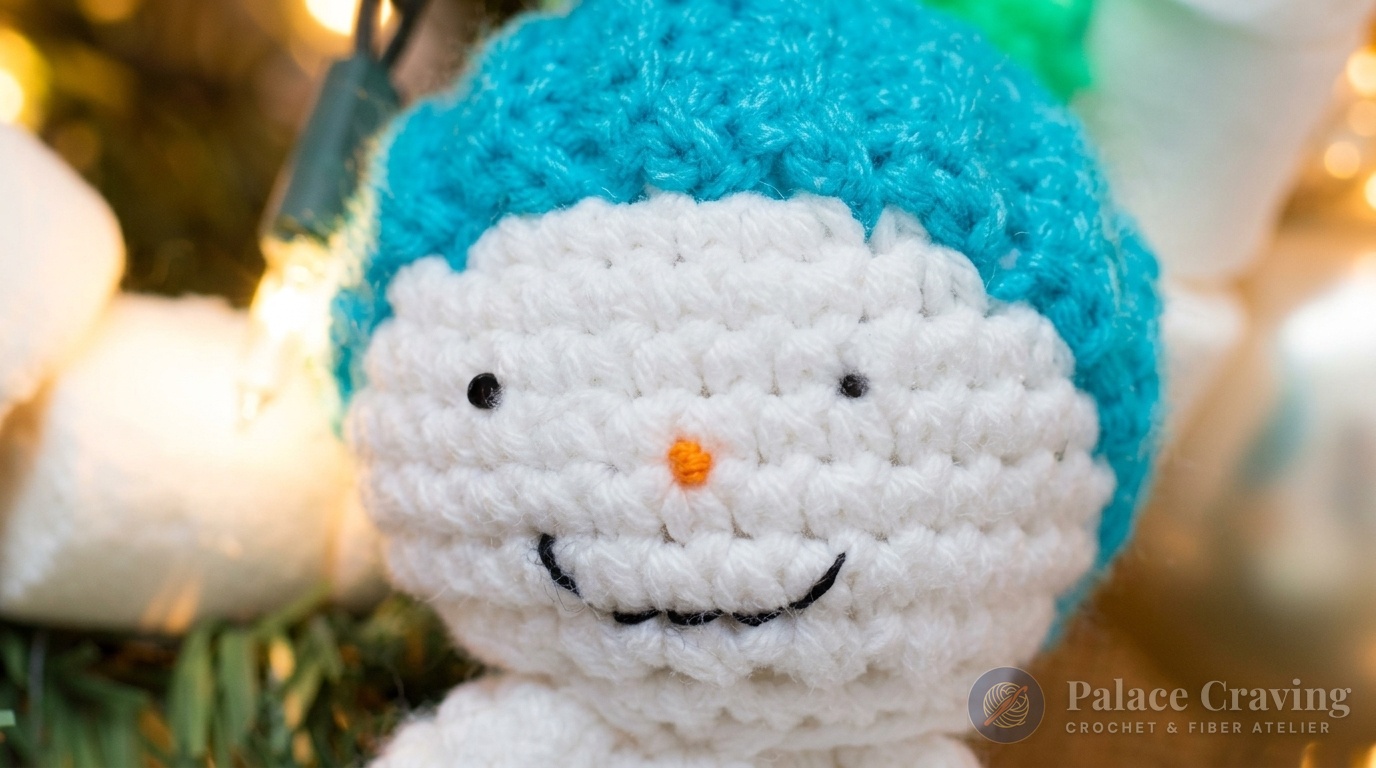
Amigurumi projects sometimes frustrate beginners when stuffing bulges through loose stitches or when tiny pieces require endless complicated sewing. In our atelier, we engineered this design with an intuitive continuous-flow construction: the round head and bulbous body are shaped with mathematically balanced increases and invisible decreases, eliminating telltale seam bumps entirely. The adorable ribbed beanie and side arms are stitched separately and joined with secure, clean tapestry stitches. Whether you loved our Mini Amigurumi Octopus or are decorating a tree with our Crochet Snowflake Ornaments, this little snowman will quickly become an annual handmade tradition.
Why You’ll Love Crocheting This Mini Snowman
- Quick Afternoon Make: Sized at an adorable 5 inches (12.5 cm) tall, you can complete the entire snowman, hat, and facial embroidery in just 1.5 to 2 hours.
- Seamless Spiral Shaping: Worked in continuous rounds without slip-stitch joins, producing a smooth, uniform snowball surface free of unsightly seam lines.
- Scrap-Buster Friendly: Requires less than 30 grams of white worsted yarn and small remnants of bright turquoise and festive lime green for the accessories.
- Removable or Attached Beanie: Stitch the back-loop ribbed beanie directly to the crown or leave it removable for playful interactive styling.
- Zero Complex Stitchwork: Built 100% on foundational single crochet stitches, standard single crochet 2 together (sc2tog) decreases, and simple chain ribs.
Amigurumi Anatomy & Round Progression Blueprint
Consistent stitch counts are the secret to smooth, gap-free spheres. Follow this precision round breakdown for the snowman’s head and body:
Key Materials & Studio Swaps

- Medium Worsted (#4) Yarn: Approx. 50 yds of Snow White for head and body; 20 yds of Turquoise Blue for beanie; 10 yds of Lime Green for pompom; small length of Orange for carrot nose. (Review our Crochet Yarn Weight & Hook Size Guide for weight substitutions).
- Size U.S. F-5 (3.75 mm) Crochet Hook: Sizing down from the standard 5.0mm hook is essential in amigurumi to create tight, dense fabric that conceals fiberfill stuffing completely. For tension mastery, see our guide on Hook Grips & Yarn Tension Control.
- Premium Polyester Fiberfill: High-loft stuffing that provides firm, round sculptural shape without clumping.
- Facial Details: Two 6mm black plastic safety eyes (or black embroidery floss for embroidered French knot eyes for infant safety) and black embroidery thread for the smile.
- Notions: Locking stitch markers (vital for tracking unjoined spiral rounds), sharp yarn darning needle, and scissors.
Tested Tools for Flawless Amigurumi
Amigurumi requires firm wrist tension and snag-free hooks. These tested studio essentials ensure effortless, tight stitches:
Clover Amour 3.75mm (US F-5) Hook
Ergonomic grip prevents hand cramp during high-tension, dense single crochet stitches.
Fairfield Poly-Fil Premium Fiberfill (16 oz)
Hypoallergenic 100% polyester fiber distributes smoothly without bunching or lumps.
Disclosure: Palace Craving atelier participates in select affiliate programs. When purchasing through our links, we may earn an editorial commission at zero additional cost to you.
Step-by-Step Stitch Walkthrough
Pattern Notation & Rules:
• Work in continuous spirals without joining rounds with slip stitches. Place a locking stitch marker in the first stitch of each round and move it up as you progress.
• Sc2tog (Invisible Decrease): Insert hook into front loop only of first st, insert hook into front loop only of second st, yo and pull through both front loops, yo and draw through remaining 2 loops on hook.
Phase 1: Sculpting the Snowman Head
Using your 3.75mm hook and Snow White yarn:
Round 1: Ch 2, 6 sc in 2nd ch from hook (or make a magic ring and work 6 sc into ring). Do not join. (6 sc).
Round 2: 2 sc in each sc around. (12 sc).
Round 3: *1 sc in next sc, 2 sc in next sc.* Repeat from * around. (18 sc).
Round 4: *1 sc in each of next 2 sc, 2 sc in next sc.* Repeat from * around. (24 sc).
Rounds 5 through 9: 1 sc in each sc around. (24 sc).
Insert safety eyes between Rounds 6 and 7, approximately 4 stitches apart. Embroider a tiny orange carrot nose between the eyes and a small curved black smile with embroidery thread.
Round 10: *1 sc in each of next 2 sc, sc2tog.* Repeat from * around. (18 sc).
Round 11: *1 sc in next sc, sc2tog.* Repeat from * around. (12 sc).
Stuff the head firmly with fiberfill, shaping it into a round sphere.
Round 12: Sc2tog around. (6 sc). Fasten off, leaving an 8-inch tail. Weave through remaining 6 front loops and cinch shut.

Phase 2: The Plump Lower Body
Using White yarn:
Round 1: Ch 2, 6 sc in 2nd ch from hook (or magic ring). (6 sc).
Round 2: 2 sc in each sc around. (12 sc).
Round 3: *1 sc in next sc, 2 sc in next sc.* Repeat from * around. (18 sc).
Round 4: *1 sc in each of next 2 sc, 2 sc in next sc.* Repeat from * around. (24 sc).
Round 5: *1 sc in each of next 5 sc, 2 sc in next sc.* Repeat from * around. (28 sc).
Rounds 6 through 12: 1 sc in each sc around. (28 sc).
Round 13: *1 sc in each of next 5 sc, sc2tog.* Repeat from * around. (24 sc).
Round 14: *1 sc in each of next 2 sc, sc2tog.* Repeat from * around. (18 sc).
Stuff body firmly, pressing the base flat so the snowman sits upright without wobbling.
Round 15: *1 sc in next sc, sc2tog.* Repeat from * around. (12 sc).
Round 16: Sc2tog around. (6 sc). Fasten off, leaving a 12-inch seaming tail. Cinch closed, then use tail to sew head securely onto body.
Phase 3: The Little Arms (Make 2)
Using White yarn:
Round 1: Ch 2, 6 sc in 2nd ch from hook. (6 sc).
Rounds 2 through 6: 1 sc in each sc around. (6 sc). Join with slip stitch to first sc. Fasten off, leaving long tail. Do not stuff. Sew one arm to each side of the body at the neckline junction.
Phase 4: The Ribbed Beanie & Fluffy Pom-Pom
Ribbed Brim: Using Turquoise Blue yarn, Ch 5.
Row 1: Sc in 2nd ch from hook and in each ch across. Turn. (4 sc).
Rows 2 through 28: Ch 1, sc in back loop only (BLO) across each sc. Turn. (Creates elastic ribbing).
Join the short ends together with slip stitches to form a circular band.
Crown: Ch 1. Working around the edge of the ribbed band, work 28 sc evenly spaced. Join with sl st.
Rounds 2 & 3: Ch 1, sc in each sc around. Join with sl st. (28 sc).
Round 4: Ch 1, *sc in next 2 sc, sc2tog.* Repeat around. (21 sc).
Round 5: Ch 1, *sc in next sc, sc2tog.* Repeat around. (14 sc).
Round 6: Sc2tog around. (7 sc). Fasten off, leaving a tail. Cinch the top of the crown tightly shut.
Pom-Pom: With Lime Green yarn, wrap around two fingers 40 times, tie tightly in center, cut loops and trim into a fluffy 1.5-inch round ball. Sew securely to the peak of the beanie. Fit hat onto snowman head and tack down with 3 small invisible stitches.

3 Atelier Secrets for Professional Amigurumi Shaping
1. The ‘Invisible Decrease’ Rule: Standard single crochet decreases pull two stitches together from the base, leaving conspicuous gaps that expose white stuffing. Always work your sc2tog through the front loops only (FLO). This tilts the decrease stitches flat, making decreases completely seamless and invisible.
2. Weighted Bottom for Self-Standing Display: If you plan to display your snowman on a desk, shelf, or mantelpiece rather than hanging him on a tree, place a small fabric pouch containing 2 tablespoons of dry lentils, plastic poly-pellets, or clean aquarium pebbles inside the bottom third of the body before stuffing with fiberfill. The low center of gravity keeps him upright permanently!
3. Securing Hanging Loops: To hang as a Christmas tree bauble, cut an 8-inch strand of fine white cotton cord or metallic gold embroidery thread. Thread through the base of the pompom through the top of the beanie, knot firmly on the inside, and pull loop taut.
Explore More Free Holiday & Amigurumi Patterns
Expand your handmade holiday collection with these beloved patterns from our design studio:
- Mini Amigurumi Octopus Tutorial – A quick 30-minute no-sew beginner favorite.
- Crochet Snowflake Ornament Pattern – Heirloom lace snowflakes in 4 rapid rounds.
- Harvest Ribbed Crochet Pumpkins – Tactile autumn and winter table decor in three sizes.
Save This Snowman Pattern to Pinterest
Pin this sweet tutorial to your Crochet Amigurumi, DIY Christmas Ornaments, and Holiday Crafting boards so you can make a whole family of mini snowmen this season!

