

When decking the halls for the holidays, few handmade accents capture vintage romance and viral charm quite like plush velvet bows. With their cloud-soft chenille sheen, gently flared ribbon tails, and tailored center cinch, these velvet crochet Christmas bows bring immediate luxury to evergreen boughs, wrapped gift boxes, and winter wreaths. Best of all, each bow is built from just three quick, flat-crocheted pieces, requiring under 20 minutes and approximately 22 yards of bulky velvet yarn to complete.
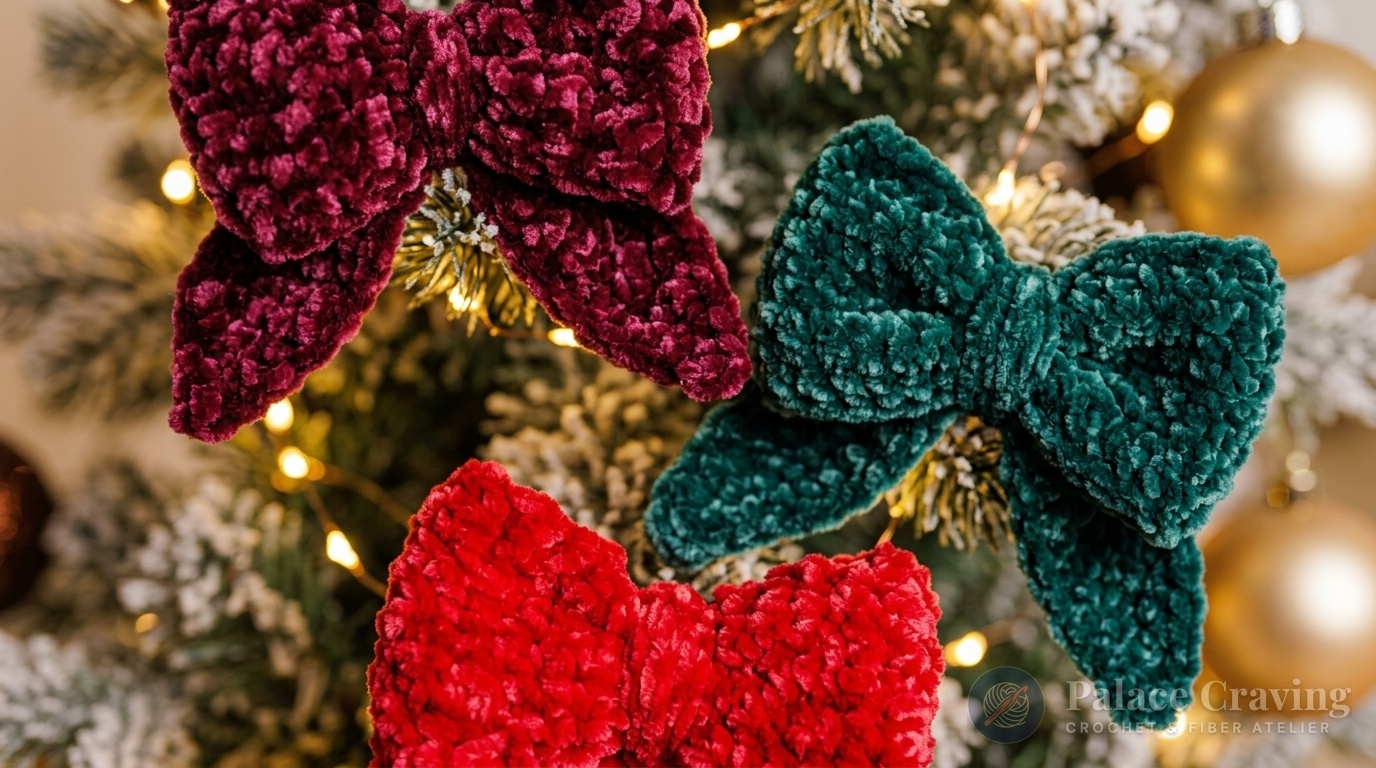
While standard woven velvet ribbons fray, crease, and lose their fullness after a single season, crocheted velvet bows maintain their bouncy, three-dimensional plumpness year after year. By working standard single crochet stitches with gentle increases and decreases, you construct an hourglass bow loop band and natural bias-angled ribbon tails that drape effortlessly. Style a dozen of these bows across your tree alongside our Crochet Spiral Wreath Ornaments, or hang them with our delicate Crochet Snowflake Ornaments to create a curated, heirloom-worthy holiday aesthetic.
Why You’ll Love Making These Velvet Holiday Bows
- Instant Gratification Make: Stitching all three components—the bow loops, the ribbon tails, and the center wrap—takes less than 20 minutes from start to finish.
- Zero Complex Stitches: Formed entirely using beginner-friendly single crochet, chain stitches, and simple two-together decreases (sc2tog).
- Engineered Ribbon Drape: Rather than blunt rectangles, the tails feature subtle bias-cut angle shaping that mirrors high-end millinery ribbon.
- Perfect Stash Buster: Requiring only 22 yards (20.5 meters) per ornament, this pattern turns small skein ends into magnificent holiday treasures.
- Versatile Holiday Utility: Attach wire clips for tree branches, sew safety pins for festive lapel wear, or tie them around kraft-paper gift parcels.
Finished Dimensions & Structural Anatomy
Each completed bow measures approximately 4½ inches (11.5 cm) wide by 5 inches (12.5 cm) long from top loop to tail tips. The three distinct components work together seamlessly:
Key Materials & Studio Swaps

- Bulky Weight (#5) Velvet / Chenille Yarn: You will need approximately 22 yards (20.5 meters) per bow. Velvet yarn provides that distinctive high-end holiday luster. Rich ruby reds, deep cranberries, forest pine teals, and soft antique whites create an enchanting festive palette. (For weight substitution rules, consult our Crochet Yarn Weight & Hook Size Guide).
- Size U.S. I/9 (5.5 mm) Crochet Hook: A smooth metallic hook allows plush chenille microfibers to glide cleanly without catching. (Review our tutorial on Hook Grips & Tension Control for smooth stitch consistency).
- Bent-Tip Tapestry Needle: Essential for tucking velvet yarn tails and firmly cinching the center tie band.
- Crocodile Clips or Ornament Hooks: Optional attachments for securing finished bows directly onto Christmas tree boughs or holiday garlands.
Gauge & Velvet Tension Mastery
Gauge: 12 single crochet (sc) and 13 rows = 4 inches (10 cm).
Working with velvet chenille yarn requires a light, even tension. Because velvet yarn has a slick thread core surrounded by plush tufted pile, pulling stitches overly tight can cause “worming” (loops poking out awkwardly from the fabric), while working too loosely will make the bow droop. Strive for relaxed, uniform single crochets that allow the plush fibers to bloom fully.
Step-by-Step Crochet Instructions
Component 1: The Bow Loop Band
Make a slip knot leaving a 4-inch tail, and chain 4.
Row 1 (Right Side): Work 1 sc in the 2nd chain from hook, then work 1 sc in each remaining chain to end. Turn. (3 sc)
Row 2: Ch 1. Work 2 sc in the first sc, 1 sc in next sc, and 2 sc in the last sc. Turn. (5 sc)
Row 3: Ch 1. Work 2 sc in the first sc, 1 sc in each of the next 3 sc, and 2 sc in the last sc. Turn. (7 sc)
Rows 4 to 10: Ch 1. Work 1 sc in each sc across to end of row. Turn. (7 sc per row)
Row 11 (Right Side): Ch 1. Sc2tog over the first 2 sts, 1 sc in each of the next 3 sc, then sc2tog over the last 2 sts. Turn. (5 sts)
Row 12: Ch 1. Sc2tog over first 2 sts, 1 sc in next sc, then sc2tog over last 2 sts. Turn. (3 sts)
Rows 13 & 14: Ch 1. Work 1 sc in each st across. Turn. (3 sts per row — this forms the narrow center pinch)
Second Loop Expansion: Repeat Rows 2 to 12 once more (expanding back to 7 sc for the second loop, then narrowing back to 3 sts).
Final Row: Ch 1. Work 1 sc in each st across. Fasten off, leaving an 8-inch (20.5 cm) tail for seaming.
Assembly of Loops: Thread your tapestry needle with the 8-inch tail. Bring the last row around to meet the foundation chain row, forming a continuous circular loop. Neatly sew the edges together with whip stitches, then knot securely.
Component 2: The Angled Ribbon Tails
Make a slip knot and chain 21.
Row 1 (Right Side): Work 2 sc in the 2nd chain from hook. Work 1 sc in each chain across until 2 chains remain. Sc2tog across the final 2 chains. Turn. (20 sts)
Row 2: Ch 1. Sc2tog across the first 2 sts. Work 1 sc in each sc across until 1 stitch remains. Work 2 sc in the final st. Turn. (20 sts)
Rows 3 & 4: Repeat Rows 1 and 2 once more. Fasten off, leaving a 6-inch tail for securing.
Notice how increasing on one end while decreasing on the opposite end creates a gorgeous, parallel bias slant that mimics diagonal ribbon cuts!

Component 3: The Center Tie Collar
Chain 9.
Row 1 (Right Side): Work 1 sc in the 2nd chain from the hook, and 1 sc in each chain to the end. (8 sc)
Fasten off, leaving an 8-inch tail for cinching and sewing.
Final Assembly & Tailoring the Pinch
Assembling the bow is quick, satisfying, and transforms the flat crochet pieces into an elegant holiday showstopper:
- Position the Loop Band: Lay your seamed bow loop flat on your table with the seamed seam centered at the back. Flatten the band so that the two wide 7-stitch sections form the outer curved loops and the narrow 3-stitch sections meet directly in the middle.
- Fold the Tails: Fold the angled tail piece in half to form an inverted “V”. Place the fold against the back center of the bow loops. Using your yarn needle and tail yarn, take a few firm stitches through both thicknesses of the tails and the bow loops to secure them together.
- Cinch with Center Tie: Wrap the 8-stitch Center Tie collar tightly around the middle of the bow and tails, pinching the fabric into deep, sculpted folds.
- Secure and Weave: On the back side of the bow, whip-stitch the ends of the Center Tie together tightly. Weave all remaining yarn tails through the back of the center knot and snip flush.
3 Chef-Level Secrets for Flawless Velvet Bows
1. Steam Pinching for Maximum Volume: Chenille velvet fibers respond magically to gentle steam. Hold a handheld clothes steamer 2 inches away from the finished bow for 3 seconds, then use your fingers to flare out the side loops. The fibers will plump up instantly with crisp, permanent loft.
2. Preventing Velvet Worming: When pulling through loops on velvet yarn, ensure you lift your hook slightly upward rather than dragging horizontally. This keeps the slippery core thread locked evenly within the micro-tufts.
3. Attaching Alligator Clips for Dual-Use Decor: Hot-glue a small 1-inch metal alligator craft clip to the back of the center knot. This lets you snap the bow effortlessly onto Christmas tree branches, holiday garlands, or even your hair for cozy holiday gatherings!
Holiday Styling & Gift Wrapping Ideas

Here are our favorite creative ways to display your handmade velvet bows this winter:
- Christmas Tree Tree-Toppers & Bough Fillers: Clip 10 to 15 bows in alternating ruby and deep pine teal shades across your evergreen branches to create the viral “Ribbon Tree” look that is trending across Pinterest.
- Eco-Friendly Luxury Gift Wrap: Tie plain brown kraft paper parcels with simple jute twine, then affix a velvet crochet bow at the center knot. The recipient gets a gift wrap accent that doubles as an heirloom Christmas tree keepsake!
- Fireplace Mantel Bunting: String 8 bows along a 6-foot length of twisted baker’s twine interspersed with wooden craft beads, and drape it across your fireplace mantel alongside our Mini Crochet Snowmen and Pinstripe Tree Skirt.
Frequently Asked Questions
Can I make these bows with standard acrylic or cotton yarn?
Yes! If using medium worsted (#4) acrylic yarn, use a 4.5mm (US 7) hook. The resulting bow will be slightly smaller (approx. 3.5 inches wide) with a crisper, more structured silhouette. For velvet’s signature plush fullness, bulky #5 chenille yarn remains unbeatable.
How do I wash and care for velvet crochet ornaments?
Spot-clean gently with cold water and mild detergent if needed. Lay flat on a clean towel to air dry. Never put velvet chenille crochet projects in a machine dryer, as extreme heat can melt synthetic microfibers.
How many bows can I make from one skein of yarn?
A standard 300g ball of bulky velvet yarn contains roughly 315 yards. At just 22 yards per bow, a single ball yields approximately 14 complete bows—making this one of the most budget-friendly holiday decor projects you can create!
Pin This Free Holiday Pattern
Save these viral velvet crochet Christmas bows to your Holiday Crochet, DIY Tree Ornaments, and Handmade Christmas Pinterest boards so you have the tutorial ready all season long!

