

Celebrate the wonder of handmade holiday play with the Interactive Peek-a-Boo Reindeer in Christmas Gift Sack. Building directly upon the beloved mechanical charm of our companion Interactive Peek-a-Boo Santa in Brick Chimney, this ingenious 2-in-1 amigurumi creation blends seamless interior slider mechanics with enchanting woodland warmth. In Open Mode, pressing gently upward against the concealed bottom bowl slider pops an adorable amigurumi reindeer fawn—complete with branching antlers, two-tone folded ears, and sleepy embroidered eyelashes—cheerfully out of a deep forest green sack, holding a miniature wrapped holiday present between its hooves. When gently pushed down into Closed Mode, the reindeer disappears completely inside the sack, closing beneath a ruffled frilled collar, eyelet row, and braided drawstring tie!
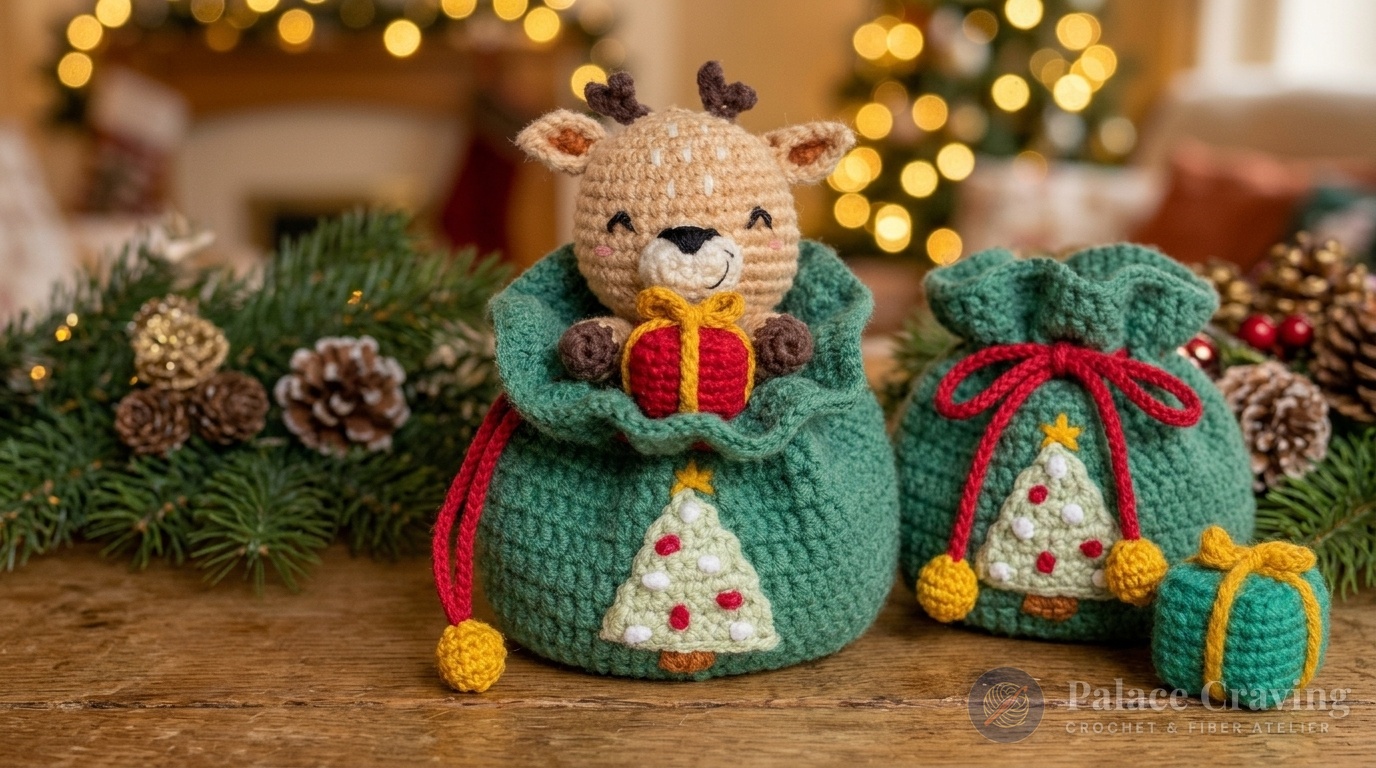
Unlike standard static amigurumi plushies, mechanical pop-up toys require precise structural calibration. The sliding column must glide smoothly within the cylinder without jamming or twisting, while maintaining sufficient wall stability so the sack stands proudly upright whether open or cinched shut. Throughout this master tutorial, we break down the dual-cylinder crochet architecture, the mathematical row joins connecting the fawn’s neck to the sliding bowl, the seamless double-loop foundation, and the delicate embroidered accents that give this festive reindeer its sweet heirloom personality.
Interactive Toy Architecture: How the 2-in-1 Pop-Up Mechanism Works
The engineering behind this interactive holiday piece relies on three harmonized structural components that work in tandem without requiring plastic gears or metal springs:
- The Outer Gift Sack Cylinder: Worked in joined double-crochet rounds of rich forest green yarn. Rounds 13–16 taper inward slightly to establish the internal neck collar, while Round 29 incorporates 21 evenly spaced
[sc, ch 2, skip 2 sts]eyelets that guide the crimson drawstring cord beneath a decorative double-crochet ruffle. - The Sliding Inner Bowl Platform: Crocheted in sturdy sport cotton starting with an 8-stitch magic ring that expands to 48 stitches across 10 rounds. This inverted cup serves as the crafter’s thumb-push elevator base. When held from the bottom, pressing the bowl upward propels the attached fawn straight through the sack’s upper aperture.
- The Joint Reindeer Core: The fawn’s lower body (Round 4) is joined directly through both the body loops and the inner bowl stitches simultaneously. This locks the head and upper torso firmly to the slider, preventing the fawn from tilting off-axis during rapid pop-up movement.
Crafters who enjoyed our sculptural techniques in the Santa, Reindeer & Gingerbread Christmas Door Wreath and the snug fit of the Christmas Snowman in Reindeer Earmuffs will appreciate how clean loop joins elevate simple amigurumi into interactive art.
Why You’ll Love Crocheting This Interactive Reindeer
- Zero Batteries or Plastic Hardware: Pure 100% yarn mechanics. Safe for gentle toddler play, sensory holiday baskets, and heirloom keepsake gifting.
- Two Distinct Decorative Modes: Display it closed on your holiday mantlepiece as a cozy miniature gift sack (6.5 cm tall), or leave the reindeer fawn popped open (9.5 cm tall) as an eye-catching table centerpiece.
- Delightful Miniature Accessories: Includes complete row-by-row instructions for two tiny cubic gift boxes (festive red and forest green) wrapped in criss-cross mustard yellow ribbon ties.
- Scrap-Yarn Friendly: Requires under 50 grams of main forest green and fawn brown sport yarn, plus small yardage remnants for the sage tree appliqué, red drawstring cord, and mustard star.
Yarn Selection, Gauge & Essential Notions

| Component | Yarn Color & Fiber Specification | Recommended Quantity |
|---|---|---|
| Gift Sack Body & Ruffle | Deep Forest Green (55% Cotton / 45% Acrylic Sport Yarn) | Approx. 35 g (115 yds) |
| Reindeer Fawn (Head & Body) | Warm Fawn Light Brown (Sport Weight Cotton Blend) | Approx. 20 g (65 yds) |
| Antlers & Hooves | Dark Chocolate Brown Sport Yarn | Approx. 8 g (25 yds) |
| Snout & Forehead Flecks | Off-White Cream & Delicate Snow White Remnants | Approx. 5 g (16 yds) |
| Tree Appliqué & Gifts | Sage Green, Festive Crimson Red & Mustard Gold | Approx. 15 g total |
| Face Embroidery | Stranded Black Cotton Floss & Soft Peach Blush | Small scrap tails |
Hook Size: A precision 2.0 mm ergonomic crochet hook is strongly recommended. Maintaining a tight gauge ensures the single-crochet stitches on the fawn’s head remain completely opaque, preventing white polyester fiberfill from peeking through when stretched over the slider base.
Pro Tip on Tension: If your double crochet stitches tend to work loose, drop down a half hook size (to 1.75 mm) for the sack walls. The sack must maintain crisp vertical posture so the upper ruffle stays perky rather than collapsing outward.
Interactive Peek-a-Boo Reindeer: Master Pattern Guide
Terminology Note: Written in Standard US Crochet Terms. Worked in continuous spiral rounds for amigurumi elements; joined rounds with slip stitches for the sack.
Part 1: Reindeer Head, Body & Sculpted Facial Details
Arms (Make 2):
Start with Dark Chocolate Brown: R1: 5 sc in magic ring (5).
R2: 5 inc (10).
Change to Light Brown yarn: R3: 10 sc around (10).
R4: [3 sc, dec] × 2 (8).
R5–8 (4 rnds): 8 sc (8). Do not stuff. Flatten the arm opening horizontally, skip the first stitch, and work 3 sc directly through both layers to seal the edge. Leave last stitch unworked. Fasten off with a 15 cm tail for later attachment.
Head:
Worked in Light Brown from the top crown downward:
R1: 6 sc in magic ring (6).
R2: 6 inc (12).
R3: [sc, inc] × 6 (18).
R4: [sc, inc, sc] × 6 (24).
R5: [3 sc, inc] × 6 (30).
R6: [2 sc, inc, 2 sc] × 6 (36).
R7–9 (3 rnds): 36 sc around (36).
R10: [5 sc, inc] × 6 (42).
R11–14 (4 rnds): 42 sc around (42).
R15: [5 sc, dec] × 6 (36).
R16: [4 sc, dec] × 6 (30).
R17: [3 sc, dec] × 6 (24).
R18: [2 sc, dec] × 6 (18).
R19: In Back Loops Only (BLO): [sc, dec] × 6 (12). Stuff head firmly with fiberfill, rounding out the cheeks.
R20: 6 dec (6). Weave yarn tail through Front Loops Only (FLO) of remaining 6 stitches, cinch tightly shut, and knot securely inside.
Lower Body Tube:
Attach Light Brown yarn to the 2nd unworked front loop to the left of the head seam on Round 18 (from the R19 BLO ridge), chain 1:
R1: In FLO: [2 sc, inc] × 6 (24).
R2–4 (3 rnds): 24 sc around (24). Complete with an invisible finish. This short cylinder forms the mounting ring that attaches to the slider bowl.
Snout:
With Off-White Cream yarn, chain 4:
R1: Starting in 2nd ch from hook: 2 sc, 3 sc in the terminal chain loop. Rotating around the foundation chain: sc, inc in last loop (8).
R2: inc, sc, 3 inc, sc, 2 inc (14).
R3: 14 sc even (14). Fasten off with a 25 cm sewing tail. Using black embroidery thread, sew a horizontal nose bar and small downward vertical mouth smile.
Folded Two-Tone Ears (Make 2):
With Brown yarn, chain 4:
R1: From 2nd ch from hook: 2 sc, 4 sc in final chain. Working down opposite side: 2 sc (8), ch 1.
Switch to Light Brown: R2: Turn work, 3 sc, inc, ch 2, slst in 2nd ch from hook (forming pointed ear tip), inc, 3 sc (11). Pull tail through first stitch of R2 and pinch bottom corner into a realistic cupped fold.
Branching Antlers (Make 2):
With Dark Chocolate Brown: Chain 5, slst in 2nd ch from hook, slst in next ch (place a locking stitch marker in this chain). Chain 3 for the tine; working back down: 2 slst. Slip stitch directly into the marked chain, then work 2 slst down the remaining main stem. Fasten off with a 15 cm tail.
Part 2: The Inner Sliding Bowl & Reindeer Integration
The slider bowl acts as the engine of the pop-up toy. It begins with Light Brown yarn:
R1: 8 sc in magic ring (8).
R2: 8 inc (16).
R3: [sc, inc] × 8 (24).
R4 (Dual-Layer Join): Align the Reindeer Body cylinder below the bowl (wrong side of the bowl touching the lower edge of the body). Lightly push fiberfill inside the body tube. Working simultaneously through both the bowl stitch and the corresponding body stitch: [3 sc, inc] × 6 (30). The reindeer is now permanently fused to the elevator base!
R5: [4 sc, inc] × 6 (36).
R6: [5 sc, inc] × 6 (42).
R7: [6 sc, inc] × 6 (48).
R8–10 (3 rnds): 48 sc even (48), slst into 1st st to close spiral.
R11a: ch 1, in BLO: sc in same st, 47 sc (48), slst to 1st st.
R12a: ch 3 (counts as 1st dc), skip slst st, 2 dc, dc inc, [3 dc, dc inc] × 11 (60), slst to 3rd ch. Fasten off Light Brown and weave in tail.

Part 3: Forest Green Gift Sack Walls, Eyelets & Drawstring
Hold the bowl assembly with the magic ring facing you. Join Forest Green yarn to the first unworked front loop to the left of Round 10 (from the Round 11a BLO ridge):
R11: ch 3 (counts as 1st dc), in R10 FLO skip slst st, 2 dc, dc inc, [3 dc, dc inc] × 11 (60), slst to 3rd ch.
R12 (Joining Layers): Work through both Dark Green (R11) and Light Brown (R12a) loops simultaneously: ch 1, sc in 3rd ch, 4 sc, inc, [5 sc, inc] × 9 (70), slst to 1st st.
R13: ch 3, skip slst st, in FLO 69 dc (70), slst to 3rd ch.
R14: ch 3, skip slst ch, 7 dc, dc dec, [8 dc, dc dec] × 6 (63), slst to 3rd ch.
R15: ch 3, skip slst ch, 6 dc, dc dec, [7 dc, dc dec] × 6 (56), slst to 3rd ch.
R16: ch 3, skip slst ch, 5 dc, dc dec, [6 dc, dc dec] × 6 (49), slst to 3rd ch.
(Pause here to assemble the Reindeer face before finishing the upper sack walls!)
Face Assembly: Sew the Cream Snout between Rounds 11–14 of the head. Position folded ears between Rounds 6–7 and branching antlers atop Round 3. Embroider sleeping curved eyes with black floss across Round 10 (2 stitches wide, 7 stitches apart). Add soft peach blush cheeks across Rounds 11–12, and stitch delicate cream forehead flecks across Rounds 4, 6, and 8. Finally, sew the two arms beneath the head so the paws rest forward.
For crafters pairing this project with our Christmas Elf Boy and Mini Reindeer Duo or the Plush Chibi Christmas Reindeer, this expressive fawn face provides wonderful stylistic harmony across your holiday display.
Resuming Sack Walls:
R17: ch 1, in BLO: [6 sc, inc] × 7 (56), slst to 1st st.
R18: ch 3 (counts as 1st dc), skip slst st, in BLO 55 dc (56), slst to 3rd ch. Fold sack base along this R17–18 BLO ridge to create a crisp perimeter corner.
R19: ch 3, skip slst ch, 6 dc, dc inc, [7 dc, dc inc] × 6 (63), slst to 3rd ch.
R20: ch 3, skip slst ch, 7 dc, dc inc, [8 dc, dc inc] × 6 (70), slst to 3rd ch.
R21–27 (7 rnds): ch 3 (1st dc), 69 dc even around (70), slst to 3rd ch.
R28: ch 3, skip slst ch, 7 dc, dc dec, [8 dc, dc dec] × 6 (63), slst to 3rd ch.
R29 (Drawstring Eyelets): ch 1, sc in same ch, ch 2, skip 2 sts, [sc, ch 2, skip 2 sts] × 20 (21 sc + 21 ch-2 eyelet openings), slst into 1st st.
R30 (Ruffle Collar): ch 3 (1st dc), [3 dc in ch-2 space, dc in sc] × 20, 3 dc in final ch-2 space (84), slst to 3rd ch.
R31: ch 3, skip slst ch, 10 dc, dc inc, [11 dc, dc inc] × 6 (91), slst to 3rd ch. Fasten off and weave in all yarn ends.
Red Cord & Mustard Stopper Bead:
With Festive Red, chain 86. Fasten off with a 10 cm tail. Weave cord alternately in and out through the 21 ch-2 eyelet windows of Round 29, bringing both tails out together on the left side.
With Mustard Yellow: R1: 6 sc in magic ring (6). R2: 6 inc (12). R3: [3 sc, inc] × 3 (15). R4: 15 sc (15). R5: [3 sc, dec] × 3 (12). Tie both red cord tails securely to the starting tail of the ball, tuck knot inside, work R6: 6 dec (6), and cinch closed through front loops.
Part 4: Christmas Tree Appliqué & Miniature Presents
Tree Appliqué (Sage Green):
Worked flat in turning rows:
Row 1: ch 2, inc in 2nd ch from hook (2), ch 1, turn.
Row 2: 2 inc (4), ch 1, turn.
Row 3: 4 sc (4), ch 1, turn.
Row 4: inc, 2 sc, inc (6), ch 1, turn.
Row 5: 6 sc (6), ch 1, turn.
Row 6: inc, 4 sc, inc (8), ch 1, turn.
Row 7: 8 sc (8), ch 1, turn.
Row 8: inc, 6 sc, inc (10). Fasten off with a 25 cm sewing tail.
Trim: Embroider red and white French knots across the green branches. Sew tree centered onto the front of the sack between Rounds 22–26. Embroider a 2-stitch brown trunk below on Round 21 and a 5-point mustard star at the top peak.
Mini Cubic Gift Boxes (Make 1 Red, 1 Green):
Large Box (Dark Green): R1: 4 sc in MR (4). R2: [inc3] × 4 (12). R3: [sc, inc3, sc] × 4 (20). R4: [2 sc, inc3, 2 sc] × 4 (28). R5: In BLO: 28 sc (28). R6–11 (6 rnds): 28 sc (28). R12: In BLO: [2 sc, sc3tog, 2 sc] × 4 (20). R13: [sc, sc3tog, sc] × 4 (12). Stuff firmly, pressing corners into a clean cube. R14: 6 dec (6), cinch shut.
Small Box (Red): R1: 4 sc in MR (4). R2: [inc3] × 4 (12). R3: [sc, inc3, sc] × 4 (20). R4: In BLO: 20 sc (20). R5–8 (4 rnds): 20 sc (20). R9: In BLO: [sc, sc3tog, sc] × 4 (12). Stuff cube. R10: 6 dec (6), cinch shut.
Ribbons: Chain 75 (Large Box) and chain 60 (Small Box) in Mustard Yellow. Center the chain beneath the box, criss-cross across the top, wrap beneath the base, and tie a crisp bow on top!
Styling & Interactive Play Ideas

Because the reindeer can pop up or hide away entirely, this project unlocks enchanting display and entertaining opportunities:
- Holiday Advent Countdowns: Hide the reindeer inside the gift bag along with a tiny holiday treat or scroll clue. Children can pull the drawstring open each morning to reveal the fawn!
- Companion Chimney & Sack Display: Place this piece side-by-side with our Interactive Peek-a-Boo Santa in Brick Chimney and the sweet 3D Christmas Gingerbread House to build an interactive Santa’s workshop display on your console table.
- Stocking Stuffer & Gift Topper: The miniature gift boxes can be tied directly to the fawn’s paws, or stowed securely inside the sack when cinched closed.
Frequently Asked Questions
What is the best way to prevent the fawn from tilting inside the sack?
Ensure that the stuffing in the lower body cylinder (Part 1, R1–4) is firm but not overstuffed. When joining Round 4 through both the bowl stitches and the body loops, verify that your stitches align evenly around the 30-stitch circumference. This centered anchor keeps the fawn standing perfectly vertical.
Can I wash the finished pop-up toy?
Yes! Because sport cotton/acrylic yarn is machine durable, spot clean with cold water and mild wool detergent. Avoid submerging or wringing violently, as the delicate branching antlers and embroidered French knots should be kept smooth. Reshape the cylinder over an empty cup and allow to air dry completely.
How do I make the drawstring slide effortlessly?
Do not crochet the red chain too tightly. After threading the chain through the 21 ch-2 eyelet spaces of Round 29, apply a drop of water or steam gently to relax the chain fibers so the cord glides freely without snagging on the double-crochet stitches.
Save and Share This Pattern
Keep this interactive holiday design ready on your boards! Pin your favorite tutorial cards below to your Christmas Crochet and Amigurumi Pinterest collections:

