

Few holiday ornaments carry the timeless, heartwarming nostalgia of vintage Christmas bells. Handcrafted from warm antique gold yarn, adorned with a jaunty forest green crochet bow, and shaped with an authentic flared rim lip, these 3-inch crochet Christmas bell ornaments bring instant classic charm to evergreen boughs, holiday wreaths, and gift packages. Because each bell works up in under 35 minutes using basic single crochet stitches in continuous spiral rounds, you can easily craft a full set of heirloom keepsakes in a single weekend.
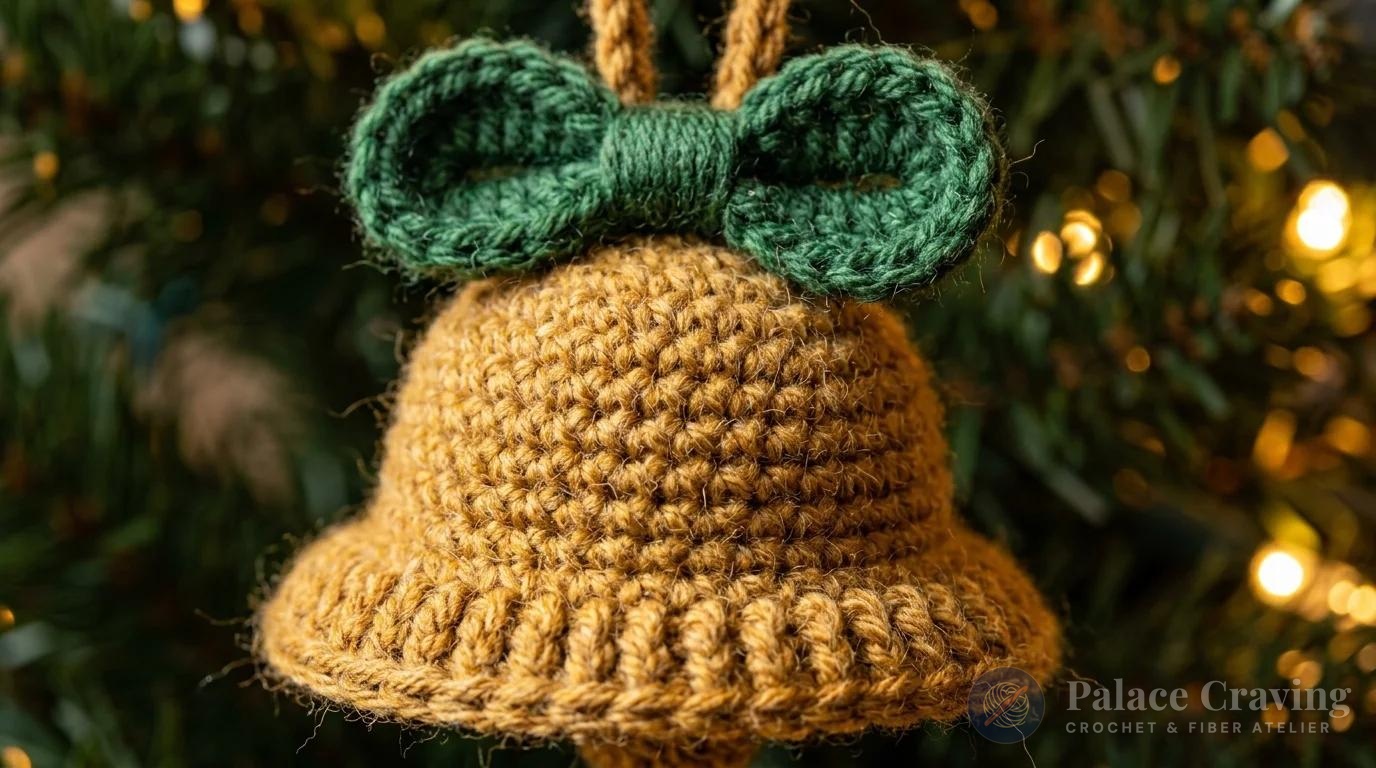
What sets this pattern apart from standard flat motifs is its true three-dimensional amigurumi architecture. By working in back loops only (BLO) across Rounds 5 and 6, the fabric forms a crisp 90-degree ridge that naturally creates the flared lower lip of a brass church bell. Lightly stuffed with polyester fiberfill and cinched closed at the top dome, the bell retains its plump, sculptural form year after year. Style your bells alongside our standing 3D Crochet Christmas Tree Duo, our sweet Crochet Gingerbread Houses, or our twirling Crochet Spiral Wreaths for a cohesive holiday display.
Why You’ll Love Crocheting These Vintage Bells
- Quick 35-Minute Project: Requiring just 15 short rounds of single crochet, this is one of the fastest three-dimensional holiday ornaments you can make.
- Ingenious Flared Lip Technique: No wire rings or stiffening starch needed—the flared bell profile is engineered purely through back loop stitch orientation!
- Minimal Stash Requirement: Uses only 16 yards of gold yarn and 6 yards of green yarn, making it the ultimate stash-busting holiday scrap project.
- Versatile Display Options: Finished with a built-in yarn hanging loop, this ornament easily adapts to keychain clasps, wreath swags, or dinner place card holders.
- Child & Pet Safe: Unlike delicate glass holiday balls, these soft stuffed yarn bells survive playful cats and curious toddler hands without breaking.
Pattern Dimensions & Stitch Mathematics
Each completed bell measures approximately 3 inches (7.5 cm) tall by 2¾ inches (7 cm) in diameter at the flared rim, excluding the hanging loop. Here is the exact stitch architecture from base to crown:
Curated Materials & Studio Swaps

- Medium Worsted (#4) Yarn:
- Color A (Bell Body): 16 yards (14.5 m) of warm antique gold, mustard, or metallic shimmer yarn.
- Color B (Bow Accent): 6 yards (5.5 m) of rich evergreen, forest green, or ruby red.
- Size U.S. G/6 (4.0 mm) Crochet Hook: A slightly compact 4.0mm hook keeps single crochet stitches tight, preventing white polyester stuffing from showing through. (Review our tutorial on Hook Tension Control).
- Polyester Fiberfill Stuffing: A small handful to give the bell firm, tactile amigurumi fullness.
- Locking Stitch Marker: Essential for tracking continuous, unjoined spiral rounds without losing your place.
- Blunt Tapestry Yarn Needle & Scissors: For cinching the crown and securing the bow band.
- Optional Embroidery Accents: A tiny strand of black yarn or 2-ply embroidery floss if embroidering playful amigurumi eyes or a smile, or a small brass jingle bell inside for authentic ringing sounds!
Gauge & Work Notes
Gauge: 18 single crochet (sc) and 20 rows = 4 inches (10 cm).
Important Note on Continuous Rounds: This ornament is worked in continuous spiral rounds without joining with a slip stitch at the end of each round. Do not turn your work. Always move your locking stitch marker to the last stitch of each round as you progress.
Step-by-Step Crochet Instructions
Part 1: The Bell Body
With Color A (Gold), make an adjustable magic loop.
Rnd 1 (RS): Ch 1. Work 8 sc in loop. Place marker (PM) in last stitch. Pull magic ring tail tight. (8 sc)
Rnd 2: Work 2 sc in each sc around. (16 sc)
Rnd 3: *(2 sc in next sc, 1 sc in next sc)* 8 times around. (24 sc)
Rnd 4: *(1 sc in each of next 3 sc, 2 sc in next sc)* 6 times around. (30 sc)
Rnds 5 & 6 (Flared Rim Lip): Working in back loops only (BLO), work 1 sc in each sc around. (30 sc per round)
Rnd 7 (First Taper): *(1 sc in each of next 4 sc, sc2tog)* 5 times around. (25 sts)
Rnd 8 (Second Taper): *(1 sc in each of next 3 sc, sc2tog)* 5 times around. (20 sc)
Rnds 9 to 11: Work 1 sc in each sc around. (20 sc per round)
Rnd 12: *(1 sc in each of next 3 sc, sc2tog)* 4 times around. (16 sts)
Rnd 13: Work 1 sc in each sc around. (16 sc)
Stuffing Pause: Firmly pack polyester fiberfill into the bell cavity, shaping the flared rim so it flares naturally downward while the body remains plump.
Rnd 14: *(Sc2tog)* 8 times around. (8 sts)
Rnd 15: *(Sc2tog)* 4 times around. (4 sts)
Fasten off, leaving a 10-inch yarn tail. Thread the tail through your tapestry needle, weave through the front loops of the remaining 4 stitches, and pull tightly to cinch the dome closed. Weave in the end securely inside the bell.

Part 2: The Forest Green Bow Accent
The bow is crocheted as a shaped strip that pinches gracefully in the center:
With Color B (Green), ch 5.
Row 1: 1 sc in 2nd ch from hook. 1 sc in each ch across. Turn. (4 sc)
Rows 2 & 3: Ch 1. 1 sc in each sc across. Turn. (4 sc)
Row 4 (Center Cinch Decrease): Ch 1. (Sc2tog) twice. Turn. (2 sts)
Row 5: Ch 1. 1 sc in each sc across. Turn. (2 sc)
Row 6 (Expansion Increase): Ch 1. 2 sc in each sc across. Turn. (4 sc)
Rows 7 to 11: Ch 1. 1 sc in each sc across. Turn. (4 sc)
Repeat Rows 4 to 8 once more. Do not fasten off. Fold the bow strip in half so the starting foundation chain aligns with the final row. Working through both thicknesses simultaneously, work 4 slip stitches evenly across to join the loop into a bow shape. Fasten off.
Part 3: Bow Band & Final Assembly
- Crochet the Bow Band: With Color B, ch 6. Work 1 sl st in 2nd ch from hook and each remaining chain to end (5 sl sts). Wrap this narrow strip around the cinched center waist of the bow, and join with a slip stitch into the starting chain. Fasten off, leaving a long sewing tail.
- Attach Bow to Bell: Using the long green yarn tail, firmly stitch the bow to the top crown dome of the bell just beside the center peak.
- Hanging Loop: Cut a 5-inch length of Color A (Gold). Fold in half and knot the free ends to form a loop. Use your hook to pull the knotted loop halfway through the very top center of the bell, thread the folded loop through itself, and pull tight.
- Optional Playful Amigurumi Face: If making whimsical holiday bells for children, split a strand of black yarn into 2 plies. Embroider two sweet French knots for eyes and a small curved straight stitch smile between Rounds 9 and 10!
3 Pro Secrets for Picture-Perfect Crochet Bells
1. Prevent Polyfill Peeking: When working Rounds 12 through 15, ensure your decrease stitches (sc2tog) are pulled firmly. Using the invisible decrease method (working through the front loops of both stitches before yarn over) creates a virtually invisible taper that locks stuffing inside.
2. Hidden Jingle Bell Hack: Before adding the final layer of stuffing in Round 13, pop a tiny ½-inch metal jingle bell into the center of the fiberfill. When children or guests touch the branch, the ornament will chime with real holiday sound!
3. Starching the Flared Rim: While the BLO stitches provide natural structure, misting the flared lower rim with a 50/50 water-and-craft-glue mixture and allowing it to air-dry over an upturned egg cup creates a razor-sharp, museum-quality flared bell edge.
Festive Tree & Home Styling Ideas

Here are creative ways to showcase your handmade bells throughout the home:
- Evergreen Christmas Tree Clusters: Group three bells together tied with natural jute twine or velvet ribbon at varying lengths for a dimensional cluster ornament.
- Holiday Wreath Accents: Wire two bells into the center bow of our Crochet Spiral Wreaths for charming motion and texture.
- Heirloom Gift Package Toppers: Tie a finished bell around kraft-paper wrapped holiday gifts in place of disposable adhesive plastic bows.
- Holiday Staircase Garland: Space bells every 12 inches along cedar pine banister garlands alongside warm fairy twinkle lights.
Frequently Asked Questions
Can I make these bells in different colors?
Absolutely! While antique gold with forest green evokes Victorian nostalgia, crisp white bells with candy red bows create an adorable peppermint Scandinavian aesthetic.
Can I use cotton yarn instead of acrylic?
Yes! 100% mercerized cotton worsted yarn creates exceptionally crisp stitch definition and holds the flared rim shape with extra natural stiffness.
How do I wash or clean these ornaments after the holidays?
Spot clean gently with a damp microfiber cloth and mild soap. Air dry thoroughly before storing in tissue paper inside an airtight ornament container.
Pin This Free Holiday Pattern
Love this vintage Christmas project? Save this free crochet Christmas bell ornament guide to your Holiday Crochet, DIY Christmas Ornaments, and Quick Gifts boards on Pinterest!

